1
Cleaning and Shaping of Root Canal System
Endodontic treatment mainly consists of three steps:
1. Cleaning and shaping of the root canal system
2. Disinfection
3. Obturation.
Cleaning and shaping is one of the most important steps in the root canal therapy for
obtaining success in the root canal treatment.
Cleaning: It comprises the removal of all potentially pathogenic contents from the root canal
system.
Shaping: The establishment of three-dimensional progressive access into the canal and
creating an apical preparation which will permit the final obturation instruments and
materials to fit easily.
Cleaning and shaping and the three-dimensional obturation are interdependent. Obturation of
root canal cannot be achieved properly if canals are not thoroughly cleaned and shaped.
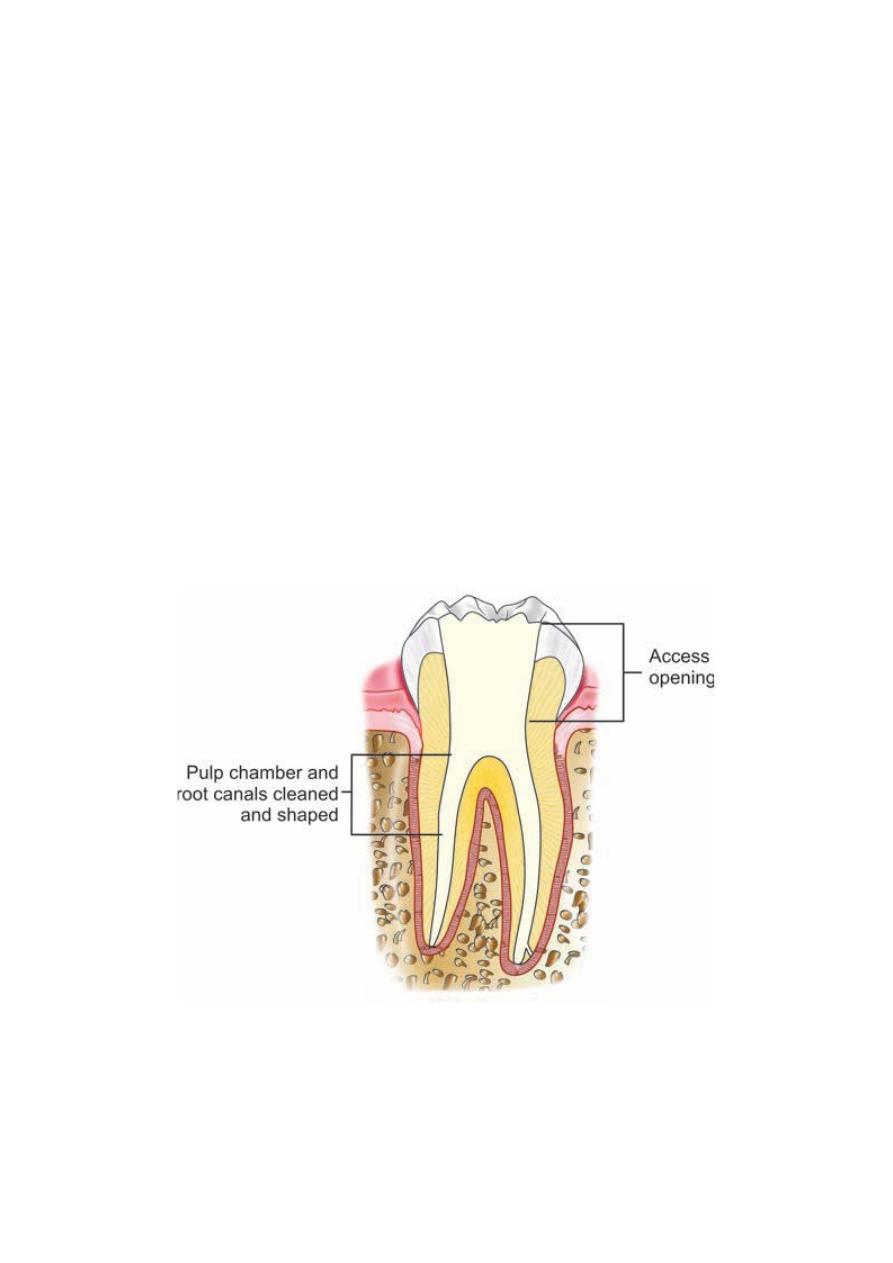
Diagrammatic representation of cleaned and shaped root canal system
.ﺩ
ﻋﻼء ﺍﺩﺭﻳﺱ
2
Mechanical Objectives of Root Canal Preparation
1. The root canal preparation should develop a continuously tapering cone: This shape
mimics the natural canal shape. Funnel-shaped preparation of canal should merge with the
access cavity so that instruments will slide into the canal. Thus, access cavity and root canal
preparation should form a continuous channel.
2. Making the preparation in multiple planes which introduces the concept of “flow”: This
objective preserves the natural curve of the canal.
3. Making the canal narrower apically and widest coronally: To create a continuous taper up
to apical third which creates the resistance form to hold gutta-percha in the canal.
4. Avoid transportation of the foramen: There should be gentle and minute enlargement of the
foramen while maintaining its position.
5. Keep the apical opening as small as possible.
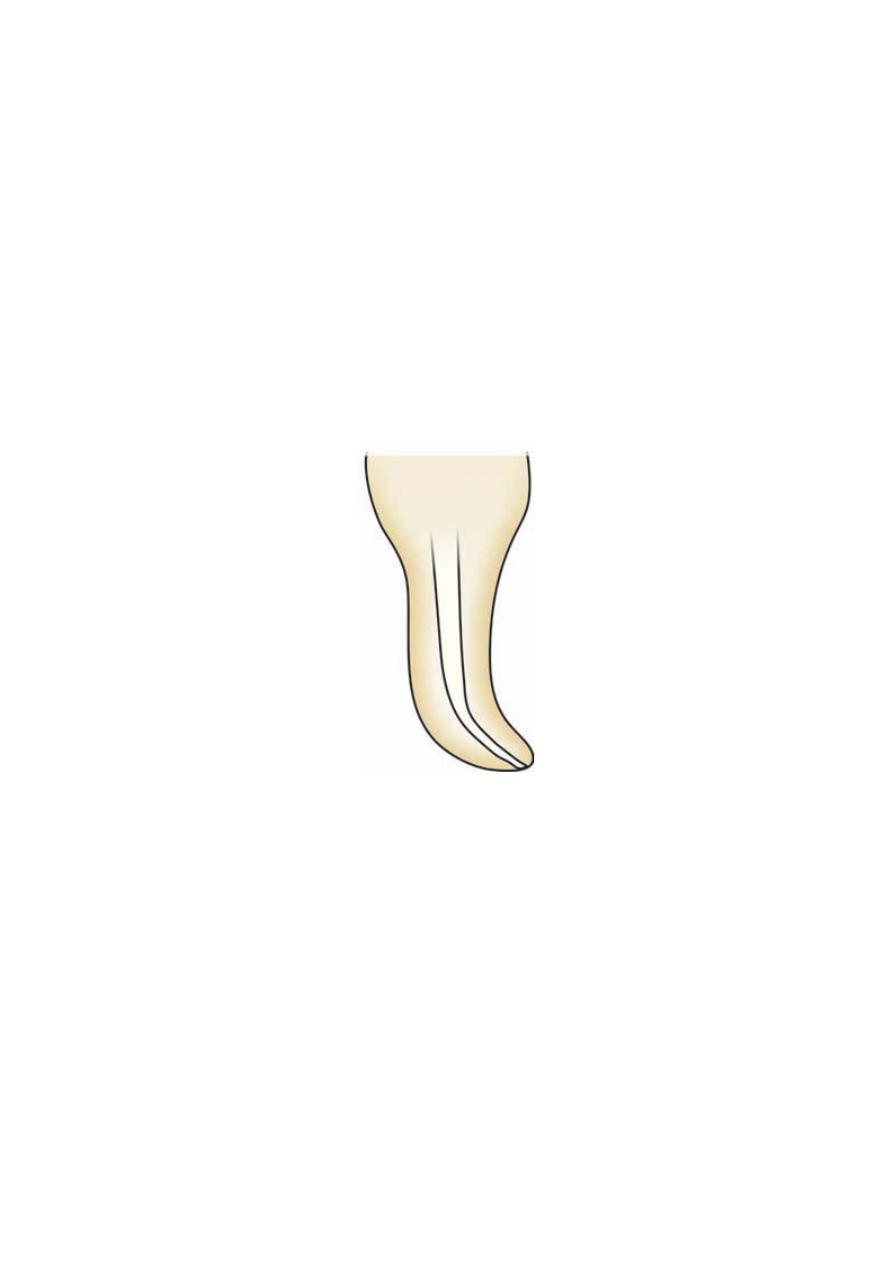
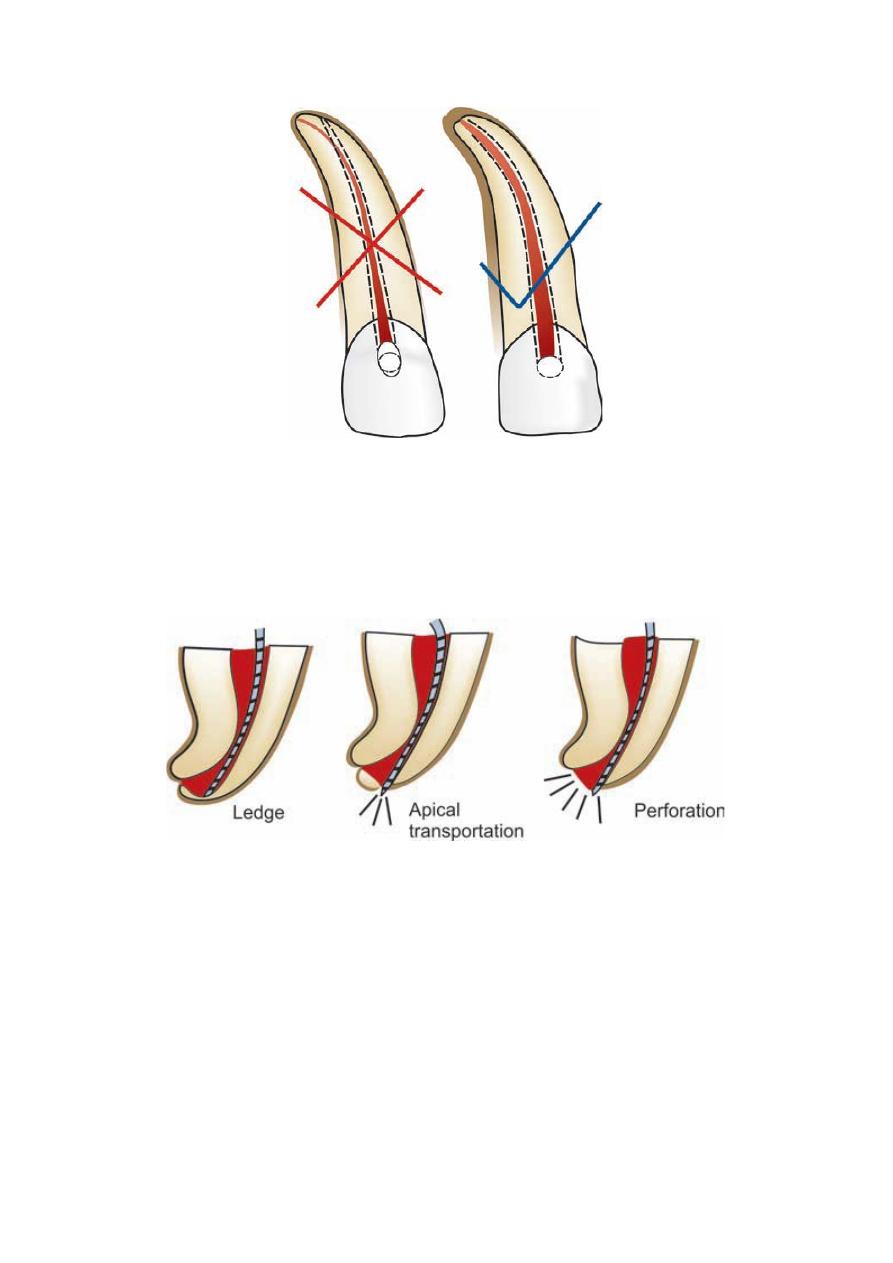
Prepared root canal shape should be continuously tapered
3
Prepared canal should retain its original form and shape
Procedural errors
4
Biologic Objectives of Root Canal Preparation
Biologic objective of root canal preparation is to remove the pulpal tissue, bacteria and their
by-products from the root canal space.
1. Procedure should be confined to the root canal space.
2. All infected pulp tissue, bacteria and their by-products should be removed from the root
canal.
3. Necrotic debris should not be forced periapically
4. Sufficient space for intracanal medicaments and irrigants should be created.
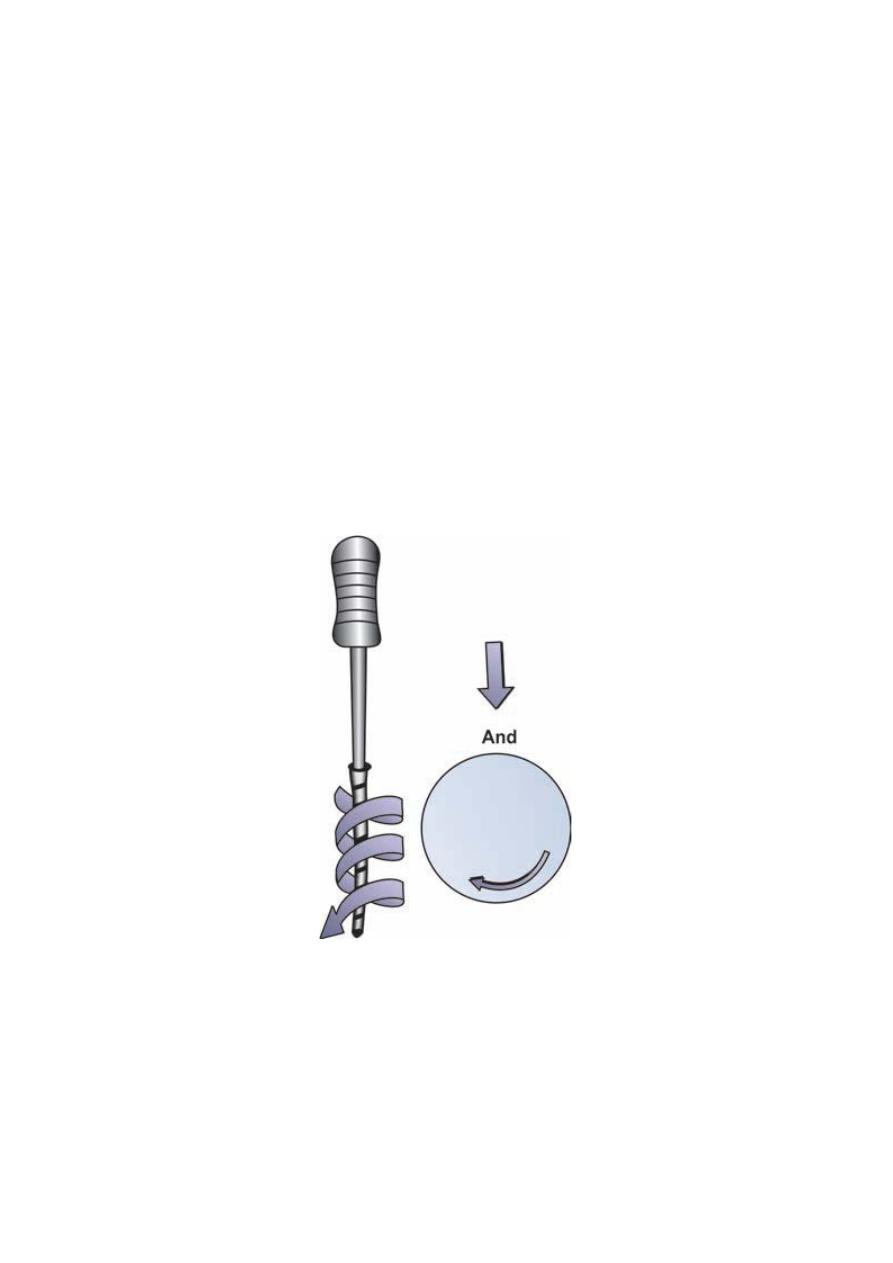
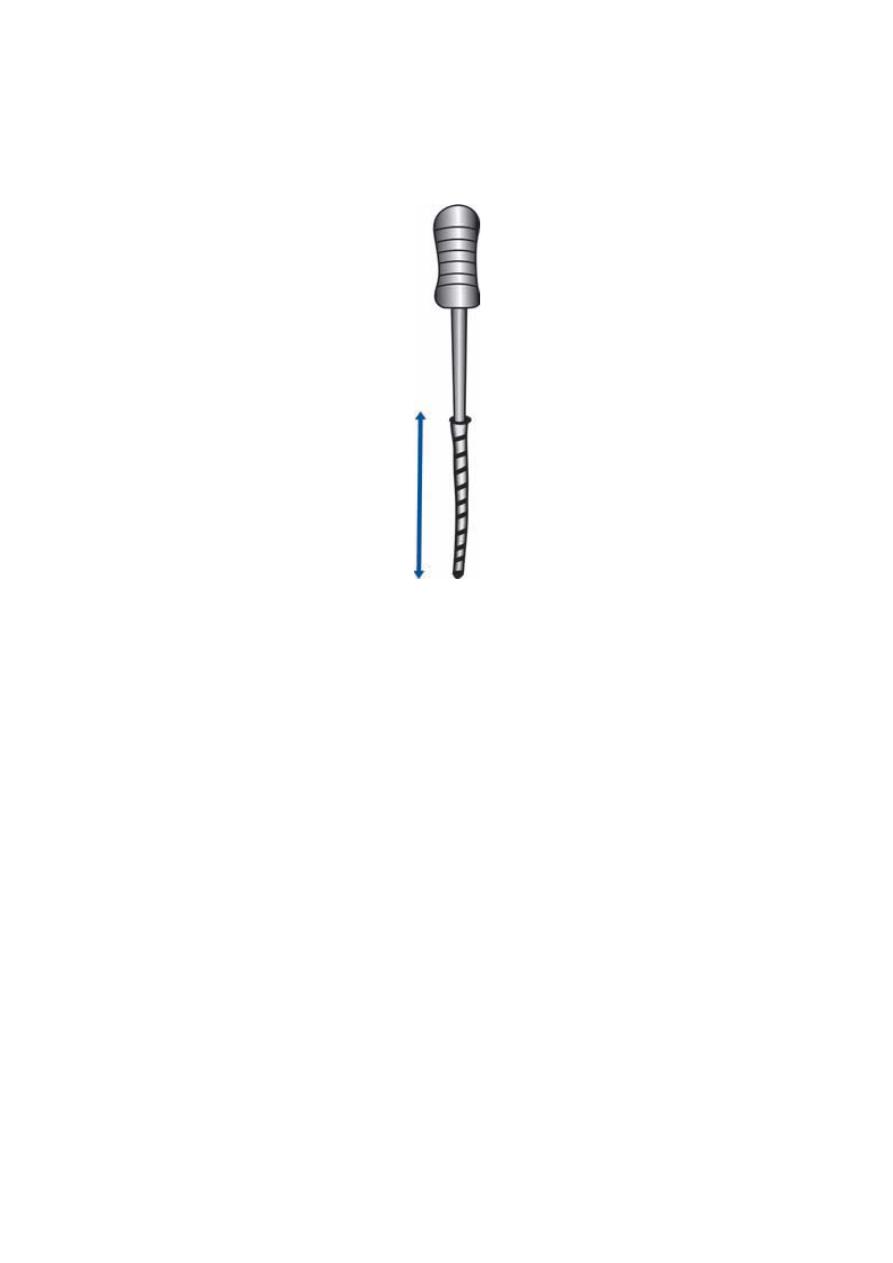
Different Movements of Endodontic Instruments
Reaming
• Reaming is commonly done by the use of reamers, though files can also be used.
• It involves clockwise rotation of an instrument.
Reaming motion involving clockwise rotation of instrument
5
Filing
• The term filing indicates push-pull motion of an instrument. This method is commonly used
for canal preparation.
Filing motion showing push and pull action of instrument
6
Combination of Reaming and Filing
• In this technique, file is inserted with a quarter turn clockwise and apically directed pressure
(i.e. reaming) and then is subsequently withdrawn (i.e. filing).
• File edges get engaged into dentin while insertion and breaks the loose dentin during its
withdrawal.
Combination of reaming and filing
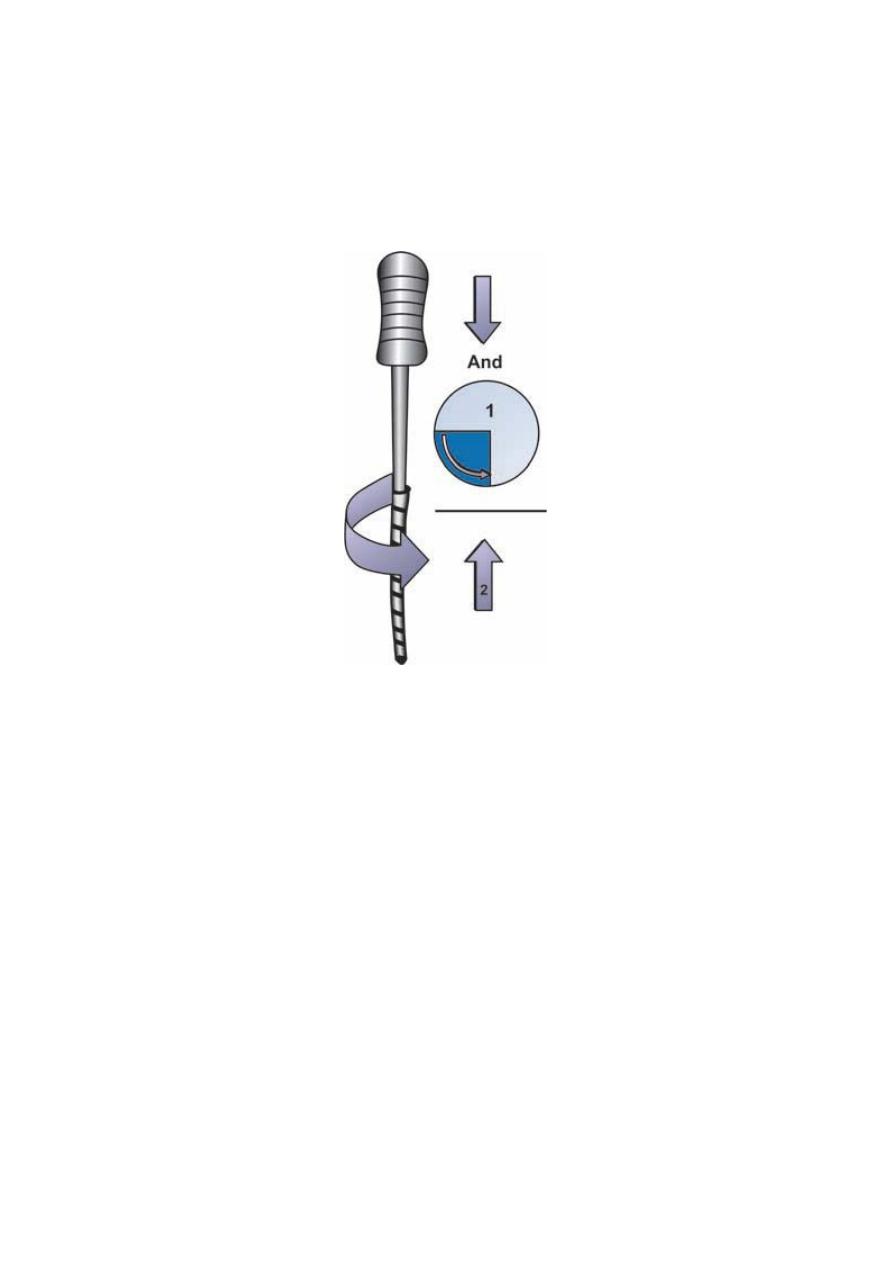
Balanced Force Technique
• Instrument is first inserted into the canal by moving it clockwise with one quarter turn.
• Then to cut dentin, file is rotated counter clockwise simultaneously pushing apically to
prevent it from moving out of the canal.
• Finally, the file is removed by rotating file clockwise simultaneously pulling the instrument
out of the canal.
• This technique offers most efficient dentin cutting but care should be taken not to apply
excessive force with this technique because it may lock the instrument into the canal.

7
Balanced force technique
Watch Winding motion
Watch winding is reciprocating back and forth (clockwise/anticlockwise) rotation of the
instrument in an arch. It is used to negotiate canals and to work files to place. Light apical
pressure is applied to move the file deeper into the canal.
Rotation of file in watch winding motion
8
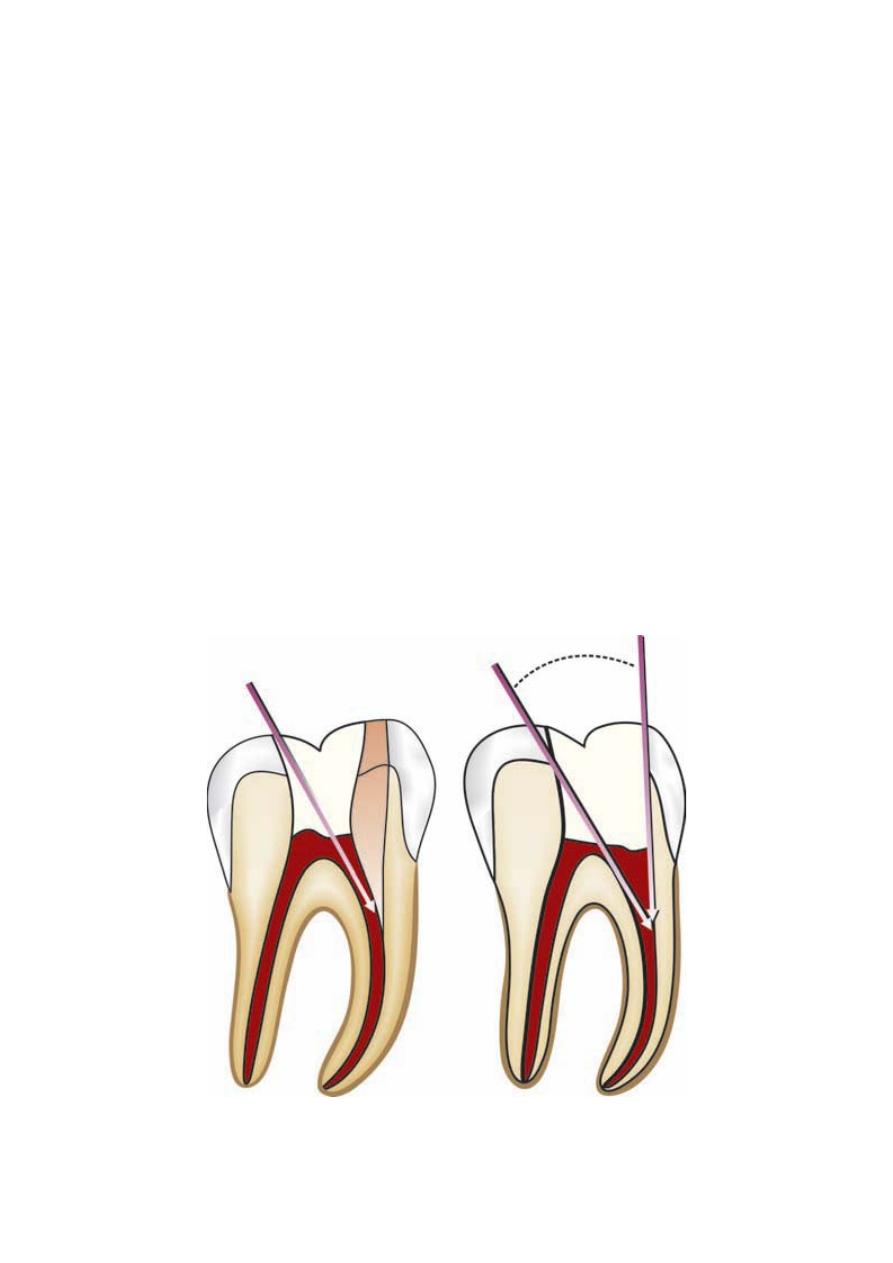
Basic Principles of Canal Instrumentation
• There should be a straight line access to the canal orifices. Creation of a straight line access
by removing overhang dentine influences the forces exerted by a file in apical third of the
canal.
• Files are always worked within a canal filled with irrigant. Therefore copious irrigation is
done in between the instrumentation, i.e. canal must always be prepared in wet environment.
• Preparation of canal should be completed while retaining its original form and the shape.
• Exploration of the orifice is always done with smaller file to gauge the canal size and the
configuration.
• Canal enlargement should be done by using instruments in the sequential order without
skipping sizes.
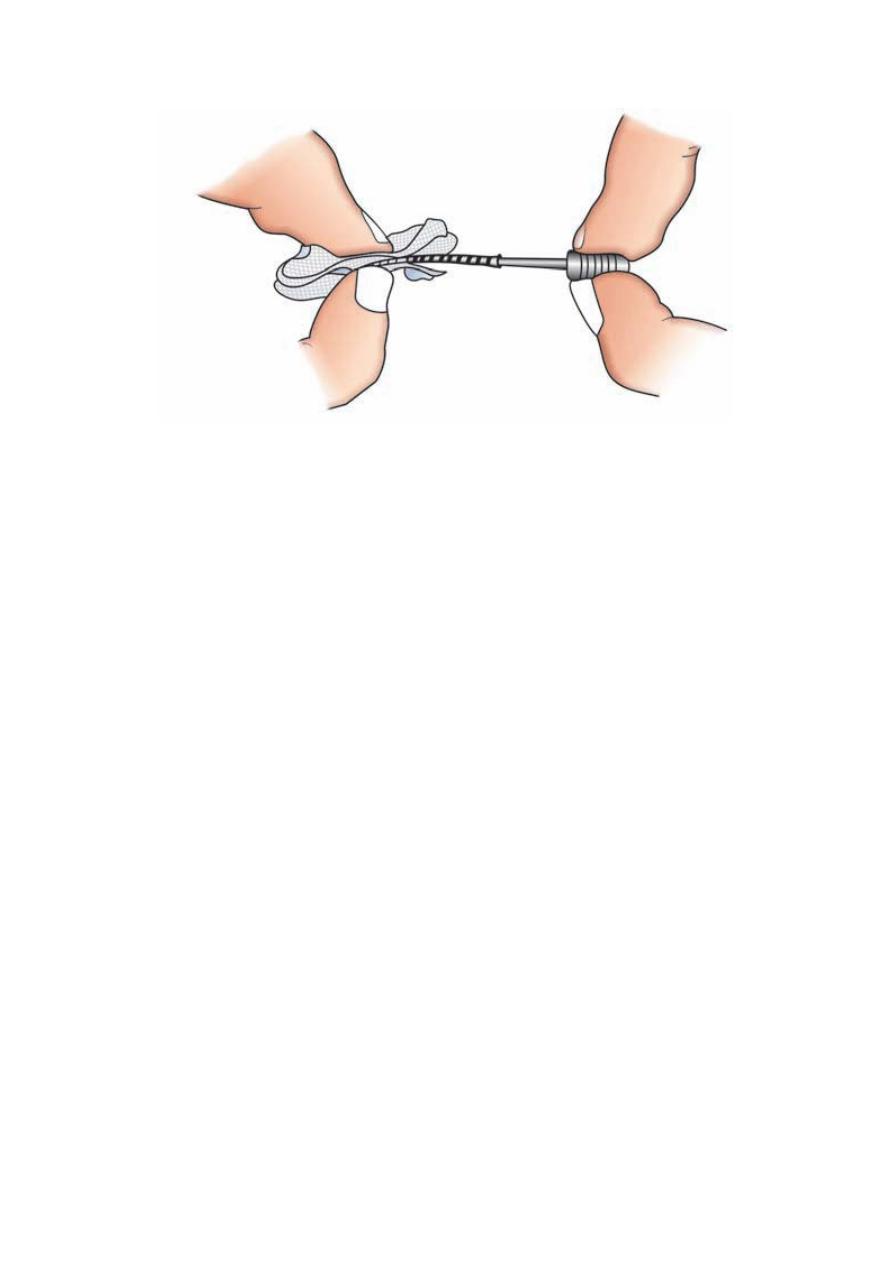
• After each insertion and removal of the file, its flutes should be cleaned and inspected.
• Recapitulation is regularly done to loosen debris by returning to working length. The canal
walls should not be enlarged during recapitulation.
Recapitulation: a process of removing the cutting debris packed into the apex by a smaller
diameter file that is inserted to full length of the canal. Recapitulation ensures the total canal
debridement and prevents the blockage of the canal with the cutting debris.
• Overpreparation and too aggressive over enlargement of the curved canals should be
avoided.
• Never force the instrument in the canal. Forcing or continuing to rotate an instrument may
break the instrument.
Removal of overlying dentin causes smooth internal walls and provides straight line access to root canals
9
Cleaning of flutes should be done after each instrumentation
Techniques of Root Canal Preparation
Basically, there are two approaches used for biomechanical preparation:
• Starting at the apex with fine instruments and working up to the orifice with progressively
larger instruments, this is Step back technique.
• Starting at the orifice with larger instrument and working up to apex with smaller
instruments, this is Crown down technique.
Various other techniques have been modified out of these two basic techniques. Whichever
the techniques is used for canal preparation one should ensure to stay within the confines of
root canal and produce a continuous tapered preparation of the canal.
Standardized Preparation Technique (Conventional Technique)
In this technique, standardized reamers of increasing sizes are used sequentially to enlarge the
apical part of the canal. Then the coronal two-thirds are prepared. It uses the same working
length definition for all instruments introduced into a root canal and therefore relies on the
inherent shape of the instruments to impart the final shape to the canal.
Techniques
• Determine working length and select initial apical file.
• Do circumferential filing to increase the apical constriction 2 to 3 files sizes greater than
initial apical file. In circumferential filing, file is inserted into the root canal to the desired
length engaged into canal wall by applying lateral pressure and then withdrawn. This
procedure is performed around all the canal walls.

10
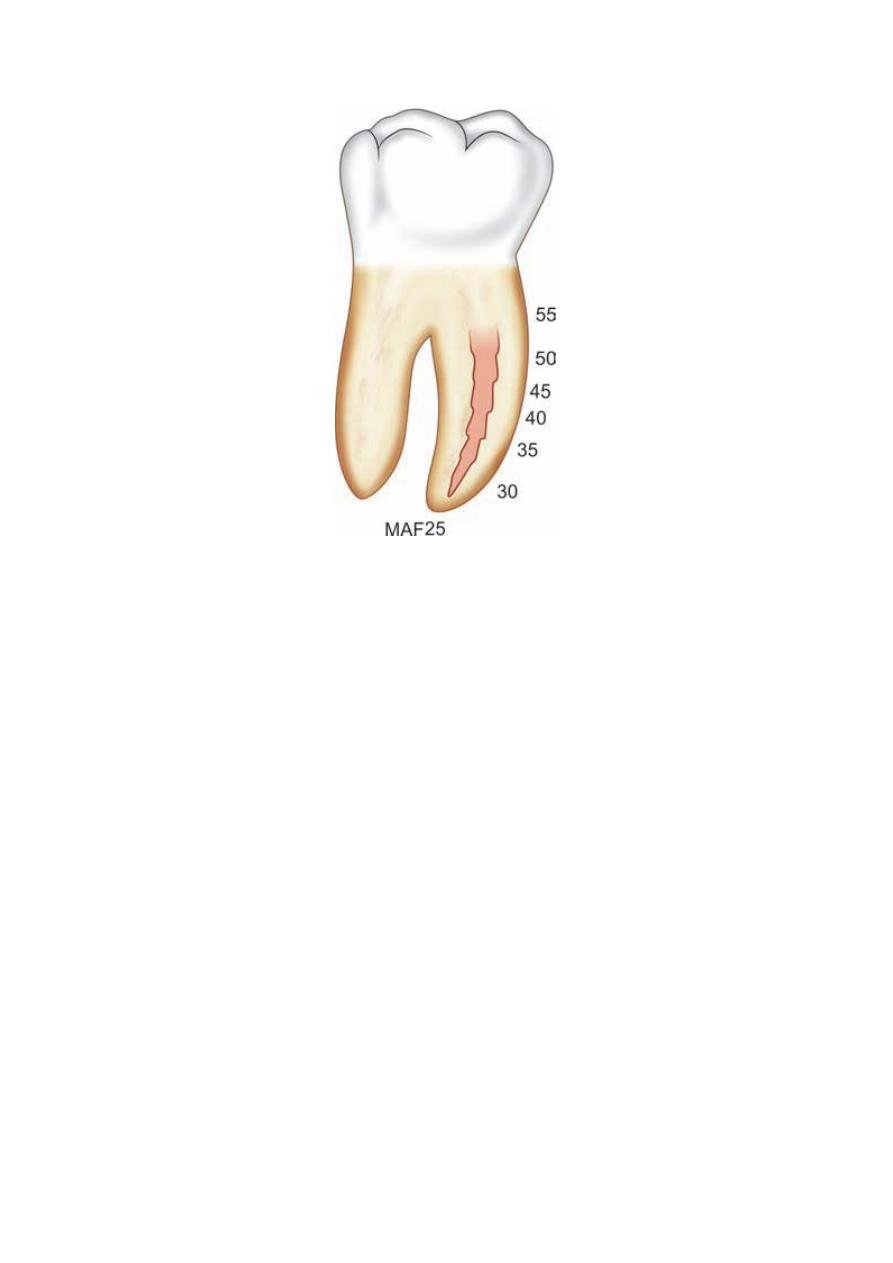
For example; if the initial apical file is size 20 the next three sizes (file size 25, 30 and 35)
will be used to prepare the apical third of the canal and they will be inserted to full working
length. Larger files (40, 45 and 50) will be used to enlarge the coronal two third of the canal.
These larger files will be inserted only into the coronal two third of the canal and lateral
pressure will be applied during the withdrawal of the files.
This technique is adequate for preparing the canals that are relatively straight and tapered;
however in cylindrical and small curved canals procedural errors were identified with this
technique.
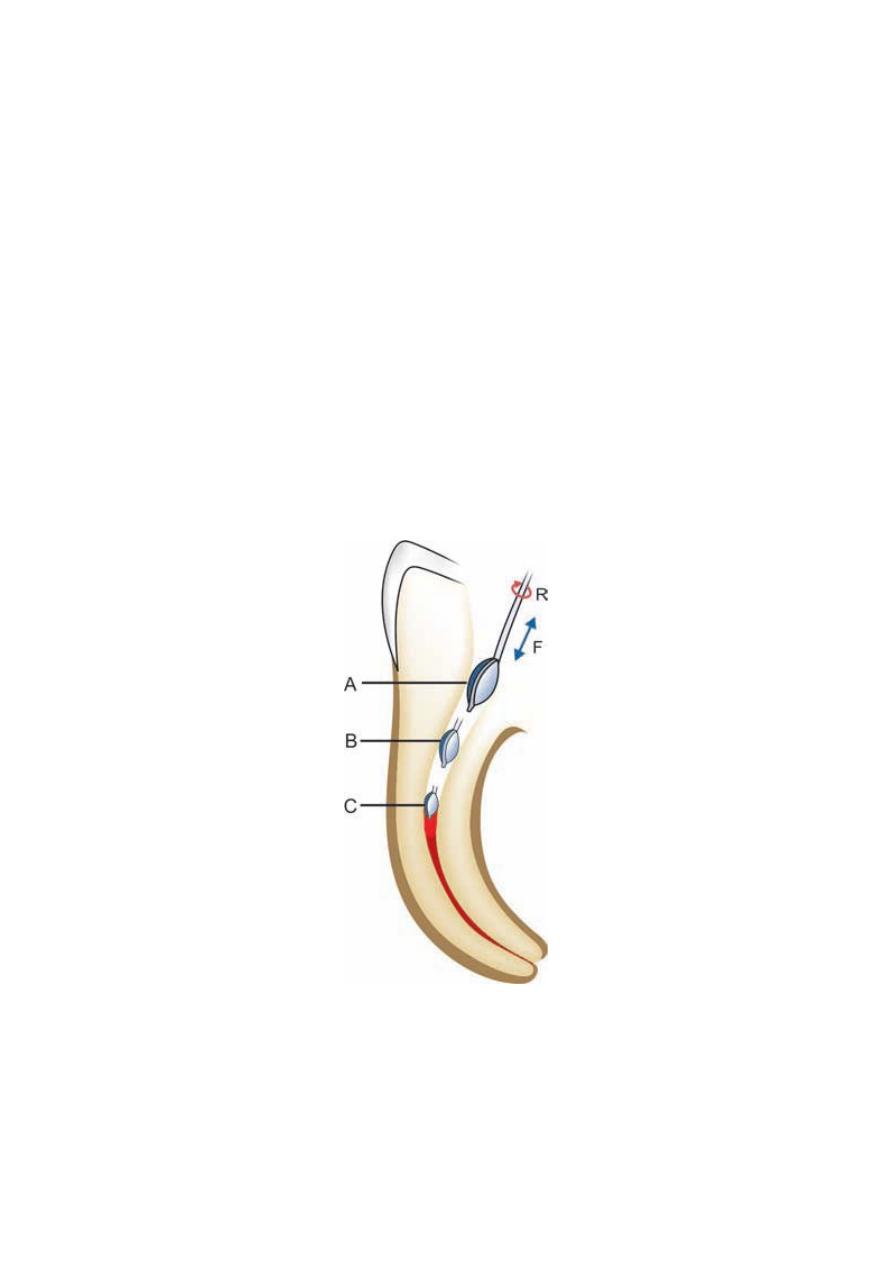
Step Back Technique/Telescopic Canal Preparation /Serial Root Canal
Preparation
Step back technique emphasizes keeping the apical preparation small, in its original position
and producing a gradual taper coronally. This technique is recommended for curved canal in
which the apical portion will be prepared using small and relatively flexible instruments.
Phase 1: involves the preparation of apical constriction of the canal.
1. Establish the working length
2. Insert the first instrument into the canal with watch winding motion (a gentle
clockwise and anticlockwise rotation of the file with minimal apical pressure).
3. Remove the instrument and irrigate the canal.
4. Place the next larger size file to the working length in similar manner and irrigate the
canal.
5. Recapitulate the canal with previous smaller size file to break up the cutting debris.
6. Repeat the process until size 25 file (master apical file) and recapitulate the canal.
Phase 2:
1. Place the next file to length 1 mm short of working length. Insert the file with watch
winding motion, remove it after circumferential filing, irrigate and recapitulate.
2. Repeat the same procedure with successively larger files at 1 mm increments from the
previously used file.
3. Finally, re-instrumentation of the root canal is done by the master apical file (file
number 25) with push-pull strokes to achieve a smooth taper form of the root canal.
11
Step back preparation creates small apical preparation with larger instruments used at successively
decreasing lengths to create a taper
Advantages of step back techniques
• This technique creates small apical preparation with a gradual taper.
Disadvantages of step back technique
• Difficult to irrigate apical region.
• More chances of pushing debris periapically.
• Time consuming.
• It has a tendency to straighten the curved canal.
• Increased chances of iatrogenic errors; ledge formation, instrument fracture, zipping of the
apical area, apical blockage.
• Since, curvature of the canal is reduced during mid-root flaring, there will be a loss in the
working length.
• Difficult to insert instruments in canal.
12
Technique of Crown Down Preparation
• Prepare the access cavity and locate the canal orifices with sharp explorer.
• Fill the access cavity with an irrigant and start preflaring of the canal orifices. Preflaring of
the coronal third of the canal can be done by using hand instruments, Gates-Glidden drills or
the nickle-titanium rotary instruments.
• Gates-Glidden drills can be used after exploring the canal orifices with number 10 or 15
files. The crown down approach begins with larger Gates-Glidden first. After using this,
subsequent, smaller diameter Gates-Glidden are worked into the canal with additional mm to
complete coronal flaring.
• Frequent irrigation with sodium hypochlorite and recapitulation with a smaller file (usually
No. 10 file) to prevent canal blockage.
• After establishing coronal and mid root enlargement explore the canal and establish the
working length with small instruments.
• Subsequently introduce progressively smaller number files deeper into the canal in
sequential order and prepare the apical part of the canal.
• Final apical preparation is prepared and finished along with frequent irrigation of the canal
system.
Use of Gates-Glidden for preflaring

13
Advantages of crown down approach
• Permits straighter access to the apical region.
• Eliminates coronal interferences which allows better determination of apical canal sizes.
• Removes bulk of the tissue and microorganisms before apical shaping.
• Allows deeper penetration of irrigants.
• The working length is less likely to change.
• Eliminates the amount of necrotic debris that could be extruded through the apical foramen
during instrumentation.
• Freedom from constraints of the apical enlarging instruments.
• The increased access allows greater control and less chance of zipping near the apical
constriction.
• It provides a coronal escapeway that reduces the “piston in a cylinder effect” responsible for
debris extrusion from the apex.
Biological benefits of crown down approach
• Removal of tissue debris coronally, thus minimizing the extrusion of debris periapically.
• Reduction of postoperative sensitivity which could result from periapical extrusion of
debris.
• Greater volumes of irrigants can reach in canal irregularities in early stages of canal
preparation because of coronal flaring
• Better dissolution of tissue with increased penetration of the irrigants.
• Rapid removal of contaminated and infected tissues from the root canal system.
Disadvantages of coronal to apical preparation
• More time consuming than the step back technique.
• Excessively flared preparation in the coronal and middle thirds may weaken the root.
• The use of end cutting rotary instruments in small or partially calcified canals may
predispose to perforation as the instrument moves apically.
• If large, less flexible rotary instruments are used too rapidly and deeply in the root canal, a
ledge may form.
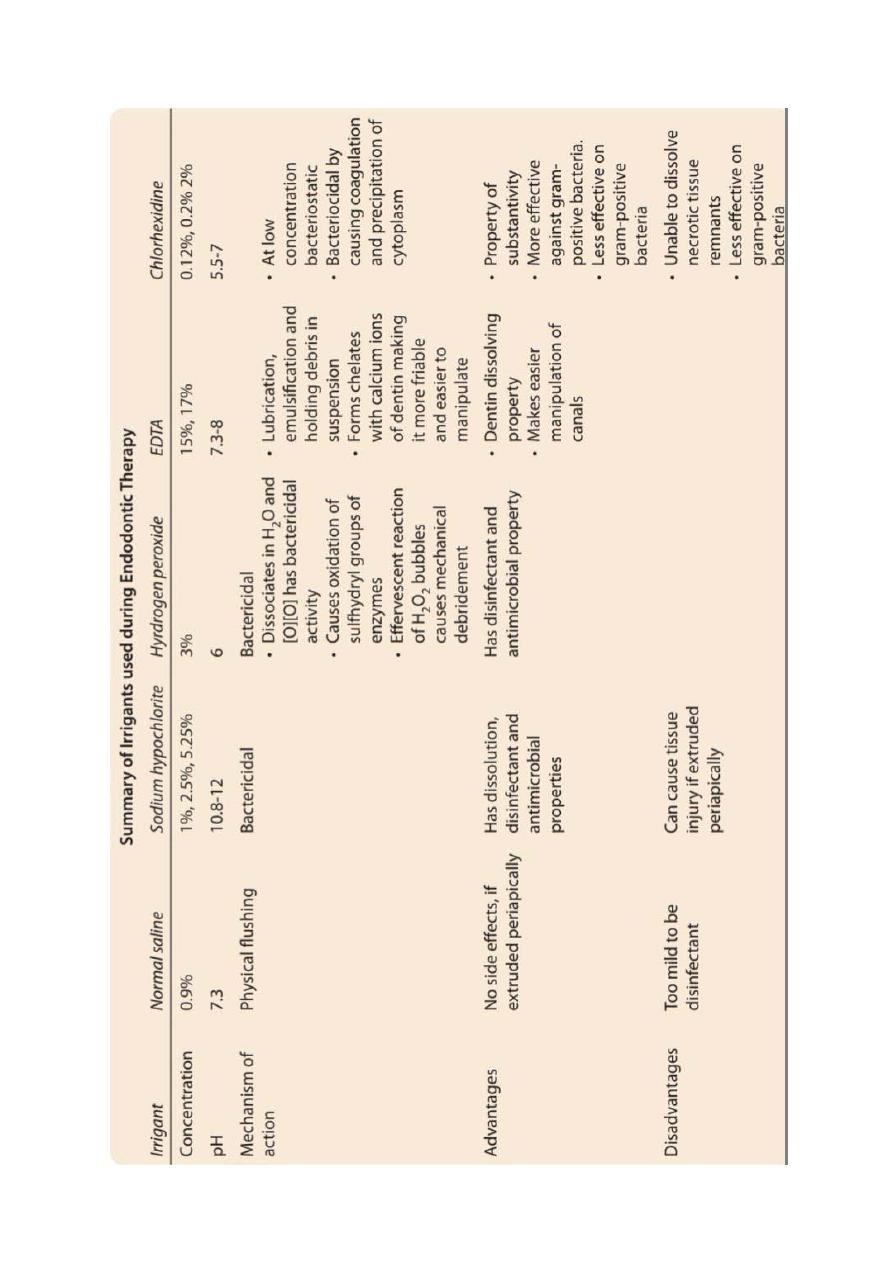
Endodontic irrigation solution
Functions of irrigation solutions:
1. Opening the dentinal tubules by removing the smear layer.
2. They act as lubricant to facilitate the instrumentation.
3. Dissolve necrotic tissues.
4. Germicidal and antibacterial effects.
5. Bleaching action.
6. Remove debris from lateral and accessory canals.
14