First stage – College of Medicine – University of Mosul / Nineveh
Computer Science/
Assistant Lecturer: Zina Abdul Salam
EXCEL 2013
1
Lecture 1
Introduction:
Microsoft Excel 2013 is a spreadsheet program that is used to manage,
analyze, and present data .it includes many powerful tools that can be used
to organize and manipulate large amounts of data, perform complex
calculations, create professional-looking charts, enhance the appearance
Of worksheets, and more. this handout provides an overview of the excel
2013 user interface and covers how to perform basic tasks such as starting
and exiting the program, creating, saving, opening, and closing workbooks,
selecting cells, entering and editing data, formatting text and numbers,
positioning cell contents, applying cell styles, and getting help.
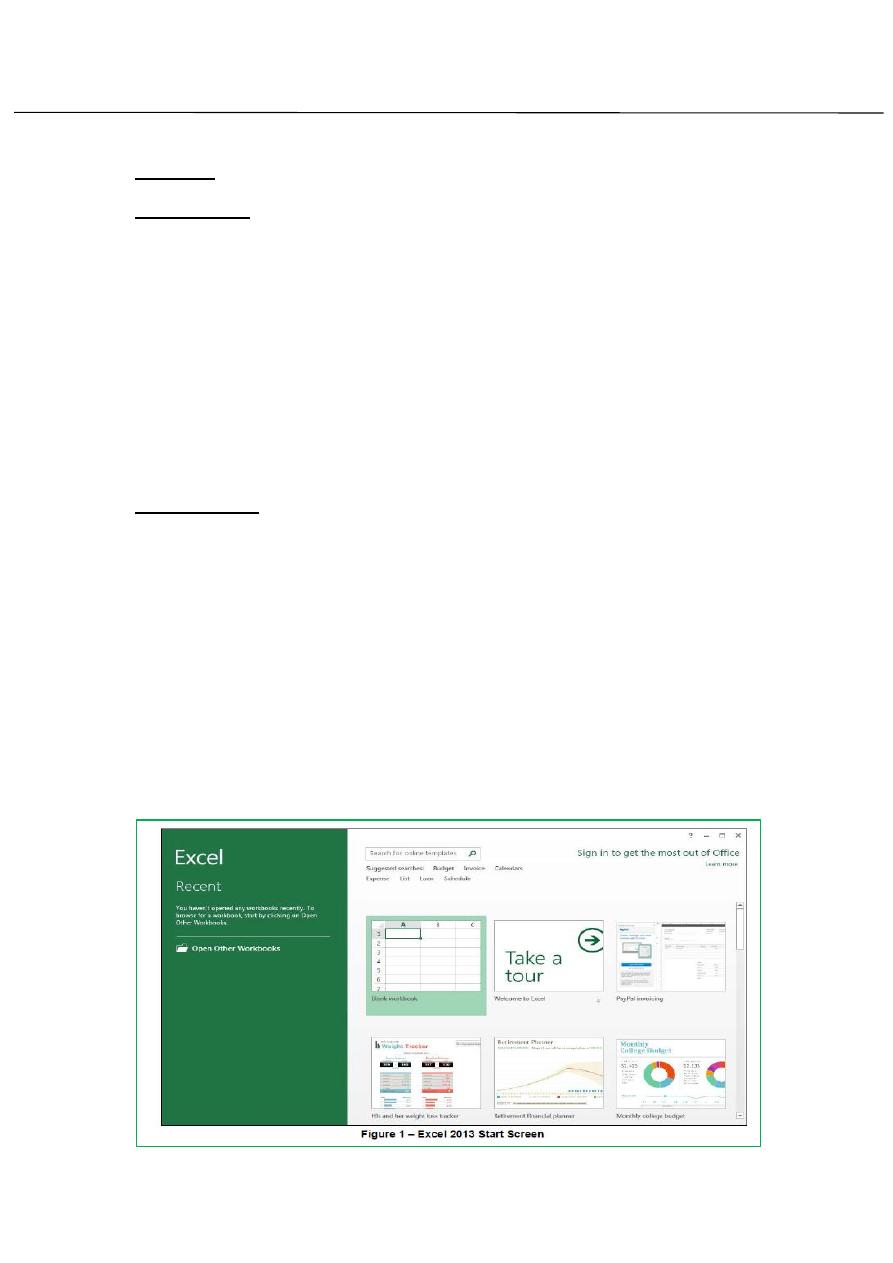
Starting Excel:
You can start Excel 2013 from the start menu (in windows 7) or by double
Clicking an existing Excel file. When you start the program without opening
A specific file, the start screen appears, prompting you to open an existing
workbook or create a new workbook.
To start Excel 2013 from the start menu:
1- Click the start menu, click All Programs, click Microsoft Office 2013,
And then click Excel 2013. The start screen appears (see figure 1).
2- In the right pane. Click blank workbook opens in the program
window.
First stage – College of Medicine – University of Mosul / Nineveh
Computer Science/
Assistant Lecturer: Zina Abdul Salam
EXCEL 2013
2
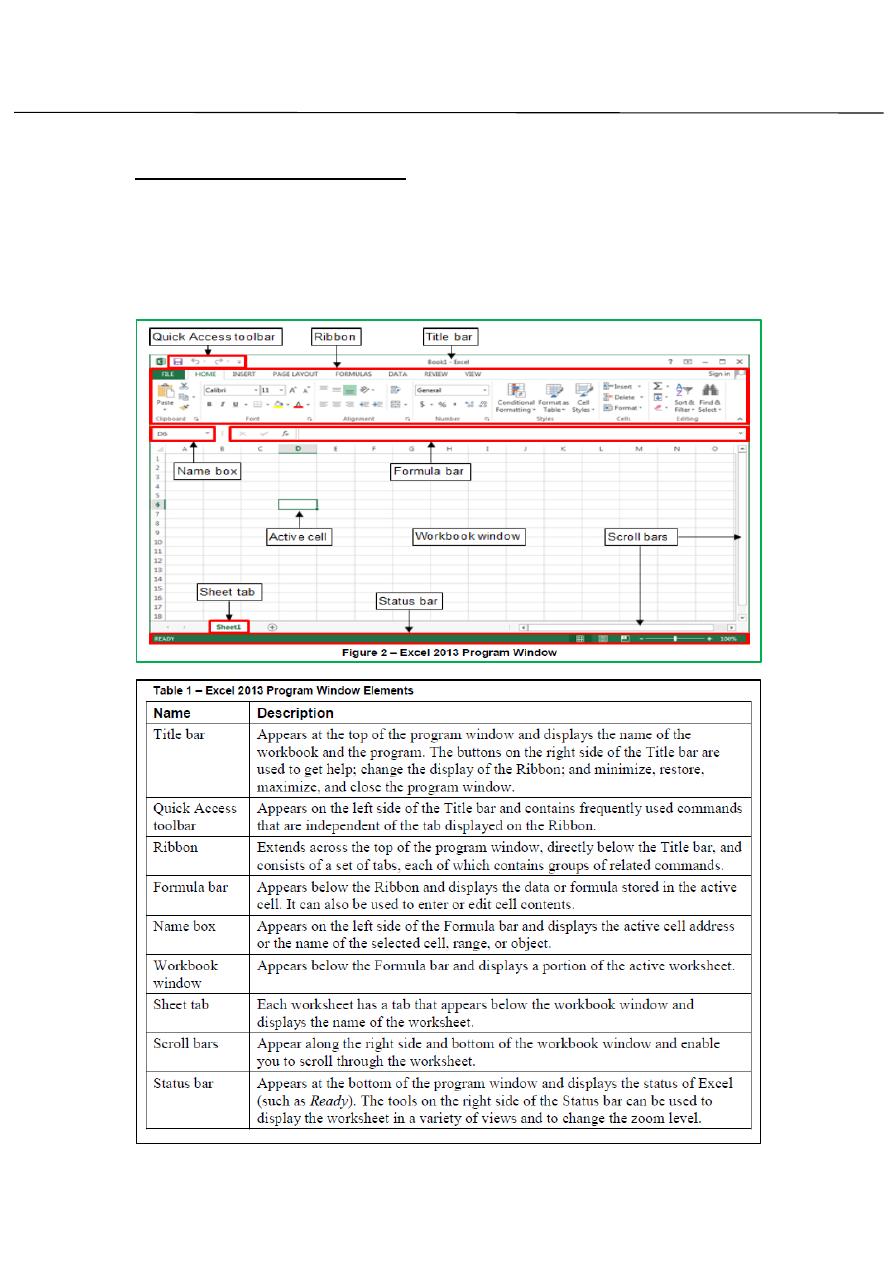
Overview of the user interface:
All the Microsoft Office 2013 programs share a common user interface so
you can apply basic techniques that you learn in one program to other
program. The Excel 2013 program window is easy to navigate and simple
to use (see figure2 and table1).
First stage – College of Medicine – University of Mosul / Nineveh
Computer Science/
Assistant Lecturer: Zina Abdul Salam
EXCEL 2013
3
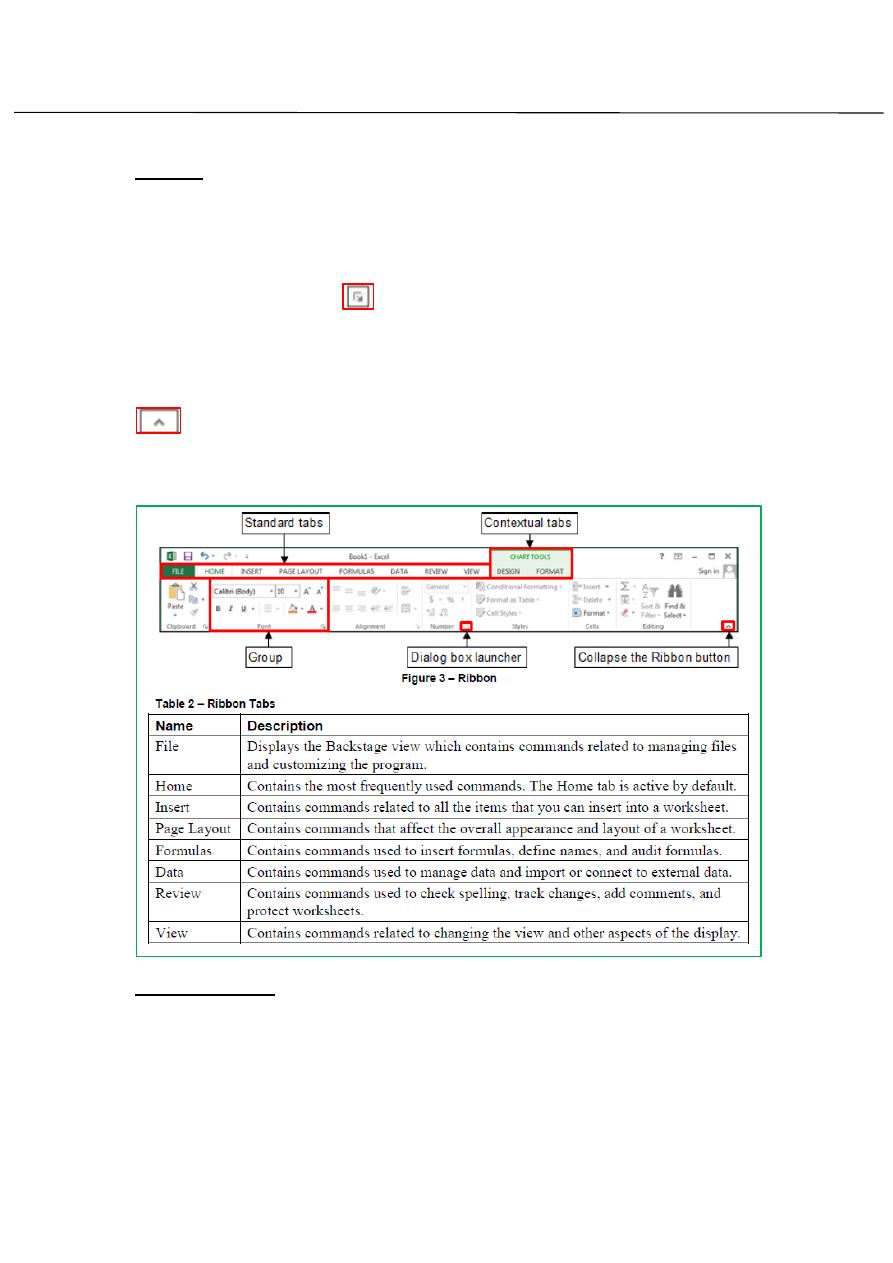
Ribbon:
The Ribbon designed to help you quickly find the commands that you need
to complete atske.it consist of asset of task-specific tabs. Clicking a tab
displays asset of related commands that are organized into logical group.
A dialog box launcher
appears in the lower-right corner of most
groups on the ribbon. Clicking it opens a related dialog box or task pane
that offers additional options. (See figure3-table2)
You can collapse the Ribbon by clicking the Collapse the Ribbon button
on the right side of the Ribbon or by double- clicking the current tab.
When the Ribbon is collapsed, only the names are visible. You can expand
the Ribbon by double-clicking any tab.
Backstage view:
The file tab (the first tab on the Ribbon) is used to display the Backstage
View which contains all the commands related to managing files and
customizing the program. It provides an en easy way to create, open, save,
print…. .
First stage – College of Medicine – University of Mosul / Nineveh
Computer Science/
Assistant Lecturer: Zina Abdul Salam
EXCEL 2013
4
To display the Back stage view:
1. Click the File tab on the Ribbon(see figure 8)
To exit the backstage view:
1. Click the back button in the upper-left corner of the backstage view or
press Esc key.
(see figure 9)
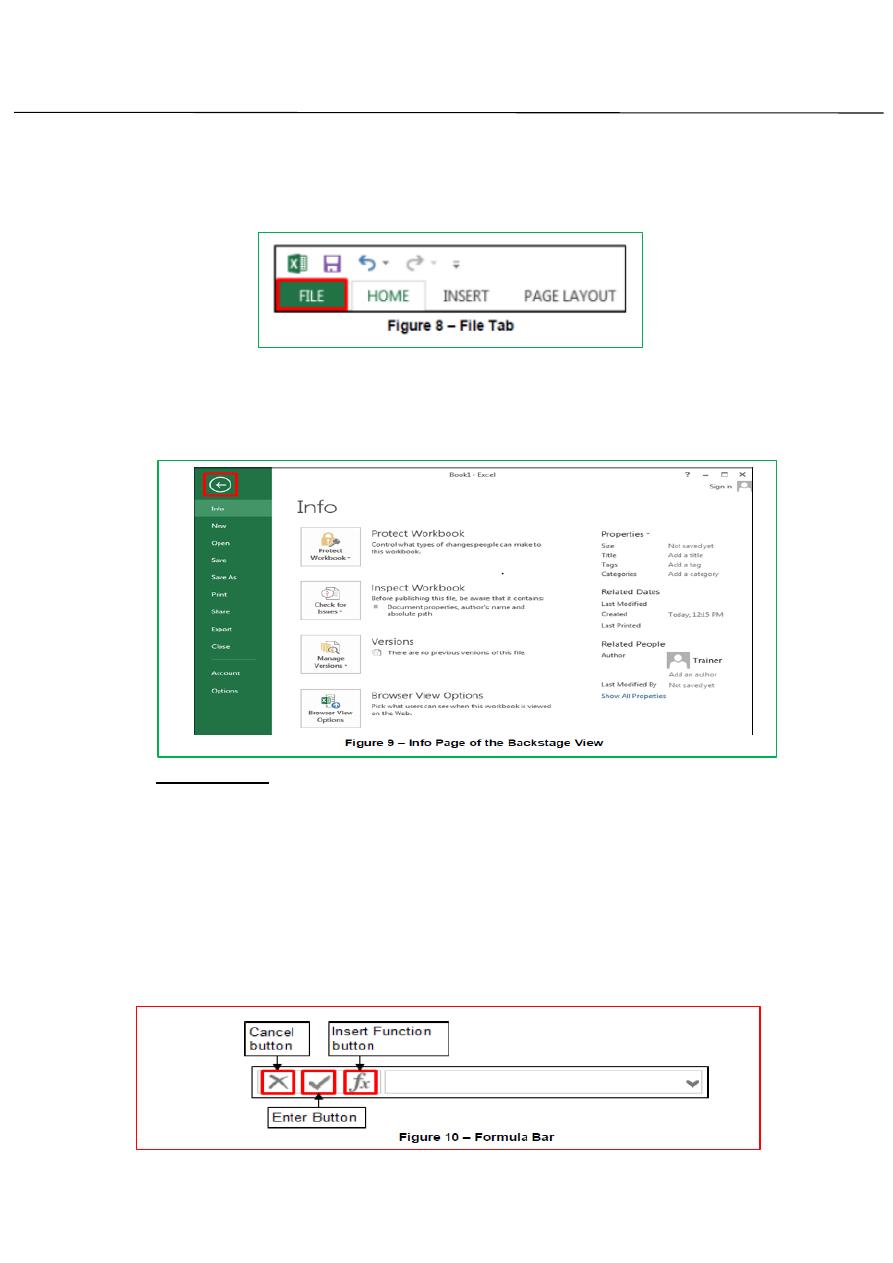
Formula Bar:
The Formula bar displays the content of the active cell and can be used
to enter or edit cell contents. The Formula bar contains three buttons (see
figure 10).the insert buttons is always available. But the other two button
are active only while you entering or editing data in a cell. Clicking cancels
button cancels the changes you make in the cell which is the same as Esc
key. Clicking the Enter Button completes the changes you make in the cell.
Clicking Insert Function button open a dialog box that helps you construct
formulas.
First stage – College of Medicine – University of Mosul / Nineveh
Computer Science/
Assistant Lecturer: Zina Abdul Salam
EXCEL 2013
5
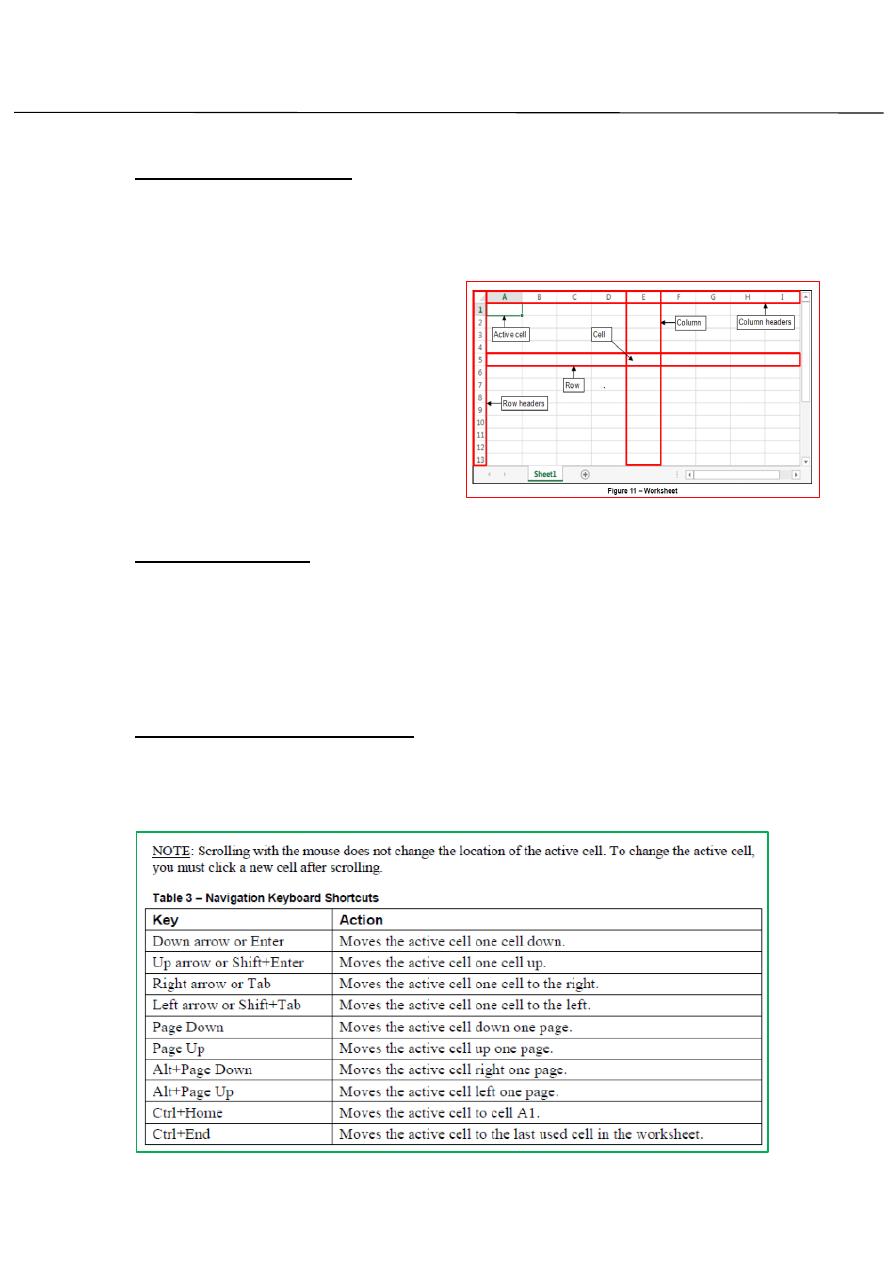
Overview of Workbooks:
An Excel file is called a workbook. Each new workbook contains one blank
work sheet (see figure 11). You can add additional workbook or delete
existing worksheet as needed. By default, a new work book is named
Book1 and the worksheet it contains
is named Sheet 1. Each work sheet
consist of 1,048,576 (numbered)
rows and 16,384 columns (labeled A
through XFD).The box formed by
intersection of row and column is
called a cell. The active cell has green
border around it and its name
appears in the formula bar.
Creating workbooks
To create a new workbook:
1. Click the File tab, and click New.
2. In the right pane, click Blank workbook.
Note: You can also create a new workbook by pressing Ctrl+N.
Moving Around in a Worksheet:
To type in a cell, you must make it the active cell, either by clicking it
Or by using one of the keyboard methods of moving the cell selector.
Table 10.1 summarizes the keyboard methods.
First stage – College of Medicine – University of Mosul / Nineveh
Computer Science/
Assistant Lecturer: Zina Abdul Salam
EXCEL 2013
6
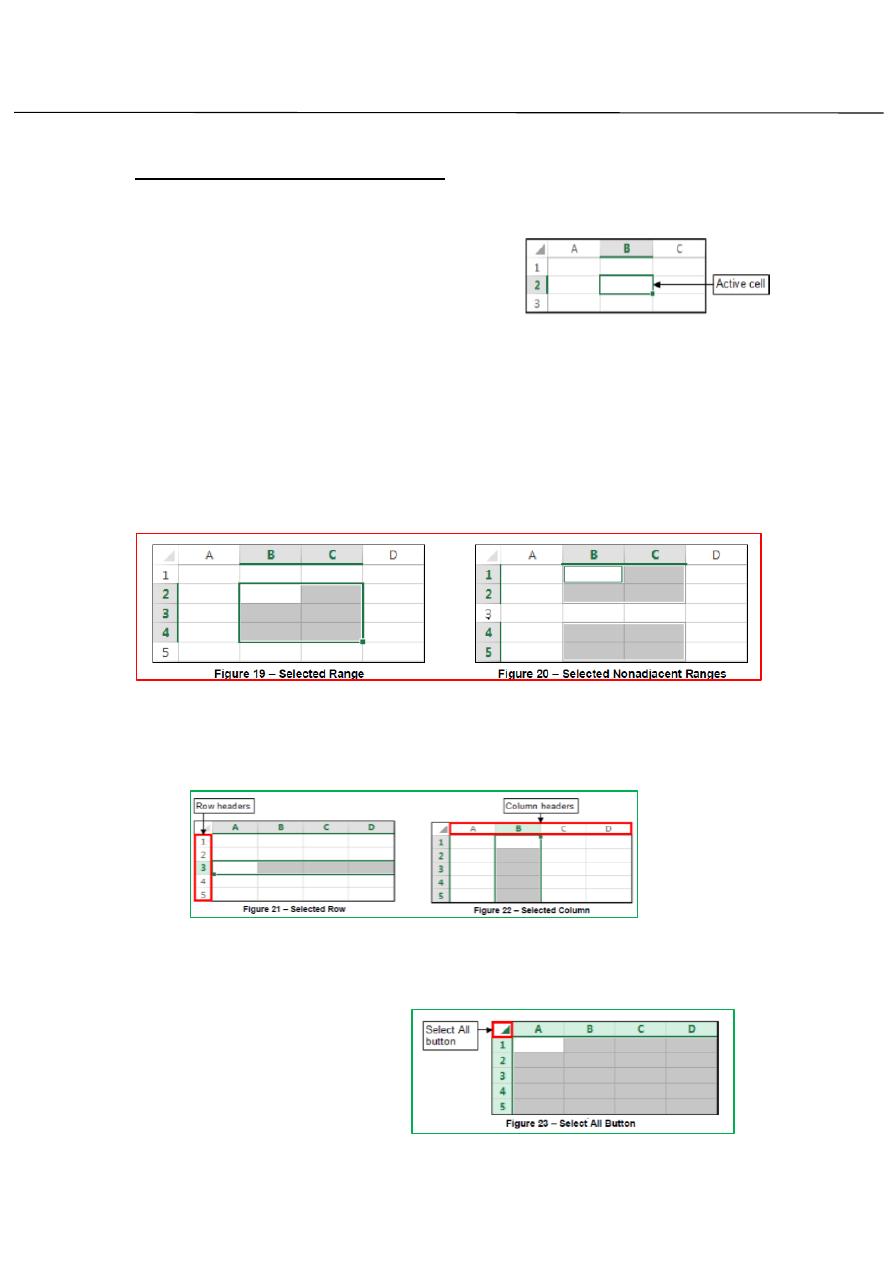
Selecting Cells, Rows, and Columns:
In order to work with cell, you must first select it.
1-To select a single cell: Click the desired
cell
2-To select a range of cells: click the first
cell that you want to include in the range, hold down the Shift key, and
then click the last cell in the range or drag from the first cell in the range
to the last cell.
3-To select nonadjacent cells or range:
Select the first cell or range, hold down the Ctrl key, and then select the
other cell or range.
To select a single row or column:
1- Click the header of the row or column that you want to select (see
figure 21 and figure 22).
To select all cells in a worksheet:
Click the Select ALL button in the upper-left corner of worksheet
(see figure 23) or press
CTRL+A.
First stage – College of Medicine – University of Mosul / Nineveh
Computer Science/
Assistant Lecturer: Zina Abdul Salam
EXCEL 2013
7
Entering data:
You can add data by entering it directly in the cell or by using formula
bar. A cell contain maximum of 32.767 characters and can hold any of
three basic types of data: text, numbers, or formulas.
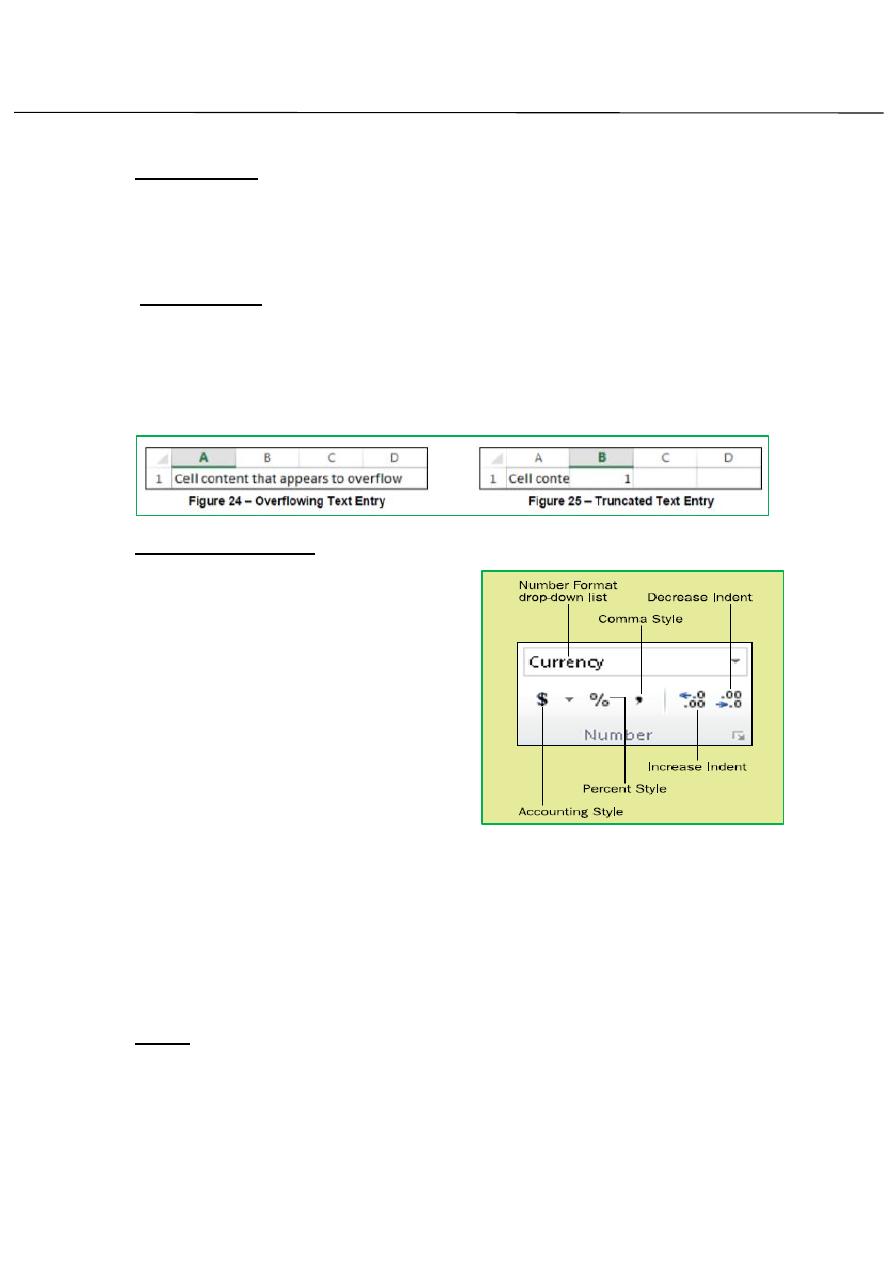
Entering Text:
Left-click a cell to select it. Each rectangle in the worksheet is called a cell.
As you select a cell, the cell address appears in the Name Box. Enter text
into the cell using your keyboard. The text appears in the cell and in the
formula bar then press the Enter key. (See figure 24, figure 25)
Formating Numbers:
Modifying a Number Format Use these
steps to select and then modify a cell’s
number format:
1. Select the cell(s) to affect.
2. On the Home tab, open the Number
Format drop-down list (in the Number
group) and select a format, or click the
Accounting, Percent Style, or Comma
Style button.
3. If you want to change the number
of decimal places, click the Increase Decimal or Decrease Decimal button
in the Number group.
4. (Optional) if you want to make other changes to the number format,
click the dialog box launcher in the Number Group to open the Format
Cells dialog box (see Figure).
5. Make any additional number formatting selections as needed.
6. Click OK.
NOTE: Formatting does not change the actual value stored in a cell.
The actual value is used in calculation and is displayed in the Formula bar
when the cell is selected.

First stage – College of Medicine – University of Mosul / Nineveh
Computer Science/
Assistant Lecturer: Zina Abdul Salam
EXCEL 2013
8
Entering Date and times:
To enter Dates:
1. Select the cell in which you want to enter the date.
2. Type the month, day, and year, with each number separated by a
forward slash (/) or a hyphen (-), and then press the Enter key.
To enter a Time:
1. Select the cell in which you want to enter the time.
2. Type the hour, a colon (:) , and the minutes , press the Spacebar
,type a for A.M. or P for P.M and then press the Enter key
Editing Data:
To edit data
1. Double- click the cell that contains the data you want to edit. The
cursor appears in the cell in the location that you double-clicked.
2. To insert characters, click where you want to make changes, and
then type the new characters.
3. To delete characters, click where you want to make changes, and
then press the Backspace or Delete key.
4. When you are finished, press the Enter key.
5. IF you are editing data and decide not to keep your edits, press the
ESC key to return the cell to its previous state.
Clearing Cells:
Can you clear a cell to remove its contents, formats, or comment.
To clear a cell:
1- Select the cell that you want to clear.
2- On Home tab, in Editing group click the
clear button and select the desired option
from menu.
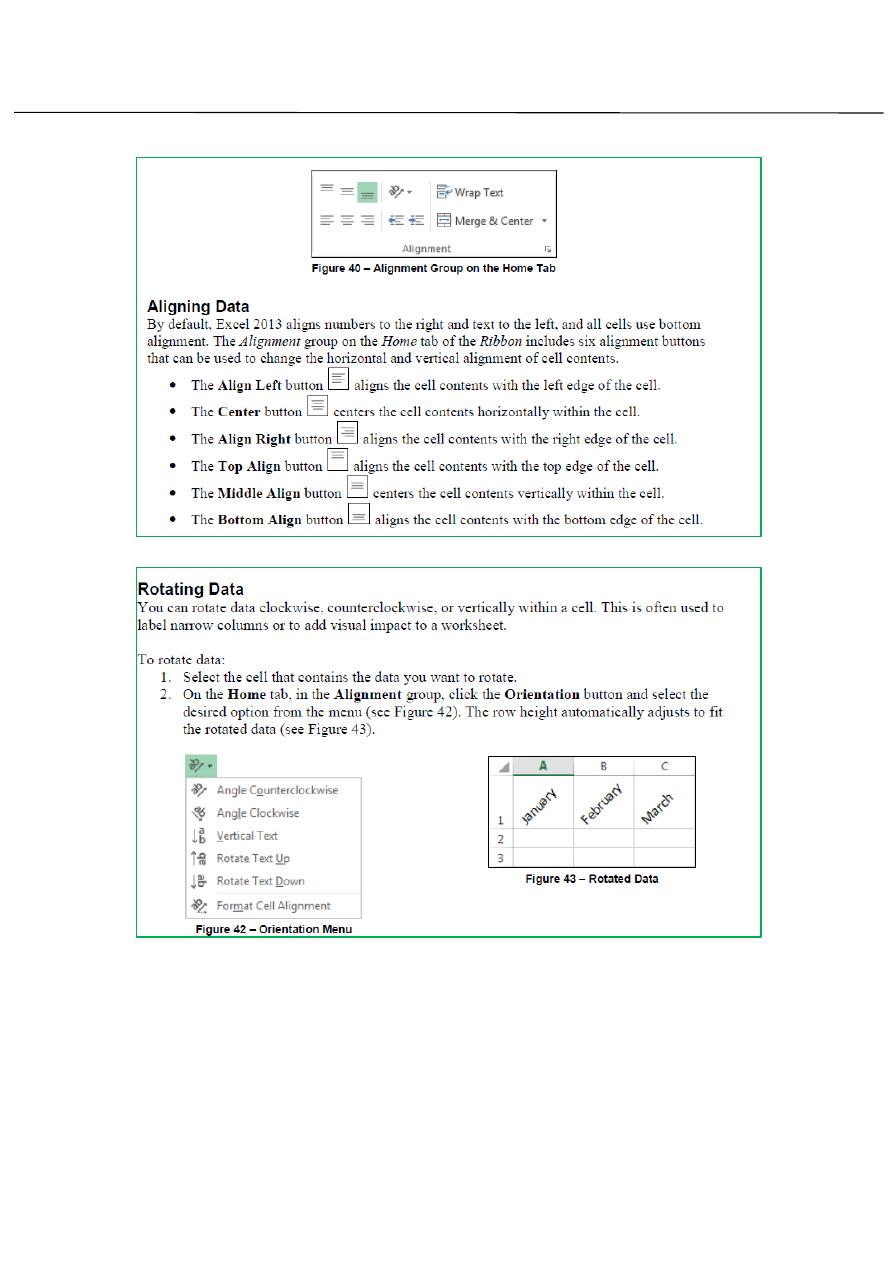
Positioing Cell Contents:
You can change the alignment, indentation and orientation of cell
content within a cell and merge cell from the Alignment group on home
tab of the Ribbon contains.
First stage – College of Medicine – University of Mosul / Nineveh
Computer Science/
Assistant Lecturer: Zina Abdul Salam
EXCEL 2013
9
First stage – College of Medicine – University of Mosul / Nineveh
Computer Science/
Assistant Lecturer: Zina Abdul Salam
EXCEL 2013
11
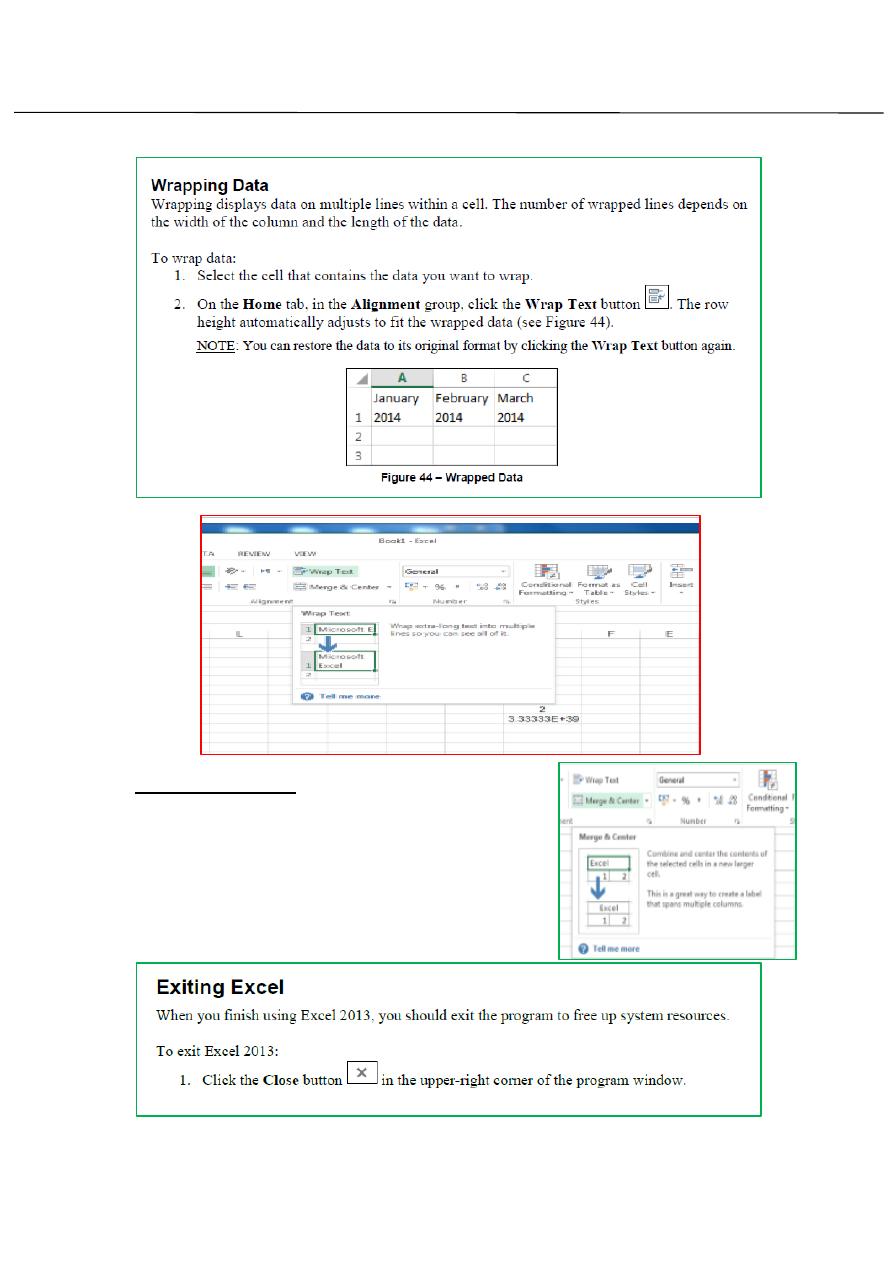
Merge and center:
Combine and center the content of the
selected cell in new larger cell.