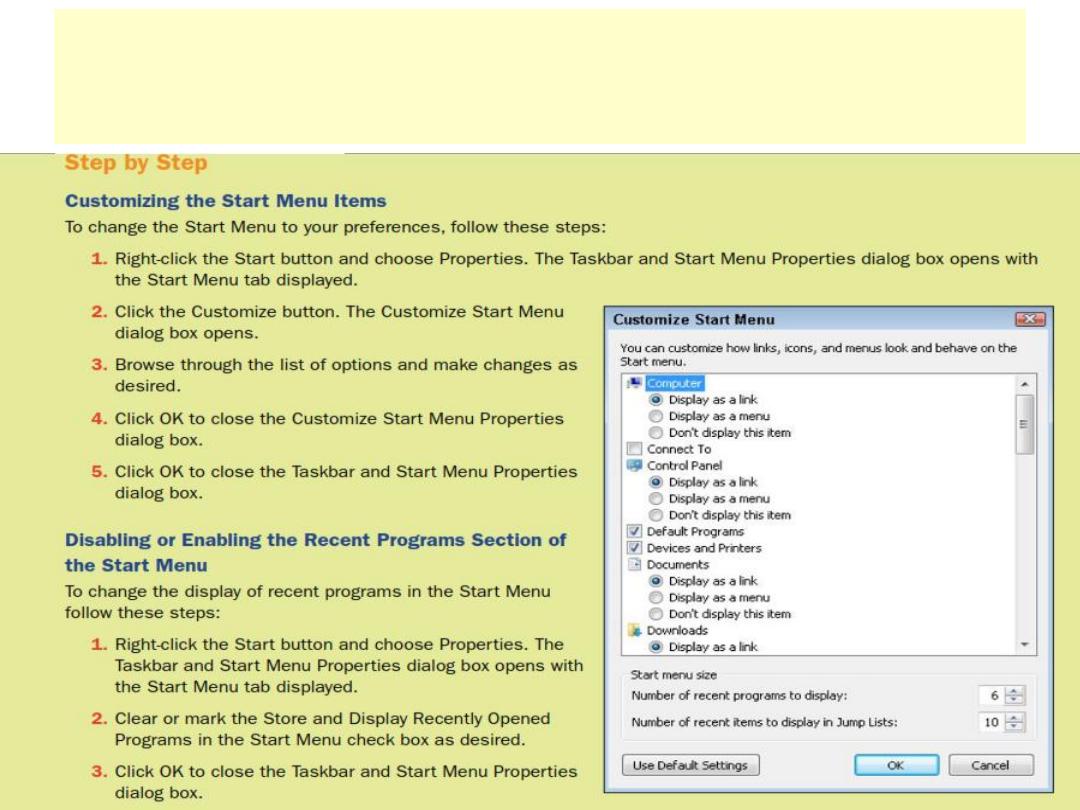
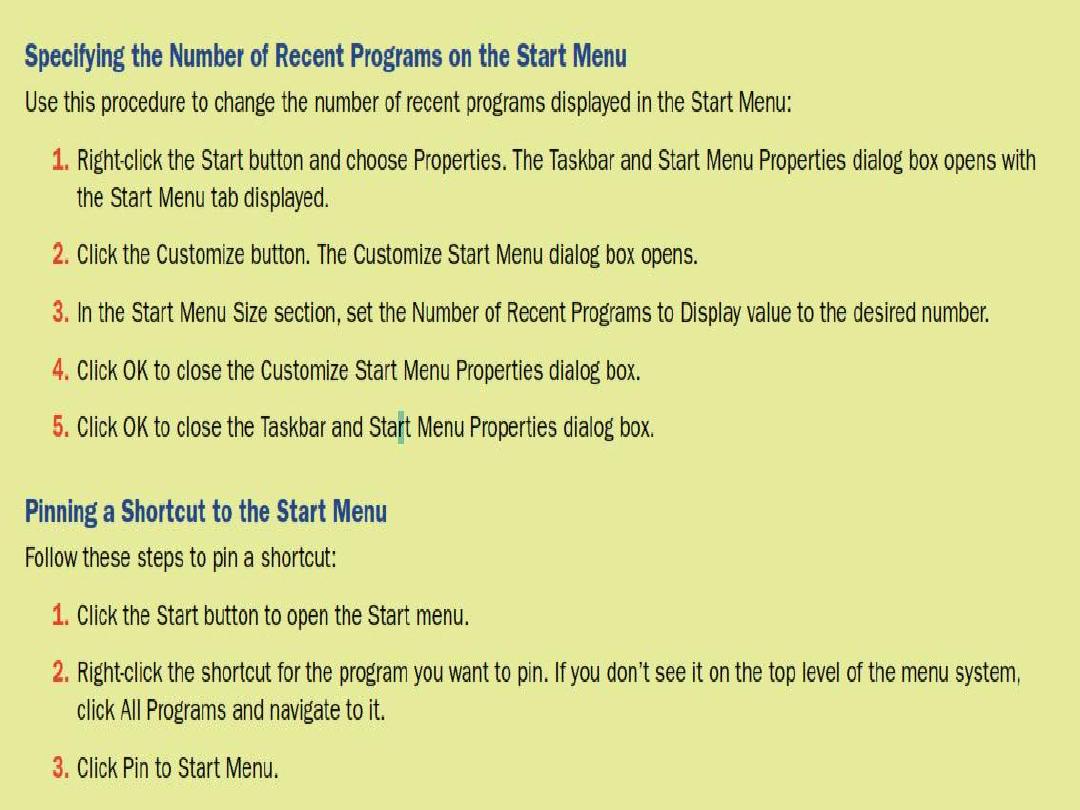
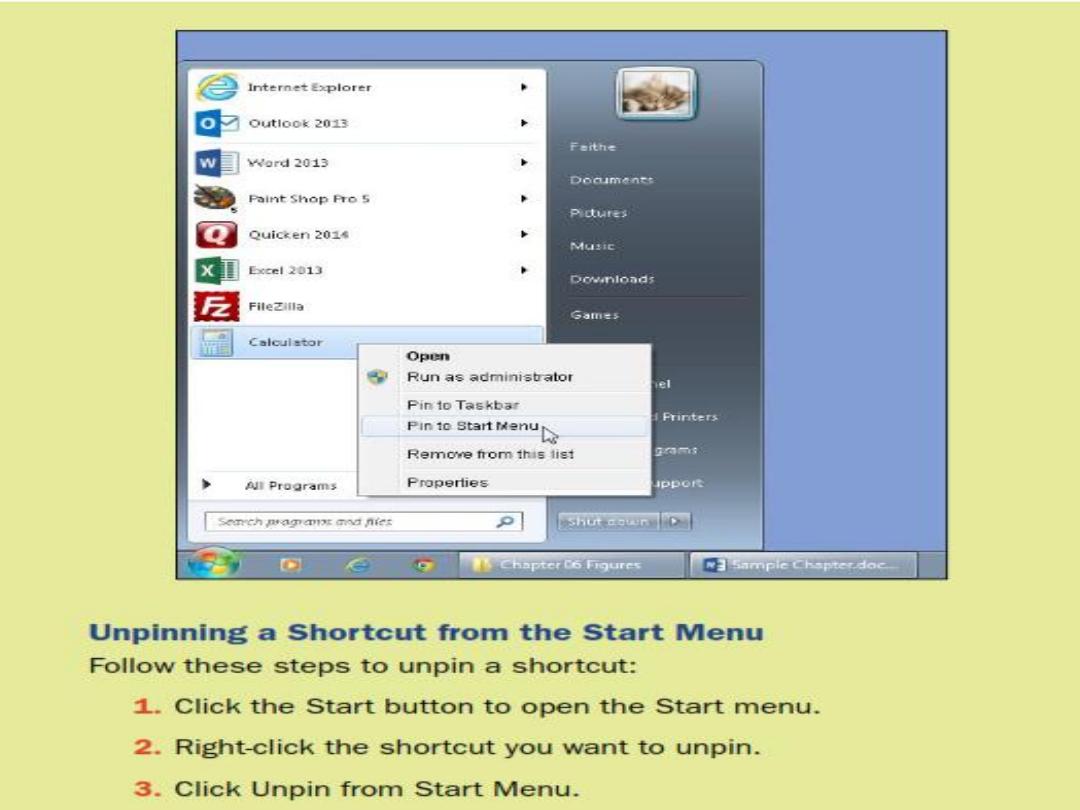
Customizing Windows 7
However, there may be some times when you want to make a
change to the way Windows operates. You might want to change a
system setting, such as adjusting the mouse pointer speed, or
customize the interface by changing the monitor resolution or the
background color.
Adjusting the Keyboard and
Mouse Settings
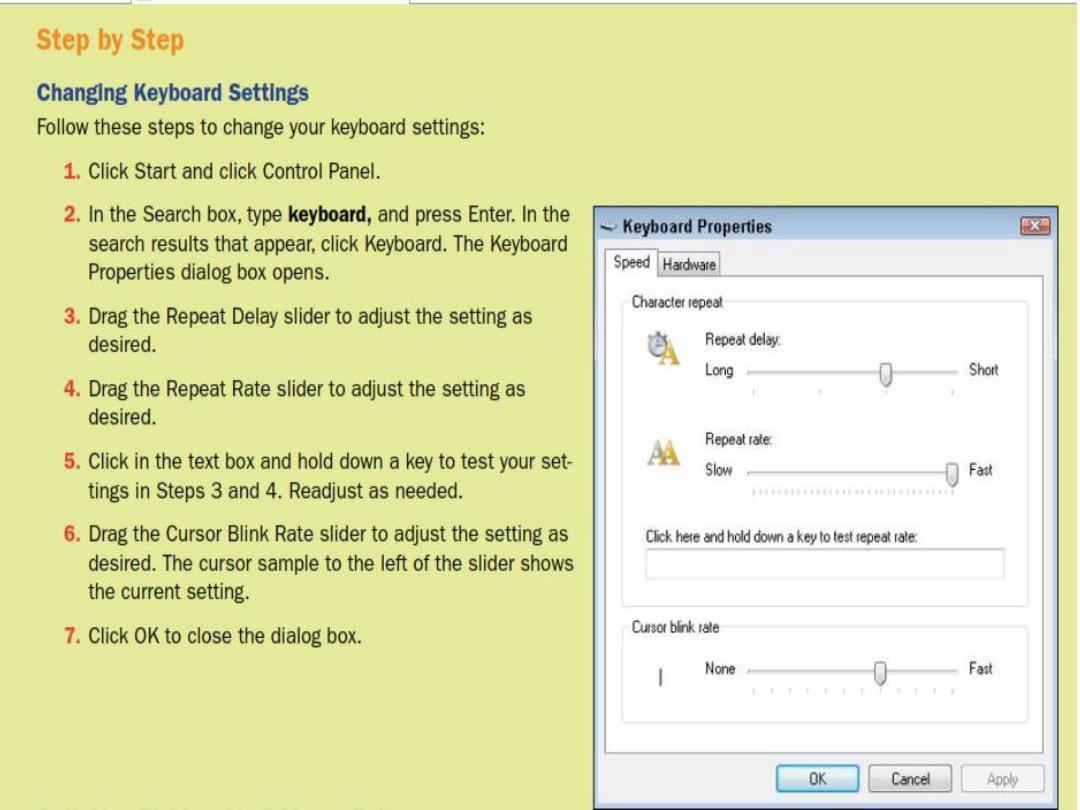
To customize the keyboard, open the Keyboard Properties dialog box from the
Control Panel. (The easiest way to find it is to type keyboard in the Search box
in the upper-right corner of the Control Panel window.) Some of the settings
you can change for the keyboard pertain to a feature called Repeat. When you
hold down a key, after a certain amount of time the character represented by
that key begins repeating on the screen rapidly. This feature enables you to
create a row of dotted lines by holding down the period key, for example. The
repeat delay setting determines how long Windows delays after you start
holding down the key before the character beings repeating. The repeat rate
determines how quickly the character repeats once it gets started doing so. You
can also adjust the cursor blink rate, which determines how fast the cursor
blinks.
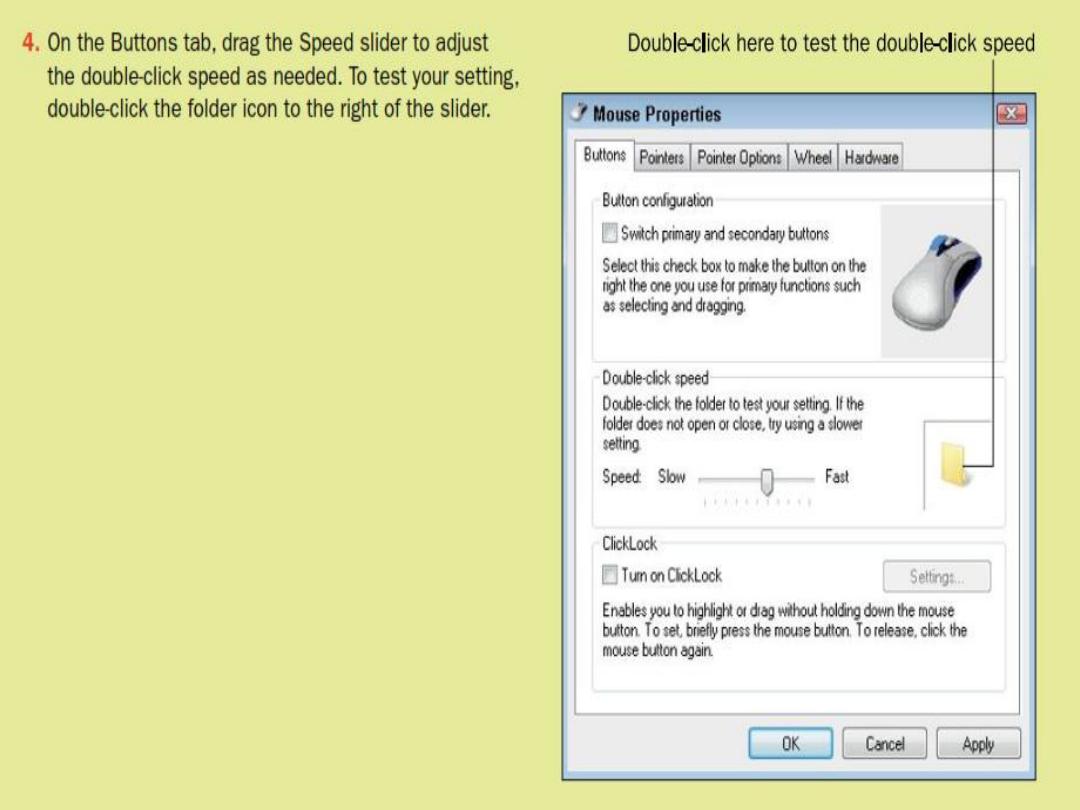
You can also make many adjustments in how the mouse operates. The
most commonly customized settings for a mouse are:
Button configuration: You can switch the functions of the right and
left mouse buttons.
Double-click speed: You can change the minimum threshold for how
quickly the two clicks need to be in succession to be considered a
double-click instead of two separate clicks.
Adjusting the Keyboard and
Mouse Settings

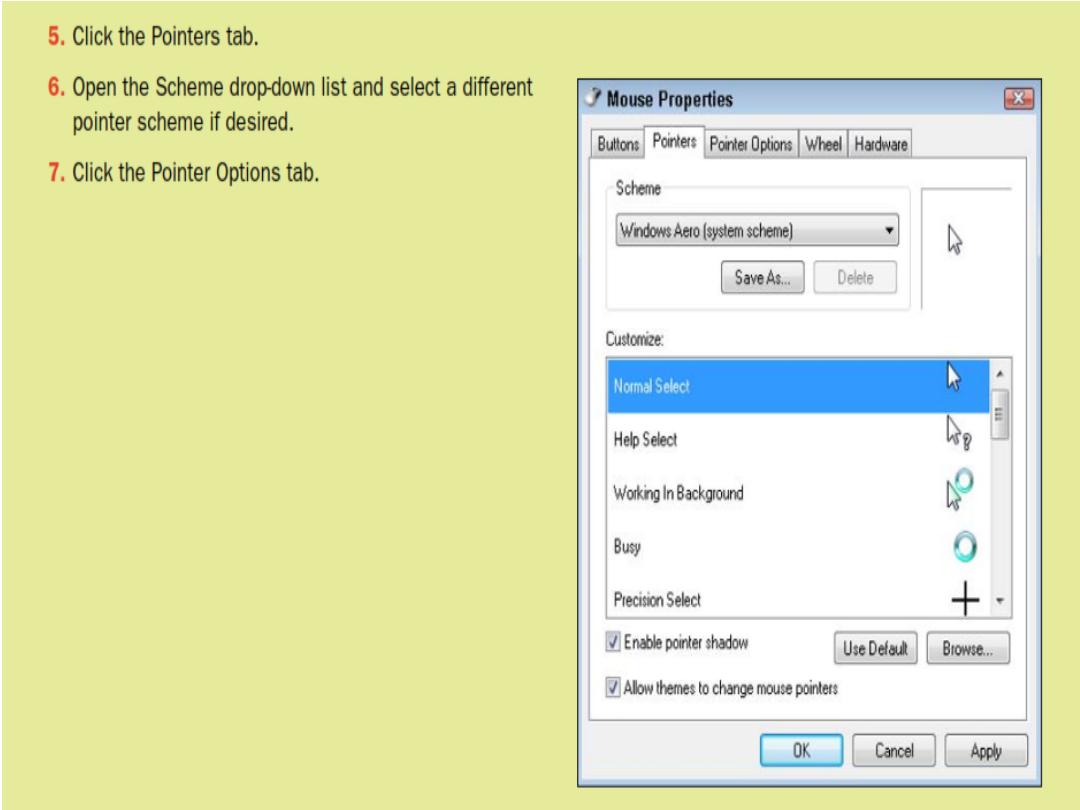
Pointers: The default mouse pointer scheme in Windows 7 uses a
small white arrow as the main pointer. It also defines graphics for
many other pointer situations too, such as the graphic to appear
while Windows is busy, when the pointer is over a clickable
hyperlink, and when the pointer is over the border of a resizable
window. You can choose a different scheme, or you can customize
each of the pointers individually.
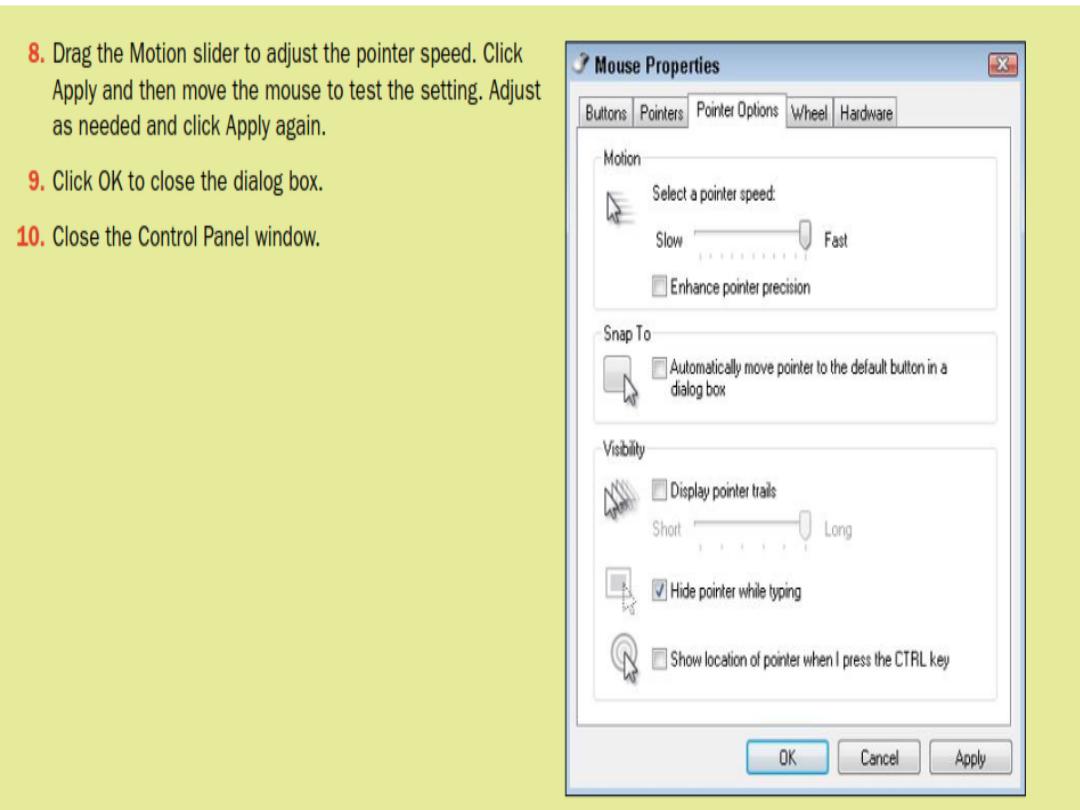
Motion: You can control how far the pointer onscreen moves in
relation to the amount of mouse movement. This setting is adjusted
on the Pointer Options tab.
Adjusting the Keyboard and
Mouse Settings


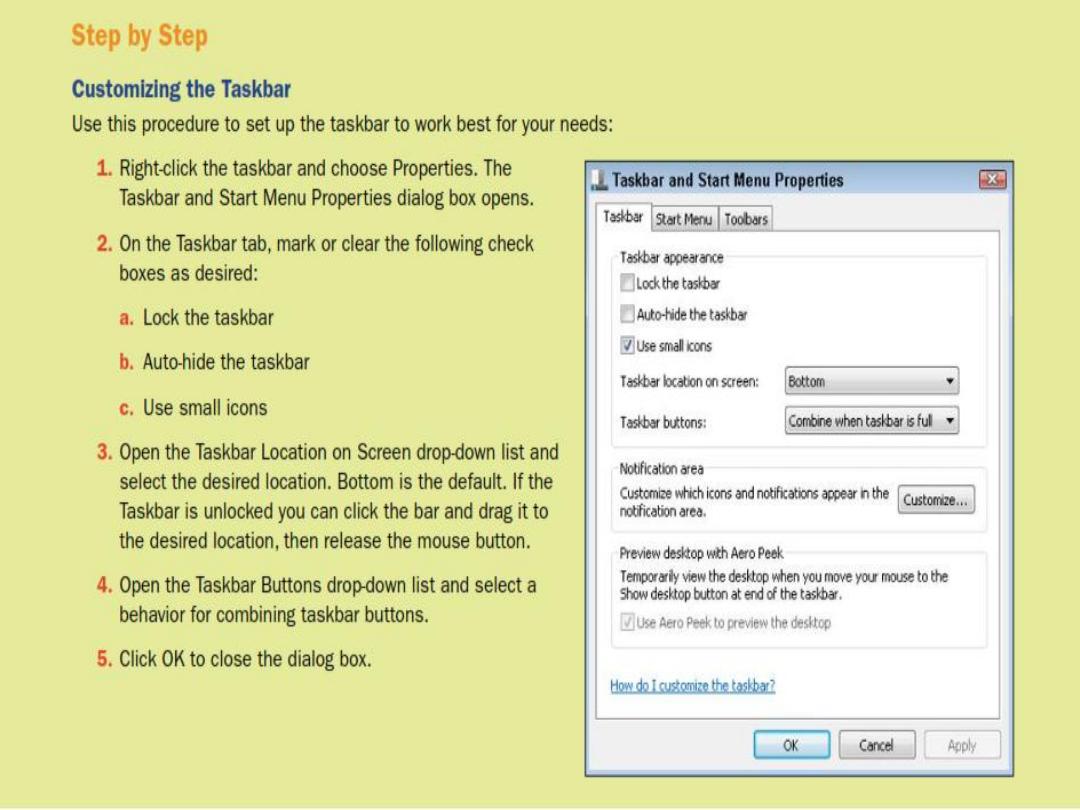
Customizing the Taskbar
Here are some ways you can customize the taskbar:
Lock Taskbar
: You can lock or unlock the taskbar. When
it’s locked, it
can’t be moved or resized and the toolbars on it can’t be resized.
Keeping it locked except when you want to make changes ensures that
there are no accidental changes made.
Auto-Hide Taskbar
: You can auto-hide the taskbar. When this option is
enabled, the taskbar disappears when you aren’t using it. To make it
reappear, move the mouse to the bottom of the screen and it pops into
place. Auto-hiding the taskbar provides a little more room for application
windows.
Icon Size
: You can choose an icon size (small or large) for the icons on
the taskbar. When the Use Small Icons option is enabled, the icons on
the taskbar are smaller than when the option is disabled. Smaller icons
take up less space, but the icons may be easier to see at the larger size.
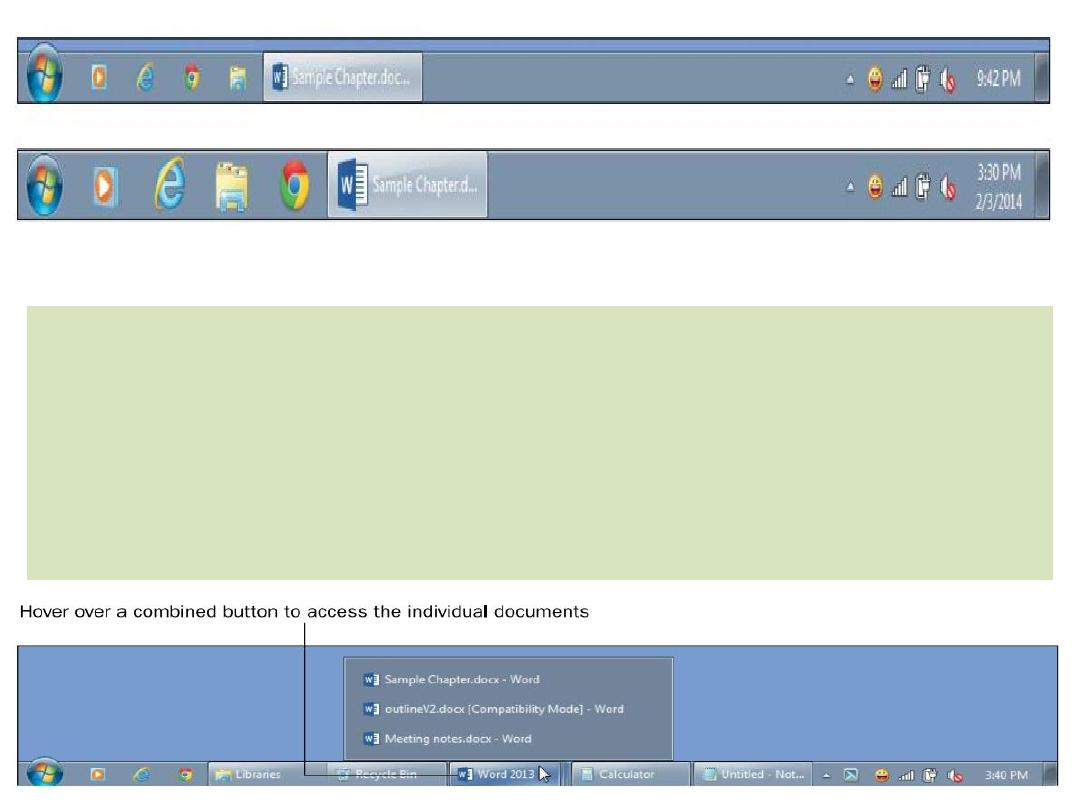
Small icons on the taskbar (above) versus large ones (below).
Taskbar Location
: You can change the taskbar location. By default, it is
at the bottom of the screen but you can move it to the top, left, or right.
Combine Buttons for the Same Application
: You can choose whether
or not to combine buttons for different items in the same application on
the taskbar. The default is to combine them only when the taskbar is full,
but you can choose to always or never combine.

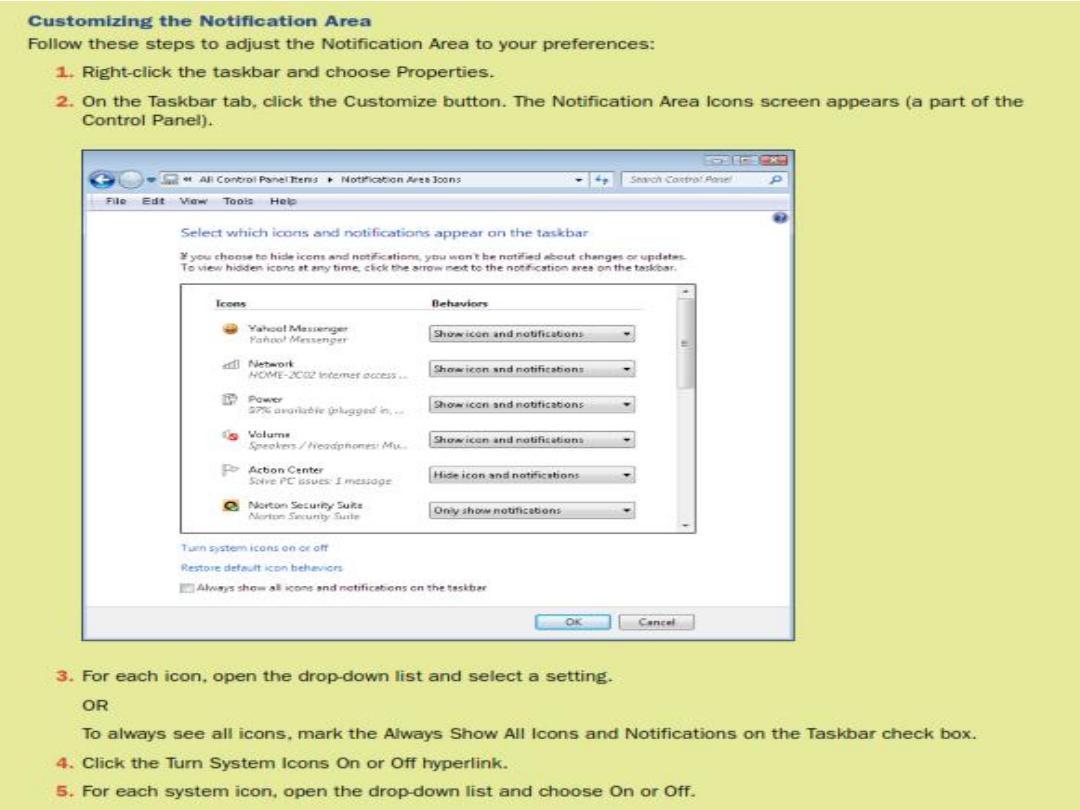
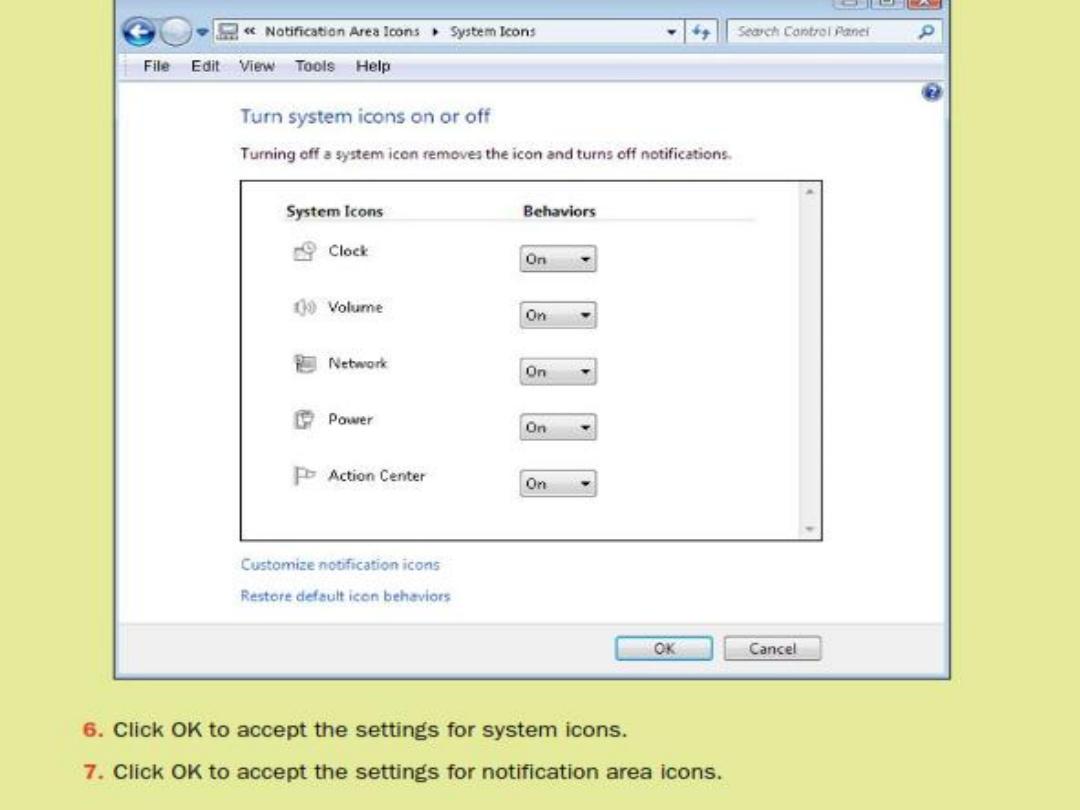
Choose Notification Area Icons
the notification area is the area
just to the left of the clock, where icons appear for programs that run
in the background.
-
Show icon and notifications
- Hide icon and notifications
- only show notifications
Customizing the Taskbar
Resize the Taskbar:
The taskbar is one row high by default. You can
make it thicker so that it can display more rows (useful if you have a
lot of windows open at once).
Pin and Unpin Items on the Taskbar:
The icons to the right of the
Start button are pinned to the taskbar. By default, Internet Explorer
and Windows Explorer are pinned there, but you might have other
programs pinned there, too. You can pin shortcuts there for quick
use, or unpin shortcuts for items you don’t use much.
Customizing the Taskbar
Customizing the Start Menu
Customizing the Start Menu
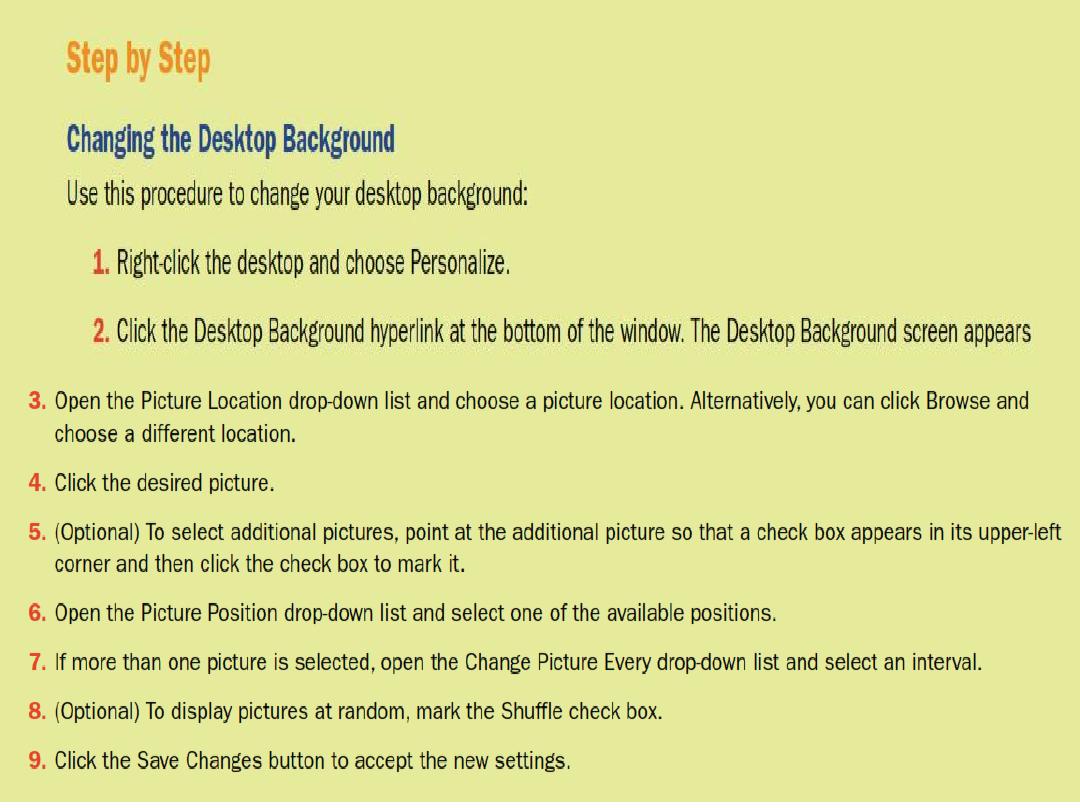
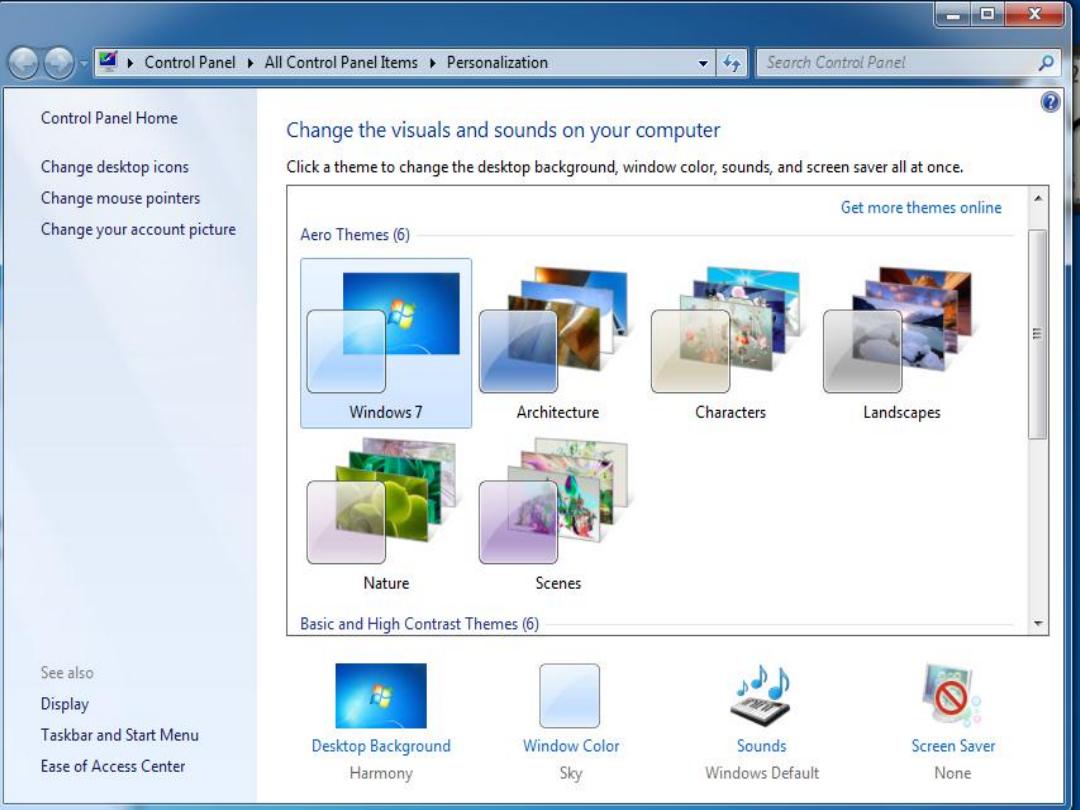
Personalizing the Desktop
You work with the desktop almost constantly when working in windows,
so you will probably want to adjust its appearance to be pleasing to you.
You can make several changes to the desktop. For example, you can
change the background image to your favorite photo, an abstract design,
or a solid color. You can also change the window color, the sounds that
Windows makes as it operates, and the screen saver. To access the
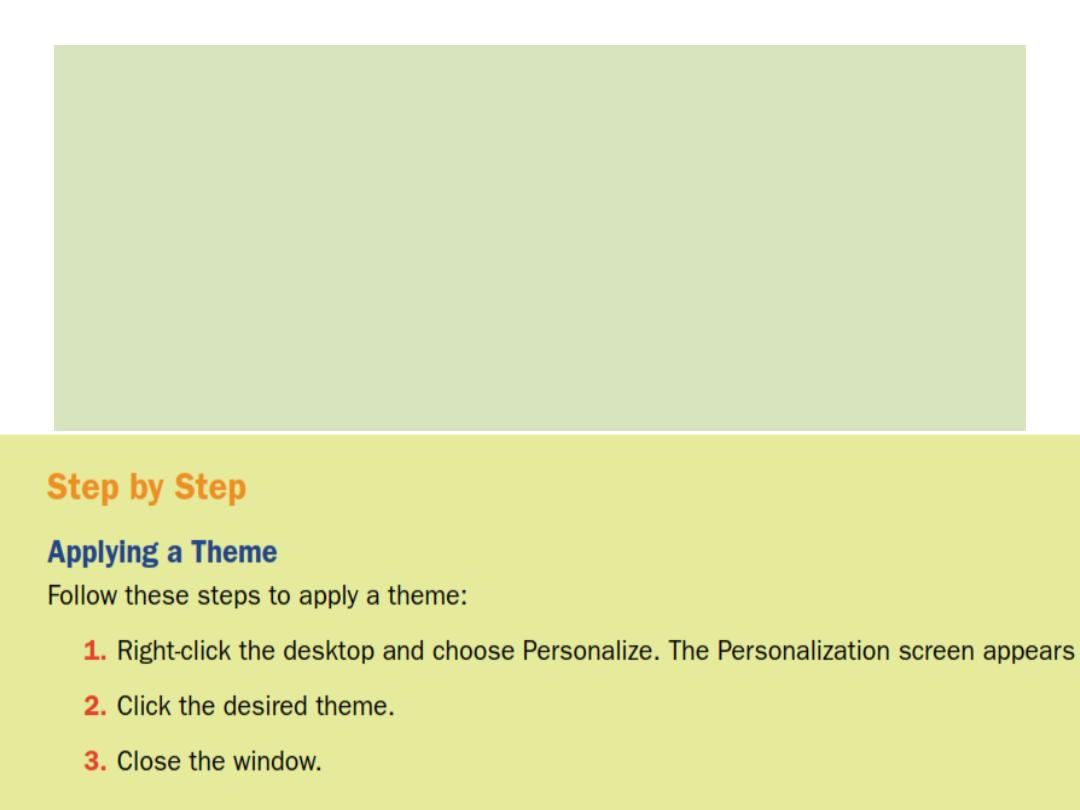
interface for changing the desktop right-click the desktop and choose
Personalize. The Personalization screen appears
• theme
A named set of formatting presets, governing font, color, and
object effect choices.
•
Aero theme
A theme that uses Aero features such as semi-
transparent window borders.
• high-contrast theme
A theme that uses starkly contrasting colors
for adjacent items, such as window borders and the Windows
desktop, to make them easier to see.
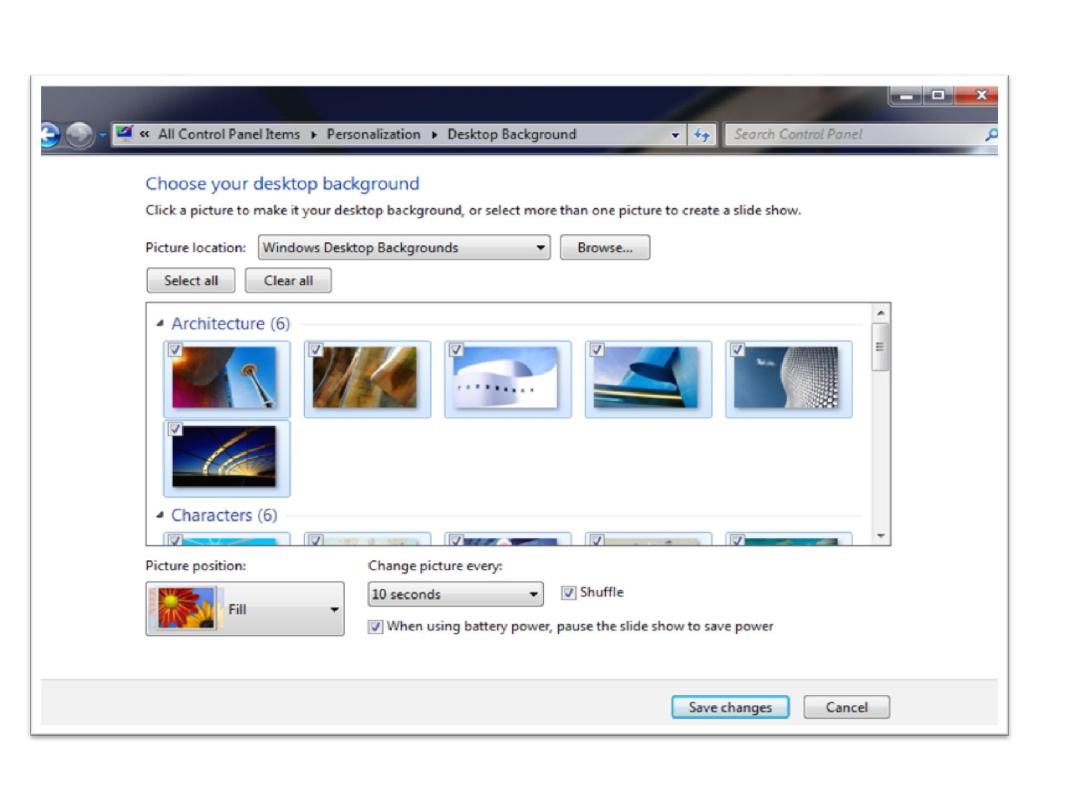
Selecting a Desktop Background
Windows 7 comes with many interesting and attractive
desktop background photos and abstract graphics. You can
choose any of those, or you can use your own photos.
Select the location to browse from the Picture Location drop-
down list in the Desktop Background window. If you select
only one desktop background,
that’s one that stays on all the
time. However, if you select multiple backgrounds, Windows
will cycle through them, changing the background at the
interval you specify. To choose multiple images, click to
place a mark in the check box in the upper-left corner of
each image you want. To show them in random order, mark
the Shuffle check box.
After selecting an image as the background, you must specify
how it will appear if it is not exactly the same size (that is, the
same resolution) as the current desktop resolution. Table 1
summarizes the choices available. Some of the choices involve
a background color behind the image. The default is black; if you
want a different color, click the Desktop Background hyperlink at
the bottom of the window to open a dialog box from which you
can choose some other color.
Selecting a Desktop Background