
51
Hyperlinks are those bits of underlined text or pictures that, when you click them, take you to a new place,
like another Web page. Most people never think of adding links to their Word documents, because they're
thinking of them as printed documents. However, if some of your readers may read your work onscreen,
consider adding hyperlinks
Word's hyperlinks are identical to the hyperlinks on Web sites. They even use the same programming
language (HTML). Hyperlinks you create in Word stay intact if you save the file in a format other than
Wordlike a PDF file or a Web page. And since other Office programs also use HTML, if you copy or cut the
text and paste it in another document in a program such as Excel or PowerPoint, the hyperlink will work just
fine in the new document.
Links aren't just for Web pages anymore. Word lets you make hyperlinks that go all sorts of places:
Locations in your document. If your document refers to another section, add a link so your readers
can jump right there instead of scrolling.
Other documents on your computer or network. If you're working with a group of people on an
office network, hyperlinks to related shared documents can be very effective. When you click the
link to a shared document, Word opens that document even if it's not on your computer, as long as
you have permission to open it.
Documents on the Web. Whatever topic you're writing about, you can find related Web pages,
photos, maps, news items, and blogs on the Internet. If you can find them, you can create hyperlinks
for your readers.
To create a hyperlink to any of the above places, the steps are almost the same. You select the text you want
to turn into a hyperlink, and then, in the Insert Hyperlink box, you tell Word what to link it to:
1. Select the text for the link.
Choose text that gives your readers a good clue to where the link goes. Two or three words is usually
enough to catch your readers' attention.
2. Go to Insert →Links →Hyperlink to open the Insert Hyperlink dialog box.
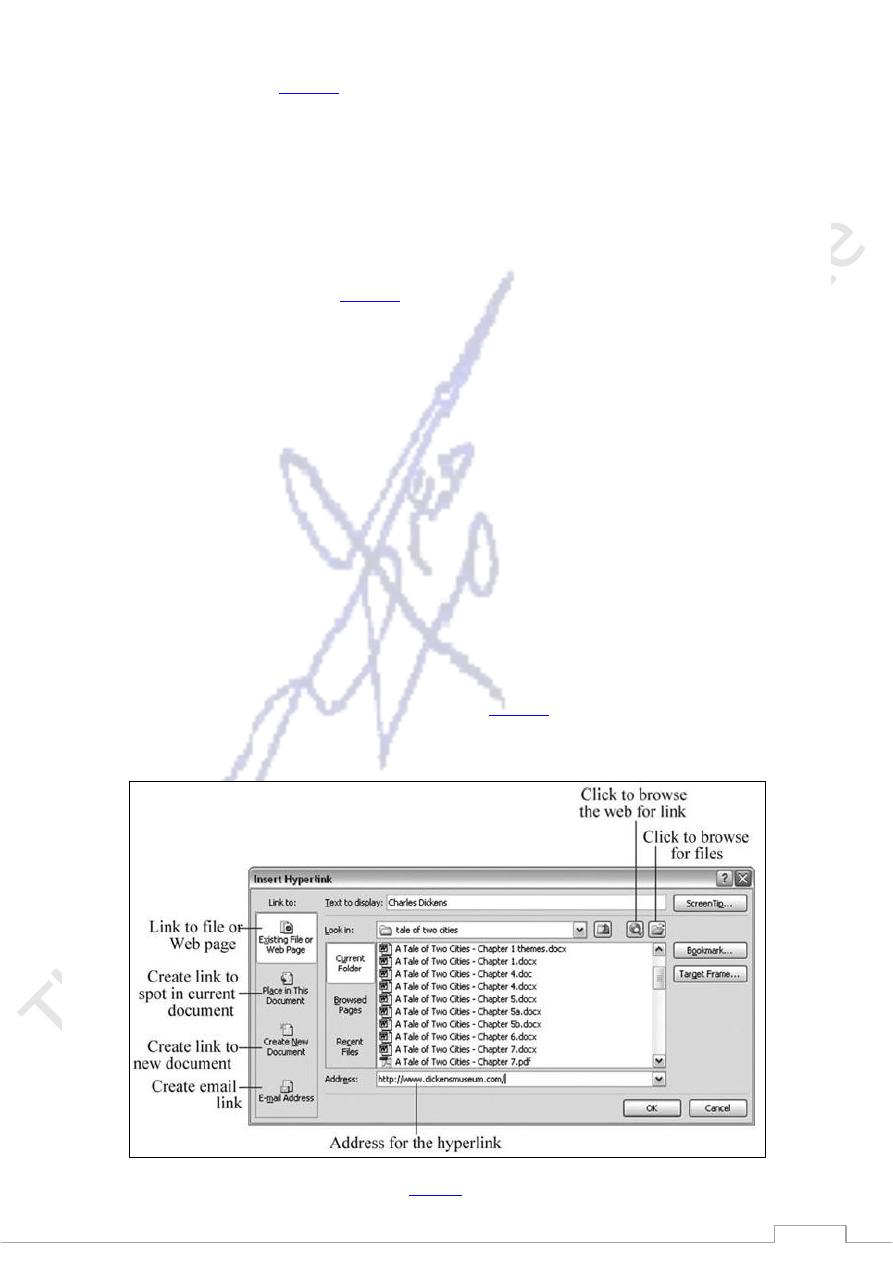
51
The Insert Hyperlink box looks much like a standard Windows Open file box, but there are some
significant differences (
Figure 2
). In fact, the box is something of a chameleon and changes when
you click the buttons on the left side.
3. On the left, in the "Link to" box, choose the type of link you want to create.
You have several options:
o
Existing File or Web Page is the button to click if you want to link to another Word document
on your own computer or network, or if you want to link to a Web page. Just to the right of
the "Look in" drop-down menu, click the folder icon to browse your computer or network for
documents (as shown in
Figure 2
). Double-click the document you want to link to. The Insert
Hyperlink box closes, and Word creates the link.
To link to a Web page, click the Internet icon in the upper-right corner (it looks like a globe
under a magnifying glass) to open your Web browser and go to the Web page you wish to
link to. After you've found the page in your browser, go back to the Insert Hyperlink box and
once again click the Existing File or Web Page button. Word adds the address in your Web
browser to the Address box. (It begins with http://, as do all good Web addresses.) Click OK
to close the box and create the hyperlink.
o
Click Place in this Document if you're creating a link to help readers jump around in a long
document. Within a document, Word can create links to either headings or bookmarks, and
shows you a list of your choices. (If you don't have anything for Word to attach the link to,
click Cancel to close the dialog box and create a bookmark, as described in the next section.)
o
Create New Document lets you create a hyperlink to a document you haven't even started yet.
When you click Create New Document, the Insert Hyperlink box changes. Type the name of
the new document you want to create in the "Name of new document" text box, and then
click OK. Word creates and saves your new document on the spot. You can go back and add
text to it later.
o
Email Address creates a mailto hyperlink in your document. When you choose this option,
the Edit Hyperlink box changes, as shown in
Figure 2
, so you can type the email address you
want to link to. It's also helpful (but not necessary) to provide a Subject for the email. Click
OK to close the box and create the link.
Figure 2
52
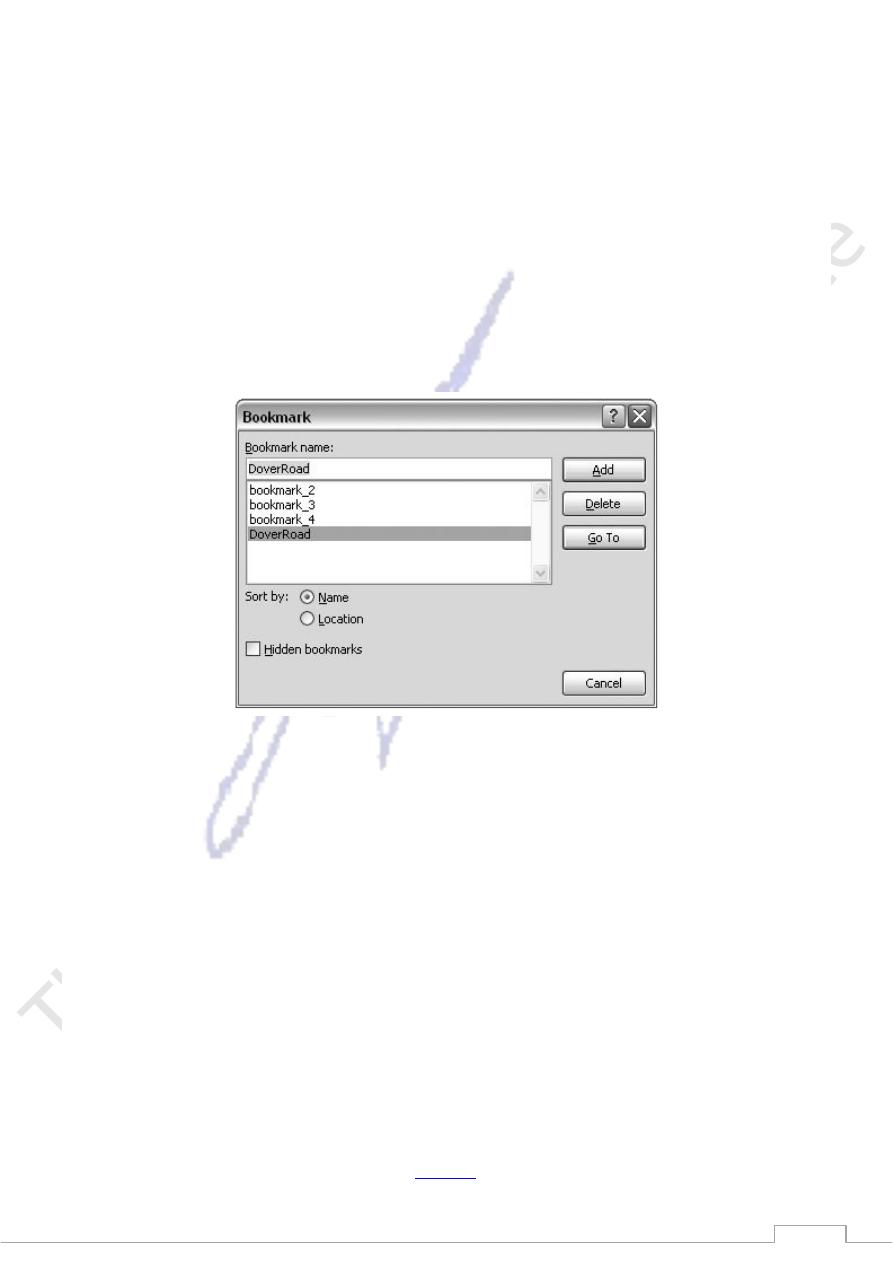
Inserting Bookmarks
Bookmarks, which mark a spot in your document, may seem like a somewhat mild-mannered Word tool, but
more power is hidden under their Clark Kent exterior than you may expect. Bookmarks come in handy in
long documents because so many other features depend on them:
Browsing by bookmark. You give each bookmark a name when you create it, and you see those
names listed in the Go To dialog box (Home →Editing →Go To). You can then use these bookmarks
to hop from place to place in your document.
Indexing. Because bookmarks are based on selected text, you can create a bookmark that includes
several pages. In this way, you can use bookmarks to create page ranges for building indexes, as
described earlier in this chapter.
Hyperlinks. When you create a hyperlink to a specific point in your document, Word needs
something to anchor the link to. That can be a heading or a bookmark that you've created at any point
in the text.
Creating Tables
If you've never created a table in a Word document before, don't worryit's remarkably easy and even fun,
especially if you use the drawing-with-the-mouse method.
You can create tables by:
Pointing at and clicking a mini table map. Chose Insert →Table and click the grid that appears to
size and create a table.
Filling in numbers and clicking button in a dialog box. Choose Insert →Table →Insert Table to open
the Insert Table dialog box.
Drawing your table on the page with your mouse. Choose Insert →Table →Draw Table to turn your
cursor into a table-drawing tool.
Creating a Table from the Ribbon
As always, the ribbon approach to the job is very visual, and it may seem vaguely familiar. It's a
variation on the way you'd create tables in the last few versions of Word, where you'd click a button
and drag out a grid that represented the table. Word's new method is even a little easier for
newcomers to grasp. The drop-down menu presents a 10 x 8 grid. You click to select the number of
boxes you want in your table, as shown in
Figure 5
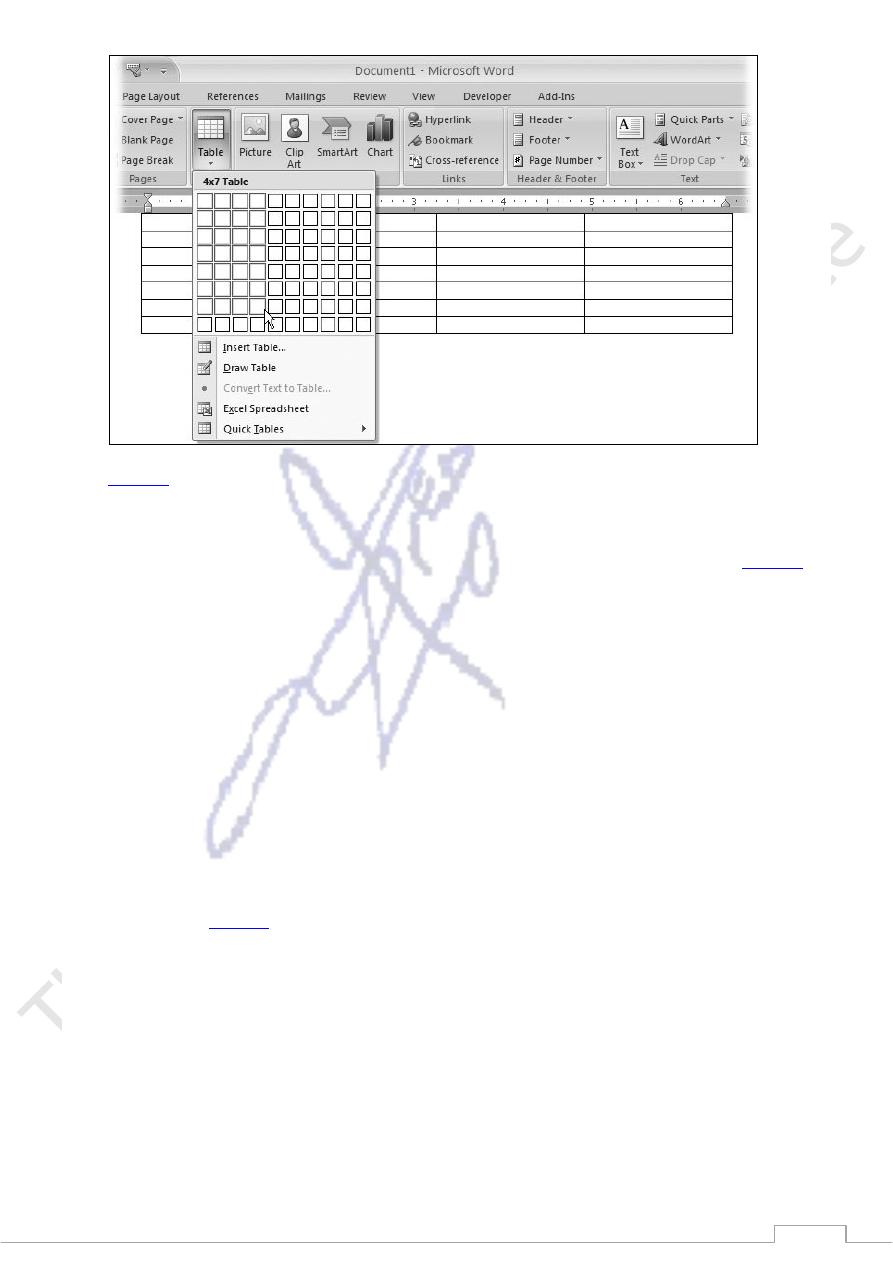
53
Figure 5
1. On the ribbon, choose Insert →Tables →Table.
A menu appears with what looks sort of like a bunch of boxes or a piece of graph paper
Figure 5
2. Point to a box on the grid to create a table with the number of rows and columns you want.
As you move your mouse over the grid, the boxes in the grid are highlighted, and you see the table
appear on your page. (Tables use Microsoft's Live Preview feature that shows you what will happen
if you click the mouse button.) A message above the grid on the menu keeps tally of the number of
columns and rows. You don't have to be exact; it's easy enough to create or delete columns and rows
later.
3. Click the grid to create the table and place it in your document for real.
Using the Insert Table Box
The Insert Table dialog box is a more traditionaland boringway to create a table. Choose Alt+N, TI to open
the Insert Table box (
Figure 6
). The box is a simple affair. Just type numbers in the text boxes at the top for
the columns and rows you need in your table. This dialog box also lets you choose the AutoFit behavior, as
explained below:
Fixed column width. Use this option if you want to limit columns to a specific width. Enter a number
in the box next to this option to set the width of the columns. Or, if you choose Auto instead, Word
creates a table that fits in your current margins, with the number of columns specified above, each of
equal width.
AutoFit to contents. With this option, the column width adjusts automatically to accommodate the
amount of text you type in the cells. Use this option if you're not sure how much space your text will
take up until you type it.
AutoFit to window. This option is more suited to Web pages than printed documents. It makes the
table expand and contract to fit a browser window. Web pages are designed to work on all different
types of computers, PDAs, cell phones, TV sets, and who-knows-what in the future. AutoFit tables
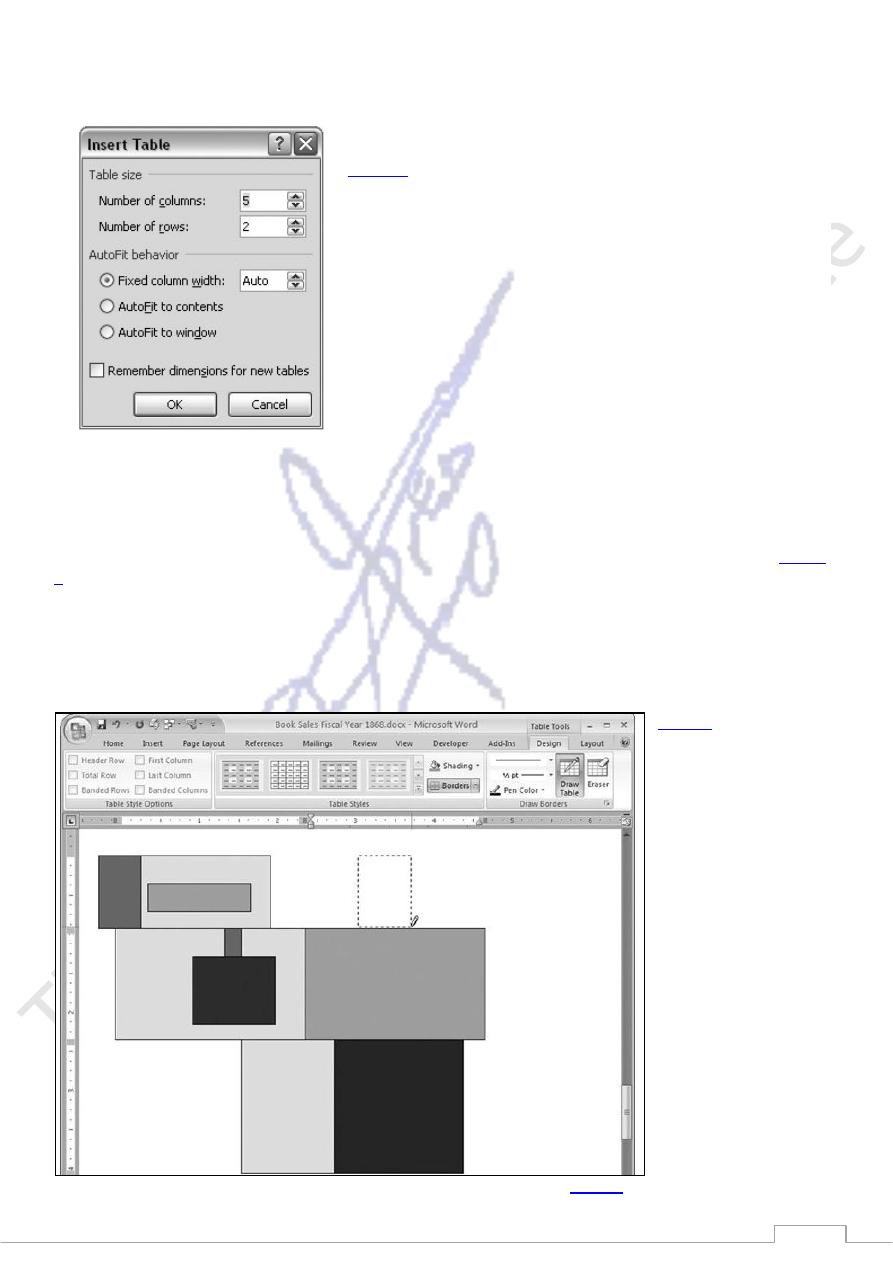
54
like these help Web designers create pages that work for screens and browsers with dramatically
different capabilities.
(
Figure 6
).
Drawing a Table
As you can guess, the least mechanical and most creative way to make a table is to draw your own. It's a
great technique if you need an irregularly shaped table. With Word's table tools you can draw tables, and
divide them into columns and rows in just about any configuration imaginable. As you can see from
Figure
7
, you can do just about anything except make a curve.
Here's how to use the table drawing tools to draw a fairly traditional table:
1. Choose Insert →Tables →Table →Draw Table.
Your mouse cursor changes into a pencil, inviting you to start drawing.
Figure 7
On an empty place on the page, drag diagonally to draw your first rectangle (
Figure 8
).
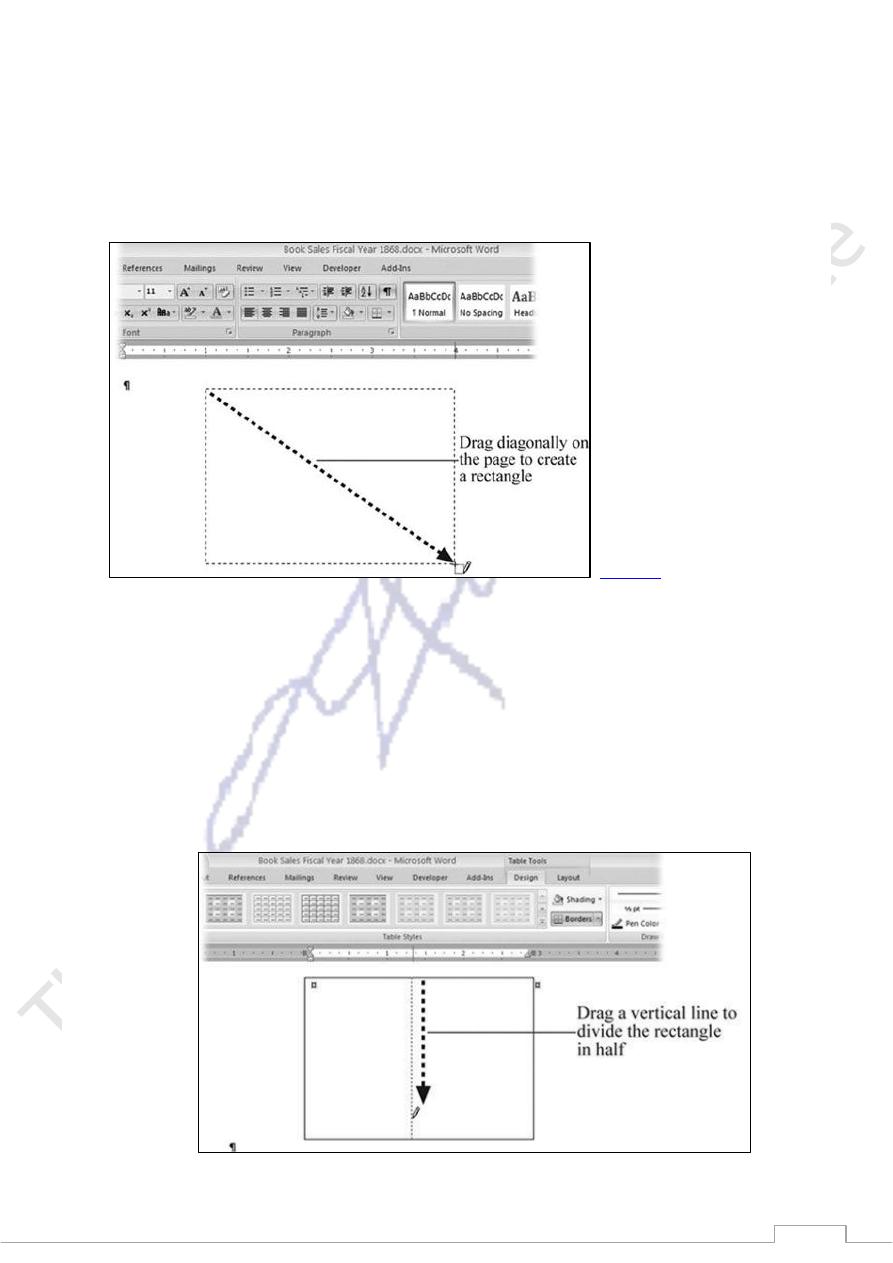
55
The rectangle that appears on your page marks the borders for your table. Soon you'll divvy it up,
creating columns and rows inside. Word adds paragraphs, adjusts margins, and generally does
whatever's necessary to place your table exactly where you draw it.
The moment you release the mouse button, the Table Tools contextual tab appears on the right side
of the ribbon. Two tabs appear in this contextual tab: Design and Layout. You're now on the Design
tab, where you see tools for formatting your table. On the right side, the Draw Table button is
highlighted, indicating that you're in Draw Table mode.
(
Figure 8
).
3.Next, drag to draw a vertical line to divide your table in half.
Your line separates the table into two cells. You can draw lines wherever you want to divide your
table into cells of just about any shape. When you drag diagonally, you create rectangles instead of
lines. Rectangles turn into cells, or if they're far enough from the original table, they're new tables.
Experiment to get a feeling for creating tables and cells. If you make an error, undo it with Ctrl+Z.
Next to the Draw Table button you find an Eraser button (Table Tools | Design →Draw Borders
→Eraser. If you click the button to highlight the eraser, then your mouse cursor changes to an eraser
icon. Dragging it over lines in your table erases them.
4. Draw a horizontal line on the left half of your table.

56
When you draw the horizontal line, you divide one of the cells into two cells, creating a new row.
You can draw the line to the vertical divider or you can continue onto the right side of the table. This
horizontal line creates two rows in your table.
You can continue to divvy up your table into additional cells.
5. When you're done, click the Draw Table button (on the right side of the ribbon), to turn off the Draw
Table mode.
10.7. Doing Math in Tables
When presenting numbers in your document, whether it's a budget, or sales figures, or an inventory tally,
you probably want to total some of the columns. Sure, you could add up the numbers on a calculator, and
then type the totals into the cells. That's fine if you know the figures aren't going to change, and you're
certain you won't transpose any figures between your calculator and the table. A better (though, admittedly,
not necessarily easier) way is to insert one of Word's fields with instructions to sum the column above. Use
the Formula button (
Figure 9
) on the Layout tab to insert the field into your table.
(
Figure 9
)
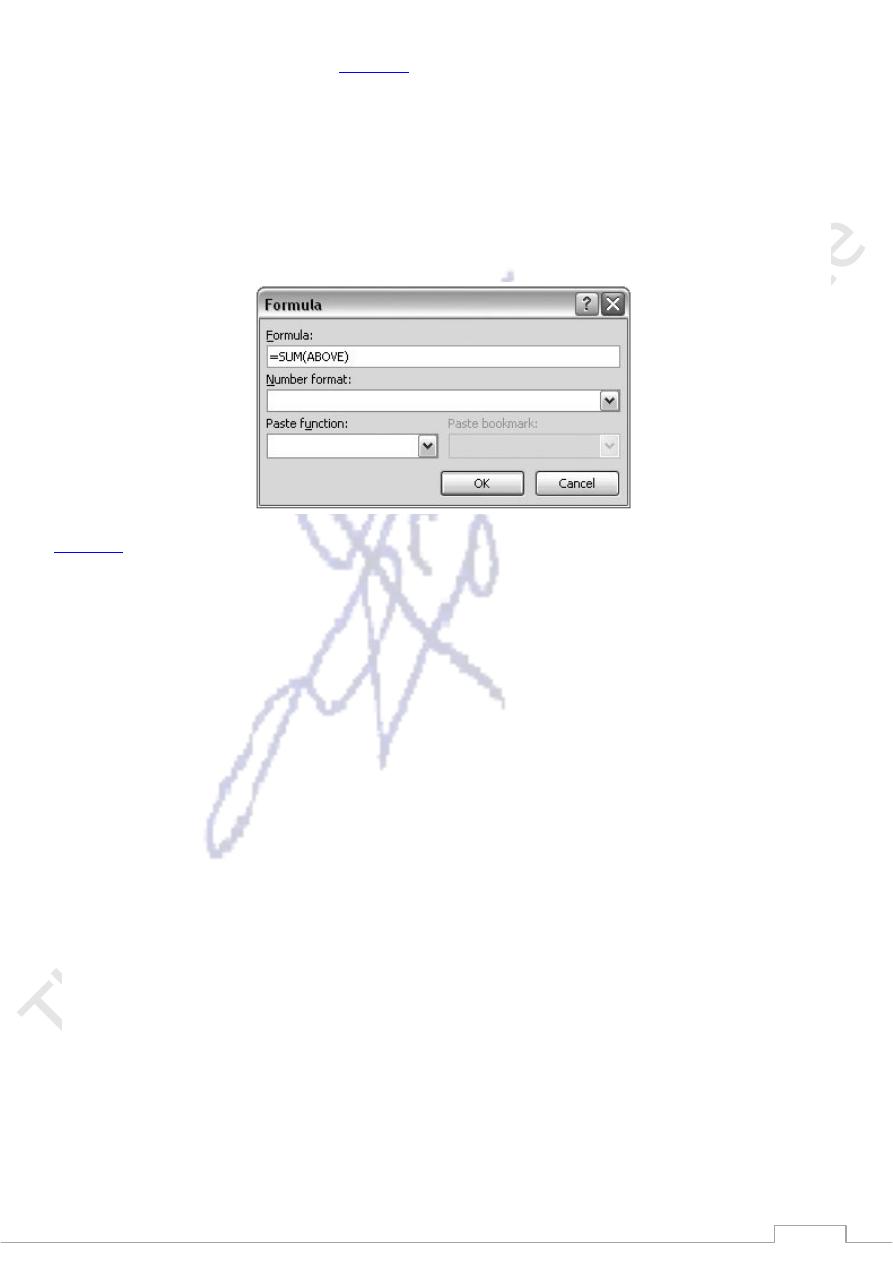
1. Click to place the insertion point in the bottom cell of a column with numbers, and then go to Table
Tools | Layout →Data →Formula.
57
The Formula dialog box opens (
Figure 10
). Word makes some assumptions based on the fact that the
insertion point is at the bottom of a column of numbers. For example, the Formula box is preloaded
with a formula designed to total the column of numbers. It's almost as readable as plain English:
=SUM(ABOVE). If your insertion point had been at the end of a row of numbers, the formula would
have read: =SUM(LEFT).
2. In the Formula box, check to make sure the formula does what you want, and then click OK.
Word inserts the field code in the cell, and then it runs the calculationin this case, a sum, which then
shows up in the cell.
Figure 10
).
It's not unusual to have several columns that you want to total. If that's the case, you can select the cell with
the SUM field, and then press Ctrl+C to copy it. Then move the insertion point to the next cell, and then
press Ctrl+V to paste it.