

List of Contents
دكتورة وفاء
Lab 1 – Blood Typing
Lab 2 – Bleeding Time
Lab 3 – Blood clotting tests
Lab 4 – RBC Count
Lab 5 – WBC Count
Lab 6 – Hemoglobin
Lab 7 – ESR (Erythrocyte Sedimentation Rate)
Lab 8 – Measurement of Hormone Concentration in the Blood
دكتور حيدر
Lab 9 – Arterial Pulse
Lab 10 – Body Temperature
Lab 11 – Electrical Potential of the Heart
Lab 12 – Exercise ESG Test
دكتور طالب
Lab 31 – Examination of Cranial nerves
(Except II, III, IV, and VI)
دكتور احمد الشيباني
Lab 34 – Ocular Physiology
Lab 35 – Color Vision
Lab 36 – Cardiopulmonary resuscitation (CPR)
Lab 37 – Reflexes
دكتور صباح
Lab 38 – Osmosis
Lab 39 – Semen


1
Blood typing
Blood typing is a method to tell what specific type of blood
you have. What type you have depends on whether or not
there are certain proteins, called antigens, on your RBCs.
Blood is often grouped according to the ABO blood typing
system. This method breaks blood types down into four
categories: A, B, AB & O.
Your blood type (or blood group) depends on the types that
are been passed down to you from your parents.
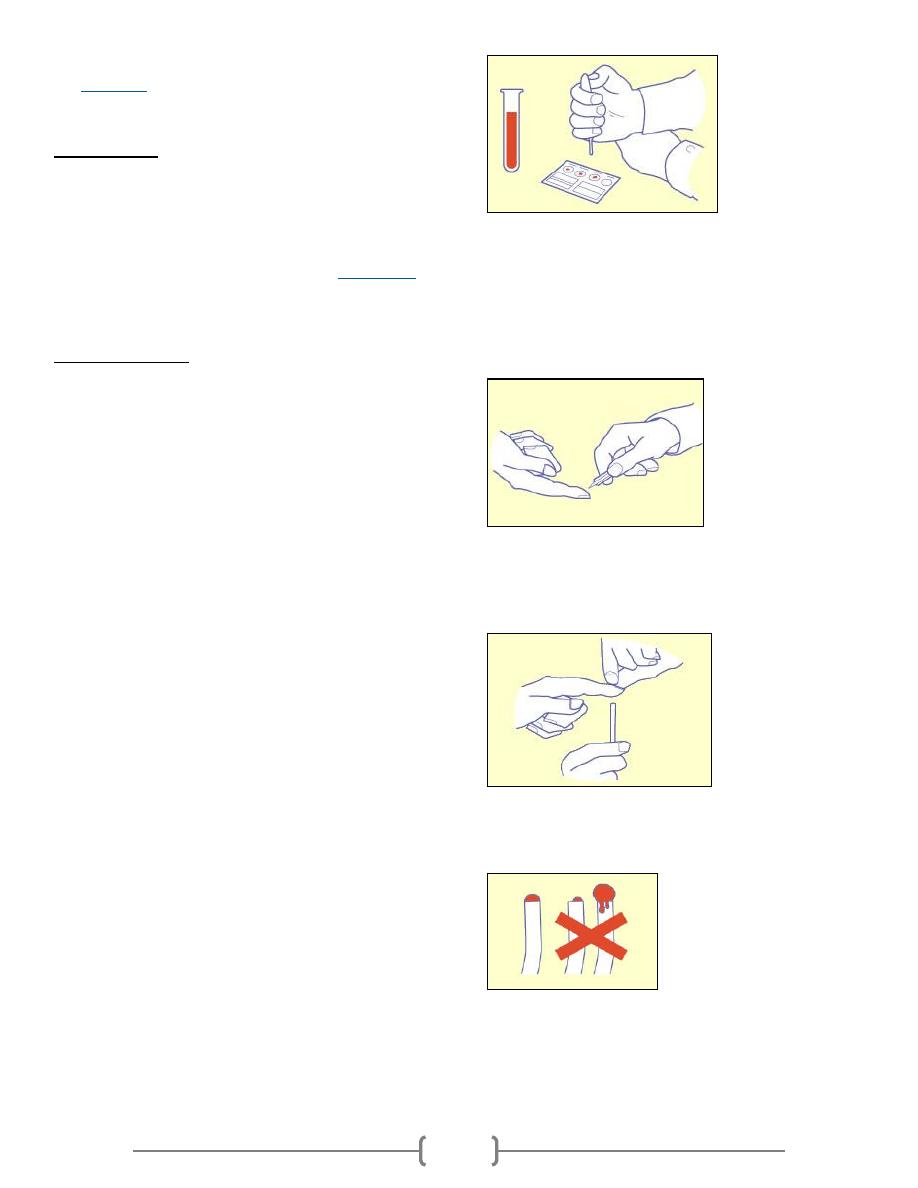
How the Test is performed
Blood is drawn from a vein, usually from the inside of the
elbow or the back of the hand. The puncture site is cleaned
with a germ-killing product. An elastic band is placed around
the upper arm to apply pressure, which causes the vein to
swell with blood.
A needle is inserted into the vein, and the blood is collected
into a tube. During the procedure, the elastic band is removed
to restore circulation. Once the blood has been collected, the
needle is removed, and a band-aid or gauze is applied.
In infants or young children, the area is cleansed with
antiseptic and punctured with a sharp needle or a lancet. The
blood may be collected in a pipette (small glass tube), on a
slide, onto a test strip, or into a small container. A bandage
may be applied if there is any bleeding.
The test to determine your blood group is called ABO typing.
Your blood sample is mixed with antibodies against type A
and B blood, and the sample is checked to see whether or not
the blood cells stick together (agglutinate). If blood cells stick
together, it means the blood reacted with one of the antibodies.
The second step is called back typing. The liquid part of your
blood without cells (serum) is mixed with blood that is known
to be type A and type B. Persons with type A blood have anti-
B antibodies, and those with type B blood have anti-A
antibodies. Type O blood contains both types of antibodies.
These two steps can accurately determine your blood type.
Blood typing is also done to tell whether or not you have a
substance called Rh factor on the surface of your red blood
cells. If you have this substance, you are considered Rh+
(positive). Those without it are considered Rh- (negative). Rh
typing uses a method similar to ABO typing.
How to Prepare for the Test
No special preparation is necessary for this test.
How the Test Will Feel
Some people have discomfort when the needle is inserted.
Others may only feel a tiny prick or stinging sensation.
Afterward, there may be some throbbing or a bruise may
develop.
Why the Test is performed
This test is done to determine a person's blood type. Health
care providers need to know your blood type when you get a
blood transfusion or transplant, because not all blood types are
compatible with each other. For example:
If you have type A blood, you can only receive types A
and O blood.
If you have type B blood, you can only receive types B
and O blood.
If you have type AB blood, you can receive types A, B,
AB, and O blood.
If you have type O blood, you can only receive type O
blood.
Type O blood can be given to anyone with any blood type.
That is why people with type O blood are called universal
blood donors.
Blood typing is especially important during pregnancy. If the
mother is found to be Rh-, the father should also be tested. If
the father has Rh+ blood, the mother needs to receive a
treatment to help prevent the development of substances that
may harm the unborn baby. See:
Rh incompatibility
If you are Rh+, you can receive Rh+ or Rh- blood. If you are
Rh-, you can only receive Rh- blood.
Normal Results
ABO typing:
If your blood cells stick together when mixed with:
Anti-A serum, you have type A blood
Anti-B serum, you have type B blood
Both anti-A and anti-B serums, you have type AB blood
If your blood cells do not stick together when anti-A and anti-
B are added, you have type O blood.
Back typing:
If the blood clumps together only when B cells are added
to your sample, you have type A blood.
If the blood clumps together only when A cells are added
to your sample, you have type B blood.
If the blood clumps together when either types of cells are
added to your sample, you have type O blood.
Lack of blood cells sticking together when your sample is
mixed with both types of blood indicates you have type AB
blood.
RH typing:
If your blood cells stick together when mixed with anti-
Rh serum, you have type Rh-positive blood.
If your blood does not clot when mixed with anti-Rh
serum, you have type Rh-negative blood.
Risks
Risks associated with taking blood may include:
Fainting or feeling light-headed
Multiple punctures to locate veins
2
Excessive bleeding
Hematoma
(blood accumulating under the skin)
Infection (a slight risk any time the skin is broken)
Considerations
There are many antigens besides the major ones (A, B, and
Rh). Many minor ones are not routinely detected during blood
typing. If they are not detected, you may still have a reaction
when receiving certain types of blood, even if the A, B, and
Rh antigens are matched.
A process called cross-matching followed by a
Coombs' test
can help detect these minor antigens and is routinely done
prior to transfusions, except in emergency situations.
Alternative Names
Cross matching; Rh typing; ABO blood typing
Eldoncard in home blood type test - step by
step procedure
This fast, easy to use blood typing kit contains everything
required to determine blood group and Rh factor using a
whole blood sample obtained from a finger prick without the
need for separate reagents or laboratory training. The
EldonCard is a patented test card device that comes specially
treated and impregnated with dried antibody sera Anti-A,
Anti-B and Anti-Rh used universally for determining Blood
type by the forward typing method. Creates a Permanent
Blood Type Record Card for medical histories and
emergencies.
1) Wash your hands before carrying out the test and again after
carrying out the test.
2) Open the foil pouch containing the test cards, the 2 tests are on
the one card so you need to cut the tests into 2 single cards.
Using a pair of scissors cut the cards in half, down the line in
the middle of the two. Place the card on a table or flat surface.
3) Lay out the applicators (eldonsticks) ready for use.
4) Fill a small cup with tap water and using the plastic pipette,
draw a small volume of the tap water into the plastic pipette.
You draw the water by simply holding the small, thin end in
the water and squeezing the top part.
5) With the test card still on a flat surface release one drop of
water onto each of the coloured reagents spots on the
EldonCard.
6) Twist off the little green protective cap from the lancet. Place
the lancet upon a table.
7) Wipe a fingertip with the alcohol impregnated tissue provided
and allow it to dry.
8) Place the lancet against the end of the finger and press the
green body against your finger to release the needle.
9) Massage the finger from the bottom to the top to encourage
bloodflow. Press the blood towards fingertip. Repeat pressing
until a drop with a 3 to 4 mm (1/8 inch) diameter is seen.
10) Transfer the blood to an EldonStick, approached from beneath
the finger. Don't smear the blood over the skin.
11) Place the eldonstick with the drop of blood into the first circle.
The blood should touch the water already present. Gently
press the side of the eldonstick head against the card and stir
in the water and blood mixture until the coloured dry material
has dissolved.
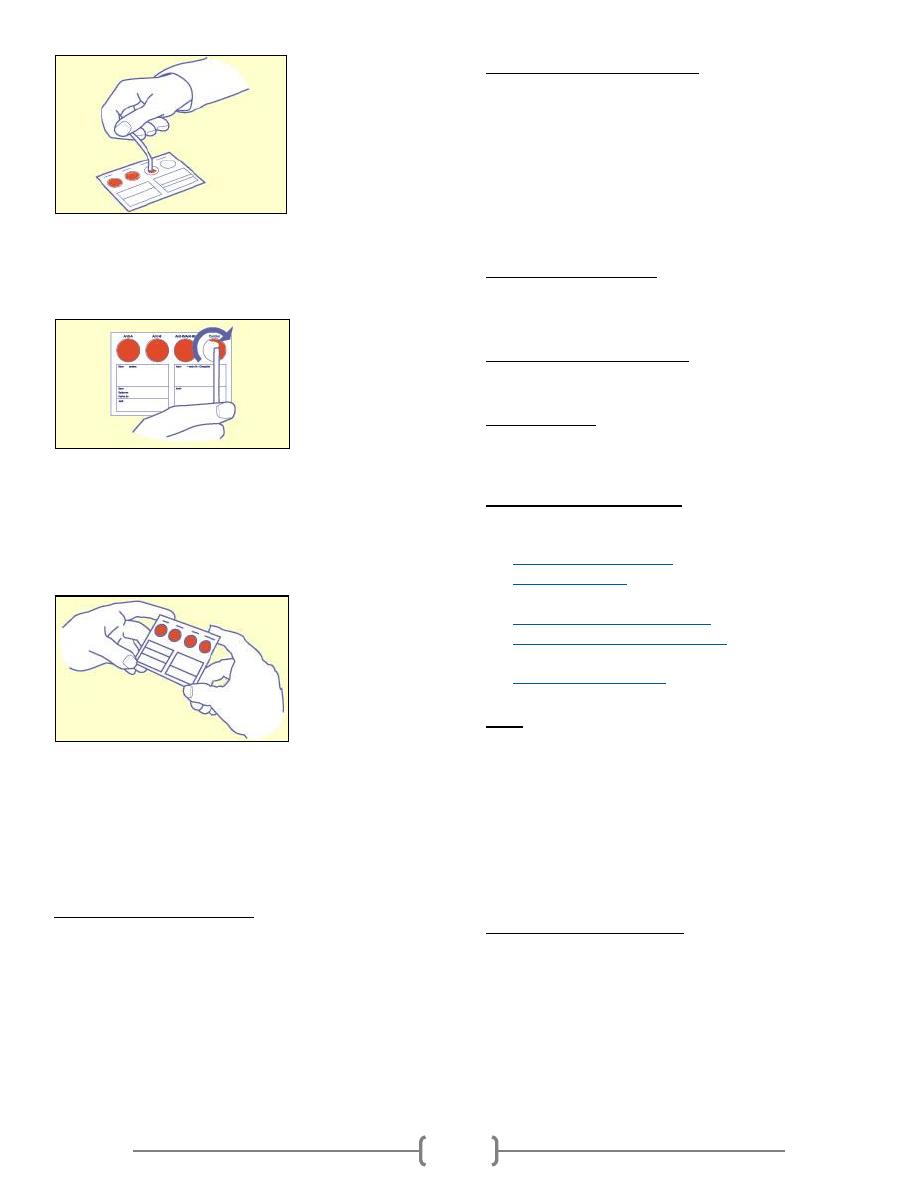
3
12) Repeat this procedure for the other 3 circles, making sure you
use a new eldonstick for each circle. You should NEVER
transfer liquid from one circle to another.
13) Once all 4 circles are complete gently tilt the whole card
vertically on its bottom edge and keep this position for 10
seconds. You will see the blood flowing slowly to the bottom
of the circle. Repeat this procedure tilting the card on the 3
other sides
Bleeding time
Bleeding time is a blood test that looks at how fast small blood
vessels in the skin close to stop you from bleeding.
How the Test is performed
A blood pressure cuff is inflated around your upper arm.
While the cuff is on your arm, the health care provider makes
two small cuts on the lower arm. They are just deep enough to
cause a tiny amount of bleeding.
The blood pressure cuff is immediately deflated. Blotting
paper is touched to the cuts every 30 seconds until the
bleeding stops. The health care provider records the time it
takes for the cuts to stop bleeding.
How to Prepare for the Test
Certain medications may change the test results. Always tell
your doctor what medications you are taking, even over-the-
counter drugs. Drugs that may increase bleeding times include
dextran, nonsteroidal anti-inflammatory drugs (NSAIDs), and
salicylates (including aspirin).
Your doctor may tell you to stop taking certain medicines a
few days before the test. Never stop taking medicine without
first talking to your doctor.
How the Test Will Feel
The tiny cuts are very shallow. Most people say it feels like a
skin scratch.
Why the Test is Performed
This test helps diagnose bleeding problems.
Normal Results
Bleeding normally stops within 1 to 9 minutes. However,
values may vary from lab to lab.
What Abnormal Results Mean
Longer-than-normal bleeding time may be due to:
Blood vessel defect
Platelet aggregation defect
Thrombocytopenia
(low platelet count)
Additional conditions under which the test may be performed:
Acquired platelet function defect
Congenital platelet function defects
Primary thrombocythemia
Von Willebrand's disease
Risks
There is a very slight risk of infection where the skin is
broken. Excessive bleeding is rare
Blood Clotting Tests
Blood clotting tests are used to diagnose and assess bleeding
problems and to monitor people who take warfarin or other
anticoagulant medicines.
What is blood made up of?
Plasma, the liquid part of blood, makes up about 60% of the
blood's volume. Plasma is mainly made from water but
contains many different proteins and other chemicals such as
hormones, antibodies, enzymes, glucose, fat particles, salts,
etc.
Blood cells, which can be seen under a microscope, make up
about 40% of the blood's volume. Blood cells are made in the

4
bone marrow by blood 'stem' cells. Blood cells are divided
into three main types.
Red cells (erythrocytes). These make blood a red colour.
One drop of blood contains about five million red cells. A
constant new supply of red blood cells is needed to replace
old cells that break down. Millions are released into the
bloodstream from the bone marrow each day. Red cells
contain chemical called haemoglobin. Haemoglobin is
attracted to oxygen and the two substances can bind
together. This allows oxygen to be transported by red
blood cells from the lungs to all parts of the body.
White cells (leukocytes). There are different types of white
cells such as neutrophils (polymorphs), lymphocytes,
eosinophils, monocytes, basophils. They are a part of the
immune system and are mainly involved in combating
infection.
Platelets. These are tiny and help the blood to clot if we
cut ourselves
Related articles
Anticoagulants
Atrial Fibrillation
Gallium Scan
How does blood clot?
Within seconds of cutting a blood vessel, the damaged tissue
causes platelets to become 'sticky' and clump together around
the cut. These 'activated' platelets and the damaged tissue
release chemicals which react with other chemicals and
proteins in the plasma, called clotting factors. There are 13
known clotting factors which are called by their Roman
numbers - factor I to factor XIII. A complex cascade of
chemical reactions involving these clotting factors quickly
occurs next to a cut.
The final step of this cascade of chemical reactions is to
convert factor I (also called fibrinogen - a soluble protein) into
thin strands of a solid protein called fibrin. The strands of
fibrin form a meshwork and trap blood cells and platelets
which form into a solid clot.
If a blood clot forms within a healthy blood vessel it can cause
serious problems. So, there are also chemicals in the blood
that prevent clots from forming and chemicals that 'dissolve'
clots. There is balance between forming clots and preventing
clots. Normally, unless a blood vessel is damaged or cut, the
'balance' tips in favour of preventing clots forming within
blood vessels.
What problems can occur?
Bleeding disorders
There are various conditions where you tend to bleed
excessively if you damage or cut a blood vessel - for example:
Too few platelets (
thrombocytopenia
) - due to various causes.
Genetic conditions where you do not make one or more
clotting factors. The most well known is
haemophilia A
which
occurs in people who do not make factor VIII.
Lack of
vitamin K
, which can cause bleeding problems, as you
need this vitamin to make certain clotting factors.
Liver disorders - these sometimes cause bleeding problems, as
your liver makes most of the clotting factors.
Clotting disorders
Sometimes a blood clot forms within a blood vessel that has
not been injured or cut - for example:
A blood clot that forms within an artery supplying blood to
the heart or brain is the common cause of heart attack and
stroke. The platelets become sticky and clump next to
patches of
atheroma
(fatty material) in blood vessels and
activate the clotting mechanism.
Sluggish blood flow can make the blood clot more readily
than usual. This is a factor in
deep vein thrombosis
(DVT)
which is a blood clot that sometimes forms in a leg vein.
Certain genetic conditions can make the blood clot more
easily than usual.
Certain medicines can affect the blood clotting mechanism,
or increase the amount of some clotting factors, which may
result in the blood clotting more readily
Liver disorders can sometimes cause clotting problems, as
your liver makes some of the chemicals involved in
preventing and dissolving clots.
Blood clotting tests
You may be advised to have tests of blood clotting:
If you have a suspected bleeding disorder. For example, if
you bleed a lot after cuts, or if you bruise easily.
If you have certain liver diseases that can affect the
making of blood clotting factors.
Before surgery, in certain circumstances, to assess your
risk of bleeding problems during an operation.
If you develop a blood clot within a blood vessel for no
apparent reason.
If you take anticoagulant medication such as warfarin (to
check that you are taking the correct dose).
There are a number of different tests. The ones chosen depend
on the circumstances and the suspected problem.
RBC count
An RBC count is a blood test that tells how many red blood
cells (RBCs) you have.
RBCs contain
hemoglobin
, which carries oxygen. How much
oxygen your body tissues get depends on how many RBCs
you have and how well they work.
How the Test is Performed

5
A blood sample is needed. For information on how this is
done, see:
Venipuncture
How to Prepare for the Test
No special preparation is necessary for adults.
How the Test Will Feel
When the needle is inserted to draw blood, some people feel
moderate pain, while others feel only a prick or stinging
sensation. Afterward, there may be some throbbing.
Why the Test is Performed
The RBC count is almost always part of the
CBC
(complete
blood count) test.
The test can help diagnose anemia and other conditions
affecting red blood cells.
Additional conditions under which an RBC count may be
performed:
Alport syndrome
Drug-induced immune hemolytic anemia
Hemolytic anemia due to G6PD deficiency
Hereditary anemias, such as thalassemia
Idiopathic autoimmune hemolytic anemia
Immune hemolytic anemia
Macroglobulinemia of Waldenstrom
Paroxysmal nocturnal hemoglobinuria (PNH)
Primary myelofibrosis
Normal Results
The general the range is as follows:
Male: 4.7 to 6.1 million cells per microliter (cells/mcL)
Female: 4.2 to 5.4 million cells/mcL
Note: Normal value ranges may vary slightly among different
laboratories. Talk to your doctor about the meaning of your
specific test results.
The examples above show the common measurements for
results for these tests. Some laboratories use different
measurements or may test different specimens.
What Abnormal Results Mean
Higher-than-normal numbers of RBCs may be due to:
Cigarette smoking
Congenital heart disease
Cor pulmonale
Dehydration
(such as from severe diarrhea)
Kidney tumor (renal cell carcinoma)
Low blood oxygen levels (hypoxia)
Pulmonary fibrosis
Polycythemia vera
Your RBC count will increase for several weeks when you
move to a higher altitude.
Drugs that can increase the RBC count include:
Gentamicin
Methyldopa
Lower-than-normal numbers of RBCs may be due to:
Anemia
Bone marrow failure (for example, from radiation, toxins,
or tumor)
Erythropoietin deficiency (secondary to kidney disease)
Hemolysis (RBC destruction) due to transfusion, blood
vessel injury, or other cause
Hemorrhage (bleeding)
Leukemia
Malnutrition
Multiple myeloma
Nutritional deficiencies of:
o Iron
o
Copper
o
Folate
o
Vitamin B-12
o
Vitamin B-6
Overhydration
Pregnancy
Drugs that can decrease the RBC count include:
Chemotherapy drugs
Chloramphenicol
Hydantoins
Quinidine
Risks
There is very little risk involved with having your blood taken.
Veins and arteries vary in size from one patient to another and
from one side of the body to the other. Taking blood from
some people may be more difficult than from others.
Other risks associated with having blood drawn are slight but
may include:
Excessive bleeding
Fainting or feeling light-headed
Hematoma (blood accumulating under the skin)
Infection (a slight risk any time the skin is broken)
Alternative Names
Erythrocyte count; Red blood cell count
WBC count
A WBC count is a blood test to measure the number of white
blood cells (WBCs).
White bloods cells help fight infections. They are also called
leukocytes. There are five major types of white blood cells:
Basophils
Eosinophils
Lymphocytes (T cells and B cells)

6
Monocytes
Neutrophils
See also:
Blood differential
How the Test is performed
Blood is typically drawn from a vein, usually from the inside
of the elbow or the back of the hand. The site is cleaned with
germ-killing medicine (antiseptic). The health care provider
wraps an elastic band around the upper arm to apply pressure
to the area and make the vein swell with blood.
Next, the health care provider gently inserts a needle into the
vein. The blood collects into an airtight vial or tube attached to
the needle. The elastic band is removed from your arm.
Once the blood has been collected, the needle is removed, and
the puncture site is covered to stop any bleeding.
In infants or young children, a sharp tool called a lancet may
be used to puncture the skin and make it bleed. The blood
collects into a small glass tube called a pipette, or onto a slide
or test strip. A bandage may be placed over the area if there is
any bleeding.
The blood sample is sent to a laboratory. A WBC count is
almost always done as part of a
complete blood count
(CBC).
How to Prepare for the Test
No special preparation is usually needed. Tell your doctor
about any medications you are taking, including over-the-
counter products. Certain drugs may interfere with test results.
Drugs that may increase WBC counts include:
Allopurinol
Aspirin
Chloroform
Corticosteroids
Epinephrine
Heparin
Quinine
Triamterene
Drugs that may lower your WBC count include:
Antibiotics
Anticonvulsants
Antihistamines
Antithyroid drugs
Arsenicals
Barbiturates
Chemotherapy drugs
Diuretics
Sulfonamides
How the Test Will Feel
When the needle is inserted to draw blood, some people feel
moderate pain, while others feel only a prick or stinging
sensation. Afterward, there may be some throbbing.
Why the Test is performed
Your doctor will order this test to find out how many white
blood cells you have. Your body produces more white blood
cells when you have an infection or allergic reaction -- even
when you are under general stress.
Normal Results
4,500-10,000 white blood cells per microliter (mcL).
Note: Normal value ranges may vary slightly among different
laboratories. Talk to your doctor about the meaning of your
specific test results.
The examples above show the common measurements for
results for these tests. Some laboratories use different
measurements or may test different specimens.
What Abnormal Results Mean
A low number of WBCs is called leukopenia. It may be due
to:
Bone marrow deficiency or failure (for example, due to
infection, tumor, or abnormal scarring)
Collagen-vascular diseases (such as
systemic lupus
erythematosus
)
Disease of the liver or spleen
Radiation therapy or exposure
A high number of WBCs is called leukocytosis. It may be due
to:
Anemia
Bone marrow tumors
Infectious diseases
Inflammatory disease (such as
rheumatoid arthritis
or
allergy
)
Leukemia
Severe emotional or physical stress
Tissue damage (for example, burns)
These lists are not all inclusive.
Risks
There is very little risk involved with having your blood taken.
Veins and arteries vary in size from one patient to another and
from one side of the body to the other. Taking blood from
some people may be more difficult than from others.
Other risks associated with having blood drawn are slight but
may include:
Excessive bleeding
Fainting or feeling light-headed
Hematoma (blood accumulating under the skin)
Infection (a slight risk any time the skin is broken)
Considerations
People who have had their spleen removed (
splenectomy
) will
always have a slightly higher number of WBCs.
Alternative Names
Leukocyte count; White blood cell count
1
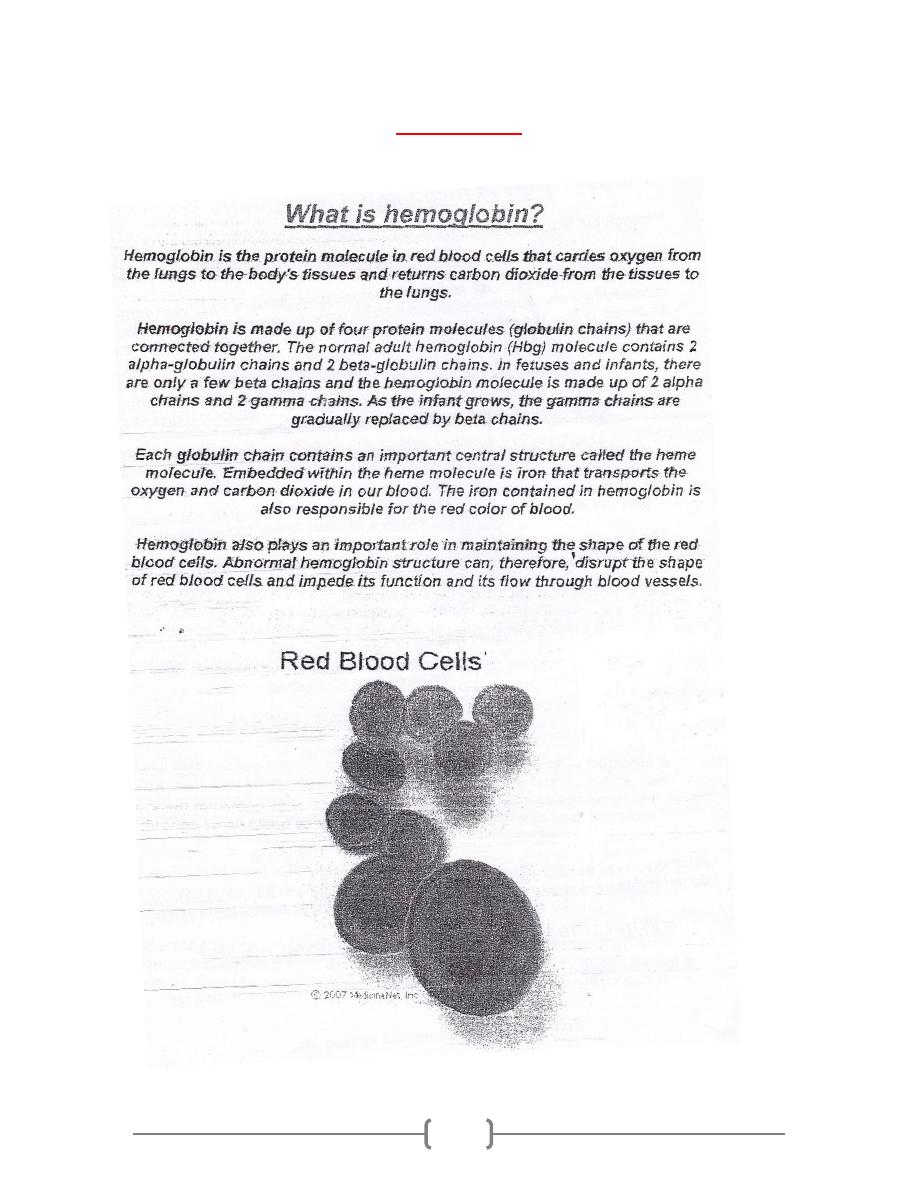
Hemoglobin
2
3
4

ESR
1
ESR stands for erythrocyte sedimentation rate. It is commonly
called a "sed rate."
It is a test that indirectly measures how much inflammation is
in the body.
How the Test is performed
A blood sample is needed. For information on how this is
done, see:
Venipuncture
The blood sample is sent to a lab. The test measures how fast
red blood cells called erythrocytes fall to the bottom of a tall,
thin tube.
How to Prepare for the Test
There are no special preparations needed.
How the Test Will Feel
When the needle is inserted to draw blood, some people feel
moderate pain, while others feel only a prick or stinging
sensation. Afterward, there may be some throbbing.
Why the Test is performed
A "sed rate" is often ordered for someone who is having
unexplained fevers, certain types of arthritis, muscle
symptoms, or other vague symptoms that cannot be explained.
Once a diagnosis has been made, this test may be used to mon-
itor whether the illness is becoming more active or flaring up.
This test can be used to monitor inflammatory diseases or
cancer. It is a screening test, which means it cannot be used to
diagnose a specific disorder.
However, it is useful for detecting and monitoring:
Autoimmune disorders
Certain forms of arthritis
Inflammatory diseases that cause vague symptoms
Tissue death
Tuberculosis
Normal Results
Adults (Westergren method):
Men under 50 years old: less than 15 mm/hr
Men over 50 years old: less than 20 mm/hr
Women under 50 years old: less than 20 mm/hr
Women over 50 years old: less than 30 mm/hr
Children (Westergren method):
Newborn: 0 to 2 mm/hr
Newborn to puberty: 3 to 13 mm/hr
Note: mm/hr. = millimeters per hour
Normal value ranges may vary slightly among different
laboratories. Talk to your doctor about the meaning of your
specific test results.
What Abnormal Results Mean
Although it can help diagnose some illnesses, an abnormal
ESR does not prove that you have a certain condition. Other
tests are almost always needed
An increased ESR rate may be due to:
Anemia
Cancers such as lymphoma or
multiple myeloma
Kidney disease
Pregnancy
Thyroid disease
The immune system helps protect the body against harmful
substances. In
autoimmune disorder
is a condition that occurs
when the immune system mistakenly attacks and destroys
healthy body tissue. ESR is often higher than normal in people
with an autoimmune disorder.
Common autoimmune disorders include:
o
Lupus
o
Rheumatoid arthritis in adults
or
children
Very high ESR levels occur with less common
autoimmune disorders, including:
o Allergic vasculitis
o
Giant cell arteritis
o Hyperfibrinogenemia (increased
fibrinogen
levels in
the blood)
o
Macroglobulinemia - primary
o
Necrotizing vasculitis
o
Polymyalgia rheumatica
An increased ESR rate may be due to some infections,
including:
o Body-wide (systemic) infection
o
Bone infections
o
Infection of the heart or heart valves
o
Rheumatic fever
o Severe skin infections, such as
erysipelas
o Tuberculosis
Lower-than-normal levels occur with:
Congestive heart failure
Hyperviscosity
Hypofibrinogenemia
(decreased fibrinogen levels)
Low plasma protein (due to liver or kidney disease)
Polycythemia
Sickle cell anemia
Risks
Veins and arteries vary in size from one patient to another and
from one side of the body to the other. Obtaining a blood
sample from some people may be more difficult than from
others.
Other risks associated with having blood drawn are slight but
may include:
Excessive bleeding
Fainting or feeling light-headed
Hematoma (blood accumulating under the skin)
Infection (a slight risk any time the skin is broken)
Alternative Names
Erythrocyte sedimentation rate; Sed rate; Sedimentation rate
ESR
2
Procedure 14-8: perform an ESR using the
westergren method
Theory and Rationale
A well-mixed anticoagulated blood sample is drawn into a
Westergren tube and left upright for an hour. The full length
of red cells from the top of the column in that hour is the
erythrocyte sedimentation rate, or sed rate. Reference ranges
vary among institutions, but the generally accepted reference
range is 0 to 20 mm/hr for women and 0 to 15 mm/hr for men.
Materials
ESR kit (Sediplast ESR System)
EDTA anticoagulated patient blood sample
gauze square
disposable gloves
biohazard waste container
sharps container
patient record
Competency
(Conditions) With the necessary materials, you will be able to
(Task) demonstrate performing an ESR using the Westergren
method (Standards) correctly in one hour.
1) Wash your hands.
2) Gather equipment and supplies.
3) Greet and identify the patient and escort him or her to the
laboratory draw area. Explain the procedure.
4) Wash your hands and put on your gloves and PPE.
5) Perform a venipuncture and obtain an EDTA-
anticoagulated tube of patient blood; gently mix the
anticoagulation tube for 2 minutes.
6) Remove the stopper on the prefilled vial included with the
Sediplast ESR System. Fill the vial to the indicated line
with blood.
7) Replace the stopper and invert several times to mix.
8) Insert the pipette through the pierceable stopper, and push
down until the pipette touches the bottom of the vial. The
pipette will autozero the blood and any excess with flow
into the closed reservoir compartment.
9) Let the pipette stand for one hour, then read the numerical
results of the ESR.
10) Dispose of all used sharps and biohazardous waste in the
appropriate containers.
11) Remove the disposable gloves and discard appropriately.
Wash your hands.
12) Document the sed rate in mm/hr on the laboratory
requisition or other designated area of the chart.
Patient Education
Instruct the patient beforehand in the general procedure. Do
not promise the patient that the procedure will not hurt. It is
more tactful to say that it might feel like a “brief sting.”Let the
patient know when the actual puncture is about to happen. As
necessary, provide information about how long the results will
take and how they will be transmitted to the patient.
Charting Example
Sometimes charting may not be required for phlebotomy
procedures because laboratory processing documentation is
sufficient. If charting is required, it might look like this:
08/25/XX 7:30 a.m. Pt anxious about phlebotomy
procedure. General explanations given before each step. Pt
voiced concern over the amount of pain she would
experience and that her veins were hard to get blood from.
Venous specimen obtained for a CBC, Na, K, and Cl with
appropriate tubes. Pt held pressure gauze onsite, site was
bandaged, and pt was instructed to leave the bandage in
place for 15 minutes. Pt escorted to the exit. Robert Larin,
RMA (AMT)
Erythrocyte sedimentation rate (ESR)
The ESR is a simple non-specific screening test that indirectly
measures the presence of inflammation in the body. It reflects
the tendency of red blood cells to settle more rapidly in the
face of some disease states, usually because of increases in
plasma fibrinogen, immunoglobulins, and other acute-phase
reaction proteins. Changes in red cell shape or numbers may
also affect the ESR.
Method
When anticoagulated whole blood is allowed to stand in a
narrow vertical tube for a period of time, the RBCs – under the
influence of gravity - settle out from the plasma. The rate at
which they settle is measured as the number of millimeters of
clear plasma present at the top of the column after one hour
(mm/hr).
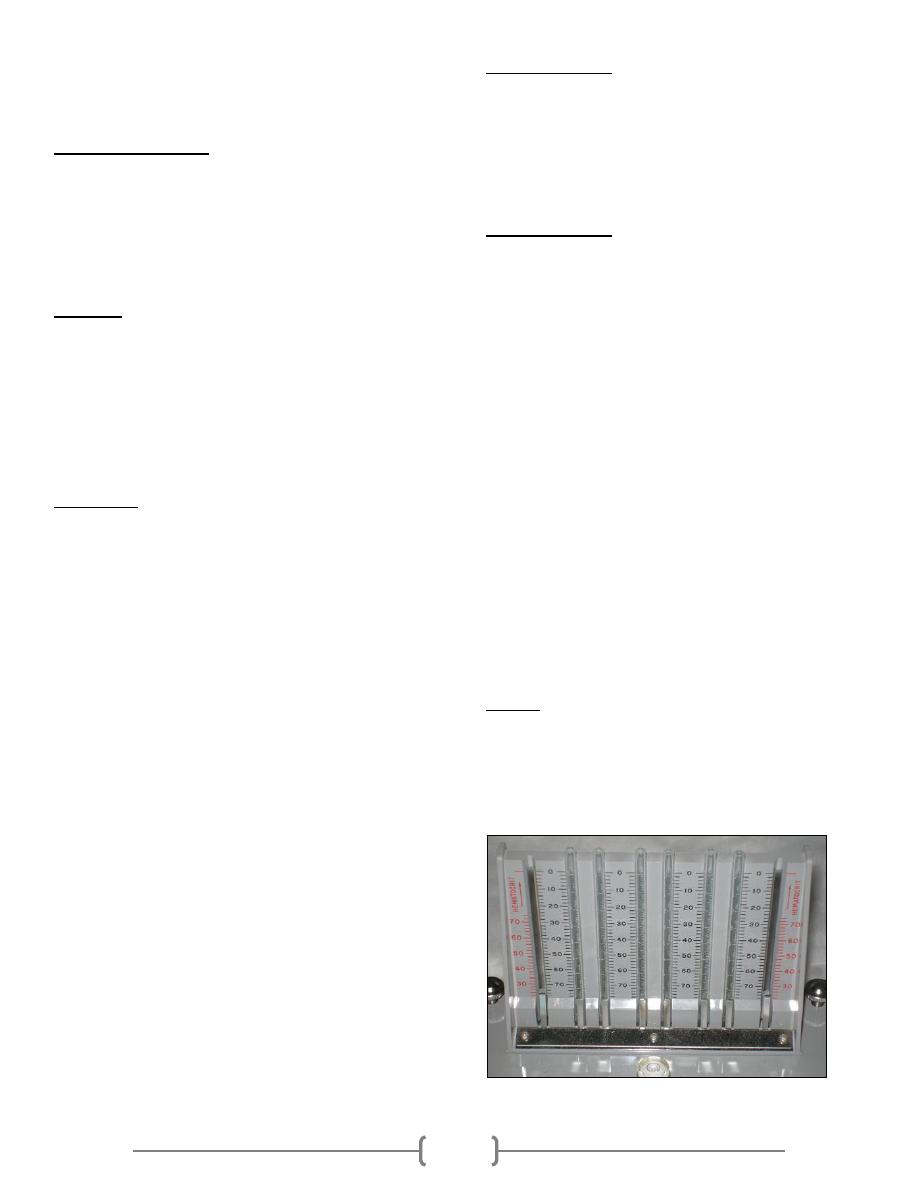
The Wintrobe sedimentation rack
ESR
3
There are two main methods used to measure the ESR: the
Westergren method and the Wintrobe Method. Each method
produces slightly different results. Most laboratories use the
Westergren method.
Westergren method:
The Westergren method requires collecting 2 ml of venous
blood into a tube containing 0 .5 ml of sodium citrate. It
should be stored no longer than 2 hours at room temperature
or 6 hours at 4 °C. The blood is drawn into a Westergren-Katz
tube to the 200 mm mark. The tube is placed in a rack in a
strictly vertical position for 1 hour at room temperature, at
which time the distance from the lowest point of the surface
meniscus to the upper limit of the red cell sediment is
measured. The distance of fall of erythrocytes, expressed as
millimeters in 1 hour, is the ESR.
Wintrobe method:
The Wintrobe method is performed similarly except that the
Wintrobe tube is smaller in diameter than the Westergren tube
and only 100 mm long. EDTA anticoagulated blood without
extra diluent is drawn into the tube, and the rate of fall of red
blood cells is measured in millimeters after 1 hour. The
shorter column makes this method less sensitive than the
Westergren method because the maximal possible abnormal
value is lower. However, this method is more practical for
demonstration purposes.
Average values in healthy men are: <15mm/hr; in healthy
females, they are somewhat higher: <20mm. The values are
slightly higher in old age, in both genders.
Theoretical considerations
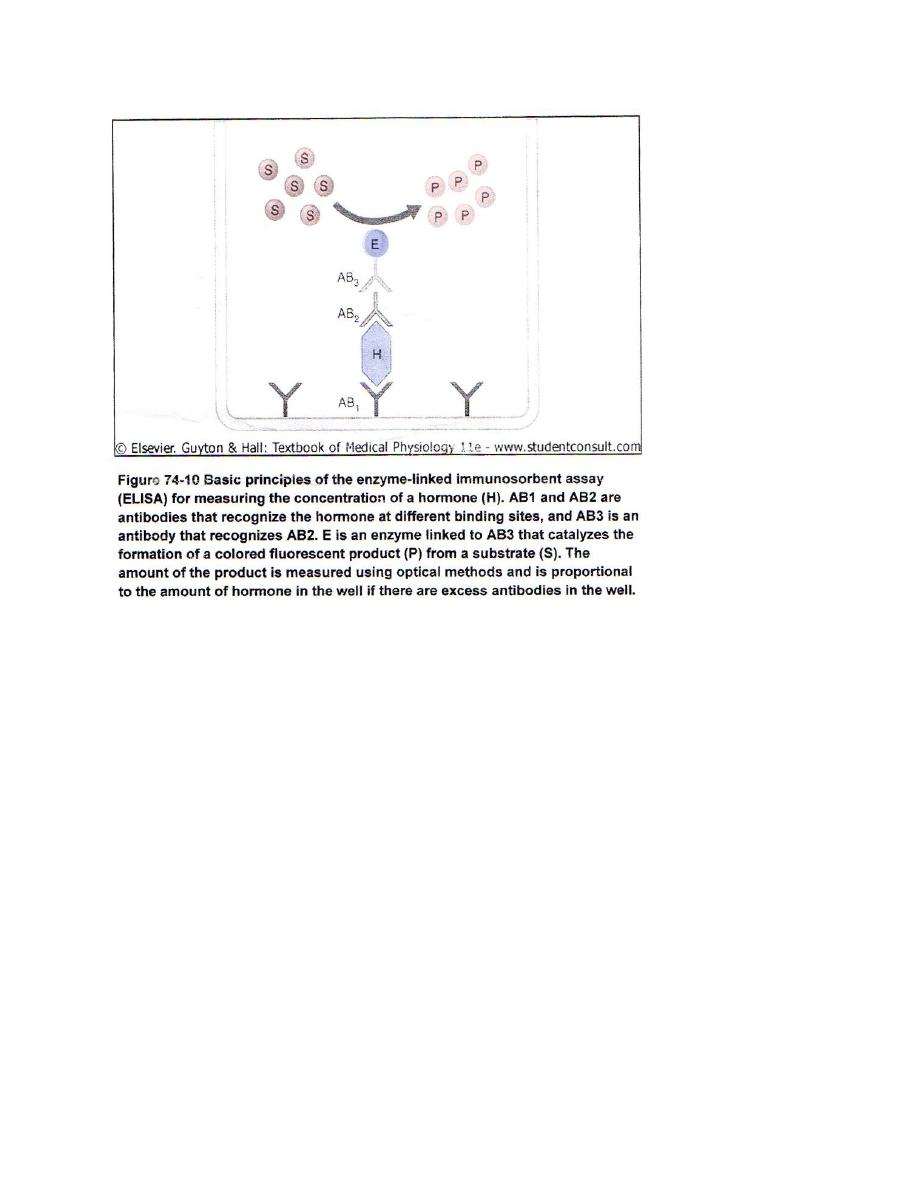
The RBCs sediment because their density is greater than that
of plasma; this is particularly so, when there is an alteration in
the distribution of charges on the surface of the RBC (which
normally keeps them separate form each other) resulting in
their coming together to form large aggregates known as
rouleaux.
Rouleaux formation is determined largely by increased levels
of plasma fibrinogen and globulins, and so the ESR reflects
mainly changes in the plasma proteins that accompany acute
and chronic infections, some tumors and degenerative
diseases. In such situations, the ESR values are much greater
than 20mm/hr. Note that the ESR denotes merely the presence
of tissue damage or disease, but not its severity; it may be used
to follow the progress of the diseased state, or monitor the
effectiveness of treatment.
Some interferences which increase ESR:
Increased level of fibrinogen, gamma globulins.
Technical factors: tilted ESR tube, high room temperature.
Some interferences which decrease ESR:
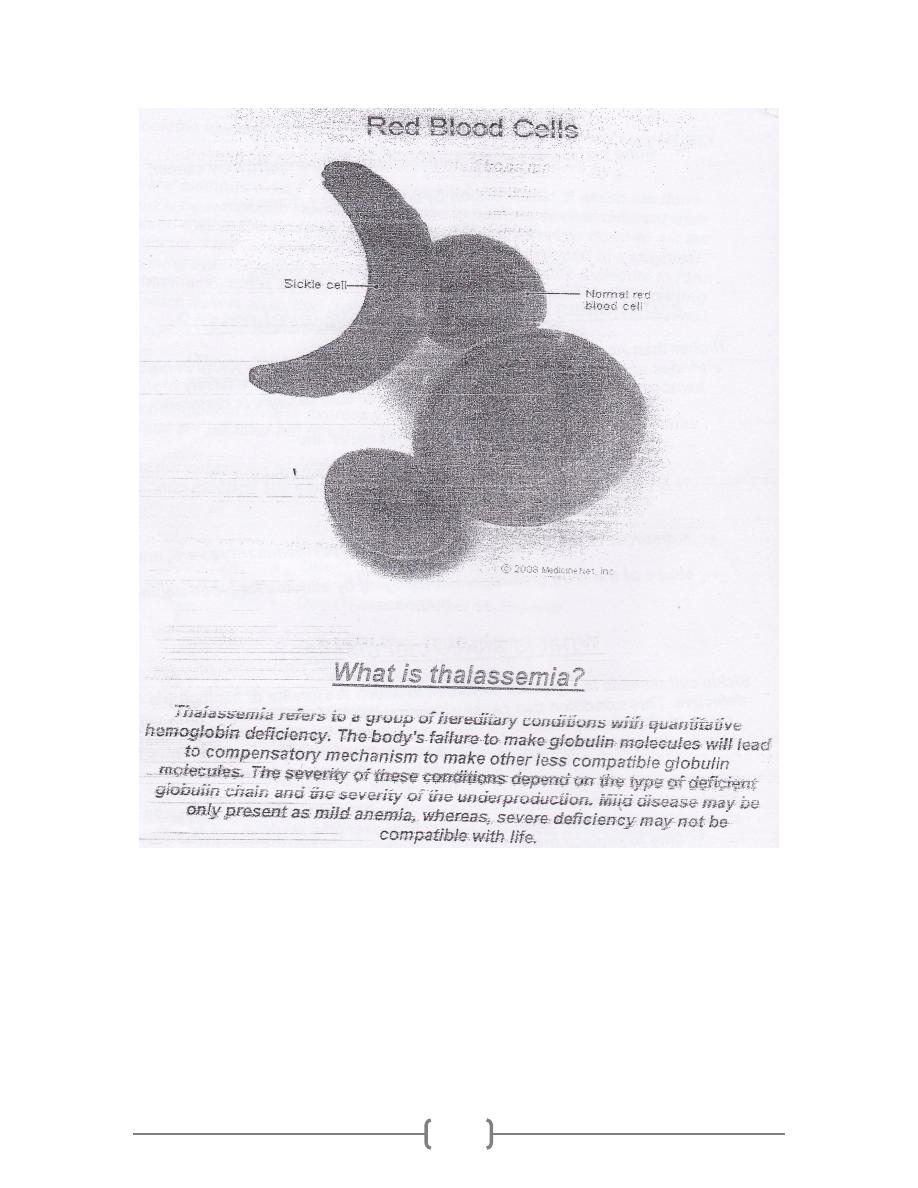
Abnormally shaped RBC (sickle cells, spherocytosis).
Technical factors: short ESR tubes, low room temperature,
delay in test performance (>2 hours), clotted blood sample,
excess anticoagulant, bubbles in tube.
Chronic inflammatory disease (collagen and vascular diseases)
increases ESR.
Polycythemia decreases ESR.
This picture
shows a rack
holding
Wintrobe
tubes, in which
anticoagulated
whole blood
has just been
added.
(Time: 0)
Red blood cells
have settled,
leaving plasma
at the top of the
tube. Reading:
18 mm/hour
(Time: one
hour)
Measurement of Hormone Concentration in the Blood

1
Arterial Pulse
Anatomy
As the ventricles eject blood into the arteries a pressure wave
(pulse) is transmitted and can be felt particularly where the
arteries are superficial and pass over bone. The pressure wave
travels faster than the blood. The pulse waveform depends on
the heart rate, stroke volume, peripheral resistance (especially
in the arterioles), left ventricular outflow obstruction and the
elasticity of peripheral vessels.
Cross-section of an artery
Surface markings of the arterial pulses
Important table
Use the larger (brachial, carotid or femoral) pulses to assess
the pulse volume and character and in hypotensive
States. When taking a pulse, characterize the information
according to: rate, rhythm, volume & character.
Examination sequence
Arterial pulses
If you are in any doubt about whose pulse you are feeling,
palpate your own pulse at the same time. If what you are
feeling is not synchronous with yours it is the patient's pulse.
Radial pulse
Place the pads of your three middle fingers over the right
radial artery.
Assess rate, rhythm and volume.
Count the pulse rate over 15 s and multiply by 4 to obtain
the beats per minute (bpm).
To detect a collapsing pulse, feel the pulse with the base of
your fingers, then raise the
patient's hand above his head.
Palpate both radial pulses simultaneously, assessing any
volume differences.
Palpate the femoral and radial pulse simultaneously, noting
any delay between the two and any difference in pulse
volume between them.
Brachial pulse
This artery lies deeper than the radial, medial to the biceps
tendon, so use your thumb to palpate it, with your fingers
cupped round the back of the elbow
Assess the character and volume
Carotid pulse
Explain to the patient what you are going to do. Never
assess both carotid pulses simultaneously
Ask the patient to lie semi-recumbent in case you induce a
reflex bradycardia.
Gently place the tip of your thumb between the larynx and
the anterior border of the sternocleidomastoid muscle
Listen for bruits over both femoral arteries, using the
diaphragm of your stethoscope.
Listen for bruits over both carotid arteries, using the
diaphragm of your stethoscope while the patient holds his
breath
Femoral pulse
Ask the patient to lie down and explain what you are going
to do.
With your fingers extended, place the pads of your index
and middle fingers over the femoral artery
Check for radiofemoral delay.
Listen for bruits over both femoral arteries, using the
diaphragm of your stethoscope.
Surface marking
Artery
At the wrist, lateral to the flexor carpi radialis tendon
Radial
In the antecubital fossa, medial to the biceps tendon
Brachial
At the angle of the jaw, anterior to the
sternocleidomastoid muscle
Carotid
Just below the inguinal ligament, midway between the
anterior superior iliac spine and the pubic
symphysis (the mid-inguinal point). It is immediately
lateral to the femoral vein and medial to the femoral
nerve
Femoral
Lies posteriorly in relation to the knee joint, at the level
of the knee crease, deep in the popliteal fossa
Popliteal
Located 2 cm below and posterior to the medial
malleolus, where it passes beneath the flexor
retinaculum between flexor digitorum longus and
flexor hallucis longus
Posterial
Tibial
Passes lateral to the tendon of extensor hallucis longus
and is best felt at the proximal extent of the groove
between the first and second metatarsals. It may be
absent or abnormally sited in 10% of normal subjects,
sometimes being 'replaced' by a palpable perforating
peroneal artery
Dorsalis
Pedis

2
The radial, brachial and carotid pulses. (A) Locating
and palpating the radial pulse. (B) Feeling for a collapsing
radial pulse. (C) Assessing the brachial pulse with your
thumb. (D) Locating the carotid pulse with your thumb.
(E) Examining the femoral artery, while simultaneously
checking for radiofemoral delay.
Normal findings
Rate
Assess the pulse rate in the clinical context. A pulse rate
of 40 bpm can be normal in a fit, young adult, whereas a
pulse rate of 65 bpm may be abnormally low in the setting
of acute heart failure. Resting heart rate is normally 60-
100 bpm.
Bradycardia is a pulse rate <60 bpm.
Tachycardia is a pulse rate of >100 bpm.
Rhythm
Normal rhythm is regular; it is called sinus rhythm, as it
originates from the sinoatrial (SA) nodeIt varies slightly
with the respiratory cycle, mediated by the vagus nerve, and
is most pronounced in children, young adults or athletes
(sinus arrhythmia). During inspiration, parasympathetic
tone falls and the heart rate quickens; on expiration, the
heart rate falls
Volume
Volume means the degree of pulsation and reflects the pulse
pressure.
Character
Character means the waveform or shape of the arterial pulse.
Body Temperature:
Measurement of body temperature is used routinely in the
clinical work. It varies considerably under many physiological
and pathological conditions. The normal body temperature
ranges between 36.6-37.2 ºC. Circadian variation of 0.5 ºC
occurs and the lowest record is in the early morning.
Temperature variations occur as shown below:
Hypothermia below 35 ºC
Subnormal below 36.6 ºC
Febrile above 37.2 ºC
Hyperpyrexia above 41.6 ºC
The rectal temperature is usually about 0.5 ºC higher than the
mouth and mouth temperature in turn 0.5 ºC higher than that
of axilla.
Body Temperature Is Controlled by Balancing Heat
Production Against Heat Loss:
When the rate of heat production in the body is greater than
the rate at which heat is being lost, heat builds up in the body
and the body temperature rises. Conversely, when heat loss is
greater, both body heat and body temperature decrease.
Heat Production:
We discuss the different factors that determine the rate of heat
production, called the metabolic rate of the body. The most
important of these factors are:
(1) basal rate of metabolism of all the cells of the body;
(2) extra rate of metabolism caused by muscle activity,
including muscle contractions caused by shivering;
(3) extra metabolism caused by the effect of thyroxine (and, to
a less extent, other hormones, such as growth hormone ) on
the cells;
(4) extra metabolism caused by the effect of epinephrine,
norepinephrine, and sympathetic stimulation on the cells;
(5) extra metabolism caused by increased chemical activity in
the cells themselves, especially when the cell temperature
increases; and
(6) extra metabolism needed for digestion, absorption, and
storage of food (thermogenic effect of food).
Heat Loss:
Most of the heat produced in the body is generated in the deep
organs, especially in the liver, brain, and heart, and in the
skeletal muscles during exercise. Then this heat is transferred
from the deeper organs and tissues to the skin, where it is lost
to the air and other surroundings. Therefore, the rate at which
heat is lost is determined almost entirely by two factors: (1)
how rapidly heat can be conducted from where it is produced
in the body core to the skin and (2) how rapidly heat can then
be transferred from the skin to the surroundings.

3
Basic Physics of How Heat Is Lost from the Skin Surface:
The various methods by which heat is lost from the skin to the
surroundings include radiation, conduction, and
evaporation, which are explained next.
(1) Radiation: in a nude person sitting inside at normal room
temperature, about 60 per cent of total heat loss is by
radiation.
Loss of heat by radiation means loss in the form of infrared
heat rays, a type of electromagnetic wave. Most infrared heat
rays that radiate from the body have wavelengths of 5 to 20
micrometers, 10 to 30 times the wavelengths of light rays. All
objects that are not at absolute zero temperature radiate such
rays. The human body radiates heat rays in all directions. Heat
rays are also being radiated from the walls of rooms and other
objects toward the body. If the temperature of the body is
greater than the temperature of the surroundings, a greater
quantity of heat is radiated from the body than is radiated to
the body.
(2) Conduction: only minute quantities of heat, about 3 per
cent, are normally lost from the body by direct conduction
from the surface of the body to solid objects, such as a chair or
a bed. Loss of heat by conduction to air, however, represents a
sizable proportion of the body's heat loss (about 15 per cent)
even under normal conditions.
(3) Convection: The removal of heat from the body by
convection air currents is commonly called heat loss by
convection. Actually, the heat must first be conducted to the
air and then carried away by the convection air currents .
A small amount of convection almost always occurs around
the body because of the tendency for air adjacent to the skin to
rise as it becomes heated. Therefore, in a nude person seated
in a comfortable room without gross air movement, about 15
per cent of his or her total heat loss occurs by conduction to
the air and then by air convection away from the body .
(4) Evaporation: When water evaporates from the body
surface, 0.58 Calorie (kilocalorie) of heat is lost for each gram
of water that evaporates. Even when a person is not sweating,
water still evaporates insensibly from the skin and lungs at a
rate of about 600 to 700 ml/day. This causes continual heat
loss at a rate of 16 to 19 Calories per hour. This insensible
evaporation through the skin and lungs cannot be controlled
for purposes of temperature regulation because it results from
continual diffusion of water molecules through the skin and
respiratory surfaces. However, loss of heat by evaporation of
sweat can be controlled by regulating the rate of sweating .
Evaporation Is a Necessary Cooling Mechanism at Very
High Air Temperatures. As long as skin temperature is
greater than the temperature of the surroundings, heat can be
lost by radiation and conduction. But when the temperature of
the surroundings becomes greater than that of the skin, instead
of losing heat, the body gains heat by both radiation and
conduction. Under these conditions, the only means by which
the body can rid itself of heat is by evaporation.
Therefore, anything that prevents adequate evaporation when
the surrounding temperature is higher than the skin
temperature will cause the internal body temperature to rise.
Regulation of Body Temperature-Role of the
Hypothalamus:
The temperature of the body is regulated almost entirely by
nervous feedback mechanisms, and almost all these operate
through temperature-regulating centers located in the
hypothalamus. For these feedback mechanisms to operate,
there must also be temperature detectors to determine when
the body temperature becomes either too high or too low.
Role of the Anterior Hypothalamic-Preoptic Area in
Thermostatic Detection of Temperature:
Experiments have been performed in which minute areas in
the brain of an animal have been either heated or cooled by
use of a thermode. This small, needle-like device is heated by
electrical means or by passing hot water through it, or it is
cooled by cold water. The principal areas in the brain where
heat or cold from a thermode affects body temperature control
are the preoptic and anterior hypothalamic nuclei of the
hypothalamus .
Using the thermode, the anterior hypothalamic-preoptic area
has been found to contain large numbers of heat-sensitive
neurons as well as about one third as many cold-sensitive
neurons. These neurons are believed to function as
temperature sensors for controlling body temperature. The
heat-sensitive neurons increase their firing rate 2- to 10-fold in
response to a 10°C increase in body temperature. The cold-
sensitive neurons, by contrast, increase their firing rate when
the body temperature falls .
When the preoptic area is heated, the skin all over the body
immediately breaks out in a profuse sweat, while the skin
blood vessels over the entire body become greatly dilated.
This is an immediate reaction to cause the body to lose heat,
thereby helping to return the body temperature toward the
normal level. In addition, any excess body heat production is
inhibited. Therefore, it is clear that the hypothalamic-preoptic
area has the capability to serve as a thermostatic body
temperature control center.
Detection of Temperature by Receptors in the Skin and
Deep Body Tissues:
Although the signals generated by the temperature receptors of
the hypothalamus are extremely powerful in controlling body
temperature, receptors in other parts of the body play
additional roles in temperature regulation. This is especially
true of temperature receptors in the skin and in a few specific
deep tissues of the body .
It will be recalled from the discussion of sensory receptors that
the skin is endowed with both cold and warmth receptors.
There are far more cold receptors than warmth receptors-in

4
fact, 10 times as many in many parts of the skin. Therefore,
peripheral detection of temperature mainly concerns detecting
cool and cold instead of warm temperatures .
When the skin is chilled over the entire body, immediate
reflex effects are invoked and begin to increase the
temperature of the body in several ways:
(1) by providing a strong stimulus to cause shivering resultant
increase in the rate of body heat production;
(2) by inhibiting the process of sweating, if this is already
occurring; and (3) by promoting skin vasoconstriction to
diminish loss of body heat from the skin .
Deep body temperature receptors are found mainly in the
spinal cord, in the abdominal viscera, and in or around the
great veins in the upper abdomen and thorax. These deep
receptors function differently from the skin receptors because
they are exposed to the body core temperature rather than the
body surface temperature. Yet, like the skin temperature
receptors, they detect mainly cold rather than warmth. It is
probable that both the skin and the deep body receptors are
concerned with preventing hypothermia-that is, preventing
low body temperature .
Posterior Hypothalamus Integrates the Central and
Peripheral Temperature Sensory Signals:
Even though many temperature sensory signals arise in
peripheral receptors, these signals contribute to body
temperature control mainly through the hypothalamus. The
area of the hypothalamus that they stimulate is located
bilaterally in the posterior hypothalamus approximately at the
level of the mammillary bodies. The temperature sensory
signals from the anterior hypothalamic-preoptic area are also
transmitted into this posterior hypothalamic area. Here the
signals from the preoptic area and the signals from elsewhere
in the body, are combined and integrated to control the heat-
producing and heat-conserving reactions of the body.
Neuronal Effector Mechanisms That Decrease or Increase
Body Temperature:
When the hypothalamic temperature centers detect that the
body temperature is either too high or too low, they institute
appropriate temperature-decreasing or temperature-increasing
procedures. The reader is probably familiar with most of these
from personal experience, but special features are the
following:
A-Temperature-Decreasing Mechanisms When the Body
Is Too Hot:
The temperature control system uses three important
mechanisms to reduce body heat when the body temperature
becomes too great :
1. Vasodilation of skin blood vessels. In almost all areas of the
body, the skin blood vessels become intensely dilated. This is
caused by inhibition of the sympathetic centers in the posterior
hypothalamus that cause vasoconstriction. Full vasodilation
can increase the rate of heat transfer to the skin as much as
eightfold .
2. Sweating. The effect of increased body temperature to cause
sweating, which shows a sharp increase in the rate of
evaporative heat loss resulting from sweating when the body
core temperature rises above the critical level of 37°C
(98.6°F). An additional 1°C increase in body temperature
causes enough sweating to remove 10 times the basal rate of
body heat production .
3. Decrease in heat production. The mechanisms that cause
excess heat production, such as shivering and chemical
thermogenesis, are strongly inhibited .
B-Temperature-Increasing Mechanisms When the Body Is
Too Cold:
When the body is too cold, the temperature control system
institutes exactly opposite procedures. They are :
1. Skin vasoconstriction throughout the body. This is caused
by stimulation of the posterior hypothalamic sympathetic
centers .
2. Piloerection. Piloerection means hairs "standing on end."
Sympathetic stimulation causes the arrector pili muscles
attached to the hair follicles to contract, which brings the hairs
to an upright stance. This is not important in human beings,
but in lower animals, upright projection of the hairs allows
them to entrap a thick layer of "insulator air" next to the skin,
so that transfer of heat to the surroundings is greatly
depressed .
3. Increase in thermogenesis (heat production). Heat
production by the metabolic systems is increased by
promoting shivering, sympathetic excitation of heat
production, and thyroxine secretion.
Concept of a "Set-Point" for Temperature Control:
It is clear that at a critical body core temperature of about
37.1°C (98.8°F), drastic changes occur in the rates of both heat
loss and heat production. At temperatures above this level, the
rate of heat loss is greater than that of heat production, so the
body temperature falls and approaches the 37.1°C level. At
temperatures below this level, the rate of heat production is
greater than that of heat loss, so the body temperature rises and
again approaches the 37.1°C level. This crucial temperature
level is called the "set-point" of the temperature control
mechanism. That is, all the temperature control mechanisms
continually attempt to bring the body temperature back to this
set-point level.
Fever: which means a body temperature above the usual range
of normal, can be caused by abnormalities in the brain itself or
by toxic substances that affect the temperature-regulating
centers. They include bacterial diseases, brain tumors, and
environmental conditions that may terminate in heatstroke .

5
Resetting the Hypothalamic Temperature-Regulating
Center in Febrile Diseases-Effect of Pyrogens:
Many proteins, breakdown products of proteins, and certain
other substances, especially lipopolysaccharide toxins released
from bacterial cell membranes, can cause the set-point of the
hypothalamic thermostat to rise. Substances that cause this
effect are called pyrogens. Pyrogens released from toxic
bacteria or those released from degenerating body tissues
cause fever during disease conditions. When the set-point of
the hypothalamic temperature-regulating center becomes
higher than normal, all the mechanisms for raising the body
temperature are brought into play, including heat conservation
and increased heat production. Within a few hours after the
set-point has been increased, the body temperature also
approaches this level .
Mechanism of Action of Pyrogens in Causing Fever-Role
of Interleukin-1: Experiments in animals have shown that
some pyrogens, when injected into the hypothalamus, can act
directly and immediately on the hypothalamic temperature-
regulating center to increase its set-point. Other pyrogens
function indirectly and may require several hours of latency
before causing their effects. This is true of many of the
bacterial pyrogens, especially the endotoxins from gram-
negative bacteria .
When bacteria or breakdown products of bacteria are present
in the tissues or in the blood, they are phagocytized by the
blood leukocytes, by tissue macrophages, and by large
granular killer lymphocytes. All these cells digest the bacterial
products and then release the substance interleukin-1-also
called leukocyte pyrogen or endogenous pyrogen-into the
body fluids. The interleukin-1, on reaching the hypothalamus,
immediately activates the processes to produce fever,
sometimes increasing the body temperature a noticeable
amount in only 8 to 10 minutes. As little as one ten-millionth
of a gram of endotoxin lipopolysaccharide from bacteria,
acting in concert with the blood leukocytes, tissue
macrophages, and killer lymphocytes, can cause fever. The
amount of interleukin-1 that is formed in response to
lipopolysaccharide to cause fever is only a few nanograms .
Several experiments have suggested that interleukin-1 causes
fever by first inducing the formation of one of the
prostaglandins, mainly prostaglandin E2, or a similar
substance, which acts in the hypothalamus to elicit the fever
reaction. When prostaglandin formation is blocked by drugs,
the fever is either completely abrogated or at least reduced. In
fact, this may be the explanation for the manner in which
aspirin reduces fever, because aspirin impedes the formation
of prostaglandins from arachidonic acid. Drugs such as aspirin
that reduce fever are called antipyretics.
Experiments:
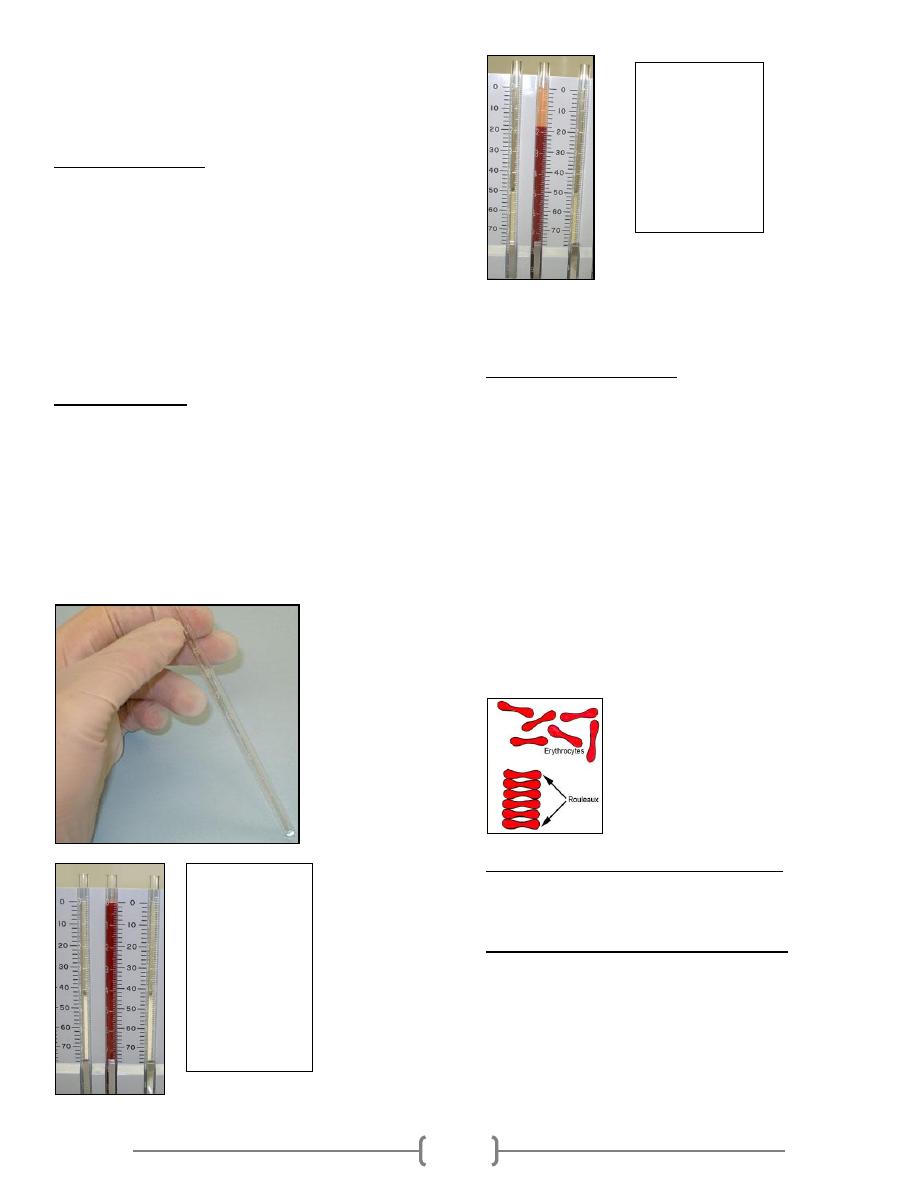
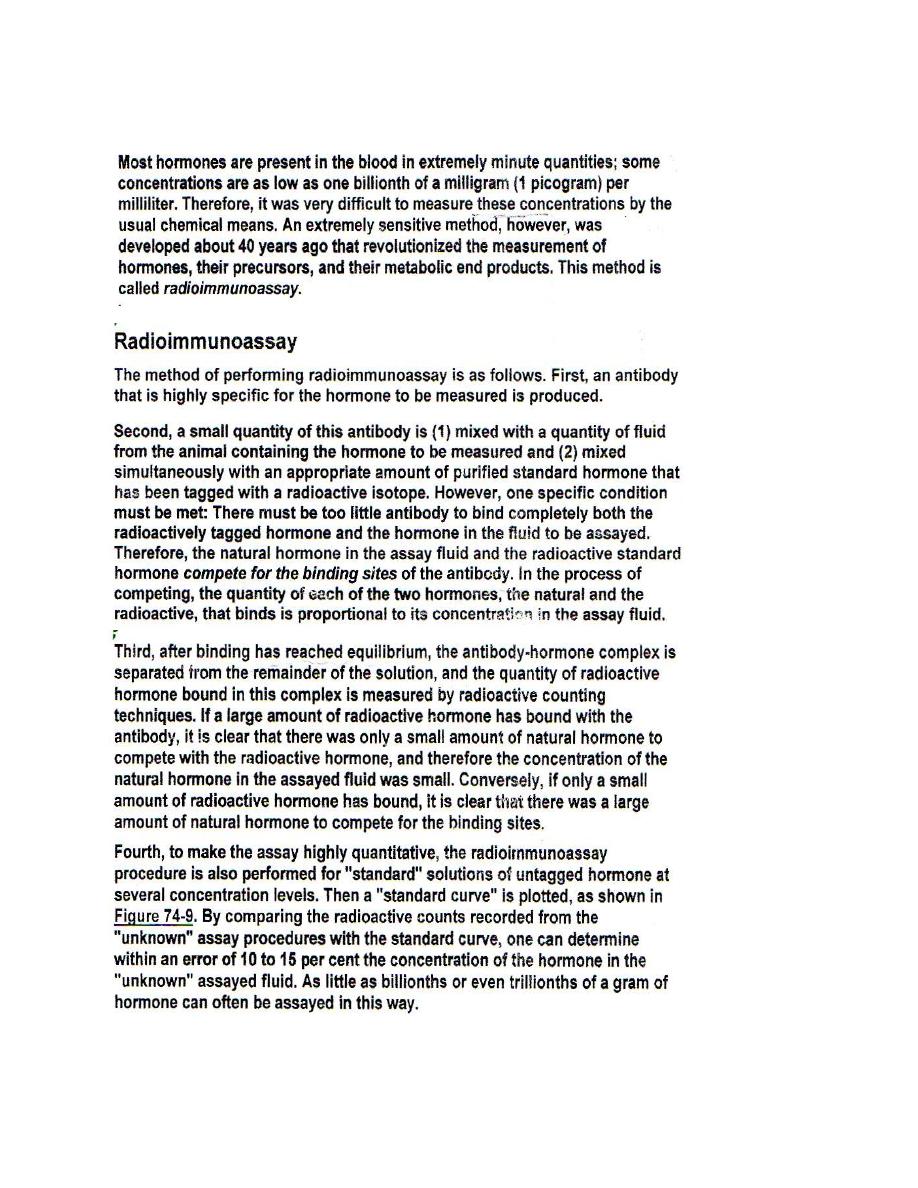
Aim: to measure the body temperature.
Apparatus: clinical thermometer.
Procedure for the oral temperature measurement:
1. Clean the thermometer by rubbing its bulb with cotton wool
soaked in alcohol in direction towards the bulb, holding it
from the end away from the bulb with your right thumb and
index fingers.
2. Holding the thermometer from the same end, observe the level
of the indicator fluid (mercury). If the column is not easily
seen rotate the thermometer forward and backward until the
column appears easily and clearly.
3. Lower the mercury level below 35 ºC, this is best done by
sharp jerky shakes of the thermometer.
4. Insert the bulb of the thermometer under the tongue with the
mouth shut tightly while breathing through the nose.
5. Leave the thermometer in its place for 2 minutes then
withdraw it and notice the level of the indicator.
1
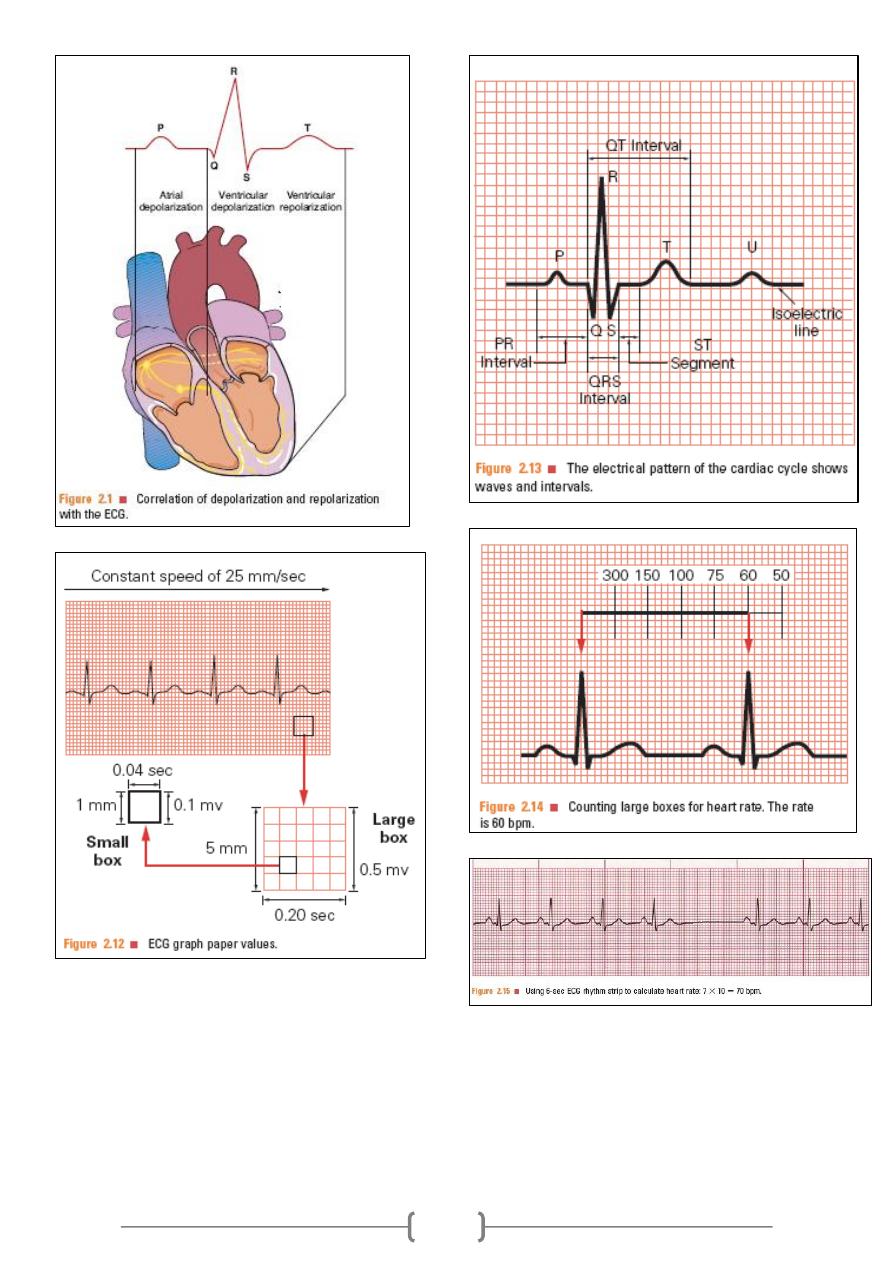
Electrical potential of the heart
The electrocardiogram (ECG):
The ECG is the recording of the electrical potential of
the heart that extend to the body surface. By placing
the electrodes of an ECG instrument on the skin
surface, you can record the waves of depolarization
and repolarization that are generated by the cardiac
muscle. The apparatus used is called the
electrocardiograph; it is formed basically of a sensitive
galvanometer and an amplifier.
A standard ECG consists of 12 leads:
3 Bipolar standard limb leads (I, II, III).
3 unipolar limb leads (aVR, aVL, aVF).
6 unipolar chest leads.
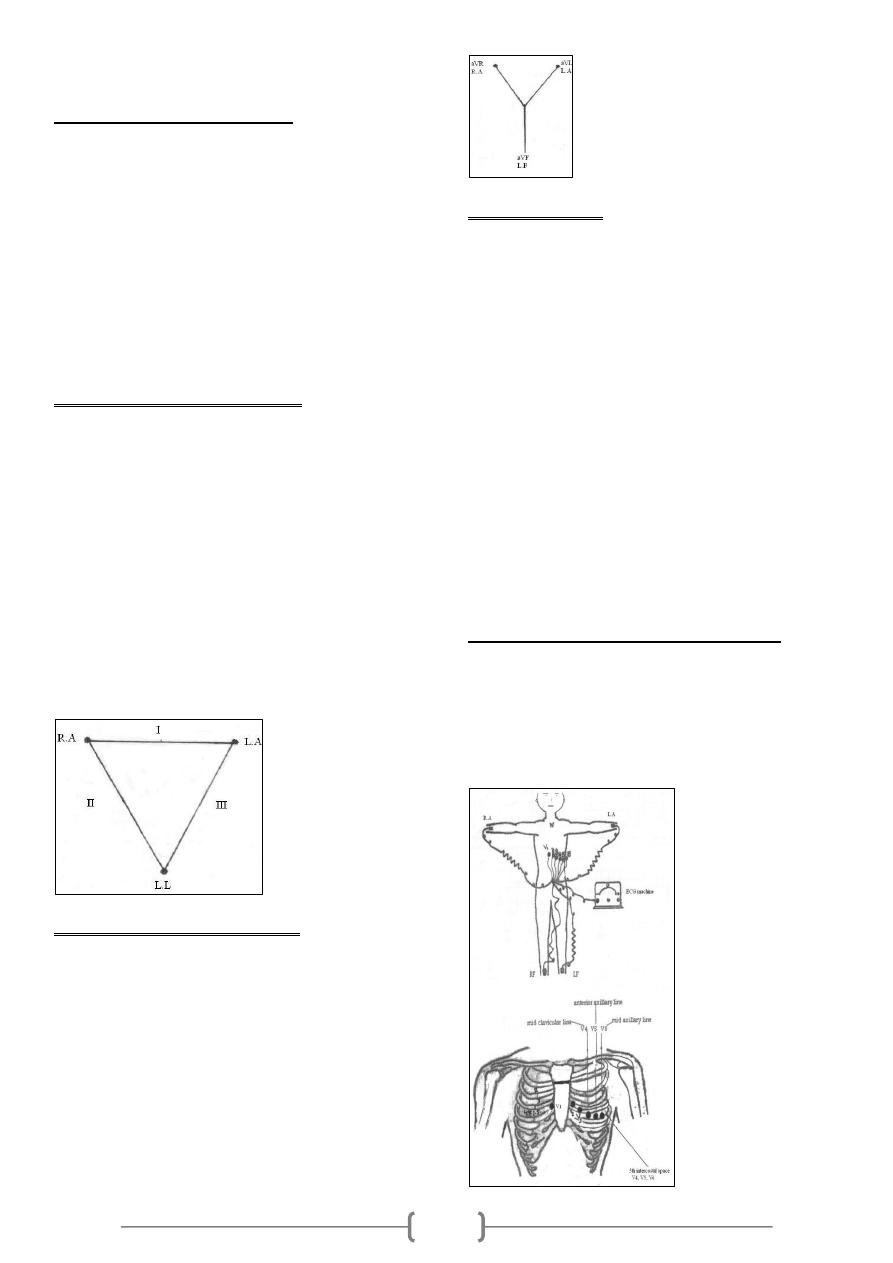
Bipolar standard limb leads (I, II, III):
These leads record the differences between the potentials in 2
limbs, by applying electrodes usually at the wrist and ankle.
The 3 standard bipolar limb leads include:
Lead I: This records the difference between the potential
in the left arm
(LA) and that in the right arm (RA).
Lead 11: This records the difference between the potential
in the right arm (RA) and that in the left leg (LL).
Lead III: This records the difference between the potential
in the left
leg (LL) and that in the left arm (LA).
Einthoven's triangle: This is an equilateral triangle, the
sides of which represent the 3 bipolar standard limb leads
while the heart lies at its centre.
Unipolar limb leads (aVR, aVL, aVF):
These measure the absolute (actual) potential at a certain
point. This is carried out by applying one electrode from the
electrocardiograph to the desired point (it is active, +ve or
exploring electrode) while the other electrode represents a
common reference point inside the instrument; it is the -ve
electrode (0 potential) i.e. the unipolar leads measure the
potential differences between active electrodes and zero
potential.
These are augmented unipolar limb leads that have magnified
amplitudes by about 50 % without any change in their
configuration, so they are called aVR, aVL and aVF (a =
augmented).
Unipolar chest leads:
Unipolar leads (precordial or chest leads) record the absolute
potential at 6 standard points on the anterior chest wall desig-
nated as V1 to V6, the locations of which are as follows:
V1: At the right margin of the sternum in the 4th right
intercostal space.
V2: At the left margin of the sternum in the 4th left
intercostal space.
V3: Midway between V2 and V4.
V4: At the left midclavicular line in the 5th intercostal
space.
V5: At the left anterior axillary line in the 5th intercostal
space.
V6: At the left midaxillary line in the 5th intercostal
space.
The precordial leads look at the heart in a horizontal plane
from the front & left sides. Leads V1 & V2 look at the right
ventricle and reflect its activity, V3 & V4 look at the
interventricular septum and reflect its activity, while leads V5
& V6 look at the left ventricle and reflect its activity.
Connections of the electrocardiograph:
By specific electrodes, the electrocardiograph is connected to
the 4 limbs and the chest at the same time. The right leg
connection is used to "earth" the subject (to minimize
interference currents). It is arranged so that an upward (+ ve)
deflection is produced when a depolarization wave is moving
toward the exploring electrode or a repolarization wave is
moving away from it, and vice versa.

2
Calibration of the electrocardiograph:
The electrocardiograph is calibrated so that a change of 1 mV
upward or downward produces a deflection of 10 mm
amplitude (10 small squares; 2 large squares), thus each mm
between the horizontal lines (voltage calibration lines) equals
0.1 mV. In other words, the thin horizontal lines calibrated at
1 mm interval and the thick horizontal lines at 5 mm
intervals. The vertical lines are time calibration lines in
which duration of each mm (small square) equals 0.04
second, each inch (2.5cm) is 1 second, divided into 5 large
squares, each large square (5 small squares) represents 0.20
second as each small square = 0.04 second.
Calculation of heart rate from ECG paper:
If the heart rhythm is regular, the heart rate (HR) ran be
counted by dividing the number of large squares between two
consecutive R waves into 300 or small squares into 1500. If
the rhythm is irregular, one can multiply the number of
complexes in 6 seconds by 10.
Speed:
It is the speed at which the chart paper moves. The standard
speed is 25 mm/sec. The importance of another speed (50
mm/sec) is in case of tachycardia (e.g. HR of 180 beat/min)
to obtain a proper ECG.
Sensitivity:
It means mm deflection for 1 mV (range; 5-10-20). The
higher the sensitivity of the instrument, the more the
deflection and vise versa. The standard sensitivity is 10
mm/mV (2 large squares); in cardiomegally you must reduce
the sensitivity.
ECG waves:
ECG (Electrocardiograph) is an indirect recording of
electrical potential of the heart. Normal ECG consists of the
following waves:
P wave caused by the depolarization process of the atria;
i.e., correspond to atrial depolarization just before
contraction (i.e., not atrial contraction).
QRS complex of waves caused by the depolarization
process of the ventricles; again before ventricular
contraction (i.e., not ventricular contraction).
T wave caused by the repolarization of the ventricles; the
ventricles recover from the state of depolarization.
Duration and intervals:
P wave, duration; 0.07-0.14 seconds and not higher than 3
mm.
PR interval, This is measured from the beginning of the P
wave to the beginning of the QRS complex; to the onset of
the Q wave if there is one and to the onset of the R wave if
there is no Q wave. This interval corresponds to the time
taken for the impulse to travel from the sinus node to the
ventricular muscle. It ranges normally between 0.12- 0.21
seconds. Abnormal PR interval is either long as in first
degree heart block or short as in WPW syndrome.
QRS complex, duration; 0.06 – 0.10 seconds. Abnormal wide
QRS indicate bundle branch block.
T wave, duration; 0.25 -0.35 seconds and not taller than 10
mm in chest leads.
QT interval, it represents the total time from the onset of
ventricular depolarization to the completion of repolarization.
It indicates the duration of ventricular systole i.e. contraction
of the ventricle lasts from the beginning of the Q wave to the
end of the T wave. Normally it is about 0.35 seconds; range
0.28 – 0.44 seconds.
3

4
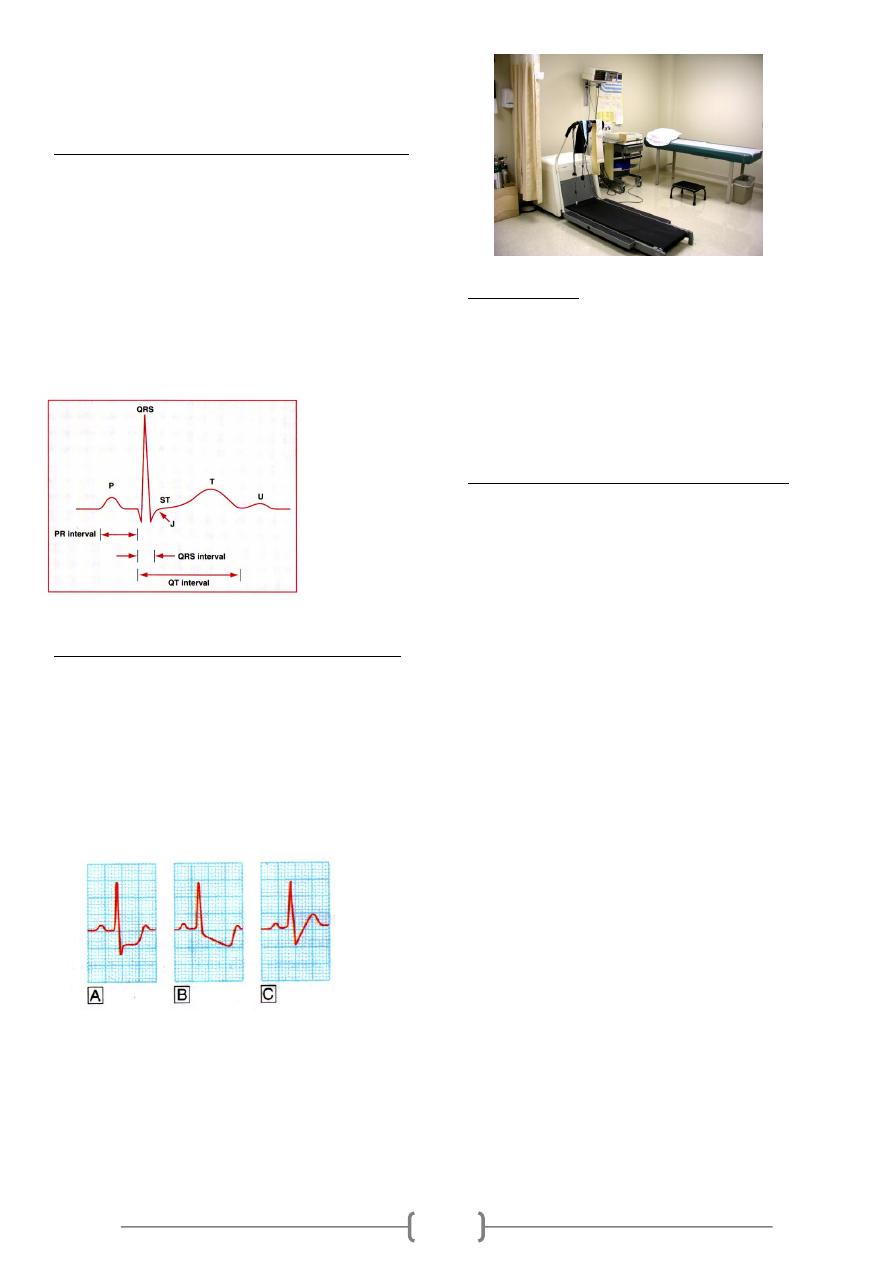
Exercise ECG test:
Exercise electrocardiography (ECG) is one of the most
frequent, non invasive modalities used to assess subjects with
suspected or proven cardiovascular disease.
The most common modes of exercise stress testing include
multistage bicycle ergometry and treadmill tests. The test,
"graded" for exercise intensity, includes submaximal levels
of three to four minutes duration each, progressing up to a
self-imposed fatigue level. The graded nature of the test
allows detection of ischemic manifestations and rhythm
disorders with small increments in exercise intensity.
Indications of exercise ECG test:
(1) Diagnostic indications:
1. Assessment of chest pain in patients with a probability
for coronary artery disease.
2. Arrhythmia provocation.
(2) Prognostic indications:
1. Evaluation of exercise tolerance and cardiac function.
2. Risk assessment after myocardial infarction.
3. Assessment of treatment for arrhythmia.
4. Evaluation of revascularization.
2. Preparation and Technique:
The following steps were performed before starting the
exercise test:
1) The room was checked for all equipments related to
cardiopulmonary resuscitation.
2) The subjects were asked to come overnight fasting or with
light breakfast at early morning.
3) The subjects were informed about details and hazards of the
test.
4) Shaving the hair of the chest and upper abdomen.
5) Electrode sites on limbs and chest were prepared with alcohol
to clean the skin.
6) The Manson-Likar limb lead modification was used; putting
the arm leads near the shoulders and lower limb leads on
sides of the abdomen.
Manson-Likar limb lead modification:
According to the Manson-Likar limb lead modification, the
electrodes were placed as follows:
1) RA (right arm): just below the right clavicle medial to deltoid
muscle.
2) LA (left arm): just below the left clavicle medial to deltoid
muscle.
3) RL (right leg): just above the right iliac crest on the
midaxillary line.
4) LL (left leg): just above the left iliac crest on the midaxillary
line.
5) V1: in the 4
th
intercostals space on the right sternal border.
6) V2: in the 4
th
intercostals space on the left sternal border.
7) V3: at the midpoint of a straight line between V2 and V4.
8) V4: in the 5
th
intercostals space on the midclavicular line.
9) V5: in the 5
th
intercostals space on the anterior axillary line.
10) V6: in the 5
th
intercostals space on the midaxillary line.
Exercise treadmill test protocol:
Modified Bruce Protocol
Workload is a reflection of oxygen consumption and hence
energy use.
Assessment of workload is measured by metabolic
equivalents (METs).
٭1 METs equals 3.5 ml oxygen/Kg per minute.
Heart rate response to exercise:
At the transition from rest to exercise, the heart rate increases
rapidly to value of 160-180 beats/min. During short periods
of maximal exercise, rates as high as 240 beats/min. have
been recorded. The initial rapid increase is thought to be the
result of central command influences or a brisk reflex from
mechanoreceptors. The almost instantaneous acceleration in
heart rate is due to vagal withdrawal than an increase in
sympathetic tone. Later, the increase in reflex activation of
pulmonary stretch receptors will trigger increased
sympathetic tone and additional parasympathetic withdrawal.
Increased circulating catecholamines from the adrenal glands
play a role as well. It has been shown that during exercise the
increase in heart rate accounts for a greater percentage of the
increase in cardiac output than does the increase in stroke
volume.
Blood pressure response to exercise:
The normal exercise response is an increase in the systolic
blood pressure which is progressive with the increase in
workloads to a peak response ranging from 160 to 200
mmHg, with the higher range of the scale in older subjects
with less compliant vascular system. In contrast, the diastolic
blood pressure does not usually change significantly. Failure
to increase systolic blood pressure beyond 120 mmHg, or a
sustained decrease greater than 10 mmHg is abnormal and
reflects either inadequate elevation of cardiac output because
of left ventricular systolic pump dysfunction or an excessive
reduction in systemic vascular resistance.
An abnormal systolic blood pressure response in
subjects with ischemic heart disease (IHD) is associated with
more extensive myocardial perfusion defects. Conditions
other than myocardial ischemia that have been associated
with failure to increase or an actual decrease in systolic blood
Stage Speed
(Km/h)
Grade/inclination
(%)
٭Workload
٭(METs)
Time
(minute)
1
2.7
10
5
3
2
4
12
7
3
3
5.4
14
9.5
3
4
6.7
16
13
3
5
8
18
16
3
5
pressure during progressive exercise are, cardiac arrhythmias,
vasovagal reactions, and ingestion of antihypertensive
drugs.
ECG findings during exercise stress testing:
In normal persons, the PR, QRS, and QT interval shortens as
heart rate increases. During exercise, P wave amplitude
increases, and the PR segment becomes progressively more
downsloping in the inferior leads. J-point or junctional
depression is a normal finding during exercise. In patients
with myocardial ischemia, however, the ST segment usually
becomes more horizontal (flattens) as the severity of
ischemic response worsens. Moreover, with progressive
exercise, the depth of ST segment depression may increase,
involving more ECG leads, and the patients may develop
chest pain.
Figure: The J-point in normal ECG waveform
Measurement of ST segment displacement:
ST segment depression is measured relative to the isoelectric
baseline (between the next T and P waves) at point 0.06 to
0.08 second (about 2 small squares) after the J- point.
Accordingly, detection of abnormal ECG changes during
exercise was depending on standard criteria for an abnormal
ST segment response which is horizontal (planar) or
downsloping depression of > 1mm, while upsloping ST
depression is considered as a normal fining during exercise.
Figure : Forms of exercise induced ST segment depression.
A- Plantar ST depression, is usually indicative of
myocardial ischemia.
B- Downsloping depression also usually indicates
myocardial ischemia.
C- Upsloping depression, however, may be a normal
finding.
The J- point:
The J-point represents the exact point at which the wave of
depolarization just completes its passage through the heart,
it occurs at the end of the QRS complex. At this point, all
parts of the ventricles are depolarized including both the
damaged and the normal parts, so that, no current is flowing
around the heart, therefore, the potential of ECG at this
instant is zero voltage.
Contra-indications for exercise testing:
1. Acute myocardial infarction.
2. Unstable angina.
3. Uncontrolled heart failure.
4. Acute myocarditis or pericarditis.
5. Acute systemic infection.
6. Deep vein thrombosis.
7. Uncontrolled hypertension (systolic blood pressure > 220
mmHg, diastolic > 120 mmHg.
8. Severe aortic stenosis.
9. Severe hypertrophic obstructive cardiomyopathy.
10. Untreated life threatening arrhythmia.
11. Recent aortic surgery.
12. Advanced atrioventricular block.
-END-

1
Exercise ECG test:
Exercise electrocardiography (ECG) is one of the most
frequent, non invasive modalities used to assess subjects
with suspected or proven cardiovascular disease.
The most common modes of exercise stress testing include
multistage bicycle ergometry and treadmill tests. The test,
"graded" for exercise intensity, includes submaximal levels
of three to four minutes duration each, progressing up to a
self-imposed fatigue level. The graded nature of the test
allows detection of ischemic manifestations and rhythm
disorders with small increments in exercise intensity.
Indications of exercise ECG test:
(1) Diagnostic indications:
1. Assessment of chest pain in patients with a probability
for coronary artery disease.
2. Arrhythmia provocation.
(2) Prognostic indications:
1. Evaluation of exercise tolerance and cardiac function.
2. Risk assessment after myocardial infarction.
3. Assessment of treatment for arrhythmia.
4. Evaluation of revascularization.
2. Preparation and Technique:
The following steps were performed before starting the
exercise test:
1) The room was checked for all equipments related to
cardiopulmonary resuscitation.
2) The subjects were asked to come overnight fasting or with
light breakfast at early morning.
3) The subjects were informed about details and hazards of the
test.
4) Shaving the hair of the chest and upper abdomen.
5) Electrode sites on limbs and chest were prepared with
alcohol to clean the skin.
6) The Manson-Likar limb lead modification was used; putting
the arm leads near the shoulders and lower limb leads on
sides of the abdomen.
Manson-Likar limb lead modification:
According to the Manson-Likar limb lead modification, the
electrodes were placed as follows:
1) RA (right arm): just below the right clavicle medial to
deltoid muscle.
2) LA (left arm): just below the left clavicle medial to deltoid
muscle.
3) RL (right leg): just above the right iliac crest on the
midaxillary line.
4) LL (left leg): just above the left iliac crest on the midaxillary
line.
5) V1: in the 4
th
intercostals space on the right sternal border.
6) V2: in the 4
th
intercostals space on the left sternal border.
7) V3: at the midpoint of a straight line between V2 and V4.
8) V4: in the 5
th
intercostals space on the midclavicular line.
9) V5: in the 5
th
intercostals space on the anterior axillary line.
10) V6: in the 5
th
intercostals space on the midaxillary line.
Exercise treadmill test protocol:
Modified Bruce Protocol
Workload is a reflection of oxygen consumption and hence
energy use.
Assessment of workload is measured by metabolic
equivalents (METs).
٭1 METs equals 3.5 ml oxygen/Kg per minute.
Target Heart Rate
Male = (220 – age) * 80%
Female = (200 – age) * 80%
In any step we find findings, we stop
Heart rate response to exercise:
At the transition from rest to exercise, the heart rate
increases rapidly to value of 160-180 beats/min. During
short periods of maximal exercise, rates as high as 240
beats/min. have been recorded. The initial rapid increase is
thought to be the result of central command influences or a
brisk reflex from mechanoreceptors. The almost
instantaneous acceleration in heart rate is due to vagal
withdrawal than an increase in sympathetic tone. Later, the
increase in reflex activation of pulmonary stretch receptors
will trigger increased sympathetic tone and additional
parasympathetic withdrawal. Increased circulating
catecholamines from the adrenal glands play a role as well.
It has been shown that during exercise the increase in heart
rate accounts for a greater percentage of the increase in
cardiac output than does the increase in stroke volume.
Blood pressure response to exercise:
The normal exercise response is an increase in the systolic
blood pressure which is progressive with the increase in
workloads to a peak response ranging from 160 to 200
mmHg, with the higher range of the scale in older subjects
with less compliant vascular system. In contrast, the
diastolic blood pressure does not usually change
significantly. Failure to increase systolic blood pressure
beyond 120 mmHg, or a sustained decrease greater than 10
mmHg is abnormal and reflects either inadequate elevation
of cardiac output because of left ventricular systolic pump
dysfunction or an excessive reduction in systemic vascular
resistance.
Stage
Speed
(Km/h)
Grade/inclination
(%)
٭
Workload
٭
(METs)
Time
(minute)
1
2.7
10
5
3
2
4
12
7
3
3
5.4
14
9.5
3
4
6.7
16
13
3
5
8
18
16
3
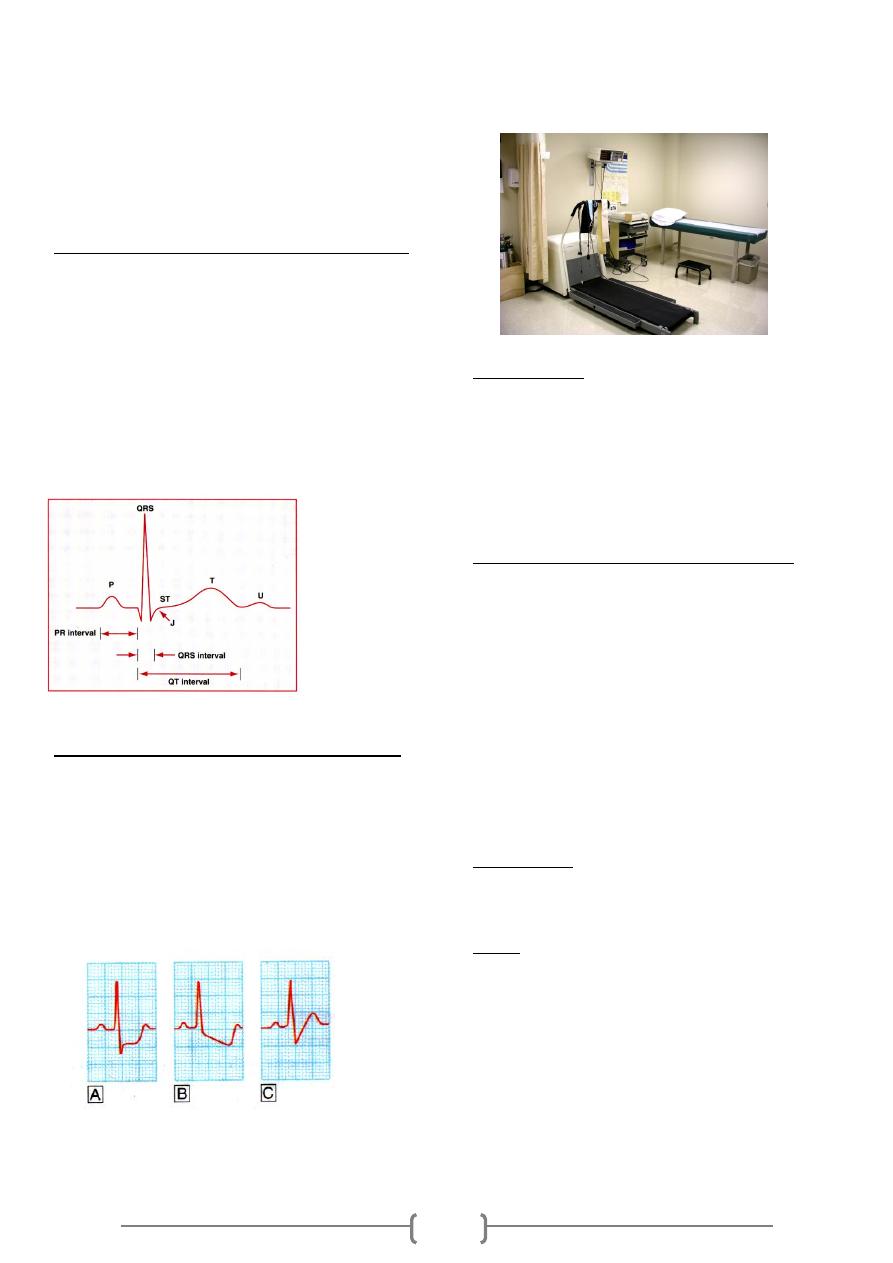
2
An abnormal systolic blood pressure response in
subjects with ischemic heart disease (IHD) is associated
with more extensive myocardial perfusion defects.
Conditions other than myocardial ischemia that have been
associated with failure to increase or an actual decrease in
systolic blood pressure during progressive exercise are,
cardiac arrhythmias, vasovagal reactions, and ingestion of
antihypertensive drugs.
ECG findings during exercise stress testing:
In normal persons, the PR, QRS, and QT interval shortens as
heart rate increases. During exercise, P wave amplitude
increases, and the PR segment becomes progressively more
downsloping in the inferior leads. J-point or junctional
depression is a normal finding during exercise. In patients
with myocardial ischemia, however, the ST segment usually
becomes more horizontal (flattens) as the severity of
ischemic response worsens. Moreover, with progressive
exercise, the depth of ST segment depression may increase,
involving more ECG leads, and the patients may develop
chest pain.
Figure: The J-point in normal ECG waveform
Measurement of ST segment displacement:
ST segment depression is measured relative to the isoelectric
baseline (between the next T and P waves) at point 0.06 to
0.08 second (about 2 small squares) after the J- point.
Accordingly, detection of abnormal ECG changes during
exercise was depending on standard criteria for an abnormal
ST segment response which is horizontal (planar) or
downsloping depression of > 1mm, while upsloping ST
depression is considered as a normal fining during exercise.
Figure : Forms of exercise induced ST segment depression.
A- Plantar ST depression, is usually indicative of
myocardial ischemia.
B- Downsloping depression also usually indicates
myocardial ischemia.
C- Upsloping depression, however, may be a normal
finding.
The J- point:
The J-point represents the exact point at which the wave of
depolarization just completes its passage through the
heart, it occurs at the end of the QRS complex. At this
point, all parts of the ventricles are depolarized including
both the damaged and the normal parts, so that, no current is
flowing around the heart, therefore, the potential of ECG at
this instant is zero voltage.
Contra-indications for exercise testing:
1. Acute myocardial infarction.
2. Unstable angina.
3. Uncontrolled heart failure.
4. Acute myocarditis or pericarditis.
5. Acute systemic infection.
6. Deep vein thrombosis.
7. Uncontrolled hypertension (systolic blood pressure > 220
mmHg, diastolic > 120 mmHg.
8. Severe aortic stenosis.
9. Severe hypertrophic obstructive cardiomyopathy.
10. Untreated life threatening arrhythmia.
11. Recent aortic surgery.
12. Advanced atrioventricular block.
Risk Factors
Hyperlipidemia, Hypertension, Diabetes Mellitus, Smoking,
Family History, Obesity & Age (male>40 , female>50)
Notes
Heart rate under control of SA normally (SA >100) but heart
rate normally = 72
This is because of parasympathetic on SA node.
Heart rate increase during exercise due to:
Decrease in parasympathetic activity on SA node
Increase in sympathetic activity
When blood pressure increase abnormally, this is a sign of
atherosclerosis
BP = CO * PR - - - CO = SV * HR
BP: blood pressure/ CO: Cardiac output / PR: peripheral
resistance / SV: stroke volume / HR: heart rate
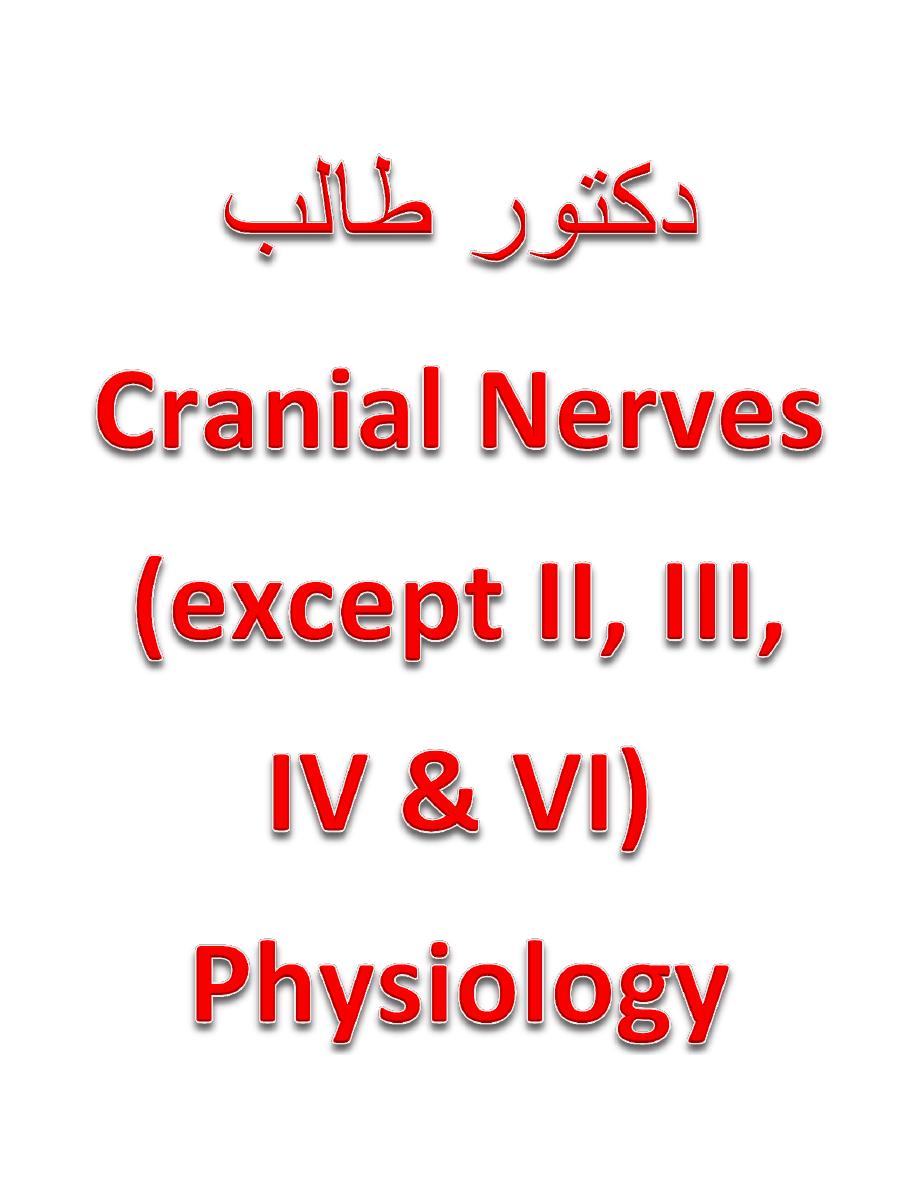
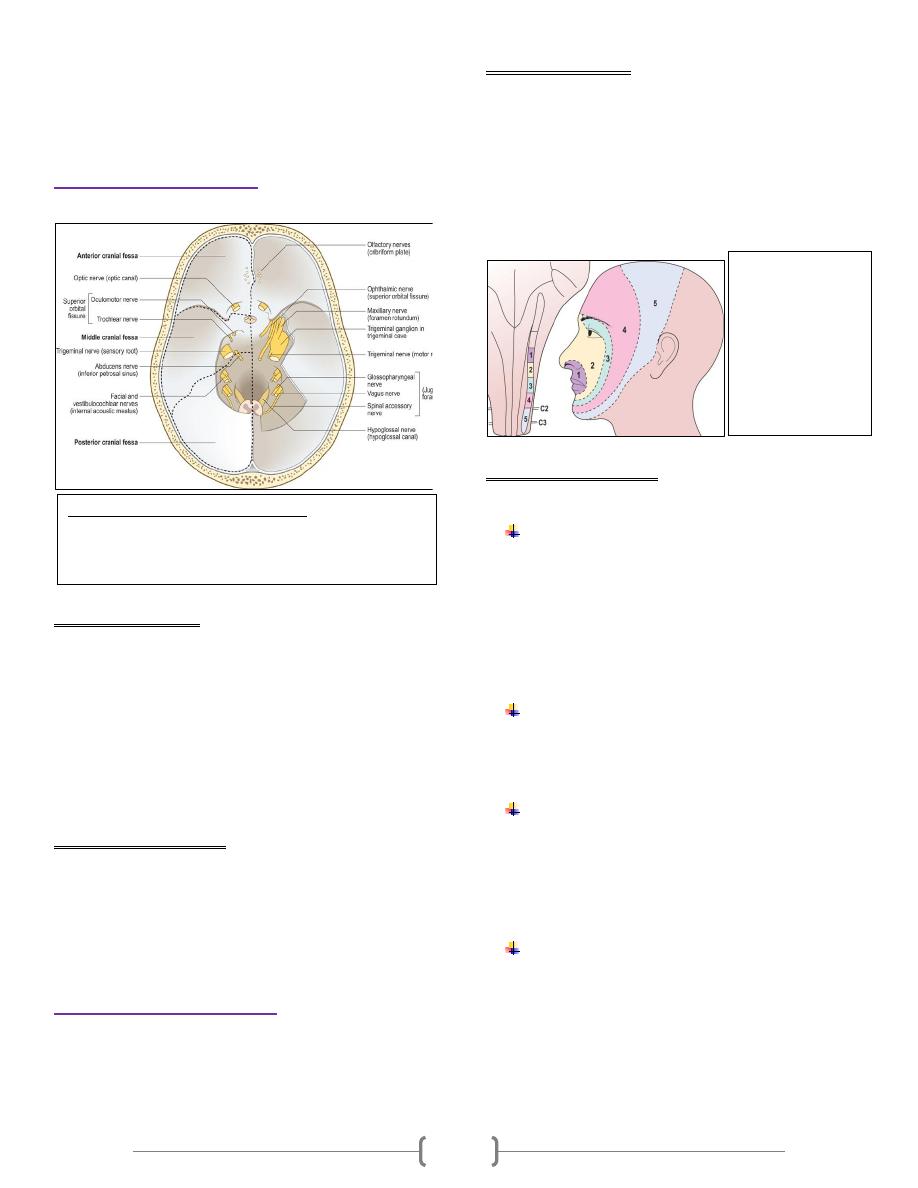
1
Examination of Cranial nerves
(Except II, III, IV, and VI)
The olfactory (I) nerve
The olfactory nerve conveys the sense of smell
Abnormal findings
loss of the sense of smell (anosmia) may result from damage to
the olfactory filaments after head injury, local compression or
invasion by skull base tumours. Patients usually complain of
altered ability to taste when they have lost the sense of smell.
When pleasant odours are perceived as unpleasant, this is
called parosmia. It is uncommon but may occur after head
trauma, with sinus infection or as a side-effect of drugs.
Olfactory hallucinations may occur in Alzheimer's disease and
focal epilepsies.
Examination sequence
1- Check that the nasal passages are clear
2- Ask the patient to close his eyes & shut one nostril with a
finger
3- Present commonly available odours, e.g. coffee, chocolate,
soap or orange peel, and ask the patient to sniff and identify
them
The trigeminal (V) nerve
The V nerve provides sensation to the face, mouth and part of
the dura, and motor supply to the muscles of the jaw involved
in chewing
Abnormal findings
Unilateral loss of sensation in one or more branches of the V
nerve may result from direct injury in association with facial
fractures particularly maxillary n. or local invasion by cancer.
Lesions within the cavernous sinuses, e.g. cancer, often result
in loss of the corneal reflex & ophthalmic cutaneous sensory
loss.
Although thoracic dermatomes are often involved, the
ophthalmic division of the trigeminal (V) nerve is commonly
affected
Examination sequence
There are four functions of the V nerve: sensory, motor
and two reflexes
-sensory
1- Ask the patient to close his eyes and say 'yes' each time he
feels you lightly touch them using the edge of a tissue. Do this
in the areas of the 3 branches of the nerve.
2- Repeat, using a fresh neurological pin, e.g. Neurotip to test
superficial pain
3- Use an orange stick to test touch on the anterior two-thirds
of the tongue. Ask the patient to close his eyes and indicate
when they feel you touch the tongue
-motor
1-Inspect for wasting of the muscles of mastication
2-Ask the patient to clench his teeth; feel the masseters
3-Ask the patient to open his jaw against your hand, which is
providing resistance, and note any deviation
-corneal reflex
1- Explain to the patient what you are going to do.
2- Ask the patient to look to the ceiling and depress the lower
eyelid.
3- touch the lateral edge of the cornea with a wisp of damp
cotton wool
4- Look for both direct and consensual blinking.
-jaw jerk
1- Ask the patient to let his mouth hang loosely open.
2- Place your forefinger in the midline between lower lip and
chin.
3- Percuss your finger gently with the tendon hammer noting
any reflex shutting of the jaw. The normal response is absent
or just present.
Figure 11.6 Base of the cranial cavity: showing the dura
mater, with the cranial nerves and their exits from the
skull. On the right side, part of the tentorium cerebelli and
the roof of the trigeminal cave have been removed.
Figure 11.7
Trigeminal nerve.
Areas 1-5 indicate
distribution of pain
fibres in the spinal
tract of V, with 1
being the pons and
5 being the upper
cervical cord.
2
The facial (VII) nerve
The facial nerve sends motor fibres to the muscles of facial
expression. It receives taste sensation from the anterior two-
thirds of the tongue.
Abnormal findings
There is weakness of both upper and lower facial muscles.
Bell's palsy is a condition presenting with acute lower motor
neurone paralysis. It may be associated with loss of taste
(hypogeusia, ageusia) and high-pitched sounds appearing
unpleasantly louder than normal (hyperacusis). Bell's
phenomena occurs when the patient is unable to close the eye
because the eyeball rolls upwards, exposing the conjunctiva
below the cornea.
In unilateral VII nerve upper motor neurone lesions, weakness
(facial paresis) is marked in the lower facial muscles with
relative sparing of the upper face. This is because there is
bilateral cortical innervation of the upper facial muscles.
While the nasolabial fold may be flattened and the corner of
the mouth drooping, eye closure is usually well preserved.
Involuntary emotional movements, e.g. smiling, employ
different neural pathways and may be preserved in the
presence of paresis.
Bilateral facial palsy is less common than unilateral lesions,
but both upper and lower motor neurone disorders
occasionally occur. Extrapyramidal disorders, particularly
Parkinson's disease, can result in a loss of spontaneous facial
movements, but involuntary facial movements often
complicate advanced Parkinson's disease. These movements
(dyskinesias) commonly involve the mouth and tongue
(orolingual), or mouth and face (orofacial), or may take the
form of facial grimacing.
Examination sequence
Motor function
-Carefully inspect the whole face for any asymmetry or for
Figure 11.10 Eliciting the jaw jerk.
Figure 11.8 Herpes zoster. (A) The ophthalmic division of the
left trigeminal (V) nerve is involved. (B) The maxillary division
of the left V nerve. (C) Cervical spinal root left C5. (D) Thoracic
spinal root right T8.
Figure 11.11 Component fibres of the facial nerve and
their peripheral distribution. Red shows motor fibres;
green, sensory; and blue, parasympathetic.
Figure 11.12 Lesions of the pons. Lesions at (1) may result in
ipsilateral VI and VII nerve palsies and contralateral
hemiplegia; at (2) ipsilateral cerebellar signs and impaired
sensation on the ipsilateral side of the face and on the
contralateral side of the body may occur.
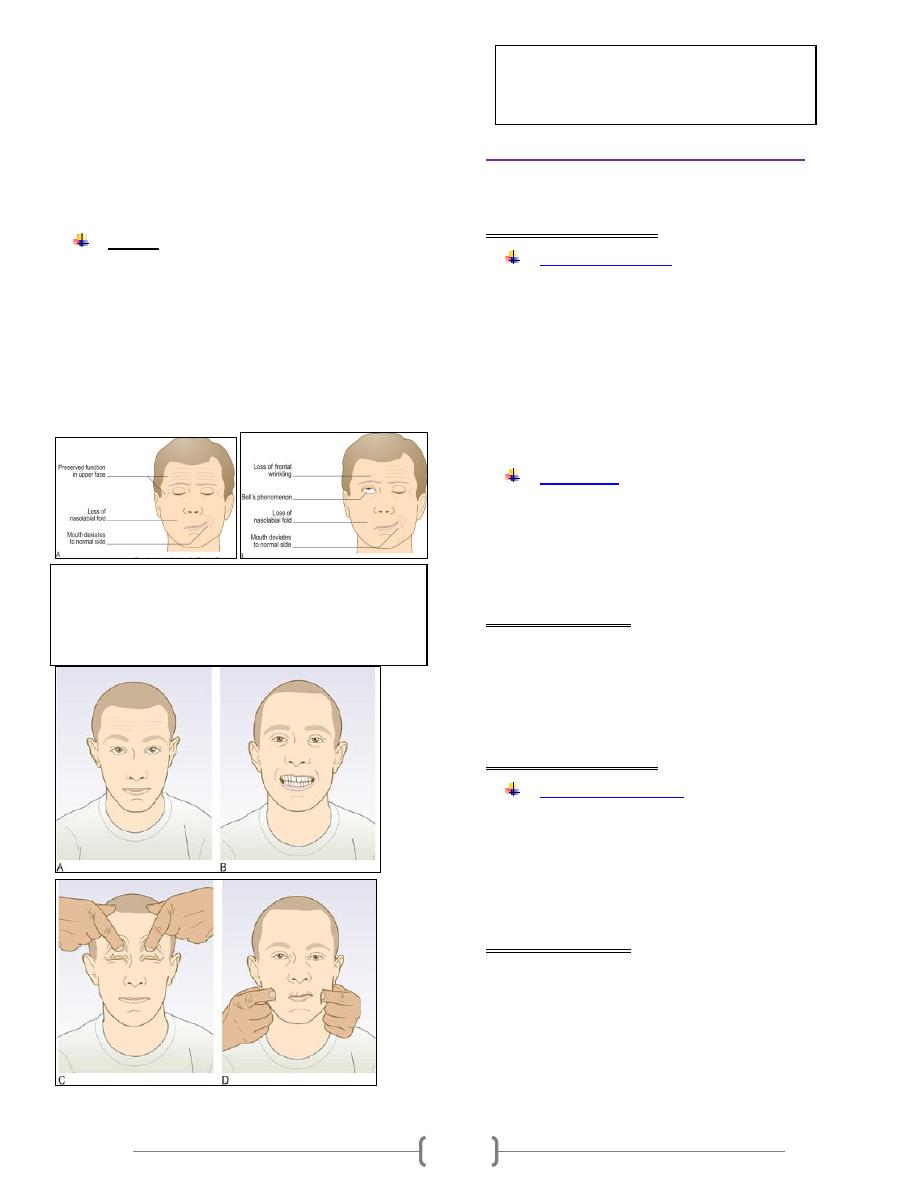
3
differences in blinking or eye closure on one side.
-Watch for spontaneous or involuntary movement. Minor
asymmetry of the face is common and rarely pathological; ask
the patient's partner if they have noticed a difference.
-Ask the patient to wrinkle the forehead.
-Ask the patient to bare the teeth.
-Test power by saying 'Screw your eyes tightly shut and stop
me from opening them,' then 'Blow out your cheeks with your
mouth closed'.
2- Taste
-Instruct the patient not to speak during the test.
-Ask the patient to put out his tongue.
-Use cotton buds dipped in sugar (sweet), salt, vinegar (sour)
and quinine (bitter) solutions. Apply them one at a time to the
anterior two-thirds of the tongue.
-Ask the patient to point to sweet, salt, sour and bitter on a
card to indicate his response.
-The patient should rinse out his mouth with water between
each test
The vestibuloscochlear (VIII) nerve
responsible for hearing (cochlear) and balance (vestibular)
Examination sequence
Whispered voice test
1- Stand behind the patient.
2- Start with your mouth about 15 cm from the ear you are
testing.
3- Mask hearing in the other ear by rubbing the tragus.
4- Ask the patient to repeat your words. Use a combination of
numbers and letters. Start at 15 cm with a normal speaking
voice to confirm that the patient understands the test.
5- Repeat, but this time at arm's length from the patient's ear.
Typically, if a patient can hear a whispered voice at 60 cm that
is normal.
Weber's test
1-Hit the fork to make it vibrate.
2-Place the base of the fork in the middle of the forehead.
3-Ask the patient where he hears the sound; normally this is in
the middle or equally in both ears.
4-Note to which side Weber's test lateralizes
Abnormal findings
In symmetrical hearing loss, the sound is also heard in the
middle. It is heard loudest in the ear with conductive deafness,
since there is no interference from extraneous noise. In
unilateral sensorineural deafness the sound is loudest in the
unaffected ear
Examination sequence
Rinne's test (Fig. 13.15
)
1-Hit the prongs of the fork to make it vibrate.
2-Place it at the patient's external auditory
meatus; ask if he can hear it.
3-Place the still-vibrating base on the mastoid
process and ask whether it is louder in front of or
behind the ear.
Abnormal findings
If the sound is louder at the ear canal, the test is positive and
air conduction is better than bone conduction. Record this as
AC > BC; this is normal.
If the sound is louder on the mastoid process, the test is
negative; bone conduction is better than air conduction.
Record this as BC > AC.
Rinne's test is negative in conductive deafness. An exception
is when one ear has no hearing at all. The test may be negative
Figure 11.13 Types of facial weakness. (A) Weakness is caused
by a lesion of the precentral area of the pyramidal tract (upper
motor neurone). (B) The cause is a lesion of the facial nerve or
nucleus (lower motor neurone); Bell's phenomenon is also
shown.
Figure 11.14 Testing the motor function of the facial
nerves. (A) Ask the patient to raise the eyebrows. (B)
Then ask him to show the teeth. (C) Next close the
eyes against resistance. (D) Then blow out the cheeks.
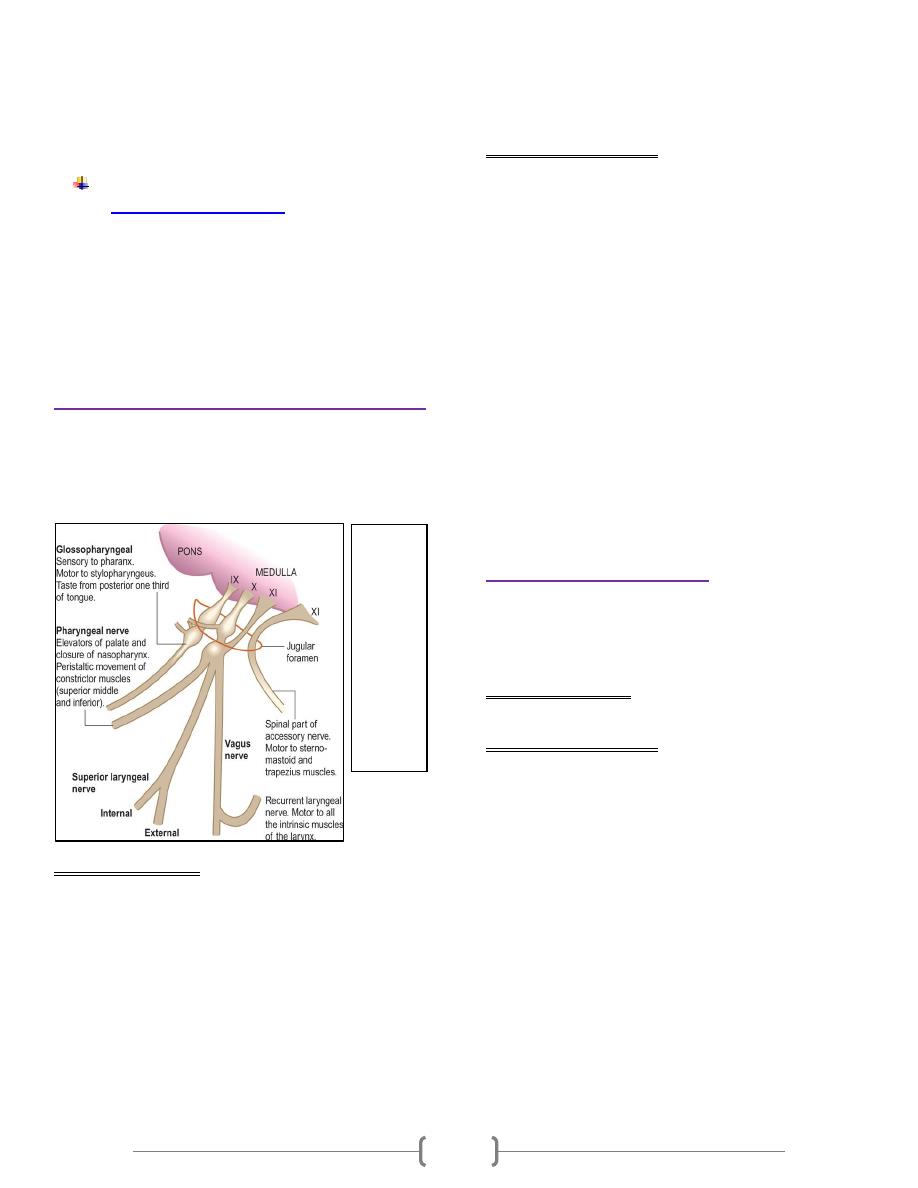
4
because sound is conducted through the skull bones to the
'good' ear - a false-negative Rinne's test. The Weber test is
more sensitive than Rinne's test in unilateral conductive
deafness, so a positive Rinne with a Weber referred to the
deafer ear indicates a relatively mild conductive deafness.
Testing vestibular function (vertigo)
Dix-Hallpike positional test
1-Ask the patient to sit upright, close to the edge
of the couch.
2-Turn the patient's head 45° to one side.
3-Rapidly lower him, so that the head is now 30°
below the horizontal. Ask patients to keep their
eyes open.
4-Watch their eyes carefully for nystagmus.
Repeat the test, turning the head to the other side.
The glossopharyngeal (IX) & vagus (X) N
The glossopharyngeal (IX) nerve carries sensation from the
pharynx and tonsils, and sensation and taste from the posterior
third of the tongue. The vagus (X) nerve carries important
sensory information but also innervates upper pharyngeal and
laryngeal muscles.
Abnormal findings
Damage to the X nerve on one side leads to deviation of the
uvula when the soft palate is elevated saying 'Aaah'. Damage
to the recurrent laryngeal branch of the X nerve due to lung
cancer, thyroid surgery, mediastinal tumours and aortic arch
aneurysm causes dysphonia and a 'bovine' cough Bilateral X
nerve lesions cause both bulbar and pseudobulbar palsies.
They are associated with dysphagia, dysarthria and either
lower or upper motor neurone lesions of the hypoglossal (XII)
nerve. Less severe cases can result in nasal regurgitation of
fluids and nasal air escape when the cheeks are puffed out.
The gag reflex produces elevation of the palate and the
pharynx, very similar to the motions seen at the beginning of
vomiting.
Examination sequence
1- Assess the patient's speech for dysarthria or dysphonia.
2- Ask him to say 'Aaah'; look at the movements of the palate
and uvula using a torch.
3- Ask the patient to puff out the cheeks with the lips tightly
closed. Look and feel for air escaping from the nose.
Normally, both sides of the palate elevate symmetrically & the
uvula remains in the midline. In order for the cheeks to puff
out, the palate must elevate & occlude the nasopharynx. If
palatal movement is weak, air will escape audibly through the
nose.
4- Ask the patient to cough; assess the strength of the cough.
5- Testing pharyngeal sensation and the gag reflex is
unpleasant for the patient. Use the more reliable water
swallow test instead, in fully conscious patients only.
Administer 3 teaspoons of water and observe for absent
swallow, cough or delayed cough, or change in voice quality
after each teaspoon. If there are no problems, watch for the
same reactions as above while the patient swallows a glass of
water
The accessory (XI) nerve
The accessory nerve has two components: a cranial part
closely related to the vagus a spinal part which provides fibres
to the upper trapezius and the sternocleidomastoid muscles.
Abnormal findings
Weakness of neck movement
Examination sequence
1-Face the patient and inspect the
sternocleidomastoid muscles for wasting or
hypertrophy; palpate them to assess their bulk.
2-Stand behind the patient to inspect the trapezius
muscle for wasting or asymmetry
3-Ask the patient to shrug the shoulders while you
apply downward pressure with your hands to assess
their power
4-Test power in the left sternocleidomastoid by
asking the patient to turn the head to the right while
you provide resistance with your hand placed on the
right side of the patient's chin .Reverse the
procedure to check the right sternocleidomastoid.
Figure
11.15
The
lower
cranial
nerves:
glossoph
aryngeal
(IX),
vagus
(X) and
accessory
(XI).
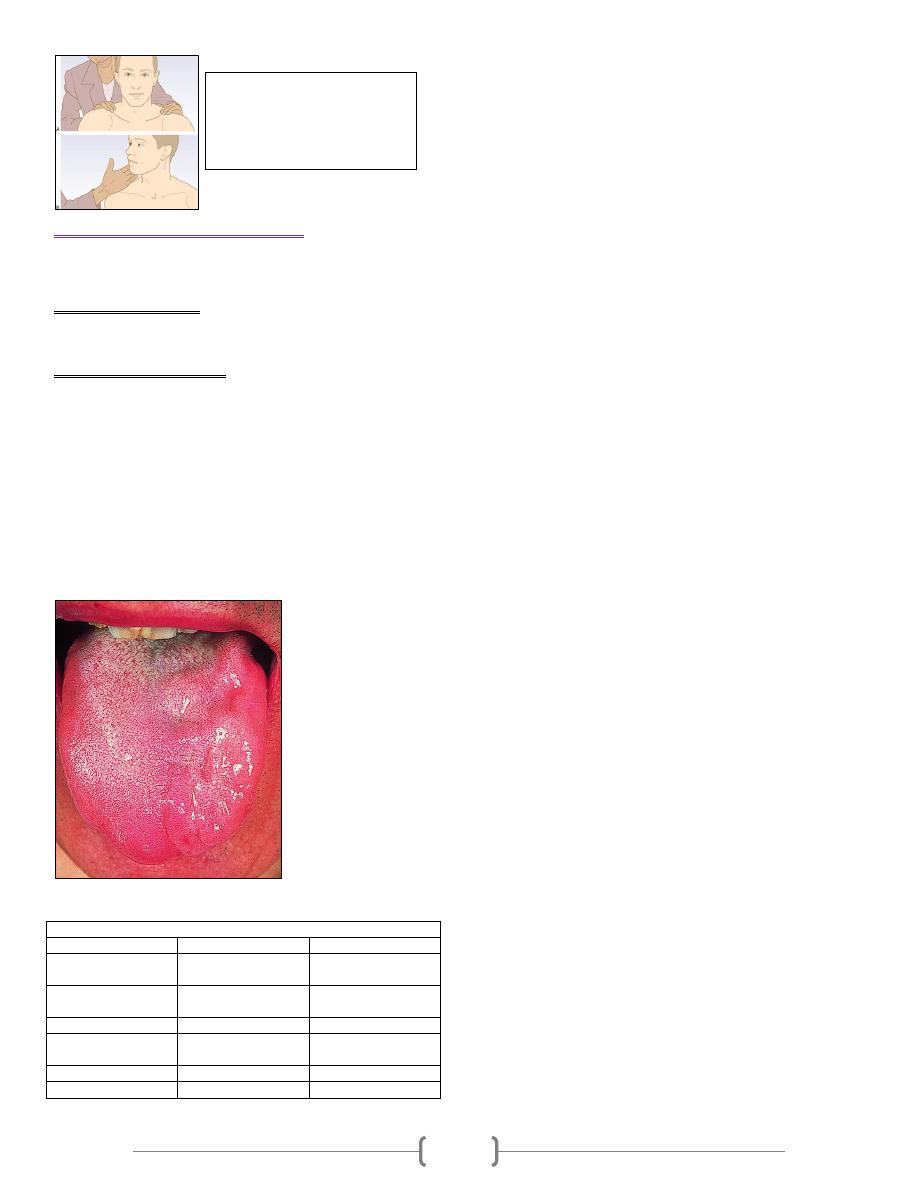
5
The hypoglossal (XII) nerve
The XII nerve innervates the muscles of the tongue
Abnormal findings
Dysarthria and chewing/swallowing problems
Examination sequence
1- Ask the patient to open the mouth. Look at the tongue at
rest for wasting, fasciculation or involuntary movement.
2- Ask the patient to put out the tongue. Look for deviation or
involuntary movement.
3- Ask the patient to move the tongue from side to side.
4- Test power by asking the patient to press the tongue against
the inside of each cheek in turn while you press from the
outside with your finger.
5- Assess speech by asking the patient to say 'yellow lorry'.
6- Assess swallowing with a water swallow test
Figure 11.17 Left hypoglossal nerve lesion.
11.9 Comparison of bulbar and pseudobulbar palsy
Bulbar palsy
Pseudobulbar palsy
Motor lesion
Lower motor
neurone
Speech
Dysarthria
Dysarthria and
dysphonia
Swallowing
Dysphagia
Dysphagia
Tongue
Weakness, wasting
and fasciculation
Conical, spastic
Jaw jerk
Absent
Brisk
Emotional lability
Absent
Present
Figure 11.16 Testing the
trapezius and left
sternocleidomastoid muscles.
(A) Trapezius. (B) Left
sternocleidomastoid.

1
OCULAR PHYSIOLOGY
Dr.Ahmed Al Shaibani
Objectives
1. Review of ocular anatomy (Ex. after image)
2. Visual pathway & field (Ex. Crossed & uncrossed diplopia,
mechanical stimulation of the retina , blind spot localization,
Light reflex & confrontation test )
3. Visual acuity (Ex. Snellen chart)
4. Color vision (Ex. ishehara test)
5. Fundoscopy (Ex. normal retinal appearance & structures)
6. Ocular motility & gaze position(Ex. CN II,III,IV &VI exam )
Review of ocular anatomy
• Layers of the eye ball
1. Conj
2. Cornea
3. Sclera
4. Uveal tissue (iris, cilliary body & choroid)
5. retina
Ant. & post. Segment(related to lens)
Ant. & post chamber( related to iris)
Optic nerve
Review of retina & photoreceptor
• Outer pigmented layer
• Neurosensory retina consists of photoreceptors, ganglion cells
and interconnecting bipolar cells.
• Rod photoreceptors are responsible for night vision and
detection of peripheral movement
• Cone photoreceptors are responsible for colour and central
vision
• Retina consist of:
Outer pigmented layer
Inner nervous layer
Ex.1// After image
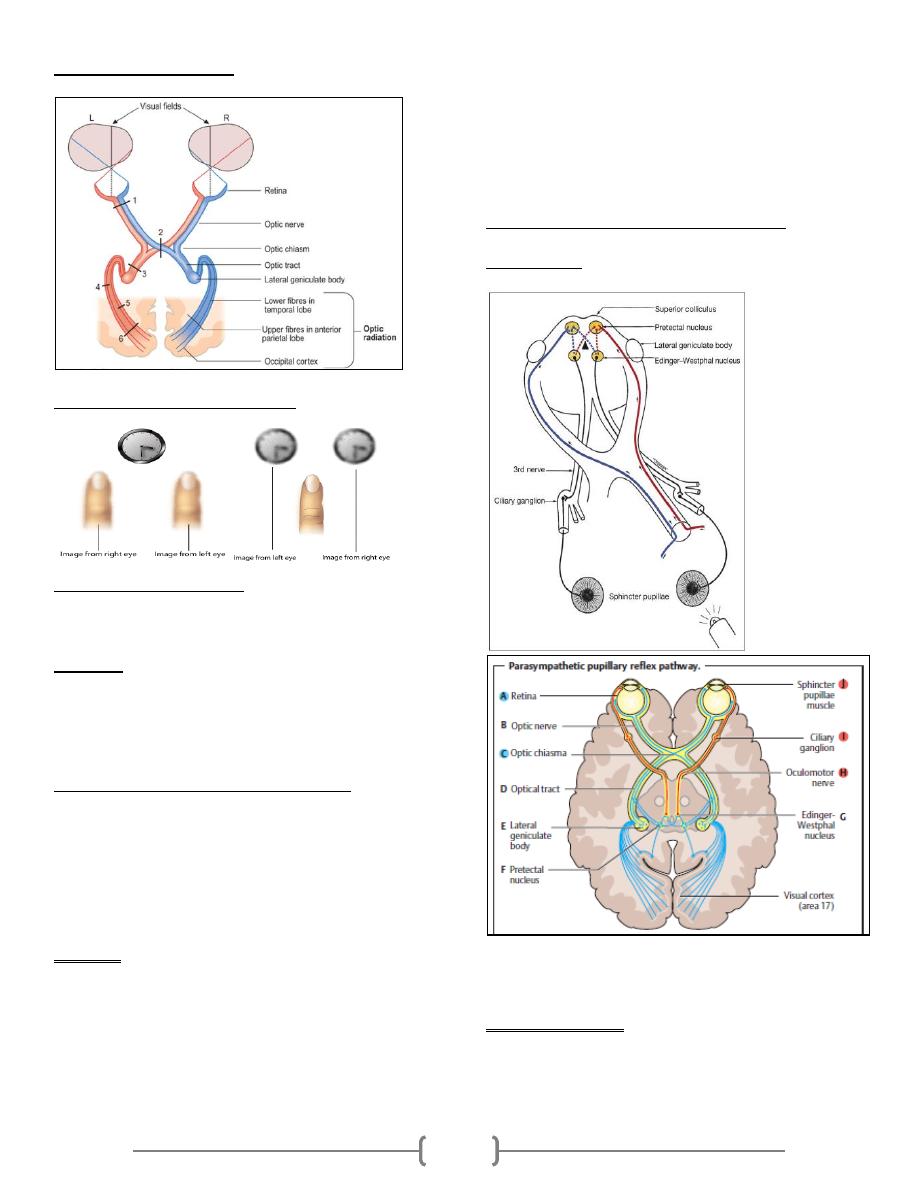
2
Visual pathway & field
Crossed Vs Uncrossed diplopia
Corresponding retinal points any retinal point in the right
eye temporal retina has its corresponding point in the left eye
nasal retina, single image of sigle object is seen when thes
point stimulated simultaneously.
Diplopia is the simultaneous appreciation of two images of
the same object in different positions and results from images
of the same object falling on non-corresponding retinal points
Crossed
Uncrossed
Mechanical Stimulation of the Retina
The eye has properties similar to those of a camera, in that the
image formed on the retina is inverted. Light falling on the
retina on one side of the eye gives a visual response in the
opposite side of the visual field. Mechanical stimulation of the
retina, by pressure on the eyeball, also gives a visual response
that is inverted.
Procedure
• Turn your gaze to the left, and shut both eyes. Keep looking to
the left.
• With a fingertip, press gently on the right side of your right
eyeball, at the corner of the eye. Note the visual effect.
• Slide your finger up and down, and note the direction of
movement of the visual response.
• Turn your gaze to the right, and similarly press on the left side
of your right eyeball, at the corner of the eye. Again, note the
visual effect. You should find that the main visual response to
stimulation is a bright circle or disc, on the opposite side of the
visual field from the site of stimulation. Stimulation of the
retina on the right side of the eye gives a response on the left,
and vice versa.
blind spot localization (10-20 degree temporally )
Light reflex
The pupil refers to the central opening in the iris. It acts as an
aperture to improve the quality of the resulting image by
controlling the amount of light that enters the eye.
Pupillary light reflex: This reflex arc consists of an afferent
path that detects and transmits the light stimulus (II) and an
efferent path that supplies the muscles of the iris(III).

3
• Pupil size ranges from approximately 1mm (miosis) to
approximately 8mm (mydriasis).
• Normally”ideally” 2.5-4mm.
• Pupils tend to be wider in teenagers and in darkness; joy, fear,
or surprise due to increased sympathetic tone.
• Pupils tend to be narrower in the newborn due to
parasympathetic tone, in light, during sleep, and in addicts
Testing the Light Reflex
1. Light reflex is tested in dim light where the pupil is slightly
dilated.
2. The patient gazes into the distance to neutralize near-field
miosis.
Direct light reflex: The examiner first covers both of the
patient’s eyes, then uncovers one eye or by projecting direct
light to the examined eye. Normally the pupil will constrict
after a latency period of about 0.2 seconds. Pupil reaction of
the contralateral eye ic called indirect or consensual light
reflex. (why?)
Visual field
Defined as the area or space that is covered by vision.It is
measured monocularly.
Normal limits extends approximately 50° superiorly, 60°
nasally, 70° inferiorly and 90° temporally
Types
1. Confrontational
2. Static perimetry
3. Kinetic perimetry
• Pathological Interpretation
1. Depression
2. Field contraction
3. scotoma
• Indication
1. Screening
2. Follow up glaucoma
3. Visual pathway study
Procedure
1. Sit directly facing the patient, about 1 metre away
2. Your right eye infront his left eye.
3. Cover one eye for both of you.
4. Ask the patient to keep looking at your eyes.
5. Start to enter your finger or any target to the field.
6. Compare between your & patients’ field.
7. Repeat step 5 to remaining 3 field quarter.
8. Repeat the procedure for the other eye.
Visual Acuity
Definition: It is the ability to appreciate the form of the
smallest retinal image.
Types :
1) Unaided VA, eye without correction.
2) Best corrected VA , eye with corrected refraction
3) Absolute VA, eye with corrected refraction & relaxed
accommodation
Factors affecting VA :
1. Refractive errors
2. Contrast
3. Pupil size (2.5-4mm)
4. Light intensity
5. Tear film
6. Stimulated retina (fovea,parafoveal or periphral retina)
Causes of decrease VA:
1. Refractive errore (myopia,hypermetropia & astigmatism).
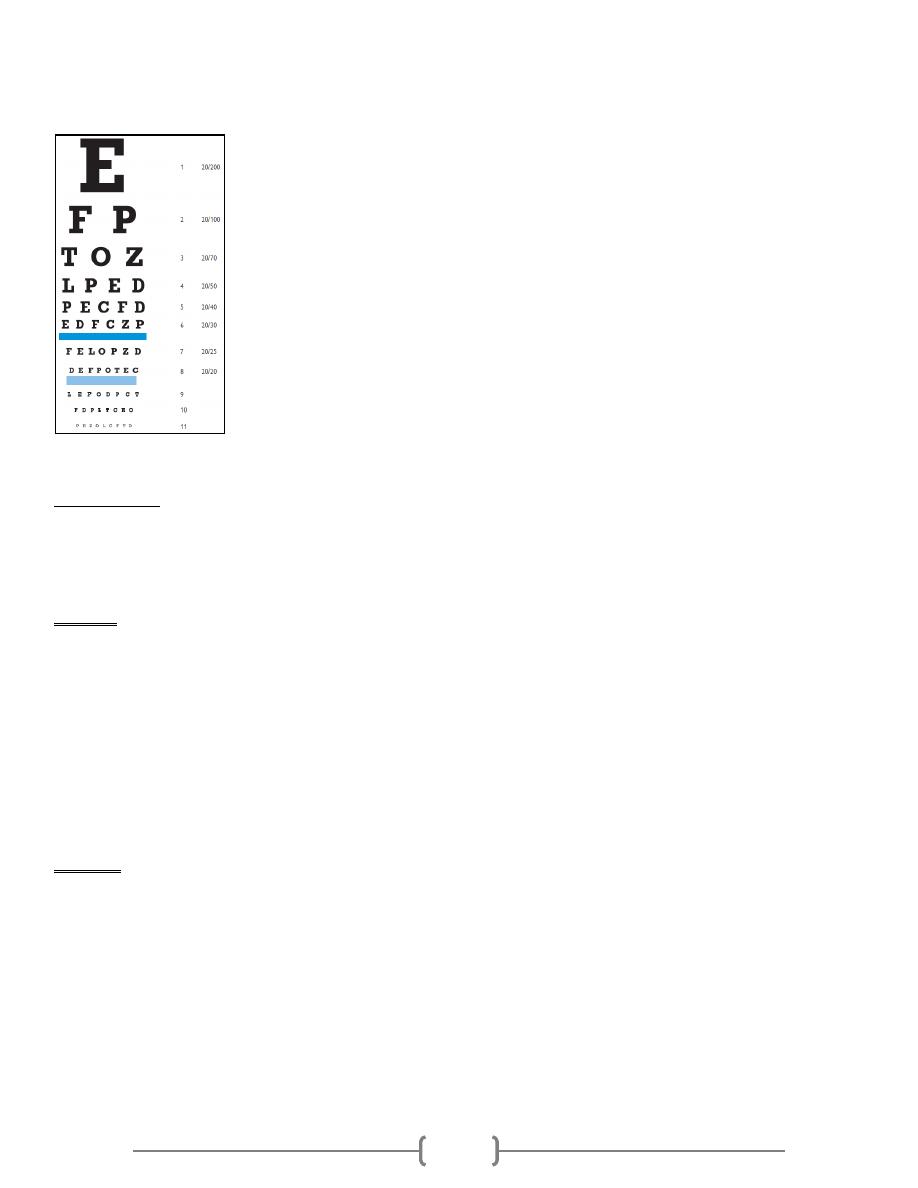
4
2. Media opacities (cornea,lens or vitreous).
3. Retinal dis. (DRP,RD…..).
4. Amblyopia
Visual Acuity
Snellen chart
Is achart printed with eleven lines of block letters. The first
line consists of one very large letter, which may be one of
several letters, for example E, H, or N. Subsequent rows have
increasing numbers of letters that decrease in size.
principles
The numerator is the actual distance used (usually 6 m)
…...why?
The denominator is the distance at which smallest letter
subjectively read, can be read by normals.
the thickness of the lines equals the thickness of the white
spaces between lines .
the height and width of the optotype (letter) is five times the
thickness of the line.
Normal acuity is designated 6/6, and other acuities are
expressed as ratios with a numerator of 6
(ex.6/9,6/12,6/24…..etc.).
Procedure
1. Stand 6 meters from the chart.
2. Ensure good ambient lighting.
3. If you wear corrective glasses, read the letters first without
your glasses (manifestVA), then with (BCVA).
4. Cover one eye with a card and read from the top down until he
can no longer distinguish the letters.
5. Switch over and repeat with the other eye.
6. If you cannot see the top line ?
Finger count (distance by meter)
Hand movement (+ve /-ve)
Light perception ( +ve/-ve, if +ve , do projection)

5
Color vision
It is the capacity of an organism to distinguish objects based
on on the wavelength of the light they reflect,emit or transmit.
Theories of color vision
1. Trichromatic (red564-580nm/green534-545nm/blue420-
440nm)
2. Opponent (red vs green/blue vs yellow)
Color blindness
• X-Linked Recessive .,skip generation
• Red /Green form is the most common type( 99%).
• 12% of male, 1% of female.
Ishihara test
These are coloured spots forming numbers which the patient
reads out.
The first plate is a test plate; if the patient cannot see the
number, they have poor visual acuity or functional visual loss.
Anomaly vs anopia
Protan (Red) ,deuter(green) & tri(blue)
Trichromats(Human) vs dichromats & monochromate (dogs)
Ophthalmoscopy
Direct ophthalmoscopy
indications
Advantages vs. Disadvantages
Procedure
1. Examine the patient's right eye, holding the ophthalmoscope
in your right hand and using your right eye.
2. Place your other hand on the patient's forehead and ask the
patient to look down. Catch the upper eyelid and gently retract
it against the orbital rim. Holding the eyelid against the brow
enables you to approach the patient's head as closely as
possible and prevents the upper eyelid from obscuring your
view.
3. Ask the patient to fixate on a distant object straight ahead.
4. From a distance of about 10 cm bring the red reflex into focus.
Any opacity will appear black. In this way the cornea, iris and
lens can be visualized.
5. Now come close to the patient's head such that you are
touching the hand you are resting on the patient's forehead.
6. As you do so, rotate the lenses anticlockwise, progressively
increasing the focal length.
7. Observe for black opacities in the vitreous until the retina
comes into focus.
Indirect ophthalmoscopy
Ocular motility & gaze position
LR6(SO4)3
LR6 = lateral rectus muscle is supplied by the 6
th
cranial nerve
(abducent nerve)
SO4 =
Superior oblique muscle is supplied by 4
th
cranial nerve
(trochlear nerve)
3 = the rest of eyeball muscles are supplied by 3
rd
cranial
nerve (oculomotor nerve)
The optic (II) cranial nerve (sensory nerve)
Figure - Schematic diagram of the human eye in horizontal section.
The visual pathway consists of the retina, the optic chiasm, the
optic tracts, the lateral geniculate bodies, the optic radiations
and the visual cortex. The retina consists of an outer
pigmented layer, and an inner neurosensory layer which is
continuous with the optic nerve. The retinal pigment
epithelium lies adjacent to the highly vascular choroid.
Around 90% of the blood supply to the eye passes through the
choroid, supplying the posterior two-thirds of the retina, the
optic nerve and the fovea. The retinal blood supplies the
relatively inert layers of the inner retina. The neurosensory
retina consists of photoreceptors, ganglion cells and
interconnecting bipolar cells.
Rod photoreceptors are responsible for night vision and
detection of peripheral movement
Cone photoreceptors are responsible for colour and central
vision
Photoreceptors synapse with the vertically oriented bipolar
cells of the retina, which in turn synapse with the ganglion
cells of the optic nerve (
Fig. 12.2
).
The optic nerve is purely sensory and, similar to 'white matter'
rather than peripheral nerve, is unable to regenerate. Initially
unmyelinated, the fibres of the
optic nerve myelinate on
leaving the eye through the optic disc.
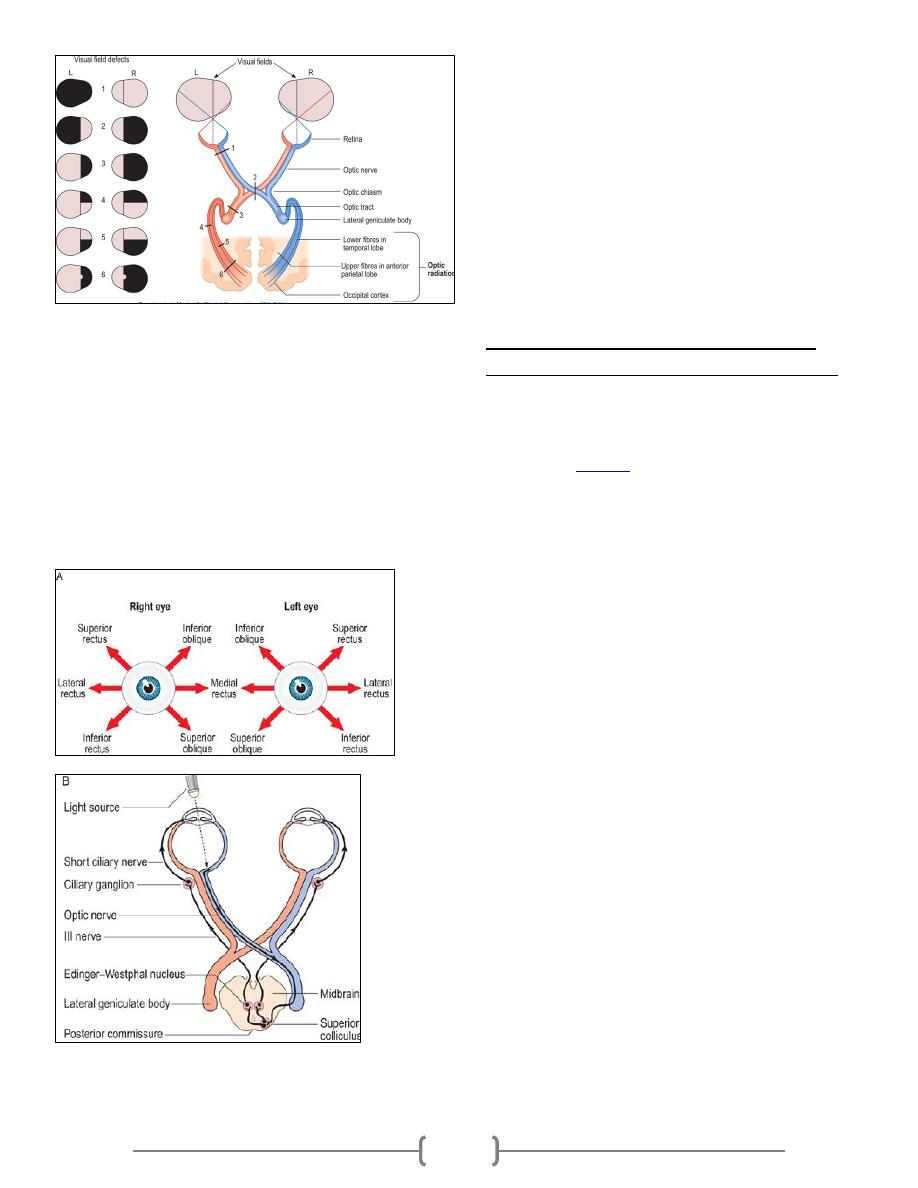
6
Figure 12.3 Visual field defects. (1) Total loss of vision in one
eye because of a lesion of the optic nerve. (2) Bitemporal
hemianopia due to compression of the optic chiasm. (3) Right
homonymous hemianopia from a lesion of the optic tract. (4)
Upper right quadrantanopia from a lesion of the lower fibres
of the optic radiation in the temporal lobe. (5) Lower
quadrantanopia from a lesion of the upper fibres of the optic
radiation in the anterior part of the parietal lobe. (6) Right
homonymous hemianopia with sparing of the macula due to
lesion of the optic radiation in the posterior part of the
parietal lobe.
Figure 12.4 Control of eye movement and pupil size. (A)
Fields of action of pairs of extraocular muscles. This diagram
will help you to work out which eye muscle is paretic. For
example, a patient whose diplopia is maximum on looking
down and to the right has either an impaired right inferior
rectus or a weak left superior oblique. (B) Pathway of
pupillary constriction and the light reflex (parasympathetic).
The occipital lobe analyses visual information and damage to
the primary visual cortex produces a homonymous hemianopia
or scotoma. Loss of function of the secondary visual areas
causes inability to recognize visual stimuli (visual agnosia)
and distorted perceptions of visual images, such as seeing
things larger (macropsia) or smaller (micropsia) than reality.
Visual hallucinations may occur.
The oculomotor (III), trochlear (IV) and
abducens (VI) cranial nerves (motor nerves)
The oculomotor (III), trochlear (IV) and abducens (VI) nerves
innervate the six external ocular muscles controlling eye
movement and, through parasympathetic nerves, also affect
pupillary size (
Fig. 12.4
). They are examined together because
of their close functional inter-relationships.

7
Cardiopulmonary resuscitation (CPR)
CPR is an emergency procedure, performed in an effort to
manually preserve intact brain function until further
measures are taken to restore spontaneous blood
circulation and breathing in those who are unresponsive
with no or abnormal breathing (with or without cardiac
arrest).
CPR is used on people in cardiac arrest in order to
oxygenate
the blood and maintain a
cardiac output
to keep vital organs
alive. Blood circulation and oxygenation are required to
transport
oxygen
to the tissues. The
brain
may sustain
damage
after blood flow has been stopped for about four minutes and
irreversible damage after about seven minutes. The heart also
rapidly loses the ability to maintain a normal rhythm. Low
body temperature prolong the time the brain survives.
Following cardiac arrest, effective CPR enables enough
oxygen to reach the brain to delay
brain death
, and allows the
heart to remain responsive to
defibrillation
attempts.
ABCD of resuscitation.
Airway, Breathing, Circulation and Defibrillation
Airway and Breathing: is the establishment, and
maintenance of a patent airway, with adequate oxygenation
and ventilation which is essential for life saving . Without this
foundation, all other resuscitative measures are doomed to
failure, as an inadequate airway leads rapidly to hypoxemia
and uncorrected hypoxemia will result in brain damage and
ultimately death.
Circulation : chest compressions at least 5 cm deep and at a
rate of at least 100 per minute in an effort to create artificial
circulation by manually pumping blood through the heart.
Checking for circulation should not commence until after
about five cycles (2 min) of CPR.
Defibrillation : CPR alone is unlikely to restart the heart; its
main purpose is to restore partial flow of oxygenated blood to
the
brain
and
heart
. The objective is to delay
tissue death
and
to extend the opportunity for a successful resuscitation without
permanent
brain damage
. Administration of an electric shock
to the subject's heart, termed
defibrillation
, is usually needed
in order to restore heart rhythm.
CPR is indicated for any person who is [unresponsive] with no
breathing, or who is only breathing in occasional gasps.
In 2010, the order of interventions was changed from
airway, breathing, chest compressions and defibillation
(ABCD)
to chest compressions, airway, breathing and
defibrillation (CABD), also compression to ventilation
ratio of 30:2 is recommended. No longer to assess signs of
circulation before beginningcompressions. Begin
compressions after delivering two rescue breaths in non
breathing patient.
High-quality CPR include:
1. Providing an adequate number and depth of compressions(100
compression/min of 5 cm depth).
2. Allowing for complete chest recoil after compressions.
3. Minimizing interruptions in chest compressions (so 30:2 ratio
is recommended instead of 4:1).
4. All breaths should be given over 1 s using sufficient volume
to achieve visible chest rise.
Techniques of CPR
Establishing Unresponsiveness and Positioning the Victim
Determine if the environment is safe, then quickly assess any
injury and determine unresponsiveness. Determined if the
victim is unconscious by gentle tapping or shaking and then
questioning them with, “Are you all right?”
call for help (122)
In order to provide effective circulation from chest
compressions, the victim must be placed supine on a firm
surface.
Recovery position (Fig). This involves rolling the patient onto
one or other side and placing the lower arm in front of the
body. This position helps to maintain a patent airway and
reduces the risk of airway obstruction and aspiration.
Maneuvers for Opening the Airway
Head Tilt/Chin Lift
The head tilt/chin lift maneuver is achieved with placement of
one hand on the victim’s forehead and a tilt of the head
backward. The fingers of the other hand are placed firmly
beneath the bony portion of the victim’s chin, lifting it upward
.
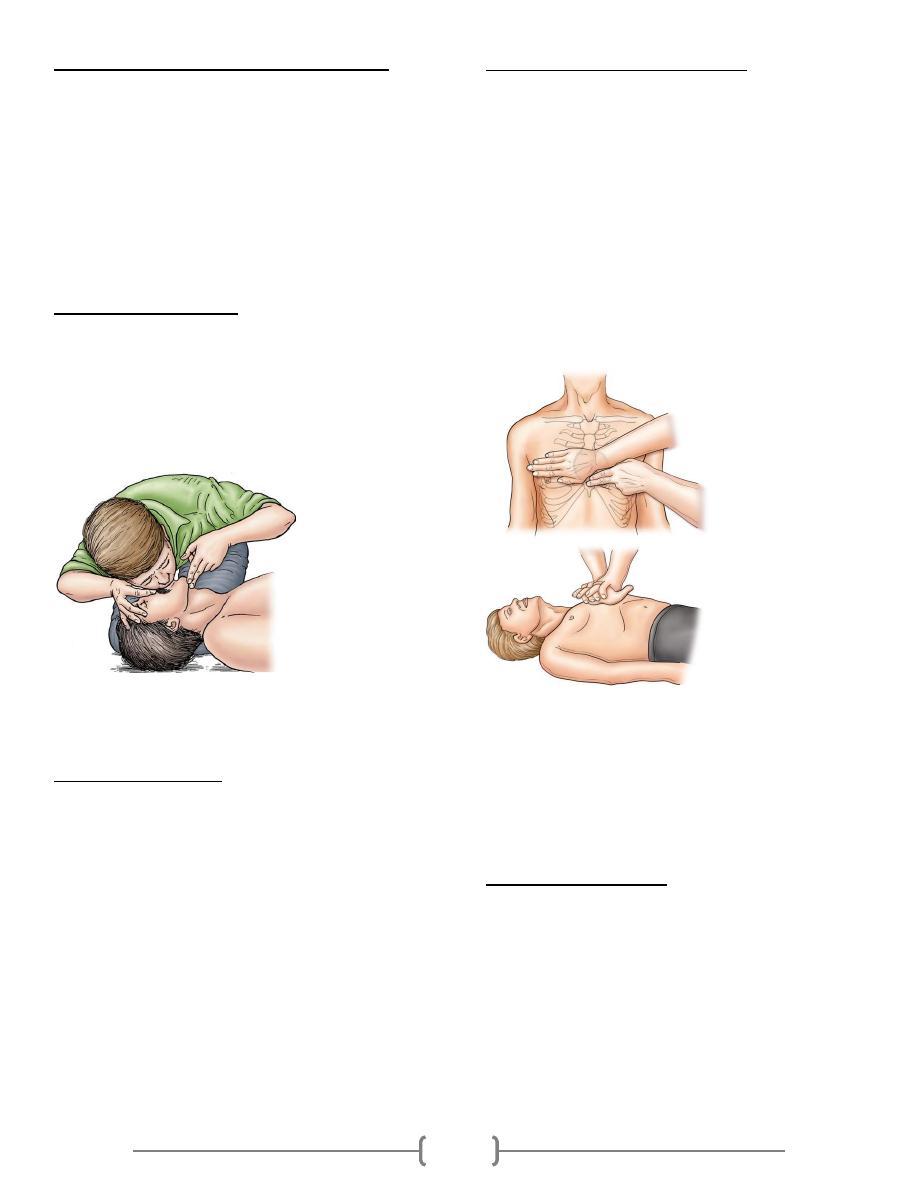
8
Determining Breathlessness (Look, Listen, and Feel)
The procedure is as follows:
1) Open the airway
2) Listen for breathing by placing your ear over the victim’s
mouth
3) Look for the rise and fall of the chest
4) Listen for breath sounds
5) Feel for the exhaled air
If these signs are present, a patent airway should be
maintained, although if there is no response, the victim should
be moved to the recovery position. However, resuscitation
should be initiated if these signs are absent indicating that the
victim is not breathing adequately.
Rescue Breathing Technique
Effective rescue breathing requires
correct head position
an airtight seal
Sufficient force to inflate the victim’s lungs.
For mouth-to-mouth breathing, the victim’s airway is opened,
their nose pinched, and an airtight mouth to-mouth seal is
created. The rescuer then provides two breaths, with each
given over 1 s and with a pause of one regular breath.
Rescuers should deliver 8–10 breaths per minute, while chest
compressions are being delivered continuously at a rate of 100
per minute.
Determining Pulselessness
Ventilation alone will not sustain an individual who has
suffered a cardiac arrest. It is also essential to concurrently
reestablish effective circulation for perfusion of the vital
organs. Palpation of the carotid or femoral pulse will assess
whether the victim has effective circulation. No more than 10
s should be taken when checking for a pulse. If a pulse is
present but the patient is apneic, ventilations are initiated at a
rate of 10–12 breaths per minute (one every 5–6 s) and the
pulse is checked every 2 min. However, if no pulse is
detectable (or there is uncertainty), cardiac arrest has occurred
and the rescuer must begin external chest compressions.
This assessment should take no longer than 10 s. If there is
some doubt about the assessment of the circulation, begin
chest compressions.
External Chest Compression Techniques
There are two main theories. The cardiac pump theory
postulates that chest compression directly squeezes the heart
between the sternum and the vertebral column. In contrast, the
thoracic pump theory maintains that chest compression
increases the intrathoracic pressure, which is transmitted
predominantly to the extrathoracic arteries, since they are
much less collapsible than the extrathoracic veins. As a result,
an arteriovenous pressure gradient is generated outside the
thoracic cavity and blood flow occurs.
The heel of one hand is placed over the lower half of the
victim’s sternum and between the nipples and the other hand
is placed on top of the first (Fig. 3.11). The rescuer’s arms
must be straight, with the shoulders directly over the victim’s
sternum.
To minimize the risk of complications (listed below), proper
hand position should be maintained at all times. For an adult,
the depth of compression is 5cm. and the rate 100 per minute.
The chest should be allowed to recoil after each compression,
to allow venous return (incomplete recoil is associated with
higher intrathoracic pressures, decreased coronary perfusion,
and decreased cerebral perfusion).
Complications of CPR
1. Rib fracture
2. gastric distention
3. mediastinal bleeding and emphysema
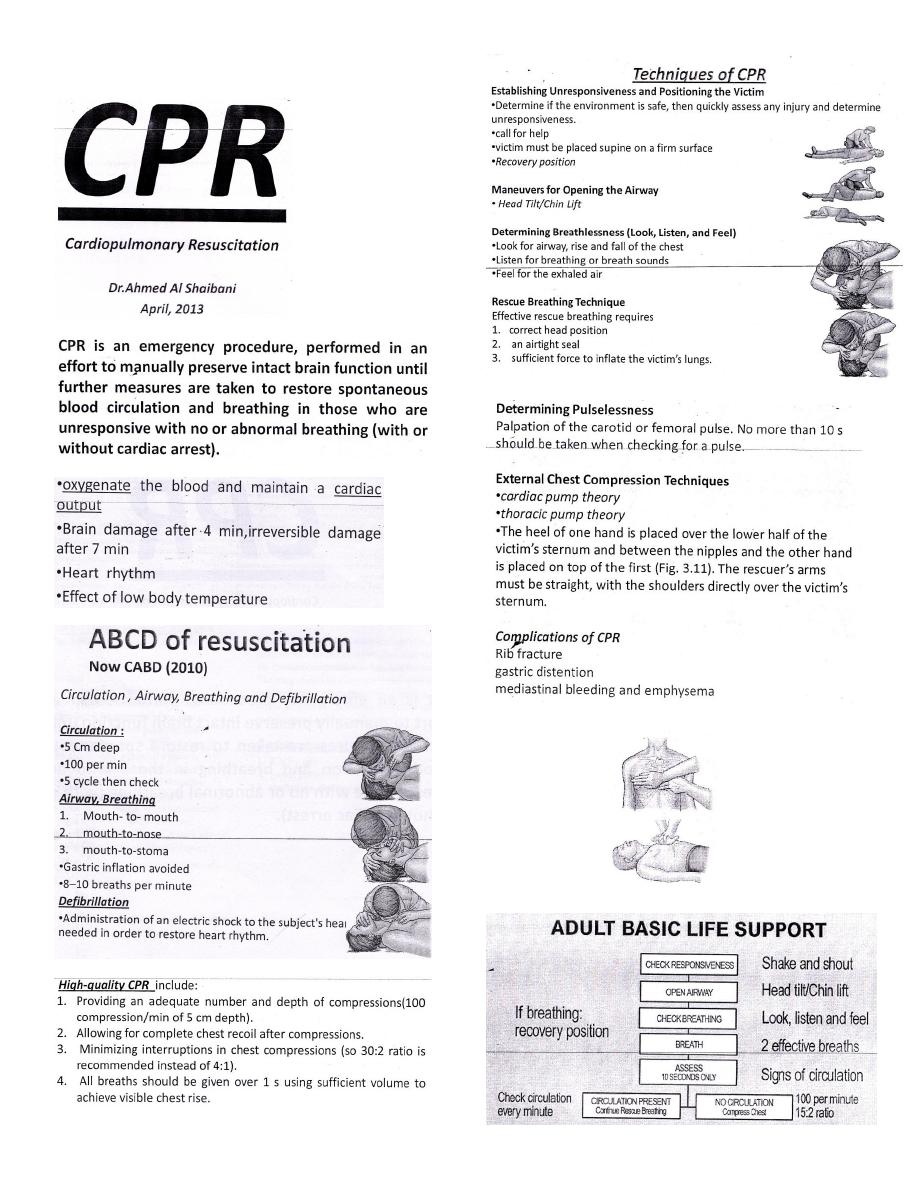
CPR ملخص ل
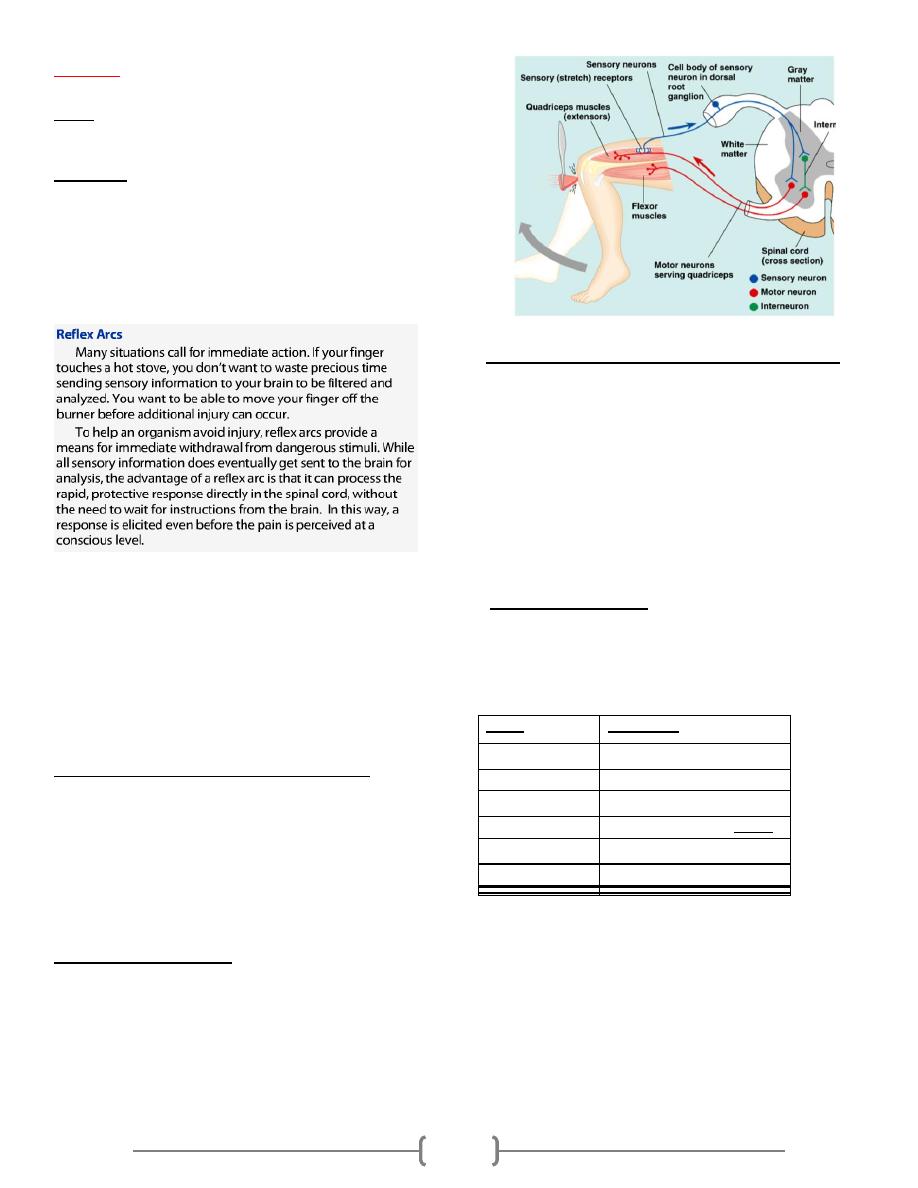
1
Reflexes
Reflex, is an involuntary and nearly instantaneous movement
in response to a stimulus. Scientific use of the term "reflex"
refers to a behavior that is mediated via the reflex arc;
A reflex arc is a neural pathway that controls an action reflex.
In higher animals, most sensory neurons do not pass directly
into the brain, but synapse in the spinal cord. This
characteristic allows reflex actions to occur relatively quickly
by activating spinal motor neurons without the delay of
routing signals through the brain, although the brain will
receive sensory input while the reflex action occurs.
The basic unit of integrated reflex activity is the reflex arc.
This arc consists of a sense organ, an afferent neuron, one or
more synapses within a central integrating station, an efferent
neuron, and an effector. In mammals, the connection between
afferent and efferent somatic neurons is generally in the brain
or spinal cord. The afferent neurons enter via the dorsal roots
or cranial nerves and have their cell bodies in the dorsal root
ganglia. The efferent fibers leave via the ventral roots.
Monosynaptic and polysynaptic reflexes
The simplest reflex arc is one with a single synapse between
the afferent and efferent neurons. Such arcs are
monosynaptic, and reflexes occurring in them are called
monosynaptic reflexes (deep reflexes). Reflex arcs in which
one or more interneuron is interposed between the afferent and
efferent neurons are called polysynaptic reflexes (Superficial
reflexes).
Reciprocal Innervation
When a stretch reflex occurs, the muscles that antagonize the
action of the muscle involved (antagonists) relax. This
phenomenon is said to be due to reciprocal innervation.
Impulses in the fibers from the muscle spindles of the
protagonist muscle cause postsynaptic inhibition of the motor
neurons to the antagonists.
Monosynaptic Reflexes: The Stretch Reflex
When a skeletal muscle with an intact nerve supply is
stretched, it contracts. This response is called the stretch
reflex. The stimulus that initiates the reflex is stretch of the
muscle, and the response is contraction of the muscle being
stretched. The sense organ is a small encapsulated spindlelike
or fusiform shaped structure called the muscle spindle, located
within the fleshy part of the muscle. The impulses originating
from the spindle are transmitted to the CNS by fast sensory
fibers that pass directly to the motor neurons which supply the
same muscle.
Grading of reflexes
Hyporeflexia(+) is generally associated with a lower motor
neuron deficit (peripheral neuropathy), whereas
hyperreflexia(+++/++++) is often attributed to upper motor
neuron lesions( central neuropathy).
Grade
Description
0
Absent
1+ or +
Diminished
2+ or ++
"Normal"
3+ or +++
Hyperactive without clonus
4+ or ++++
Hyperactive with clonus
+-
Reinfocement
Clonus is a regular, repetitive, rhythmic contractions of a
muscle subjected to sudden, maintained stretch. Only
sustained clonus with five or more beats is considered
abnormal. Ankle clonus is a typical example. This is initiated
by brisk, maintained dorsiflexion of the foot, and the response
is rhythmic plantar flexion at the ankle
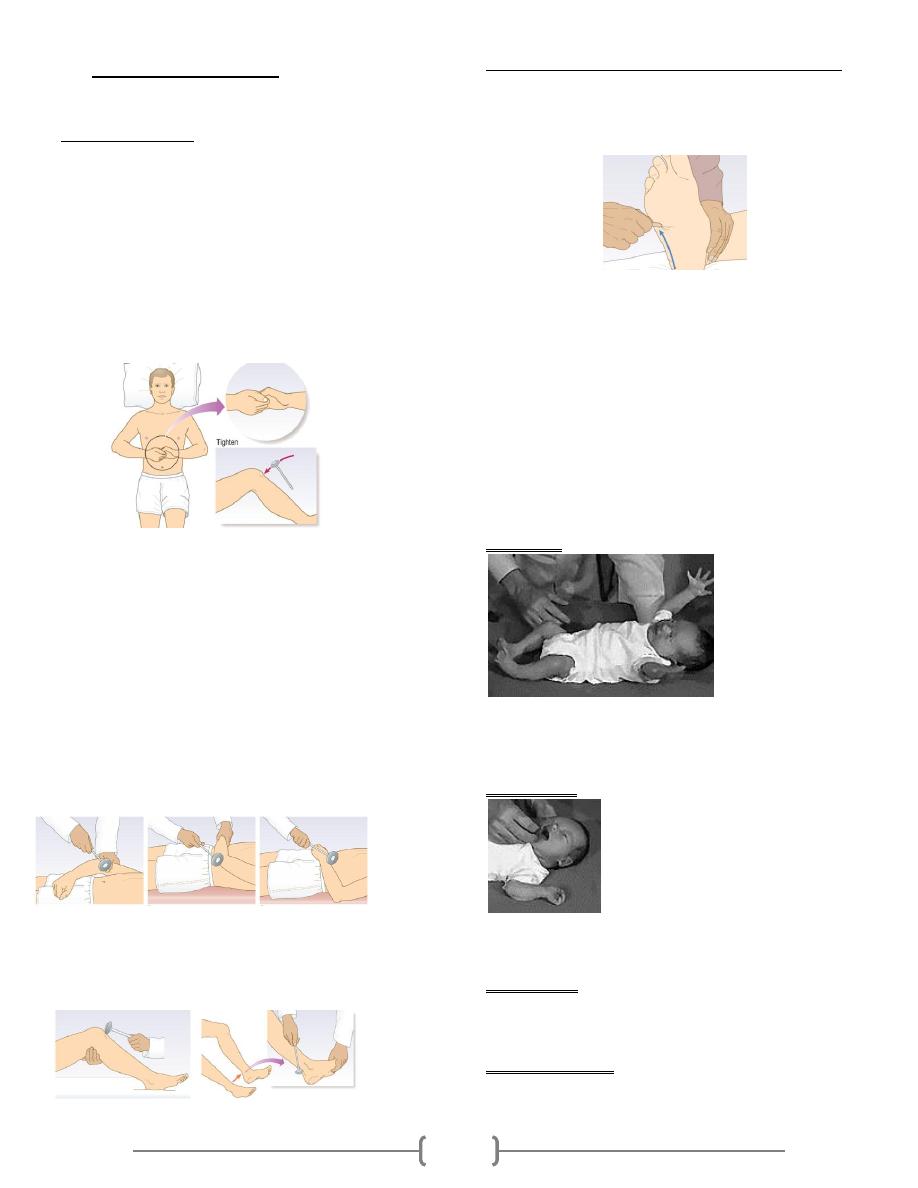
2
Examination sequence
Deep tendon reflexes
The patient should be as relaxed and comfortable as possible, as
anxiety and pain can cause an increased response.
Flex your wrist and allow the weight of the tendon hammer head to
determine the strength of the blow. Strike the tendon, not the muscle.
Record the response as:
o increased or hyperactive (+++)
o normal (++)
o diminished (+)
o absent (-)
o only present when using reinforcement (±)
.
Comparing each reflex with that of the other side, check for
symmetry of response and ensure that both the limbs are positioned
identically
Use reinforcement whenever a reflex appears to be absent. For knee
and ankle reflexes, ask the patient to interlock the fingers and pull
one hand against the other on your command immediately before you
strike the tendon .To reinforce upper limb reflexes, ask the patient to
clench the teeth or to make a fist with the contralateral hand. If you
use reinforcement, the patient must relax between repeated attempts.
Upper limb deep reflex
(A) biceps jerk, C5 (C6).
(B) Triceps jerk, C6, C7.
(C) Supinator jerk (C5), C6.
lower limb deep reflex
(A) knee jerk, L3, L4.
(B) Ankle jerk, S1
Superficial reflexes (Plantar ( Babinski) response (S1-2)
Run a blunt object along the lateral border of the sole of the
foot towards the little toe .
The normal response is flexion of the great toe and flexion of
the other toes too.
Primitive reflexes are reflex actions originating in the central
nervous system that are exhibited by normal infants, but not
neurologically intact adults, in response to particular stimuli.
These reflexes disappear or are inhibited by the frontal lobes
as a child moves through normal child development. These
primitive reflexes are also called infantile, infant or newborn
reflexes.
Older children and adults with atypical neurology (e.g. people
with cerebral palsy) may retain these reflexes and primitive
reflexes may reappear in adults. Reappearance may be
attributed to certain neurological conditions including, but not
limited to, dementia, traumatic lesions, and strokes.
Moro reflex
1) The reflex is initiated by pulling the infant up from the floor
and then releasing him ;
2) he spreads his arms 3) he pulls his arms in.
Rooting reflex
A newborn infant will turn his head toward anything that
strokes his cheek or mouth, searching for the object by moving
his head in steadily decreasing arcs until the object is found.
Sucking reflex
This linked with the rooting reflex and breastfeeding. It causes
the child to instinctively suck anything that touches the roof of
their mouth, and simulates the way a child naturally eats.
Palmar grasp reflex
When an object is placed in the infant's hand and strokes their
palm, the fingers will close and they will grasp it


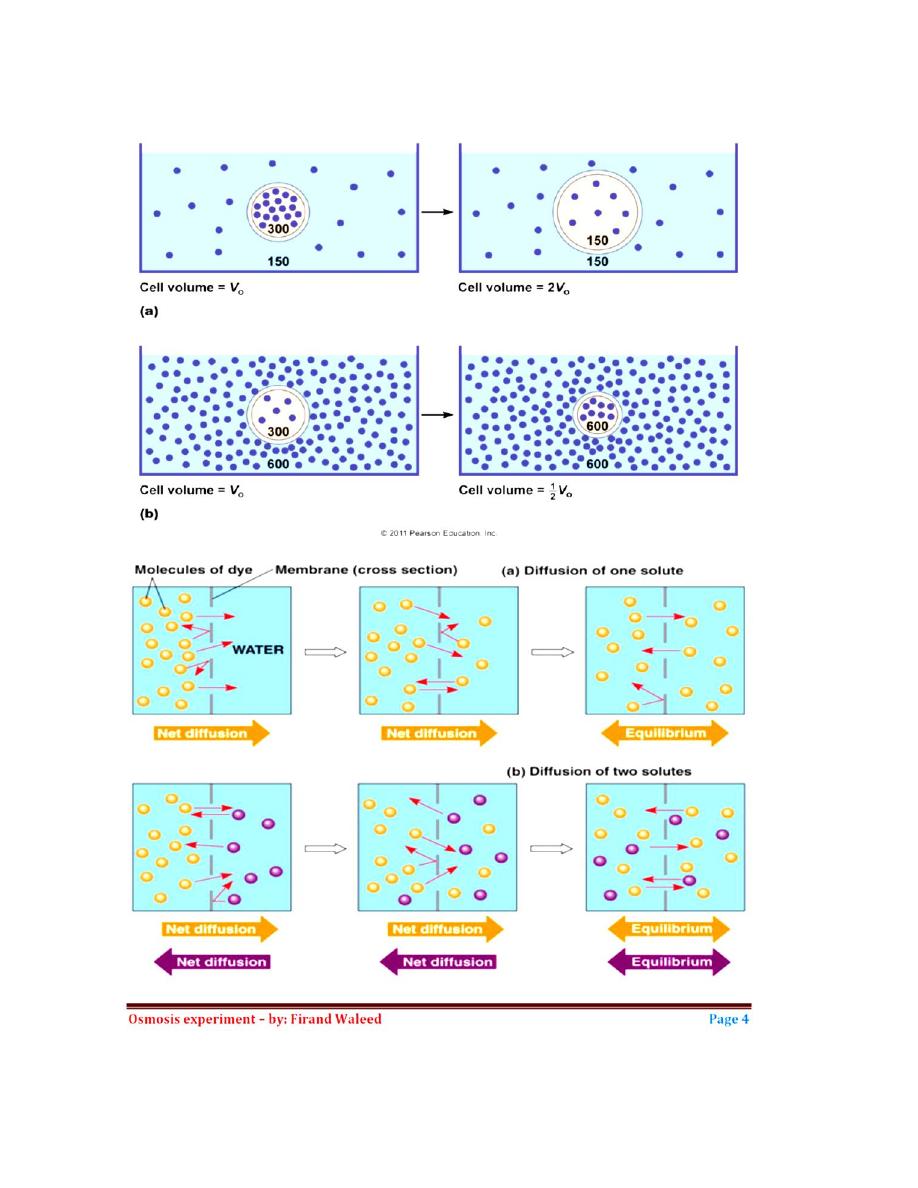
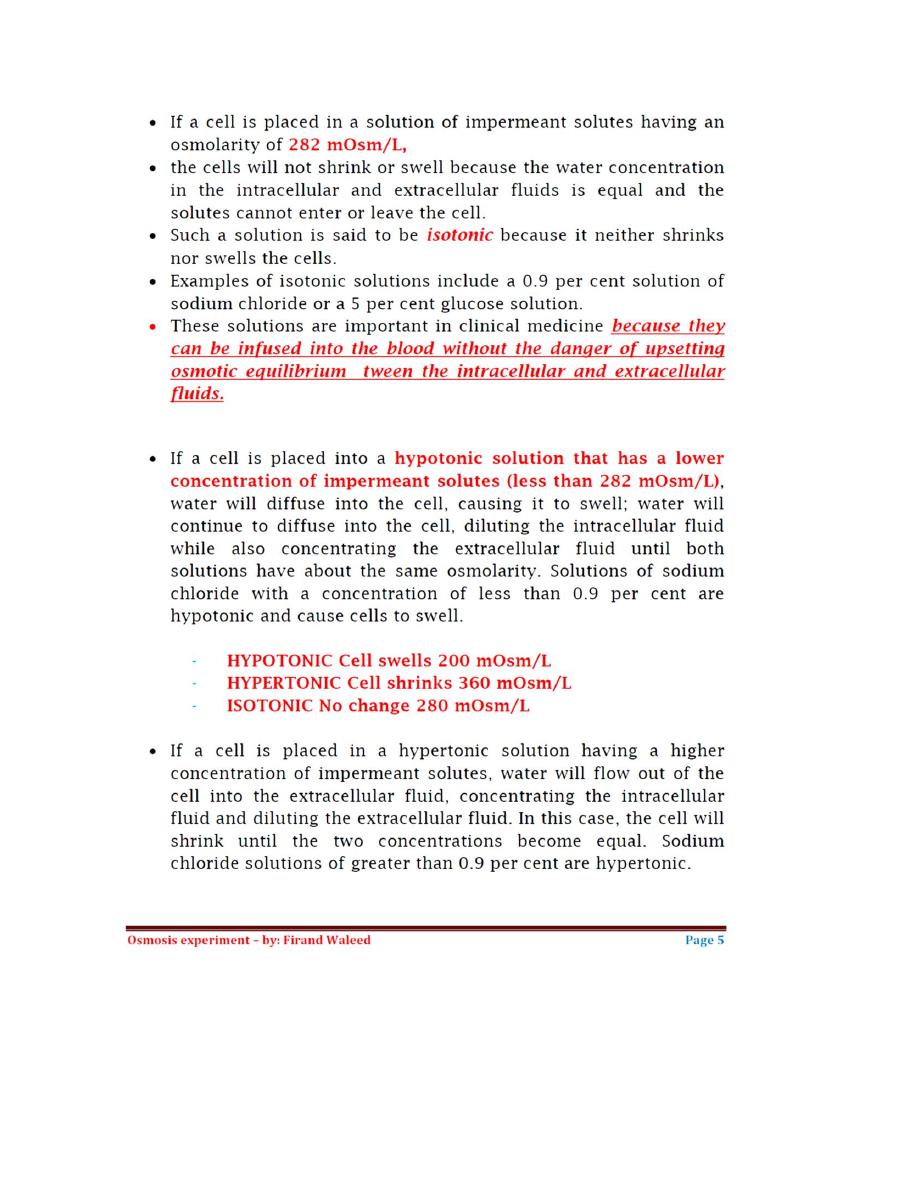
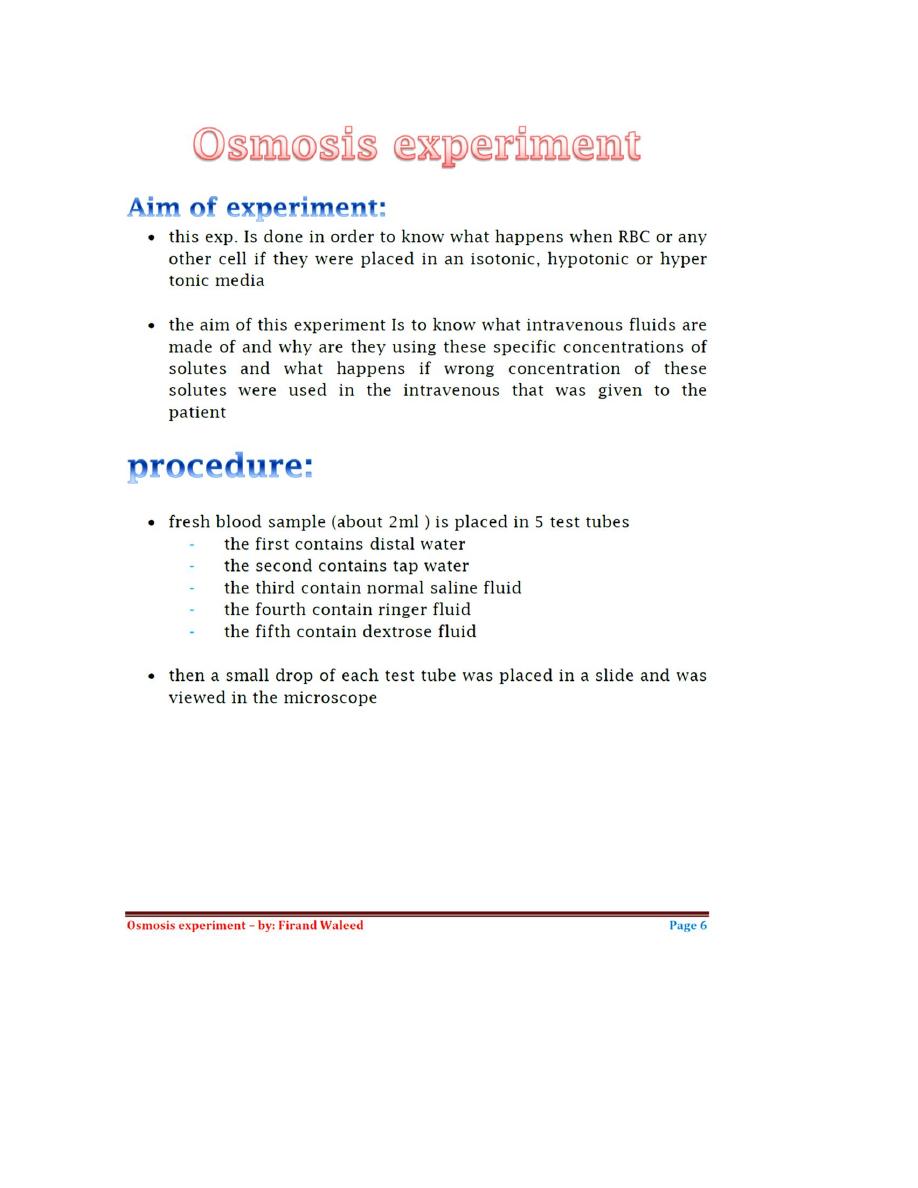


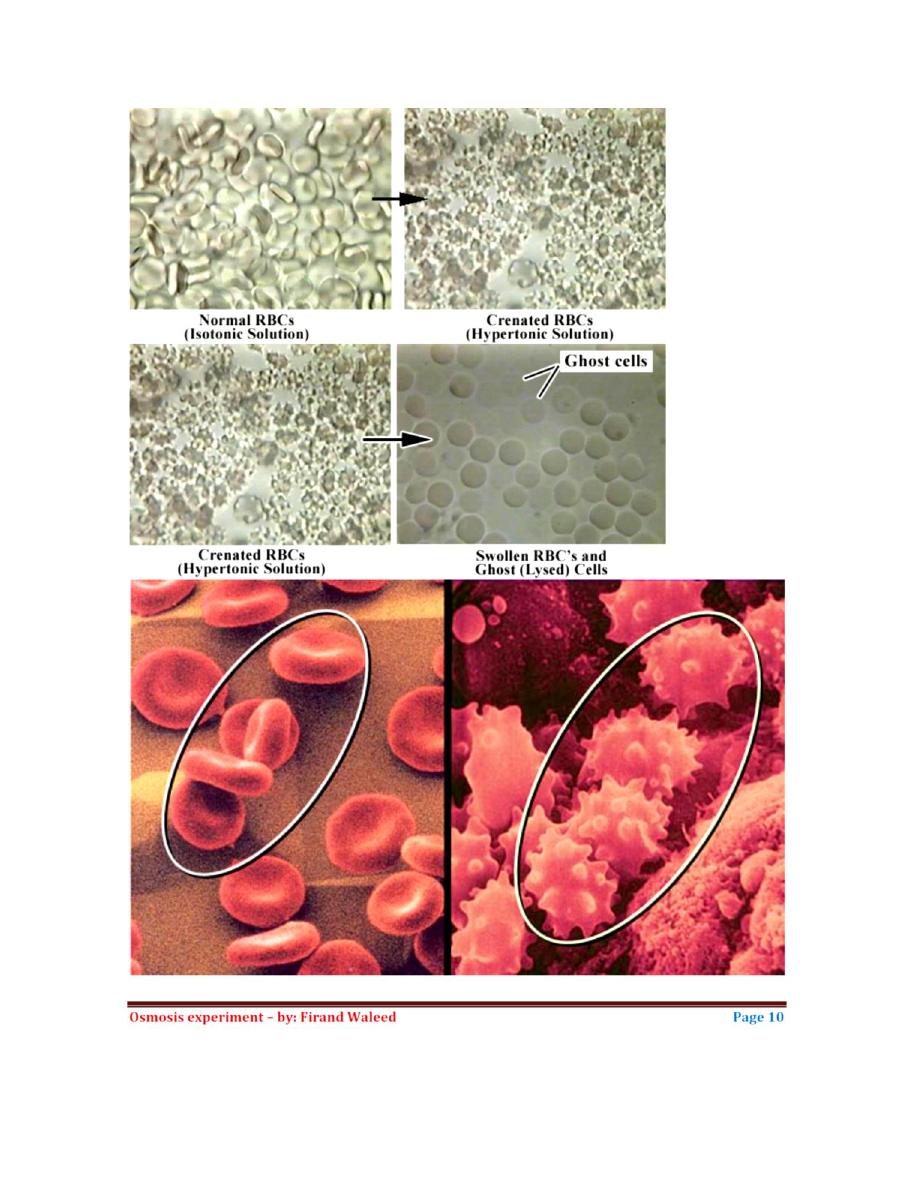
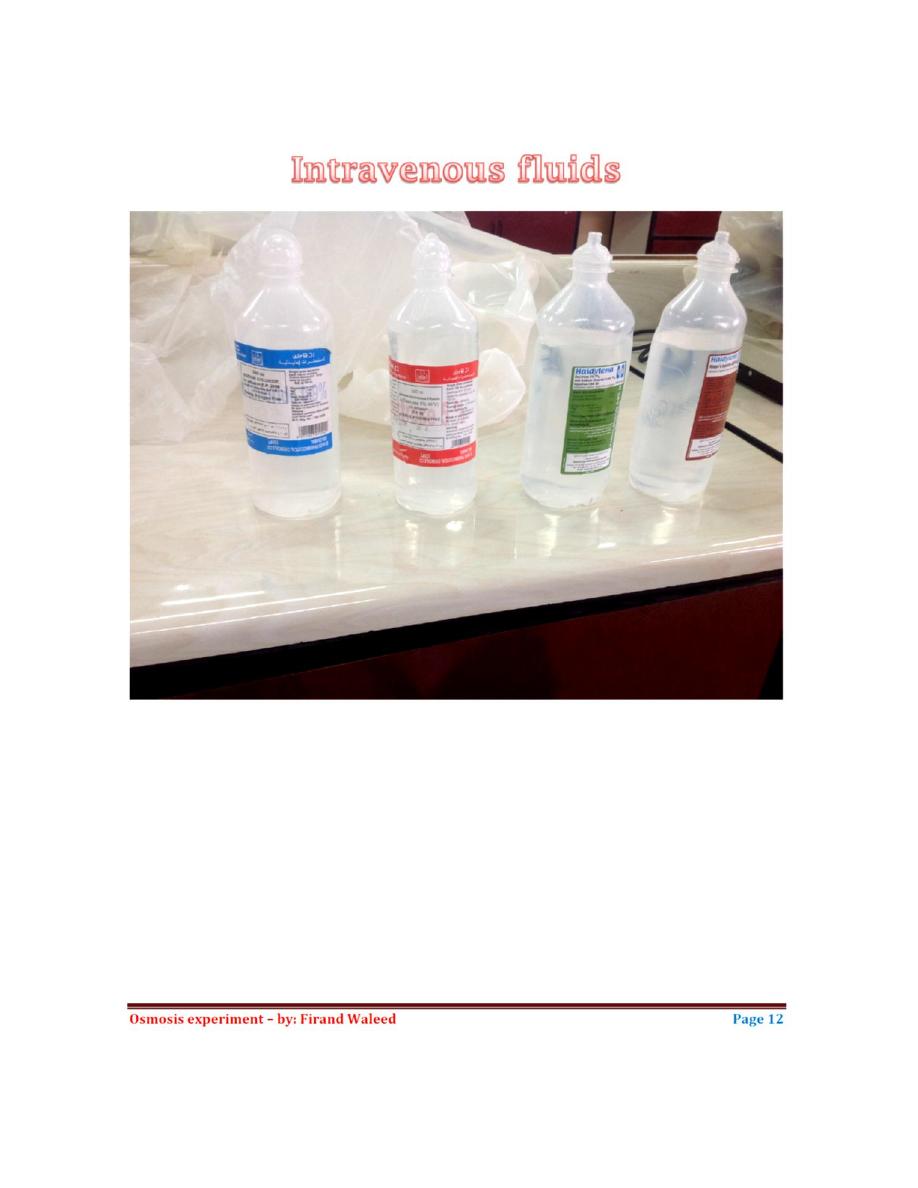
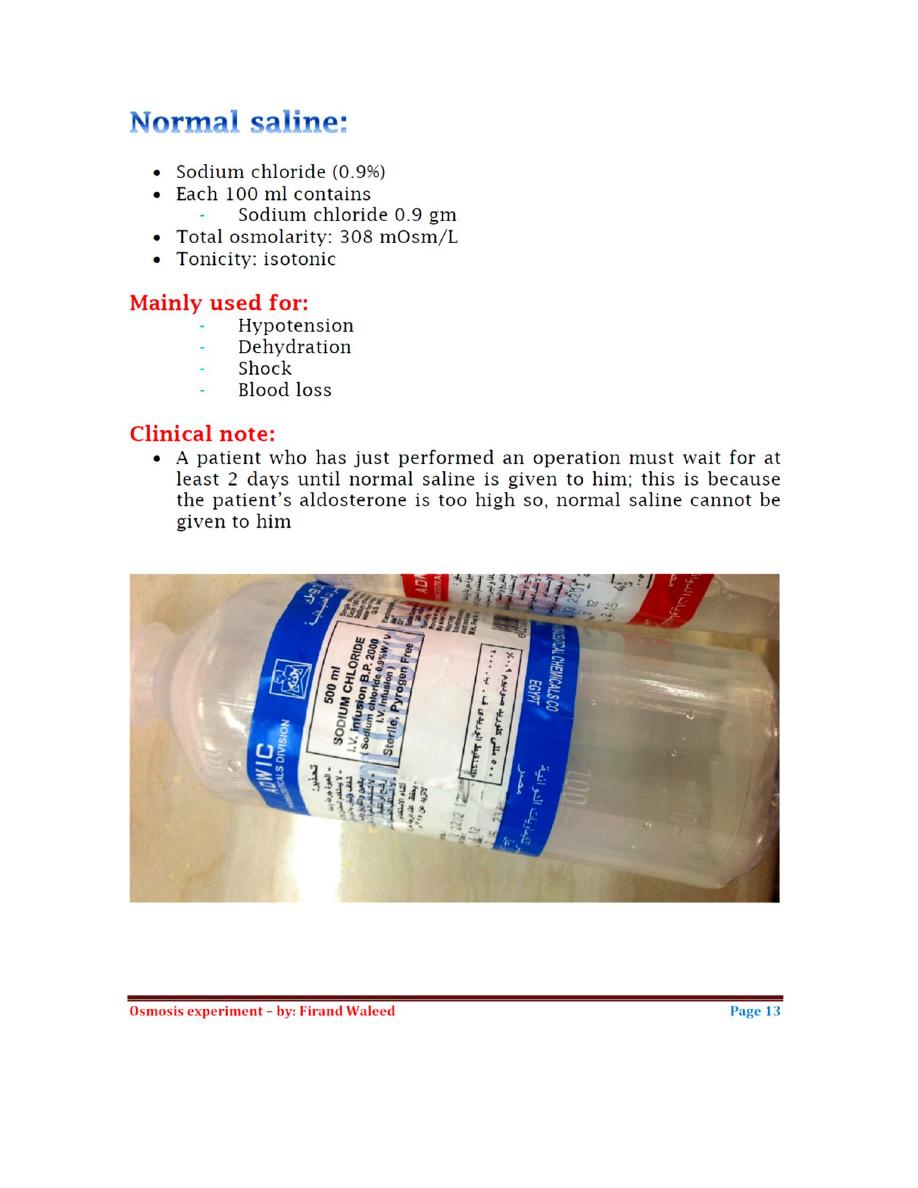
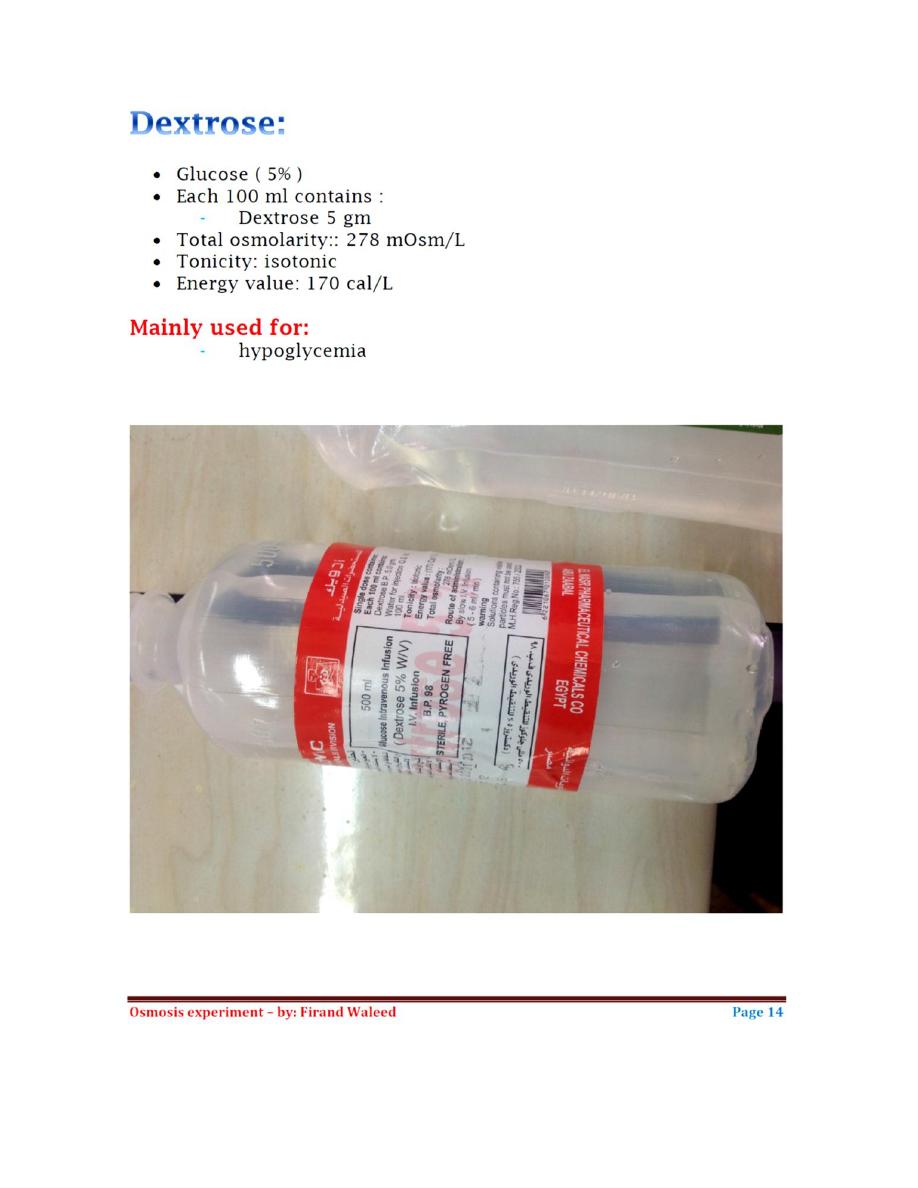
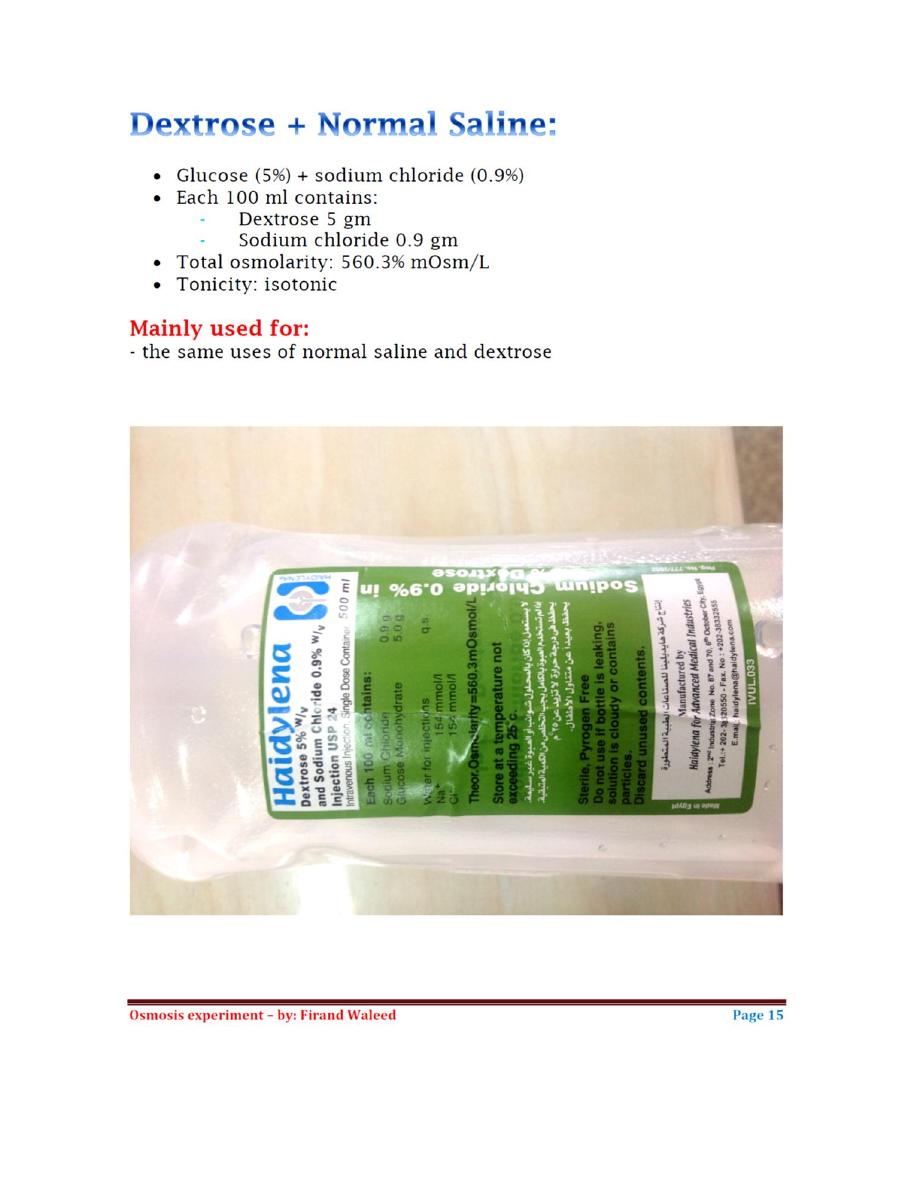
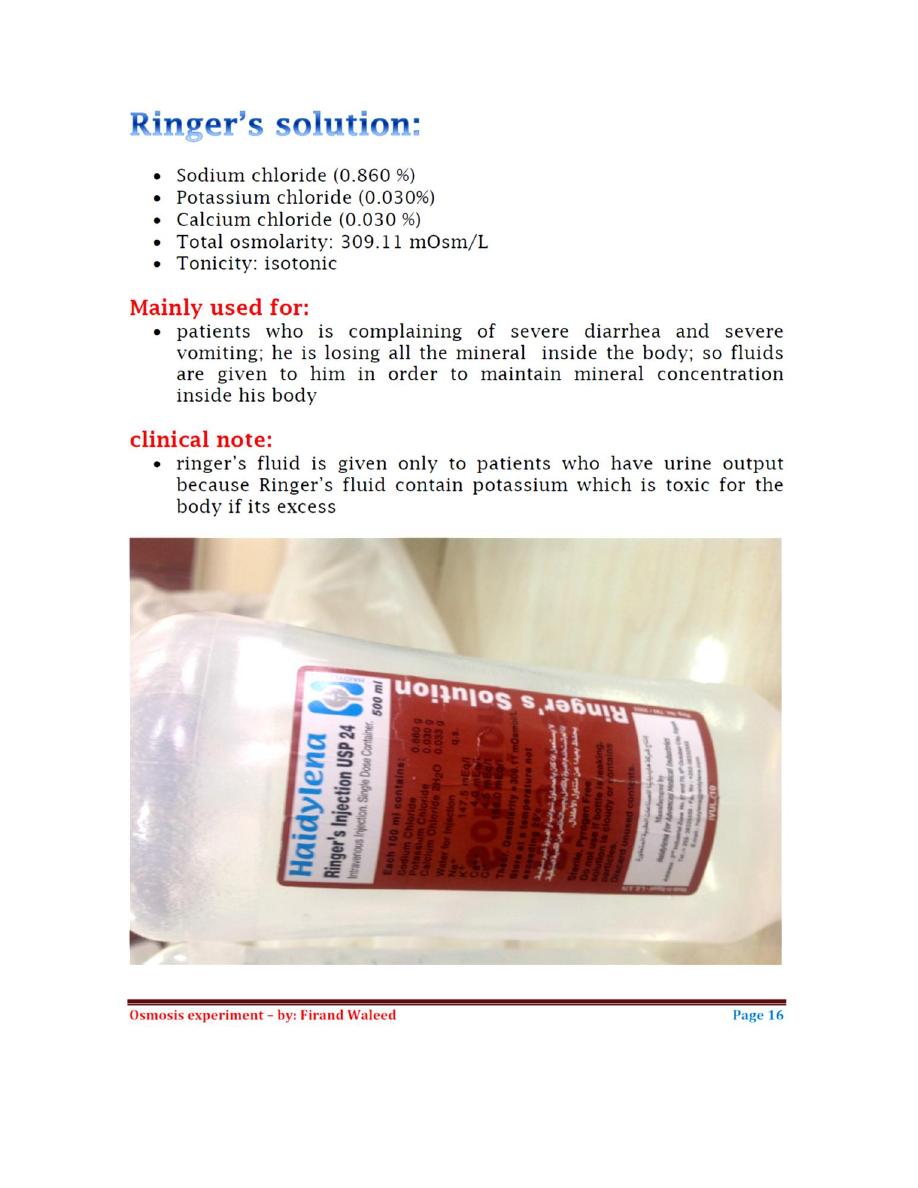
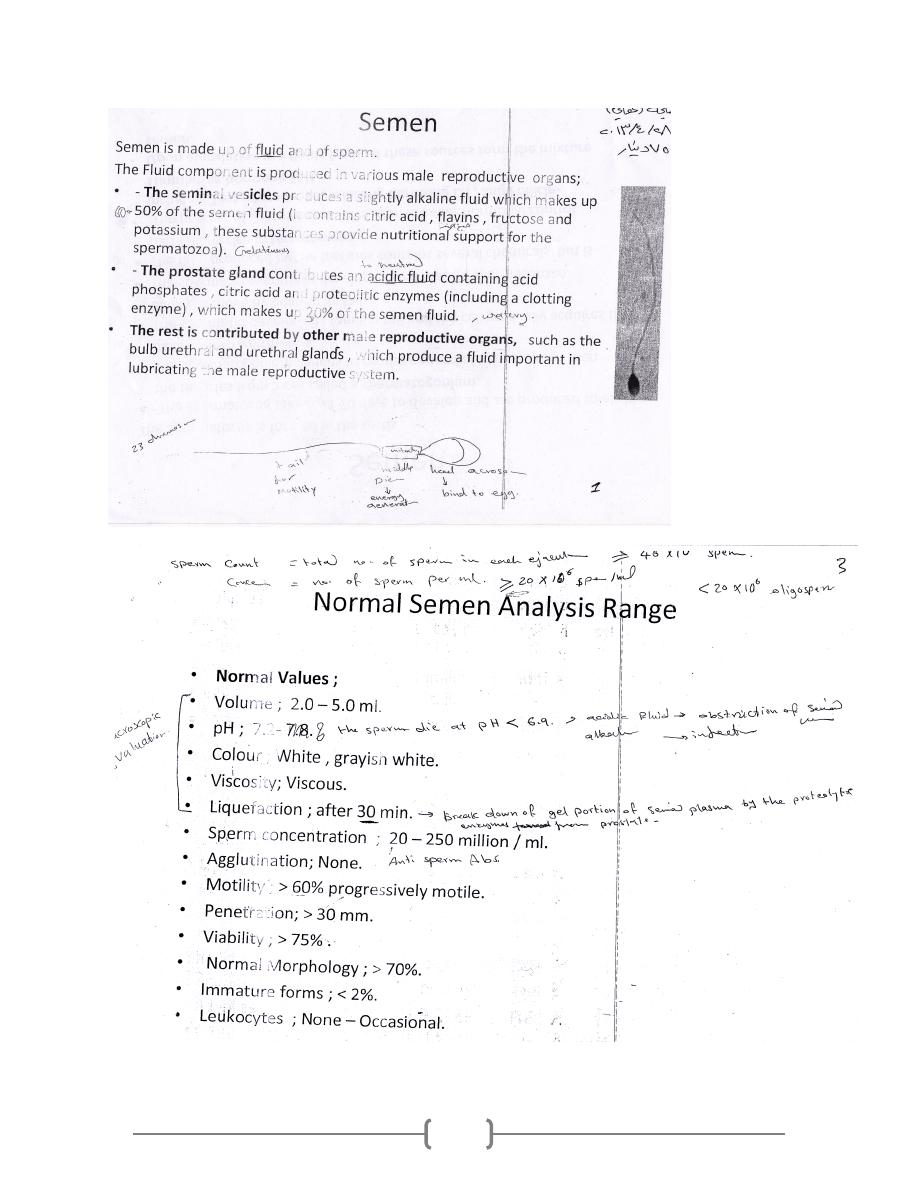
1
2
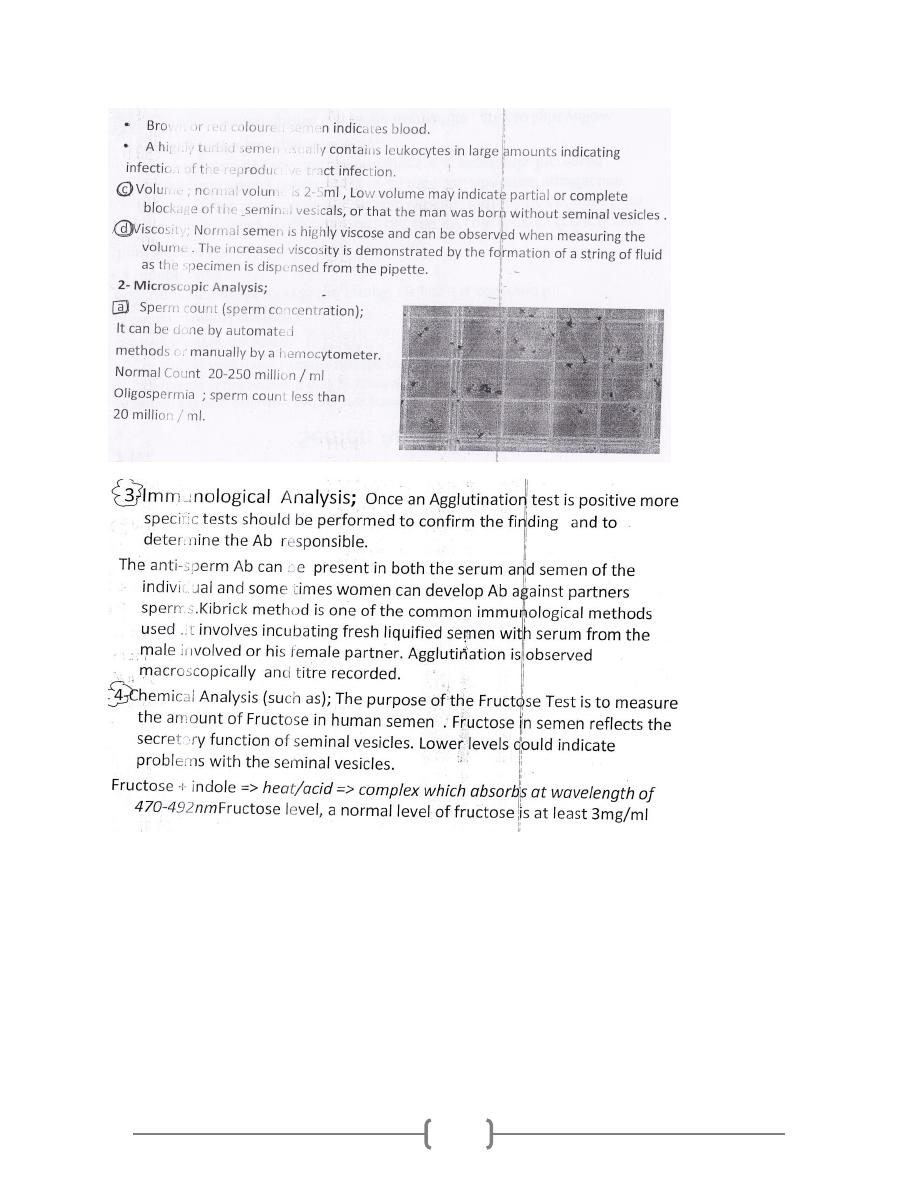
3
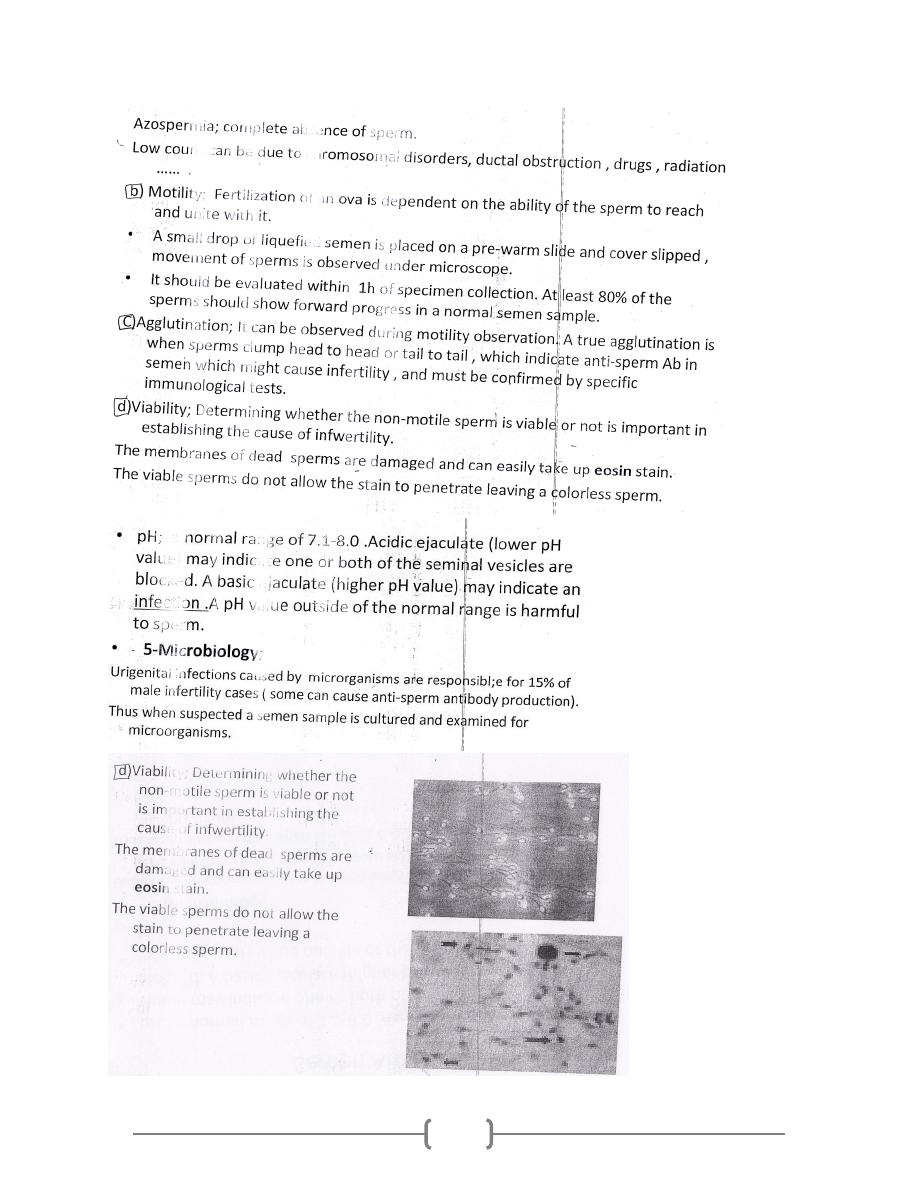
4
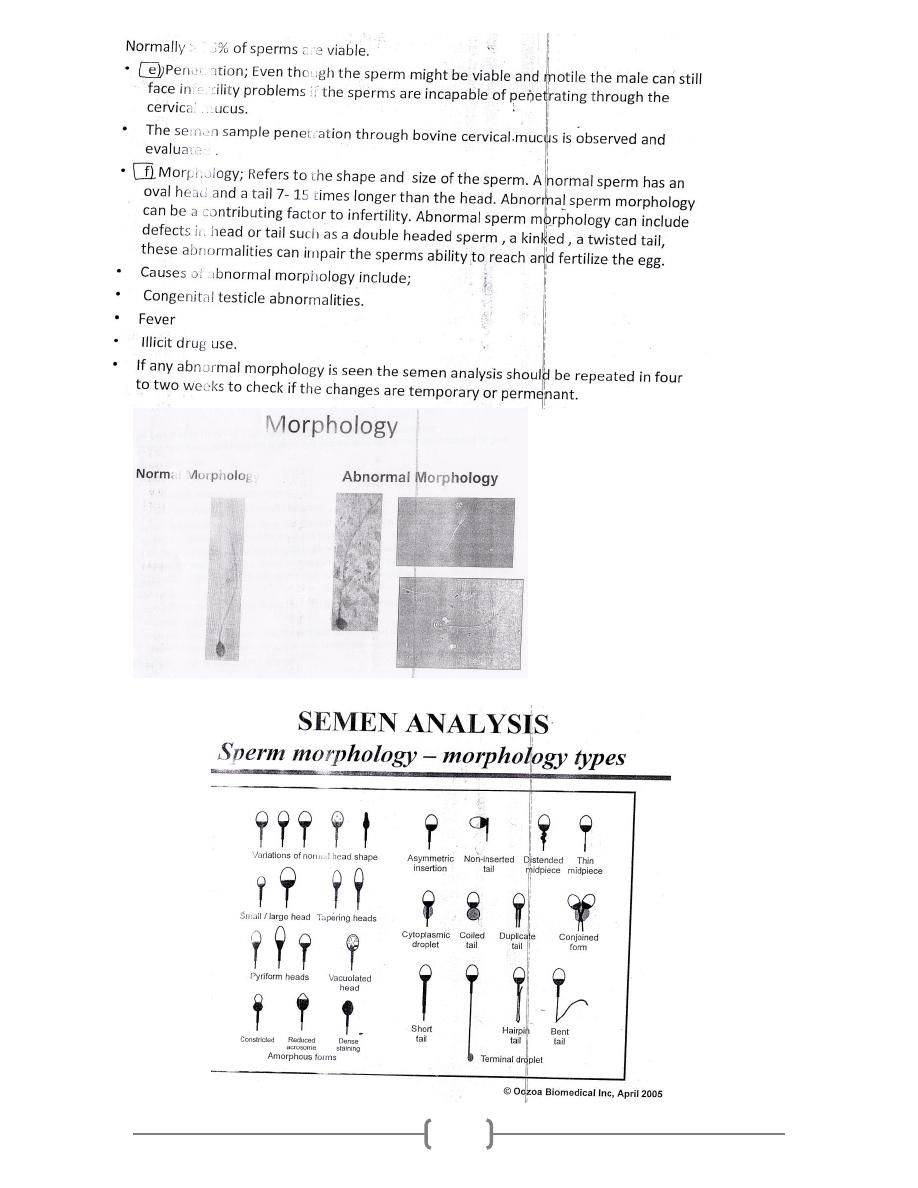
5