

OSCEs for
Medical Finals

Companion website
This book is accompanied by a companion website:
www.wiley.com/go/khan/osces
featuring:
• Downloadable checklists from the book
• Survey showing which OSCE stations have a high chance of appearing in finals
This book is also available as an e-book.
For more details, please see
www.wiley.com/buy/9780470659410
or scan this QR code:

OSCEs for
Medical Finals
Hamed Khan
MBBS DGM MRCGP MRCP (London)
GP Principal and Undergraduate Tutor
Oxted, Surrey
Iqbal Khan
BSc MBBS
FY2 Doctor
Homerton University Hospital NHS Foundation Trust
Akhil Gupta
BSc MBBS
Specialist Registrar in Anaesthetics
London Deanery
Nazmul Hussain
MBBS MRPharmS
GP ST3
Newham GP Vocational Training Scheme
Sathiji Nageshwaran
BSc MBBS
FY2 Doctor
Royal Free London NHS Foundation Trust
A John Wiley & Sons, Ltd., Publication

This edition first published 2013 © 2013 by John Wiley & Sons, Ltd.
Wiley-Blackwell is an imprint of John Wiley & Sons, formed by the merger of Wiley’s
global Scientific, Technical and Medical business with Blackwell Publishing.
Registered office: John Wiley & Sons, Ltd, The Atrium, Southern Gate, Chichester, West
Sussex, PO19 8SQ, UK
Editorial offices: 9600 Garsington Road, Oxford, OX4 2DQ, UK
The Atrium, Southern Gate, Chichester, West Sussex, PO19 8SQ, UK
111 River Street, Hoboken, NJ 07030-5774, USA
For details of our global editorial offices, for customer services and for information about
how to apply for permission to reuse the copyright material in this book please see our
website at www.wiley.com/wiley-blackwell.
The right of the author to be identified as the author of this work has been asserted in
accordance with the UK Copyright, Designs and Patents Act 1988.
All rights reserved. No part of this publication may be reproduced, stored in a retrieval
system, or transmitted, in any form or by any means, electronic, mechanical,
photocopying, recording or otherwise, except as permitted by the UK Copyright, Designs
and Patents Act 1988, without the prior permission of the publisher.
Designations used by companies to distinguish their products are often claimed as
trademarks. All brand names and product names used in this book are trade names,
service marks, trademarks or registered trademarks of their respective owners. The
publisher is not associated with any product or vendor mentioned in this book. This
publication is designed to provide accurate and authoritative information in regard to the
subject matter covered. It is sold on the understanding that the publisher is not engaged in
rendering professional services. If professional advice or other expert assistance is required,
the services of a competent professional should be sought.
Library of Congress Cataloging-in-Publication Data
OSCEs for medical finals / Hamed Khan ... [et al.].
p. ; cm.
Objective structured clinical examinations for medical finals
Includes bibliographical references and index.
ISBN 978-0-470-65941-0 (pbk. : alk. paper) – ISBN 978-1-118-44190-9 (eMobi) –
ISBN 978-1-118-44191-6 (ePDF/ebook) – ISBN 978-1-118-44192-3 (ePub)
I. Khan, Hamed. II. Title: Objective structured clinical examinations for medical finals.
[DNLM: 1. Clinical Medicine–Examination Questions. 2. Clinical Competence–
Examination Questions. 3. Communication–Examination Questions. 4. Medical
History Taking–Examination Questions. 5. Physical Examination–Examination
Questions. WB 18.2]
616.0076–dc23
2012024677
A catalogue record for this book is available from the British Library.
Wiley also publishes its books in a variety of electronic formats. Some content that appears
in print may not be available in electronic books.
Cover design by Sarah Dickinson
Set in 8.75/11 Minion pt by Toppan Best-set Premedia Limited
1 2013

Contributors, vii
Acknowledgements, viii
Preface, ix
Part 1: Examinations
Top Tips, 1
1. Cardiovascular, 2
2. Respiratory, 7
3. Abdominal, 10
4. Peripheral nervous system, 20
5. Central nervous system, 28
6. Ophthalmoscopy, 37
7. Cerebellar, 40
8. Speech, 44
9. Thyroid, 48
10. Breast, 53
11. Rectal, 56
12. Hernia, 60
13. Testicular, 64
14. Vascular (arterial), 68
15. Vascular (venous), 73
16. Ulcer, 76
17. Shoulder, 80
18. Hand, 87
19. Hip, 93
20. Knee, 98
21. Confirming death, 105
Part 2: Histories
Top Tips, 107
22. General lethargy and tiredness, 109
23. Weight loss, 112
24. Chest pain, 115
25. Palpitations, 118
26. Cough, 122
Contents
27. Shortness of breath, 125
28. Haemoptysis, 128
29. Diarrhoea, 132
30. Abdominal pain, 137
31. Abdominal distension, 143
32. Haematemesis, 148
33. Rectal bleeding, 152
34. Jaundice, 155
35. Dysphagia, 158
36. Headache, 161
37. Loss of consciousness, 165
38. Tremor, 168
39. Dizziness, 172
40. Joint pain, 177
41. Back pain, 183
42. Pyrexia of unknown origin, 191
43. Ankle swelling, 195
44. Needlestick injury, 199
45. Preoperative assessment, 201
Part 3: Communication skills
Top Tips, 205
46. Breaking bad news, 208
47. Explaining medication, 211
48. Explaining a procedure, 215
49. Inhaler technique and asthma medication, 220
50. Exploring reasons for non-compliance, 222
51. Counselling for an HIV test, 225
52. Post mortem consent, 228
53. Explaining a DNAR (Do Not Attempt
Resuscitation) decision, 230
54. Explaining post-myocardial infarction
medication, 233
55. Dealing with an angry patient, 236
56. Carrying out a handover, 239
v

vi Contents
Part 4: Procedures
Top Tips, 243
57. Urinary catheterisation, 245
58. Insertion of nasogastric tube, 248
59. Venepuncture/phlebotomy, 252
60. Intramuscular injection, 254
61. Intravenous cannulation, 257
62. Intravenous drug administration, 260
63. Arterial blood gas analysis, 262
64. Measuring peak expiratory flow rate, 267
65. Performing and interpreting ECGs, 271
66. Scrubbing up in theatre, 276
67. Suturing, 278
68. Basic life support, 282
69. Advanced life support, 286
70. Completing a death certificate, 291
Index, 293
Companion website
This book is accompanied by a companion website:
featuring:
• Downloadable checklists from the book
• Survey showing which OSCE stations have a high chance of appearing in finals

vii
Contributors
We are grateful to the following doctors and medical
students for their contributions to this book.
Contributors to the chapters
Shifa Rahman
Manpreet Sahamey
Ruth-Mary deSouza
Gillian Landymore
Ravi Naik
Contributors to the medical school tables
Saba Ali
Ali Alidina
Nina Arnesen
Svitlana Austin
James Best
Kerry Bosworth
Lisa Burton
Sangeetha Chandragopal
Emily Clark
Laura Clarke
Rebecca Critchley
Nicola Davis
Ruth-Mary deSouza
Pippa Dwan
Matthew Everson
Martin Fawcett
Clare Fernandes
Lyndsey Forbes
Rachel Friel
Ushma Gadhvi
Harminder Gill
Catherine Hatzantonis
Elizabeth Hockley
Laura Hopkins
Towhid Imam
Zara Jaulim
Michelle Kameda
Jennifer Kelly
Pamini Ledchumykanthan
Almas Malik
Sathiji Nageshwaran
Ravi Naik
Sania Naqvi
Siva Nathan
Allan Nghiem
Gary Nicholson
Clarissa Perks
Anna Rebowska
Elissa Scotland
Charly Sengheiser
Nadir Sohail
Charlotte Spilsbury
Sarah Thompson
Elizabeth Khadija Tissingh
Christine Wahba
John Wahba
Siobhan Wild
Anna Willcock
Ahila Yogendra

viii
Acknowledgements
We are immensely grateful to the multitude of friends
and colleagues who helped us with various aspects of
this book. They include the following:
• All of the patients who kindly permitted us to use
their photos in this book
• All the staff at Eversley Medical Centre who assisted
us with finding patients with signs that could be pho-
tographed – specifically Dr John Chan, Dr Colette
Boateng and practice nurses Pauline Kearney and
Cheryl Mirador
• Dr Vivek Chayya and Dr Alison Barbour for their
advice on gastroenterology
• Dr Sara Khan, Dr Kartik Modha, Dr Nazia Khan
and Dr Siva Nathan for their help in recruiting
contributors
• Saiji Nageshwaran and Vaitehi Nageshwaran for
reviewing several of the chapters
• Mr Ian Skipper for his unparalleled IT expertise and
assistance
• Dr Khalid Khan for helping us develop the idea from
which this book was derived, and for reviewing, proof-
reading and critiquing the final manuscript
• All of our parents and families, without whose
patience and support this project would never have
succeeded
We are also grateful to the Medical Womens Federa-
tion, Tiko’s GP Group and the Muslim Doctors Asso-
ciation for helping us recruit contributors through
their organisations.

ix
Preface
The student begins with the patient, continues with the
patient, and ends his studies with the patient, using
books and lectures as tools, as means to an end.
Sir William Osler
Few will disagree that the recent overhauls in medical
training, together with higher numbers of medical
students being trained, has made medicine far more
competitive than before. Medical students today have
to make definitive career choices much earlier on than
they would have had in years gone by, and to start
building a portfolio of achievements such as audits
and publications very early on at medical school. Time
has become even more precious than it was before, and
it is understandable that medical students today will
opt for concise focused textbooks rather than sprawl-
ing prosaic texts, some of which have been used over
many generations and gained an almost legendary
status.
This book is perhaps unique in that it has been
written by a group of doctors who range from those in
career-grade posts who have completed postgraduate
training and have been OSCE examiners themselves, to
those who have very recently sat their finals. We have
collated our experiences to create a textbook that we
have made as focused, easy to read and, above all, as
exam-orientated as possible. While doing this, we have
worked hard to ensure that we include everything nec-
essary not only to pass finals, but also to achieve excel-
lent marks and hopefully merits and distinctions.
The structure is based on four sections – clinical
examinations, histories, communication skills and pro-
cedures. At the beginning of each of these sections,
there is a ‘Top Tips’ page that has generic advice for any
OSCE station of that section which would help you
boost your marks and performance regardless of what
the station is.
Each section is divided into chapters based on the
stations we feel are most likely to appear in OSCEs at
medical schools. Practice makes perfect – and more so
in OSCEs than in any other form of assessment. That
is why we have started each chapter with a checklist of
items reflecting the areas you are likely to be marked
on. You should use these to perfect and consolidate your
routines, and also when practising OSCEs with friends
and on patients. You should ideally do this in a pair or
a group of three, with one student doing the station as
a candidate and one allocating mock ‘marks’ using the
checklists to assess the candidate’s performance.
Following this in each section, we have included
tables that summarise the most common conditions
that are likely to present in finals OSCEs. We have
ensured that the information on the conditions in these
tables is as focused and exam-oriented as possible.
There is also a ‘Hints and tips for the exam’ section in
which we have summarised key advice and common
pitfalls that finalists tend to make.
We hope that this book will make your revision not
only thorough and focused, but also enjoyable. We have
spent a lot of time working with our publishers to make
the text as vibrant, colourful and easy to read as pos-
sible, with a plethora of tables, illustrations and photos
that will not only make it easy to remember key
ideas and principles, but also make the topic more
interesting.
We wish you the very best of luck with your finals
OSCEs, and hope that you find this book both enjoy-
able and useful.
Hamed Khan


OSCEs for Medical Finals, First Edition. Hamed Khan, Iqbal Khan, Akhil Gupta, Nazmul Hussain, and Sathiji Nageshwaran.
© 2013 John Wiley & Sons, Ltd. Published 2013 by John Wiley & Sons, Ltd.
1
Part 1: Examinations
Top tips
Do:
• Memorise the steps: The most important thing that
OSCE examiners are looking for is an ability to carry
out a full examination with reasonable technique and
speed. At finals level, you will be forgiven for missing a
few signs, and the vast majority of the marks on the
mark schemes are allocated for going through the
motions and doing all the ‘steps’. In contrast, at post-
graduate level, for example for the MRCP exam, you
would be expected to pick up all the major signs, and
be penalised heavily for missing them.
• Always suggest a number of possible differential
diagnoses: Very few doctors will be able conclusively
to put their finger on a diagnosis after examining a
patient for 10 minutes without a history. Offering a
number of differentials means that you have a higher
chance of at least mentioning the correct one, even if it
is not at the top of your list. It will also show a healthy
awareness of your own limitations.
• Practise, practise and practise: The best way to do
this is by seeing patients, having a friend to assess you
using our checklists and then getting critical (but con-
structive) feedback from them. Swapping roles and
watching colleagues examine is more useful than most
students think, as it will reinforce the steps of the exam-
ination, and you may see them use techniques and skills
that you would not otherwise have thought of. Doing
all the major examinations should become such a
normal routine for you that you can do it without
thinking about what the next step will be – just like
riding a bicycle or driving a car.
Don’t:
• Don’t be nervous: Most people have problems in
OSCEs not because of poor technique or knowledge,
but because of anxiety and nervousness. Don’t be over-
whelmed by the occasion, and don’t be intimated by an
examiner’s grilling. You will find it much easier to focus
on your technique and findings if you are relaxed, and
most examiners only grill students who are doing well,
as they do not waste their breath on those whom they
have decided are a lost cause!
• Don’t worry about minutiae: Medicine is not an
exact science, and different doctors have different ways
of examining patients, most of which yield the right
conclusions. At undergraduate level, all the examiners
are looking for is a decent, fluent technique that appears
to be well practised. Don’t spend ages trying to figure
out exactly how much the chest should expand, or
whether the cricoid–sternal notch distance is three
finger breadths or four.
• Don’t hurt the patient: This is the only unforgivable
sin in the OSCE. Its always a good idea to start your
examination by asking if the patient is in pain anywhere,
and reassuring them that if you unintentionally cause
pain during the examination, you will be happy to stop.
Students often have a tendency to ignore patients saying
‘Ouch!’ and pretending that they have not heard it, but
this is definitely the worst thing you can do. If you do
cause pain, acknowledge it immediately, apologise unre-
servedly and offer to stop – both examiners and patients
will appreciate your honesty and professionalism.
Generic points for all examination stations
HELP:
H: ‘Hello’ (introduction and gains consent)
E: Exposure (nipples to knees/down to groins)
L: Lighting
P: Positions correctly (supine), asks if patient is in any
pain
Washes hands
Inspects from end of bed for paraphernalia
Inspects patient (scars, etc.)
Thanks patient
Offers to help patient get dressed
Washes hands
Presents findings
Offers appropriate differential diagnosis
Suggests appropriate further investigations and
management
For joints only: Look
→ Feel → Move → Active/
passive/resisted

2
1 Cardiovascular
Checklist
P
MP
F
HELP:
H: ‘Hello’ (introduction and gains consent)
E: Exposure
L: Lighting
P: Positions at 45 degrees, asks if patient is in
any pain
Washes hands
Inspection:
• From end of bed: ECG, GTN spray
• Scars: thoracotomy, mitral valvotomy
• Pacemaker
Hands:
• Clubbing (infective endocarditis, cyanotic heart
disease, atrial myxoma)
• Signs of infective endocarditis (splinter
haemorrhages, Janeway lesions, Osler’s nodes)
Radial pulse:
• Rate
• Rhythm (regular or irregular)
• Character (collapsing, slow rising)
• Radial–radial delay
Requests blood pressure
Eyes:
• Xanthelasma
• Corneal arcus
• Anaemia
Face:
• Malar flush
Mouth
• ‘CDD’ (central cyanosis, dental hygiene,
dehydration)
Checklist
P
MP
F
Neck:
• Jugular venous pressure (raised
>4 cm)
• Palpates carotid pulse (character)
Palpates apex beat
Checks if apex beat is displaced in axilla
Palpates sternal edges and subclavicular areas for
thrills
Auscultates chest:
• Mitral area/apex beat (5th intercostal space
[ICS], midclavicular line)
• Tricuspid area (4th ICS, right sternal edge)
• Pulmonary area (2nd ICS, right sternal edge)
• Aortic area (2nd ICS, left sternal edge)
• Palpate carotid or brachial pulse
simultaneously to time murmur
Cardiac manoeuvres:
• Auscultates mitral area with patient lying on
left side and in expiration for murmur of mitral
stenosis
• Auscultates aortic area with patient sitting
forward and in expiration for murmur of aortic
regurgitation
Auscultates lung bases for pulmonary oedema
Palpates shins or ankles for peripheral oedema
Thanks patient
Offers to help patient get dressed
Washes hands
Presents findings
Offers appropriate differential diagnosis
Suggests appropriate further investigations and
management
OVERALL IMPRESSION:

Examinations:
1 Cardiovascular 3
Summary of common conditions seen in OSCEs
Aortic stenosis
Aortic
regurgitation
Mitral stenosis
Mitral
regurgitation
Tricuspid
regurgitation
Location of murmur
(loudest heard)
Aortic area
Aortic area
Mitral area
Mitral area
Tricuspid area
Type of murmur
Ejection systolic
Radiating to carotids
End-diastolic
Mid-diastolic
Pan-systolic
Radiating to axilla
Systolic
Manoeuvres to
enhance murmur
None
Sit forward and
expirate
Roll on left side and
expirate
None
None
Pulse
Slow rising
Collapsing
Carotid pulsations
Irregular if atrial
fibrillation
Normal
Normal
Peripheral features
Narrow pulse pressure
Commonly have CABG
scar
Quincke’s sign
Corrigan’s pulsation
De Musset’s sign
Atrial fibrillation on
auscultation
Right-sided heart
failure
None
JVP increased to
earlobes
Key management
points
Aortic valve
replacement if
severe
Beta-blockers
Diuretics
Treat heart failure
Antibiotic prophylaxis
for gastrointestinal/
genitourinary/dental
procedures
Aortic valve
replacement
Treat any heart failure
Antibiotic prophylaxis
for gastrointestinal/
genitourinary/
dental procedures
Mitral valvotomy
Treat atrial fibrillation
and heart failure
Antibiotic prophylaxis
for gastrointestinal/
genitourinary/
dental procedures
Anticoagulate (with
warfarin)
Mitral valve
replacement
Treat any heart failure
Antibiotic prophylaxis
for gastrointestinal/
genitourinary/
dental procedures
Tricuspid valvotomy
Treat right heart
failure
Hints and tips for the exam
Identifying valvular lesions
Trying to learn all the murmurs and all the conditions
associated with them is futile and only really necessary
if you are a cardiologist. Trying to correctly differentiate
whether murmurs are ejection systolic or pansystolic,
end-diastolic rather than mid-diastolic, is also difficult
and is not necessary for finals and perhaps even PACES.
The easiest and most logical way of diagnosing the
correct valvular lesion from the murmur is by answer-
ing the following two questions:
1. Where is the murmur?
Murmurs can frequently be heard throughout the
chest, but the area where a murmur is loudest is usually
where the murmur is – so a murmur heard loudest in
the aortic area will probably be aortic regurgitation
(AR) or aortic stenosis (AS), and a murmur heard
loudest in the mitral area will probably be mitral regur-
gitation (MR) or mitral stenosis (MS). Exceptions to
this include Gallavardin’s phenomenon, in which an AR
murmur is heard loudest in the tricuspid area; however,
from the perspective of passing an exam, you would
not be penalised for missing that, and in any case it is
extremely rare.
2. Is it systolic or diastolic?
In other words, does the murmur correspond with the
pulse (systolic) or not (diastolic)?
Murmurs will only be produced if the natural flow
of the blood is opposed. In the case of valves through
which the blood leaves the heart (such as the aortic
valve), systolic murmurs will only be produced when
the outflow of blood is hindered, which can only
happen in AS (as opposed to AR, which would not
hinder the outflow of blood).
In the case of valves where the blood flows into the
heart in diastole, the natural flow of blood in diastole
is against the aortic valve, as the purpose of the aortic
valve is to stop blood flowing into the aorta during
diastole. Hence blood hits the aortic valves and stops
there when the cardiac muscles relax in diastole. This
natural flow would be impaired by AR as the blood
flows into the aorta when it should not, which is why a
diastolic murmur in the aortic area can only be AR.

4
Examinations:
1 Cardiovascular
Also remember that you should not hear a murmur
with a replaced valve unless it is leaking.
Identifying which valve has been replaced
Remember that the pulse correlates with the first heart
sound, which is the mitral valve closing. (The second
heart sound is the aortic valve closing.)
• If the loudest sound of the valve closing correlates
with the pulse, it is the first heart sound, indicating that
the mitral valve has been replaced.
• If the loudest sound of the valve does not correspond
with the pulse, it is the second heart sound, indicating
that the aortic valve has been replaced.
• The location of the loudest sounds may also be
helpful. Bioprosthetic valves sound the same as normal
heart valves, so it would be unfair for examiners to
expect you to identify them.
Apex beat
The apex beat is palpable in the 5th intercostal
space, and is displaced to the apex in MR. Various char-
acters of the apex beat have been described, such as
‘heaving’ and ‘thrusting’; differentiating between them
is extremely difficult and probably beyond the scope of
a 10-minute OSCE. Other than this, it is more likely to
cause confusion than add anything substantive.
The best course of action is to describe where the
apex beat it, and whether it is palpable or not. An
impalpable apex beat is often caused by obesity,
hyperinflation of the lungs, dextrocardia or poor
technique.
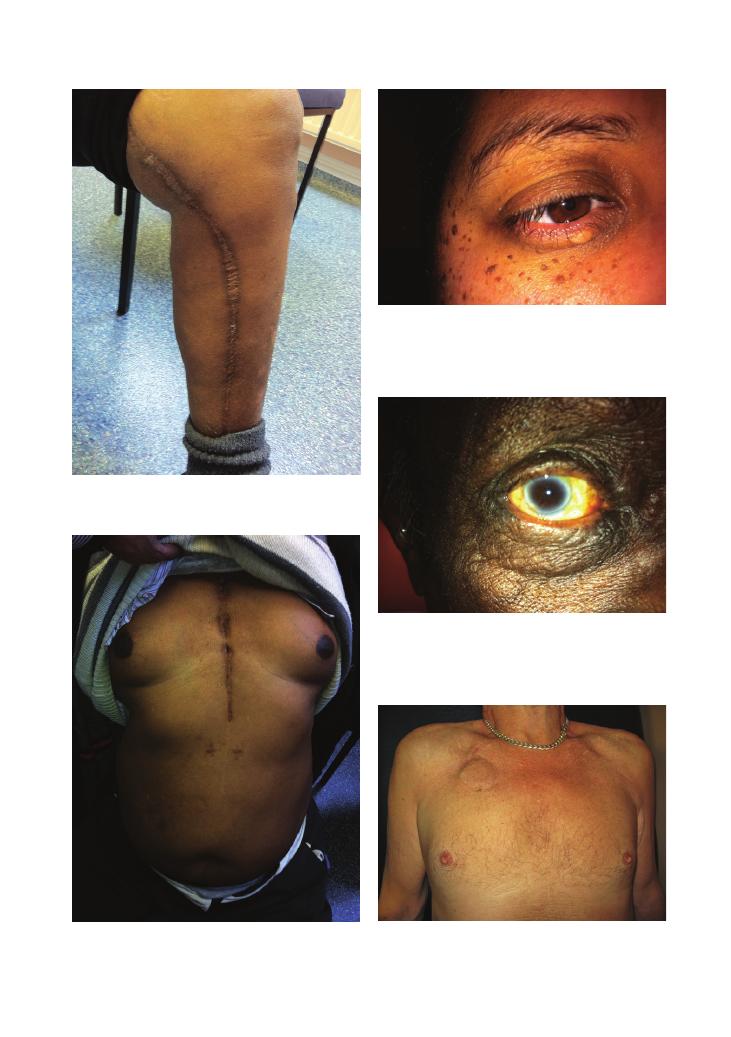
Scars
Figures 1.1–1.5 show scars and other signs that you will
need to note on your examination of the patient.
Questions you could be asked
Q. Which organism causing infective endocarditis is
associated with underlying bowel cancer?
A. Streptococcus bovis – a colonoscopy should be con-
sidered in all patients presenting who are found to have
Streptococcus bovis.
Q. What is the most common cause of tricuspid
regurgitation?
A. Most cases of tricuspid regurgitation are ‘func-
tional’, due to dilatation of the right ventricle (so that
the tricuspid valves flop downwards). This could arise
for a number of reasons, such as right heart failure,
congestive heart failure and pulmonary hypertension.
If this seems too complex, remember that diastolic
murmurs are usually ‘ARMS’ (AR or MS), and the area
where it is loudest is probably where the murmur is.
Right versus left
• LEFT-sided murmurs are louder in EXPIRATION.
• RIGHT-sided murmurs are louder in INSPIRATION.
This is because more blood flows into the intrathoracic
cavity and lungs on inspiration, and hence more blood
flows through the right-sided heart valves as these
supply the lungs. The converse is true for left-sided
murmurs.
It is vital to ask patients to hold their breath when
using this test, but you must not ask them to do this for
too long as this can cause the patient pain and you will
fail the exam. Its often a good idea to hold your own
breath at the same time so that you will know when it
is getting too long to allow your patient to breath
normally.
Timing the murmur
Timing murmurs is something that both students and
experienced doctors have difficulty with. Just remem-
ber to palpate the pulse when listening to the heart
sound, and see if you hear the murmur at the same time
as you feel the pulse.
• If the murmur is WITH the pulse, it is a SYSTOLIC
murmur.
• If the murmur if NOT WITH the pulse, it is a
DIASTOLIC murmur.
Use a central pulse such as the carotid or brachial to do
this, otherwise it will not be accurate.
Diastolic murmurs
A number of conditions can cause diastolic murmurs,
but the most common ones are AR and MS – this can
be easily memorised using the mnemonic ‘ARMS’.
Diastolic murmurs are very difficult to elicit for even
the most experienced doctors, and if you can hear a
murmur easily, it is most likely to be systolic. However,
if you do manage to identify a diastolic murmur, it is
handy to remember that MS murmurs are much quieter
than AR murmurs, and if you can auscultate a diastolic
murmur throughout the chest, it is much more likely
to be AR than MS.
Valve replacements
If you see a midline sternotomy scar, you should imme-
diately bring your ear close to the patient’s chest and
listen carefully for the clicking noise that is indicative
of the closing of a metallic valve replacement – this can
easily be heard without a stethoscope.
Examinations:
1 Cardiovascular 5
Figure 1.1 Graft scar from leg vein removal in coronary artery
bypass grafting
Figure 1.2 Chest scar in coronary artery bypass grafting
Figure 1.3 Xanthelasma
Figure 1.4 Corneal arcus
Figure 1.5 Indication of pacemaker insertion

6
Examinations:
1 Cardiovascular
Q. How should a patient with suspected heart failure
be investigated in primary care?
A. According to the NICE guidelines (NICE, 2010), the
primary investigation of choice is the blood level of
brain natriuretic peptide (BNP)– patients with normal
results are unlikely to have heart failure, and those with
a BNP level
>400 pg/mL should be investigated urgently
(within 2 weeks).
Reference
National Institute for Health and Clinical Excellence
(2010) Chronic heart failure: Management of chronic
heart failure in adults in primary and secondary care.
Available from http://www.nice.org.uk/nicemedia/
live/13099/50526/50526.pdf (accessed June 2012).

7
2 Respiratory
Checklist
P
MP
F
HELP:
H: ‘Hello’ (introduction and gains consent)
E: Exposure
L: Lighting
P: Positions at 45 degrees, asks if the patient is
in any pain
Washes hands
Inspects from end of bed:
• Looks at the front and back for thoracotomy
scars
• Sputum pots (bronchiectasis, COPD)
• Oxygen cylinders (COPD)
• Inhalers (COPD, asthma)
• Immuosuppressants (pulmonary fibrosis)
• Nebulisers (COPD)
• Peak flow charts (asthma)
Hands:
• Clubbing (suppurative conditions, lung cancer,
fibrosis)
• Tar staining
• Wasting of small muscles
Tremor
+ CO
2
retention flap
Radial pulse
Respiratory rate
Eyes:
• Horner syndrome (Pancoast syndrome)
• Anaemia
Face:
• Plethora (polycythaemia)
Mouth:
• ‘CDD’ (central cyanosis, dental hygiene,
dehydration)
Checklist
P
MP
F
Neck:
• JVP (raised
>4 cm) in cor pulmonale
• Palpates lymph nodes
• Tracheal deviation
• Cricoid–suprasternal notch distance (
<three
finger breadths in hyperinflation)
Palpates:
• Palpates apex beat
• Measures chest expansion (6–8 cm is normal)
at three places on the anterior and three on
the posterior chest
Percusses:
• Percusses at three positions on the anterior
and three on the posterior chest
Auscultates:
• Auscultates at three positions on the anterior
and three on the posterior chest
• Auscultates axillae to listen for right middle
lobe signs
• Auscultates for vocal fremitus
Palpates shins or ankles for peripheral oedema
Thanks patient
Offers to help patient get dressed
Washes hands
Presents findings
Offers appropriate differential diagnosis
Suggests appropriate further investigations and
management
OVERALL IMPRESSION:

8
Examinations:
2 Respiratory
Summary of common conditions seen in OSCEs
Condition
Key finding
Chest
expansion
Percussion
Auscultation
Vocal
fremitus
Pulmonary
fibrosis
Fine end-inspiratory
crackles
Decreased
bilaterally
Normal/mild decrease at
bases
Fine end-inspiratory
crepitations
Normal/increased
at bases
Pneumothorax
Increased resonance
Decreased
unilaterally
Increased resonance
Decreased breath sounds
at site of pneumothorax
Decreased
Pleural effusion
Stony dull bases
Normal
Dull on side of effusion
Dull base(s)
Decreased at base
COPD/asthma
Wheeze
Normal
Normal
Wheeze
+ scattered
crepitations in COPD
Normal
Lobectomy
Scar
Normal
Dull at site of lobectomy
Normal
Normal
Pneumonectomy
Scar
Decreased
unilaterally
Dull on side of
pneumonectomy
Absent on side of
pneumonectomy
Decreased
Bronchiectasis
Sputum pot,
crackles, clubbing
Normal
Normal
Normal
Normal
Consolidation
Crackles
concentrated in
one area
Normal
Normal
Normal/increased at site
of consolidation
Normal/increased
at site of
consolidation
Findings
Condition
Young, thin, short patient with a PEG
site near the umbilicus and a
tunnelled catheter at the axilla or on
the chest
Bronchiectasis
secondary to
cystic fibrosis
Middle-aged patient with full sputum
pot
Bronchiectasis
Cushingoid features (high BMI, bruising,
striae) and bruising (from steroid use)
Pulmonary fibrosis
Features of rheumatological disease, e.g.
rheumatoid hands (ulnar deviation,
swollen metacarpophalangeal joints,
swan neck deformity) or scleroderma
(beak-shaped nose, small mouth,
tight skin, telangiectasia)
Pulmonary fibrosis
Elderly patient with tar-stained
fingernails and an oxygen cylinder at
the bedside
COPD
Characteristic scars (with pictures)
Lobectomy/
pneumonectomy
Hints and tips for the exam
Inspection
Inspection can often provide the diagnosis at the respi-
ratory station. There are some key stereotypical features
of a few conditions that can give the case away.
Timing
A common problem at the respiratory station is timing
as students find it difficult to listen to carefully all
the breath sounds in enough places during the 5–10
minutes they have.
Once you have completed your inspection, start
examining from the back. Most physicians will agree
that it is easier to percuss and auscultate at the back as
you have more surface area available. In addition, the
position of the heart often makes it difficult to establish
findings in the left lower zone of the lung anteriorly.
One of the ways you can minimise collateral time
losses is by reducing the time spent in changing the
patient’s position. When the patient is lying down,
palpate, percuss and auscultate the anterior aspect of the
chest. When he or she is sitting forwards, palpate, percuss
and auscultate the posterior aspect, and examine for
lymphadenopathy at the same time.
Lobectomies and pneumonectomies
These are very common in OSCEs as patients are
usually stable and ambulant, and the examination find-
ings are obvious. Students are often surprised when
they do not hear decreased breath sounds at the site of
lobectomy scars, which they may have done during
their ward attachments. This is because, after a few
months or years, patients with lobectomies develop
Examinations:
2 Respiratory 9
Questions you could be asked
Q. Why are spontaneous pneumothoraces more
common in tall men?
A. There are a number of theories for this. One is that
the difference between the intrapleural pressure of the
apex and the base is greater in taller people, making
it easier for a pneumothorax to form spontaneously.
Another is that any anatomical defects or blebs will
become more stretched if the length if the lung is
longer, as is the case in taller individuals.
Q. Why might you hear breath sounds over an area of
the lung that has been excised in a lobectomy?
A. See ‘Lobectomies and pneumonectomies’ above.
Q. Name three causes of bibasal crepitations with club-
bing in a patient.
A. See ‘Creps and clubbing’ above.
compensatory hyperinflation, and lung tissue fills up
areas it was removed from. This will not be the case
immediately after lobectomy surgery as sufficient time
has not surpassed for compensatory hyperinflation to
occur.
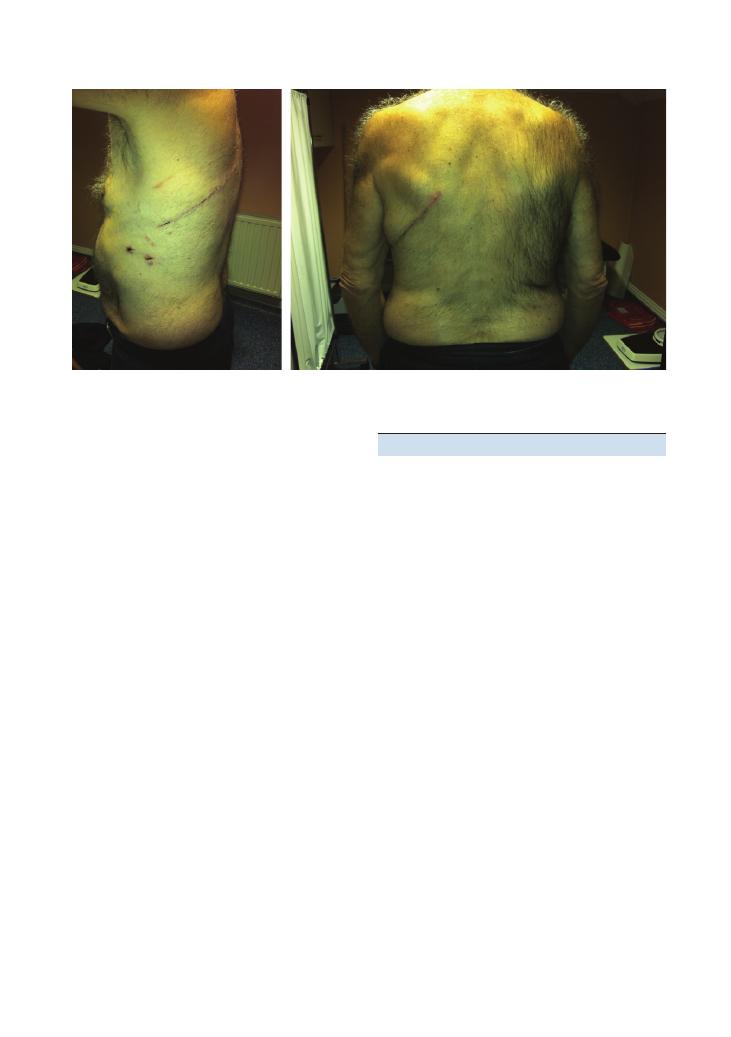
The scar from a pneumonectomy can be very similar
to the scar from a lobectomy (Figure 2.1), although they
can immediately be distinguished by the fact that chest
expansion and breaths sounds are usually completely
absent on the side of a chest that has undergone a
pneumonectomy.
‘Creps and clubbing’
Remember that bilateral crepitations and clubbing that
occur together most commonly present in patients with
bronchiectasis or pulmonary fibrosis.
Figure 2.1 Lobectomy scar: side view (a) and back view (b)
(a)
(b)

10
3 Abdominal
Checklist
P
MP
F
HELP:
H: ‘Hello’ (introduction and gains consent)
E: Exposure (nipples to knees/down to groins)
L: Lighting
P: Positions correctly (supine), asks if patient is in
any pain
Washes hands
Inspects from end of bed for relevant
paraphernalia (e.g. nutritional supplements, CAPD
device)
Inspects patient:
• Body habitus (BMI, Cushingoid from
immunosuppressants following organ
transplant)
• Pallor (anaemia)
• Jaundice
• Pigmentation (Addison’s disease, Peutz–Jeghers
syndrome, ‘bronze’/slate grey in
haemochromatosis, drugs)
• Bruising
• Tattoos
• Peripheral skin lesions associated with IBD
(erythema nodosum, pyoderma gangrenosum)
Hands:
• Clubbing (IBD, malignancy, malabsorption
states such as coeliac disease, liver cirrhosis)
• Dupuytren contracture
• Palmar erythema
• Leukonychia (iron deficiency)
• Koilonychia
• Liver flap
Arms:
• Arteriovenous fistula (for dialysis) – auscultate
for bruit
• Tattoos
Eyes:
• Jaundice
• Anaemia
• Xanthelasmata
Checklist
P
MP
F
Face:
• Parotid enlargement (alcohol excess)
Mouth:
• Angular stomatitis (iron/vitamin B deficiency)
• Glossitis (vitamin B deficiency)
• Peri-oral pigmentation (Peutz–Jeghers
syndrome), telangiectasia
• Ulcers (IBD)
• Dehydration
• Dental hygiene
• Smell of breath (hepatic fetor, uraemia)
Supraclavicular lymph nodes (Virchow’s node/
Troisier’s sign for stomach cancer)
Chest:
• Gynaecomastia
• Spider naevi (more than five is significant)
Inspects abdomen:
• Scars (see Figure 3.4)
• Drain insertion sites
• Peristalsis/pulsations
• Caput medusae
• Distension
• Masses/swellings
• Stretch marks/striae
Palpates abdomen (ideally kneeling down):
• Superficial palpation in nine quadrants for
masses and tenderness
• Deep palpation in nine quadrants for masses
and tenderness
• Hepatomegaly
• Splenomegaly
• Ballots kidneys
• Abdominal aortic aneurysm
Percusses abdomen:
• Liver
• Spleen
• Ascites with shifting dullness
• Bladder (dull if full, e.g. in urinary retention)
Auscultates for bowel sounds, renal bruits,
abdominal aortic aneurysm
Examines for shifting dullness/ascites
Examines lower legs for oedema

Examinations:
3 Abdominal 11
Checklist
P
MP
F
Tells examiner he would like to complete the
examination by examining the following:
• Hernial orifices (with cough/sitting up)
• Genitalia
• Rectum
• Lymph nodes
• Urine dipstick
Thanks patient
Offers to help patient get dressed
Checklist
P
MP
F
Washes hands
Presents findings
Offers appropriate differential diagnosis
Suggests appropriate further investigations and
management
OVERALL IMPRESSION:
Summary of common findings seen
in OSCEs
• Chronic liver disease
• Hepatomegaly
• Splenomegaly
• Nephrectomy scar/features of end-stage renal
failure (ESRF)
• Enlarged kidneys
• Transplanted kidneys
• Ascites
• Hernia
• Stoma
• Surgical scars
Summary of common conditions seen in OSCEs
Common chronic
conditions
Chronic liver disease
Inflammatory bowel
disease
Renal disease/ESRF
Examination findings
General inspection
Malnourished
Bruising (impaired clotting)
Cushingoid appearance
(from steroids)
Cushingoid appearance (from
steroids)
CAPD paraphernalia
Hands/arms
Clubbing
Palmar erythema
Dupuytren contracture
Liver flap (in hepatic encephalopathy)
Leukonychia (due to
hypoalbuminaemia)
Clubbing
Tubing for total parenteral
nutrition
Leukonychia/ koilonychia
Arteriovenous fistula (listen to
bruit)
Elevated blood pressure
Renal osteodystrophy
Face
Jaundiced sclera (if decompensated)
Parotid enlargement (if liver failure
caused by excess alcohol intake)
Mouth ulcers
Temporalis muscle wasting
Gum hypertrophy (ciclosporin)
Anaemia
Collapsed nasal bridge
(Wegener’s granulomatosis)
Molluscum (immunosuppression)
Viral skin warts/skin cancers
Butterfly rash (if SLE)
Hearing aid (if Alport syndrome)
Neck
Raised JVP (if fluid overload
secondary to hypoalbuminaemia)
Parathyroidectomy scar (after
tertiary hyperparathyroidism)
Raised JVP
Cushingoid neck
(
Continued )

12
Examinations:
3 Abdominal
Common chronic
conditions
Chronic liver disease
Inflammatory bowel
disease
Renal disease/ESRF
Chest
Reduced hair
Gynaecomastia
Spider naevi
Right internal jugular/subclavian
tunnelled intravenous line/scar
CABG scar (may indicate
atherosclerosis causing
renovascular disease)
Abdomen
Jaundice (if decompensated)
Ascites (if portal hypertension)
Hepatomegaly
Splenomegaly (in portal hypertension)
Caput medusae
Surgical scars
Liver transplant scar (from
primary sclerosing
cholangitis)
Fistulas
Stomas
Nephrectomy scars (if renal
transplant/dialysis)
Enlarged kidneys (if adult
polycystic kidney disease)
Transplanted kidney palpable in
iliac fossa/near groin
CAPD scars
Injection sites (from
subcutaneous insulin)
Cushingoid features (if
immunosuppression with
steroids)
Legs
Peripheral oedema
(hypoalbuminaemia)
Pyoderma gangrenosum
Erythema nodosum
Peripheral oedema
Key investigations
Liver function tests
Clotting and albumin (for synthetic
liver function)
Alcohol screen
Abdominal ultrasound
Viral hepatitis screen
Autoimmune hepatitis screen
Viral serology screen
Liver biopsy
Oesophago-gastro-duodenoscopy
(to look for varices if portal
hypertension suspected)
Inflammatory markers
Colonoscopy
Stool microscopy, culture
and sensitivity
Urinalysis (including albumin
creatinine ratio)
Us
+Es and glomerular filtration
rate
Nephritic/vasculitic screen
Renal ultrasound
IVU/CT kidneys, ureter and
bladder
Renal biopsy
Key management
principles
Treat underlying cause
Stop all hepatotoxic medications
Nutritional support
Salt restriction
Monitor fluid status and input/output
Vitamin B/folate supplements
Lactulose
Monitor blood glucose
Monitor Glasgow Coma Scale score
Treat clotting abnormalities
Assess for portal hypertension
(splenomegaly/ascites/caput
medusae)
→ if present do
oesophago-gastro-duodenoscopy
for varices
Steroids (topical/enema/
oral)
Mesalazine/ azathioprine/
anti-TNF
Assess for toxic
megacolon
Monitor inflammatory
markers
Metronidazole for perianal
disease
Nutritional support/
elemental diet
Surgery
Treat underlying cause
Stop all nephrotoxic medications
Nutritional support
Salt restriction
Monitor fluid status and input/
output
Calcium supplements (if
hypocalcaemic)
Phosphate binders (if high
phosphate)
Monitor parathyroid hormone
level (consider
parathyroidectomy if tertiary
hyperparathyroidism)
Monitor blood gases and treat
acidosis
Monitor Hb (consider
erythropoietin/iron if anaemic)
Optimise blood pressure (ACE
inhibitor) and cholesterol

Examinations:
3 Abdominal 13
Hints and tips for the exam
Hepatomegaly and splenomegaly
Hepatomegaly and splenomegaly are also very common
findings at this station in finals. We have discussed
various key tips below to help you in both the diagnosis
and the discussion.
Examining large livers and spleens
• Start low in the right iliac fossa, so that you do not
miss giant organomegaly.
Common conditions leading to chronic
liver disease
To make things easier, we have summarised here the key
clinical features and investigations of chronic liver
disease that you can use in the viva/questions part at
the end of the OSCE generically, regardless of what the
cause of the liver disease is. Table 3.1 outlines common
conditions leading to chronic liver disease – the most
common ones are marked with an asterisk. This will be
especially useful for students aiming for a merit or dis-
tinction, as it helps to diagnose not only chronic liver
disease, but also the underlying cause.
Table 3.1 Common conditions leading to chronic liver disease
Common causes of
chronic liver disease
Key points in history
Collateral ‘clues’
Specific investigations to
identify cause
*Alcohol
Alcohol intake
CAGE
Rib fractures on chest X-ray
High AST:ALT ratio
High MCV
*Hepatitis B and C
Sexual history
Intravenous drug abuse
Blood transfusions
Travel abroad
Tattoos
Scars from intravenous access
Hepatitis serology
Primary biliary cirrhosis
Xanthelasmata
Pigmentation
Clubbing
Excoriation marks
Female (
>90%)
Middle-aged
Features of autoimmune/connective
tissue/rheumatological diseases
Features of immunosuppression (Cushing’s
disease, molluscum contagiosum)
↑ IgM
Antimitochondrial antibodies
Cholestatic liver profile (
↑ ALP)
Liver biopsy
Autoimmune hepatitis
Musculoskeletal pain
Features of autoimmune/connective
tissue/rheumatological diseases
Features of immunosuppression (Cushing’s
disease, molluscum)
↑ IgG
Antinuclear antibodies
Anti-smooth muscle antibodies
Liver biopsy
Primary sclerosing
cholangitis
Past medical history of or active
IBD
Features of IBD (usually ulcerative colitis)
Bowel surgery scars
Stoma
pANCA
ERCP/MRCP
Liver biopsy
Cholestatic liver profile (
↑ ALP)
Wilson’s disease
Family history (autosomal
recessive inheritance)
‘Bronze’ skin pigmentation
Marked tremor
Kayser–Fleischer rings in iris
Dysarthria/cognitive impairment
Serum copper
24-hour urinary copper excretion
Haemochromatosis
Family history (autosomal
recessive inheritance)
Diabetes
Arthritis
Hypopituitarism
‘Slate grey’ pigmentation
‘Bronzing’ of the skin
Gonadal atrophy
Gynaecomastia
Serum iron studies
Liver biopsy
Fatty liver/non-alcoholic
steatohepatitis)
Xanthelasmata
Hypertension
CABG scar
Ultrasound
Lipids
Heart failure
Past medical history of heart
disease/hypercholesterolaemia
Signs of heart failure
Echo

14
Examinations:
3 Abdominal
• Use the radial aspect of your index finger – but if that
doesn’t work, use your finger with your hands pointing
up towards the patient’s head.
• Keep your fingers absolutely still as the patient
breathes in and out.
• Make sure that you move your hand upwards supe-
riorly by no more than 2 cm as the patient breathes in
and out. If you leave too large a distance as you move
up, there is a risk that you may miss the edge of the liver
or spleen.
• For the liver, percussion is almost as discriminatory
as palpation. It is also useful to differentiate between
lung hyperinflation pushing the liver down, and true
hepatomegaly. The superior aspect of the liver usually
lies between the 4th and 6th ribs, and continues down
to the last rib at the inferior border of the rib cage;
hence, there should be dullness in all of this area.
Hyperinflation pushing down the liver is confirmed if
percussion is resonant significantly below the 6th rib.
• For the spleen, use your left hand to stabilise the left
ribs in order to prevent them from being pushed
towards the left as you palpate the spleen with your
right hand. If you still have difficulty, roll the patient
on to the right side and repeat this.
• When you do find an enlarged liver or spleen, esti-
mate the size of hepatomegaly in centimeters rather
than ‘finger breadths’, which vary from person to person
(depending on how big their fingers are!).
• Avoid the business of trying to identify the liver char-
acteristics (e.g. whether it ‘firm’, ‘hard’ or ‘soft’, or pul-
satile, or nodular or smooth). Doing this in an exam
will make the patient uncomfortable and use up your
valuable time without achieving very much. Once a
large liver or spleen has been identified, the most logical
way of defining its characteristics would be to carry out
some sort of imaging – usually an ultrasound of the
abdomen.
Systematic differentiation of the underlying
causes of hepatomegaly and splenomegaly
• A large liver and/or spleen is a very common finding
at finals OSCE stations. Make sure that you have a
generic system for categorising the causes, so that you
can reel off a list of differential diagnoses quickly, con-
fidently and systematically.
• Always try to use all the signs to help you devise a
differential diagnosis. However, if you find an enlarged
spleen or liver and have no clue what the cause is,
go for conditions that can cause hepatomegaly and
splenomegaly either individually or together – the first
column of Table 3.2 summarises these.
• Don’t be too pedantic when distinguishing between
gigantic, moderate and mild splenomegaly. Identifying
splenomegaly and giving a reasonable list of differential
diagnoses and investigations will usually be enough
to score a decent pass. Distinguishing between mild/
moderate and gigantic splenomegaly will help to get
you into the merit/distinction range. Remember that
the spleen has to be at least double or triple its normal
size to be palpable.
• Remember to piece the other parts of your examina-
tion together to complete the diagnostic jigsaw. All the
conditions that cause hepatomegaly or splenomegaly
have several peripheral signs so look out for these and
use them to support your differential diagnosis.
Renal cases
Although students often worry about getting a ‘renal
case’ in finals, it can often be a blessing in disguise. The
differential diagnosis is relatively straightforward, and
the signs are easy to elicit.
Fundamentally, there are only two findings in renal
cases – those of ESRF, and ballotable enlarged kidneys.
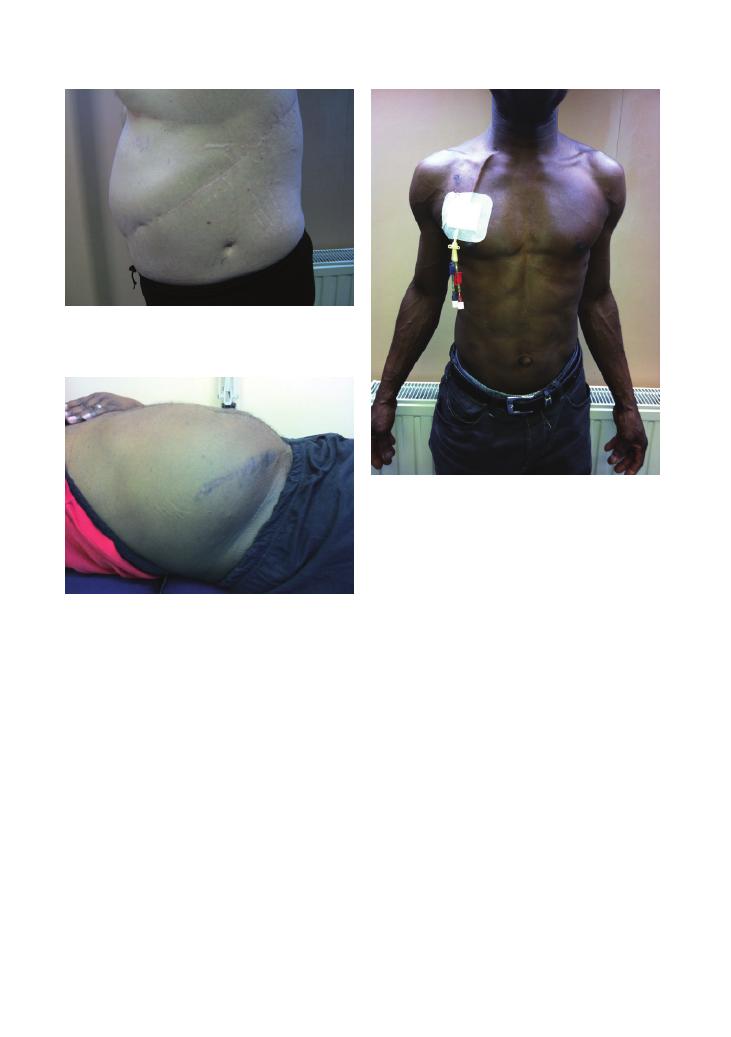
End-stage renal failure
There are potentially three findings that are all attribut-
able to ESRF:
• Nephrectomy scar (Figure 3.2): Inspect carefully for
this, making sure that you look all the way around the
lumbar/flank regions through to the back. Finding a
nephrectomy scar is alone sufficient to devise a full list
of differential diagnoses and a management plan.
• Palpable transplanted kidney: This is usually near
the groin/iliac fossa with a small scar at the site.
• Signs of dialysis use (arteriovenous fistula, right
internal jugular vein line, CAPD scars; Figure 3.3): A
slicker way of describing this is ‘renal replacement
therapy’, which covers them all – and also sounds more
impressive!
Whichever of these signs the patient has, the under-
lying condition is always ESRF.
The four most common causes of ESRF are as
follows:
1) Diabetes
2) Hypertension
3) Adult polycystic kidney disease (APKD)
4) Glomerulonephritis
Once you have got to this stage, your investigations and
management should be guided by your differential
diagnosis. However, if you are still struggling, merely
discuss the generic investigations and management
strategies for patients with ESRF, as discussed in the
summary table above.

Examinations:
3 Abdominal 15
Table
3.2
Causes
of
hepatomegaly
and
splenomegaly
Hepatosplenomegaly
Hepatomegaly
only
(without
splenomegaly)
Splenomegaly
only
(without
hepatomegaly)
Peripher
al
signs
Gigantic
splenomegaly
(palpable
in
right
lower
quadr
ant)
Moder
ate
splenomegaly
(5–10
cm)
Mild
splenomegaly
(2–5
cm)
Malignancy
All
haematological
malignancies
(myeloprolifer
ative
and
lymphoprolifer
ative)
Hepatocellular
carcinoma
Secondary
metastases
Chronic
myelogenous
leukaemia
Myelofibrosis
All
haematological
malignancies
(myeloprolifer
ative
and
lymphoprolifer
ative)
All
haematological
malignancies
(myeloprolifer
ative
and
lymphoprolifer
ative)
Lymphadenopathy
Cachexia
Anaemia
Bruising
and
purpur
a
Infective
Vir
al
hepatitis
CMV
To
xoplasmosis
Malaria
Schistosomiasis
Histoplasmosis
Brucellosis
Leptospirosis
Kala-azar
W
eils
disease
Hydatid
disease
Vir
al
hepatitis
Chronic
malaria
Viscer
al
leishmaniasis
All
infectious
causes
of
hepatosplenomegaly
Glandular
fever
Brucellosis
Vir
al
hepatitis
Early
sickle
cell
disease
HIV
Pyrexia
Recent
foreign
travel
Tattoos/intr
avenous
drug
abuse
scars
(vir
al
hepatitis)
Infiltr
ative
Sarcoidosis
Amyloidosis
Gaucher’
s
disease
Fatty
liver/NASH
Haemochromatosis
Gaucher’
s
disease
Gaucher’
s
disease
Sarcoidosis
Amyloidosis
Gaucher’
s
disease
Sarcoid
skin
disease
Inflammatory
–
–
–
Felty’
s
syndrome
(rheumatoid
arthritis
, neutropenia,
splenomegaly)
Rheumatoid
arthritis
SLE
Arthropathy
Butterfly
rash
of
SLE
Liver
disease
Liver
disease
with
portal
hypertension
Any
cause
of
chronic
liver
disease
(as
above)
–
Portal
hypertension
Liver
cirrhosis
with
portal
hypertension
Signs
of
chronic
liver
disease
(as
above)
Cardiov
ascular
–
Right
heart
failure
Tricuspid
regurgitation
–
–
Infective
endocarditis
Constrictive
pericarditis
Ankle
oedema,
raised
JVP
Haematuria
and
peripher
al
signs
of
endocarditis
Miscellaneous
–
Polycystic
kidney
disease
(causing
liver
cysts)
–
–
Haemolytic
anaemias
(autoimmune
,
hereditary
spherocytosis)
Thalassaemia
Ballotable
kidneys/
nephrectomy
scar
Jaundice
(from
haemolysis)
16
Examinations:
3 Abdominal
occurs because of tertiary hyperparathyroidism and
although it looks like clubbing, with prominence of the
distal phalanges, what actually happens is that the prox-
imal phalanges become narrow, and this makes the
distal phalanges look prominent despite being normal.
Pseudoclubbing is common after renal replacement
therapy – patients with long-standing secondary
hyperparathyroidism (due to low calcium levels)
develop parathyroid hyperplasia, leading to increased
parathyroid hormone production that becomes auton-
omous of the negative feedback system. Once a patient
is undergoing renal replacement therapy and their
calcium levels normalise, the parathyroid continues
producing excess parathyroid hormone, which results
in hypercalcaemia and resorption of bone from the
proximal phalanges, causing them to narrow.
• Chronic liver disease and features of ESRF in the
same patient: This is rare, but don’t let it put you off.
The most likely cause is hepatitis C (leading to chronic
liver disease), which also causes membranous glomeru-
lonephritis (leading to ESRF).
• Spleen versus kidney: When palpating the left side
of the abdomen, it can sometimes be difficult to distin-
guish a ballotable kidney from a spleen. Table 3.3 below
summarises the key differences.
Figure 3.2 Nephrectomy scar
Figure 3.3 Right internal jugular tunnelled catheter (for dialysis)
Figure 3.1 Scar from splenectomy after a road traffic accident, also
showing the drain insertion site
Ballotable/ enlarged kidneys
Ballotable enlarged kidneys can be palpated in the
lateral lumbar regions. As with ESRF, you only need to
remember a short list of differential diagnosis:
• APKD
• Renal cell carcinoma
• Bilateral hydronephrosis (secondary to obstruction,
e.g. by an external mass, prostate enlargement, etc.)
• Amyloidosis (primary or secondary)
The key investigations with all of these are imaging (CT
of the kidney, ureter and bladder/IVU) and renal
biopsy, with the management depending on the under-
lying cause.
Rare findings
• Clubbing versus pseudoclubbing: Although these
conditions look similar on examination, the underlying
causes are fundamentally different. Pseudoclubbing
Examinations:
3 Abdominal 17
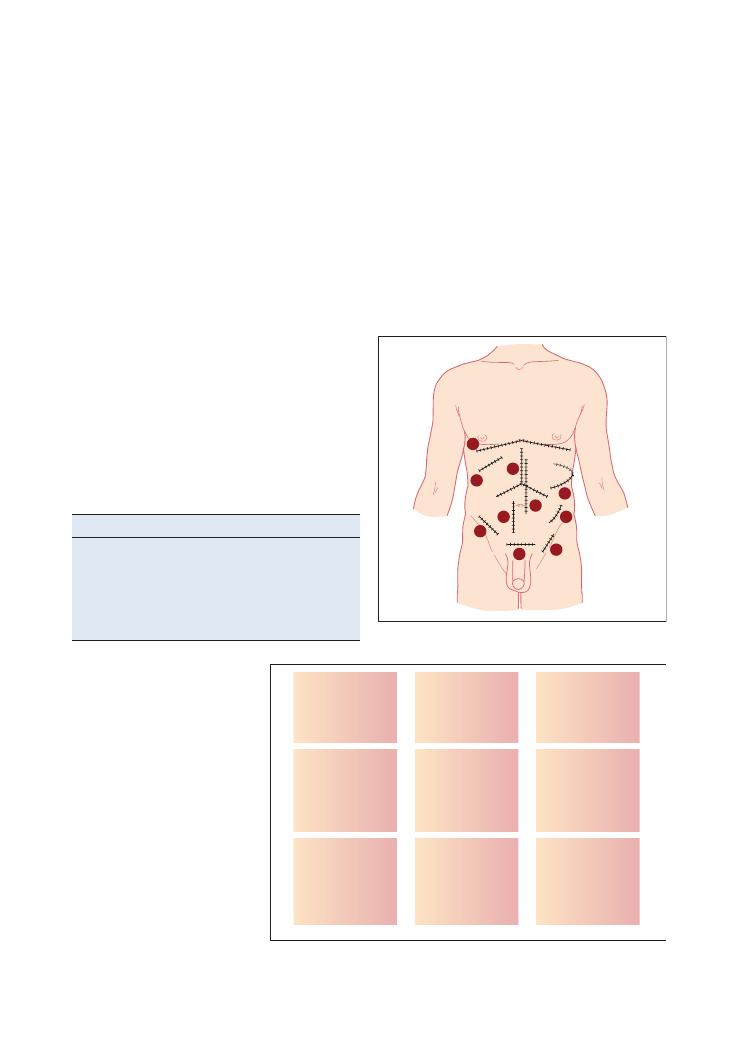
5) Nephrectomy scar (rarely adrenalectomy scar)
1. Classic caesarean section scar/hysterectomy scar
2. Appendicectomy scar: at McBurney’s point
3. Caesarean section scar (suprapubic)
4. Inguinal hernia scar
5. Femoral hernia scar
Abdominal masses
If you find a mass, try to answer two questions in your
mind.
1. Where is the mass?
First identify the quadrant where the mass is located,
and then think of the organs in that quadrant from
which the mass might originate (Figure 3.5).
Table 3.3 Spleen or kidney?
Spleen
Kidney
Cannot get above the spleen
Should be able to get above
the kidney
Moves downwards and
medially with inspiration
No movement with breathing
Not ballotable
Ballotable
Palpable notch (medial aspect)
No notch
Figure 3.4 Common abdominal scars
1
2
3
4
5
6
7
8
9
10
Figure 3.5 Location of organs in the
abdomen
Lung
Liver
Gallbladder
Stomach
Pancreas
Abdominal
aorta
Lung
Spleen
Pancreas
(rarely)
Liver
Kidney
Ureter
Stomach
Small intestine/
transverse colon
Abdominal
aorta
Spleen
Kidney
Ureter
Ureter
Ovary
Fallopian tube
Caecum
(appendix)
Bladder
Uterus
Cervix
(referred pain
from testicles)
Ureter
Ovary
Fallopian tube
Sigmoid colon
Theoretically, the spleen should be dull while the
kidney has traditionally been documented in most texts
to be ‘resonant’. This is, however, more theoretical than
realistic as in practice both kidneys and spleens feel dull
on percussion.
Abdominal scars
As with all OSCEs, the key findings in abdominal exam-
ination are often established on inspection (Figure 3.4):
1) Rooftop scar
• Partial hepatectomy
• Pancreatic surgery
• Accessing aorta
2) Kocher incision
• Cholecystectomy
3) ‘Mercedes-Benz’ scar
• Liver transplant
• Gastric surgery
• Oesophageal surgery
4) Midline laparotomy
• Colon surgery
• Aortic abdominal aneurysm surgery
18
Examinations:
3 Abdominal
Remember to describe the mass accurately and logi-
cally – see Chapter 10 on breast examination for a table
of characteristics that you should aim to describe.
2. What is the lesion?
As with everything in OSCEs, the key is to have a
generic method of categorising potential differential
diagnoses. The categories below can be used to devise
a differential diagnosis for a mass in almost any of the
nine quadrants:
• Tumour
• Benign
i. Cyst (liver, renal)
ii. Fibroids (in the pelvic area in women)
iii. Vascular (abdominal aortic aneurysm)
• Malignant
i. Primary
ii. Secondary
iii. Lymphoma
• Infection
• Abscess
• Tuberculosis (usually ileocaecal)
• Inflammatory bowel disease
• Crohn’s disease (in right iliac fossa)
• Diverticular disease (left iliac fossa)
Key investigations
The crux of investigating a mass is to visualise it and to
get a tissue sample from it. Hence the following inves-
tigations are most important:
• Imaging: CT/MRI scan
• Endoscopy: colonoscopy for colon, oesophago-
gastro-duodenoscopy for oesophagus/stomach, cystos-
copy for bladder
• Biopsy: for any non-vascular mass
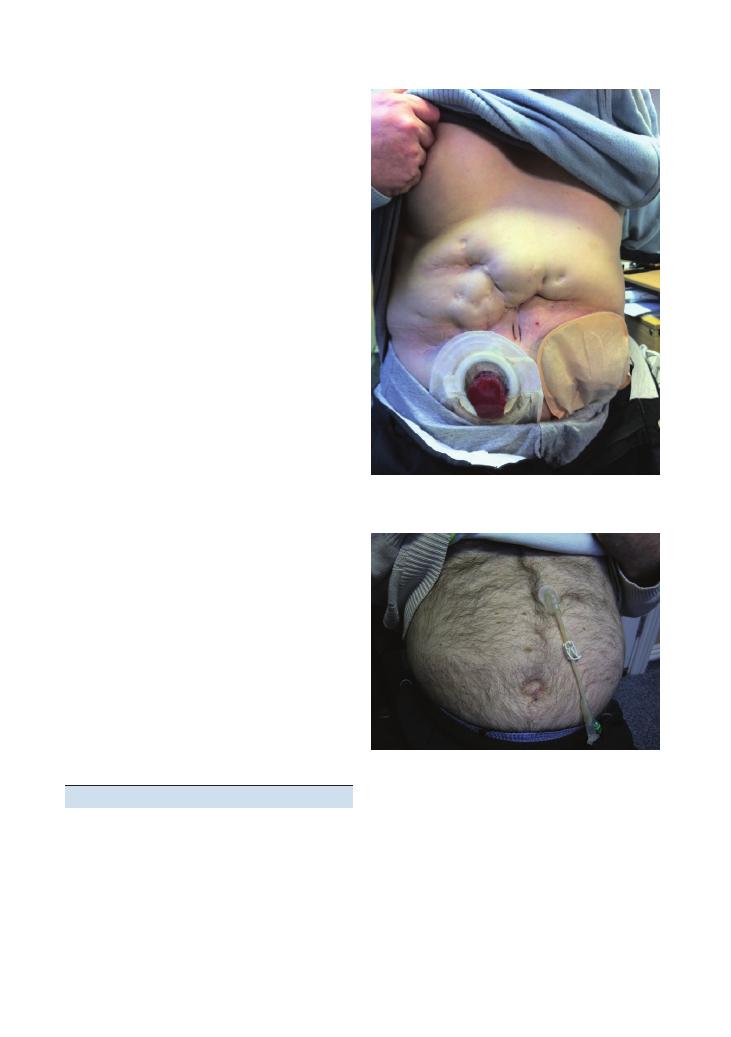
Stomas
Stomas (Figures 3.6 and 3.7) feature more commonly
in finals than most students think, and they are actually
quite easy to examine and talk about. The most
common stomas are ileostomies and colostomies, and
the key feature that distinguishes them is their location.
Table 3.4 summarises the key features.
Questions you could be asked
Q. What is the one investigation you would do in a
patient with known portal hypertension in order to
reduce mortality?
A. The key features of portal hypertension are:
• Splenomegaly
• Ascites
• Caput medusae
• Oesophageal varices
Figure 3.6 Stoma
Figure 3.7 Percutaneous endoscopic gastrostomy (PEG)
Although the answer to this is debatable, the most
important investigation would be an oesophago-
gastro-duodenoscopy to identify varices, and more
importantly to band them and prevent torrential acute
severe gastrointestinal bleeding.
Q. How big does the spleen have to be before it is
palpable?
A. About twice its normal size.

Examinations:
3 Abdominal 19
Q. Name some causes of a palpable liver without
hepatomegaly.
A.
• Lung hyperinflation (e.g. COPD) pushing it down
• Riedel’s lobe (on the left lateral side of liver)
• Gallbladder pathology
Table 3.4 Stomas
Ileostomy
Colostomy
Nephrostomy
Urostomy
Location
Right iliac fossa/lower
quadrant
Left iliac fossa
Flank
Right side of umbilicus
Reasons for use
Colon cancer (proximal)
IBD
Familial adenomatous
polyposis
Colon cancer (more distal)
Diverticulitis
Any cause of renal tract
obstruction
Any cause of renal tract
obstruction
Consistency of
products
Watery (as there is no
colonic absorption of
water)
Hard and dry (after colonic
absorption of water)
Urine
Urine (often has tiny amounts
of mucus produced by the
small intestinal conduit)
Mucosal
appearance
Mucosa protrudes
3–4 cm as a ‘spout’
No protrusion of mucosa
Usually no significant
mucosal protrusion
Usually no significant mucosal
protrusion
Permanent or
temporary
End-ileostomy (most
common): permanent
Loop ileostomy (rare):
temporary
End-colostomy: permanent
Loop colostomy: temporary
Usually temporary
Temporary or permanent
Q. What are ‘Terry’s nails’?
A. Terry’s nails signify chronic liver disease. They have
a characteristic appearance, being white proximally but
dark red distally, often in a concave shape.

20
4 Peripheral nervous system
Checklist
P
MP
F
HELP:
H: ‘Hello’ (introduction and gains consent)
E: Exposure and explains he or she wants to
examine the nerves of the arms
L: Lighting
P: Have the patient in a position that they find
comfortable and in which the examination can
easily be undertaken
Washes hands
Inspects from end of bed:
• Relevant paraphernalia: walking stick, crutches,
foot supports, wheelchair, special glasses,
hearing aid
Inspects patient’s arms:
• Asymmetry
• Scars
• Skin changes
• Deformities
• Claw hand
• Wrist drop
• Fasciculations
• Wasting of small muscles of hands
• Scars
• Contractures
• Signs of denervation, such as:
• Injuries
• Neuropathic ulcers/Charcot joints
Inspects patient’s back:
• Spinal scars (back or side of neck)
• Kyphosis
Abnormal movements:
• Abnormal movements
• Tremor
• Dyskinesia
• Chorea
Upper limbs
Checklist
P
MP
F
Scars and skin changes
+ signs of denervation:
• Injuries
• Neuropathic ulcers
• Charcot joints
Inspects patient’s neck:
• Spinal scars – these can be at the back or on
the side of the neck
• Kyphosis
Motor examination
Screening test: Asks patient to raise both arms
forwards when in a supine position
Pronator drift: Asks patient to sit up and close
their eyes. Ask them to stretch their arms out
with the palms up at the level of their shoulders.
Looks for drift into pronation
Tone: Checks at each joint in flexion, extension,
pronation and supination
Power:
• Shoulder abduction: C5
• Shoulder adduction: C6, C7, C8
• Elbow flexion: C5, C6
• Elbow extension: C7
• Wrist flexion: C8
• Wrist extension: C7
• Fingers: T1
Fingers: flexion, extension, abduction, adduction,
opposition, grip strength
Thumb: abduction, adduction, extension
Reflexes:
• Reinforces if absent (clench teeth or apply
Jendrassik* manoeuvre)
• Biceps: C5/C6
• Triceps: C6/C7
• Supinator: C5/C6

Examinations:
4 Peripheral nervous system 21
Checklist
P
MP
F
Hoffman’s sign:
• Flexes and then suddenly releases distal
phalanx of middle finger
• Looks for abnormal flexion of other fingers
• This indicates an upper motor neuron lesion
Coordination:
• Finger–nose testing bilaterally
• Dysdiadochokinesis bilaterally
• Looks for intention tremor and past-pointing
• Tests for rebound by pushing down on the
outstretched arms and looking for rebound
past the original position
Sensory examination
Explains examination to patient and checks their
sensation on a part of the body known to have
normal sensation (such as forehead or sternum)
Examines the following modalities on all
dermatomes:
• Dermatomes of the upper limbs:
• C3: lateral neck
• C4: lateral shoulder
• C5: lateral upper arm
• C6: thumb
• C7: middle finger
• C8: little finger
• T1: medial lower arm
• T2: medial upper arm
• T3: axilla
• Dermatomes of the lower limbs:
• L1: just below groin
• L2: medial aspect of mid-thigh
• L3: knee
• L4: medial lower leg
• L5: big toe
• S1: little toe
• S2: medial aspect of back of knee
Pin-prick (spinothalamic tract): uses a Neurotip
Checklist
P
MP
F
Vibration(dorsal column): uses a 128 Hz tuning
fork on most distal phalanx, and only proceeds
proximally if a deficit is identified
Joint proprioception(dorsal column):
• Only proceeds proximally if a deficit is
identified
• Holds terminal phalanx of thumb. Shows
patient that ‘up’ means extension and
‘down’ means flexion. Asks them to close
their eyes. Moves phalanx and ask them to
say if it is ‘up’ or ‘down’. Only proceeds
proximally to the wrists and elbows if a
deficit is identified. Offers to perform
two-point discrimination using calipers
Light touch (dorsal column): uses a wisp of
cotton wool
Temperature (spinothalamic tract): offers to use
syringes of hot and cold water
Identifies pattern of sensory loss:
• Identifies if the pattern is dermatomal or
‘glove and stocking’
• Identifies level if it is dermatomal
Special tests: performs these based on the likely
diagnosis from the examination. Common ones
to know are Phalen’s, Tinel’s and Froment’s
Thanks patient
Offers to help patient get dressed
Washes hands
Presents findings
Offers appropriate differential diagnosis
Suggests appropriate further investigations and
management
OVERALL IMPRESSION:
*If the reflexes are difficult to elicit, reinforce them by asking the
patient to interlock their fingers and pull them in opposite directions
(Jendrassik manoeuvre).

22
Examinations:
4 Peripheral nervous system
Checklist
P
MP
F
HELP:
H: ‘Hello’ (introduction and gains consent)
E: Exposure (shorts or underwear)
+ explains he
or she wants to examine the nerves of the legs
L: Lighting
P: Have the patient in a position that they find
comfortable and in which the examination can
easily be undertaken. Ensure privacy and dignity
Washes hands
Inspects from the end of the bed for
paraphernalia: walking stick, crutches, foot
supports, wheelchair, special glasses, hearing aid
Inspects patient’s legs:
• Fasciculations
• Wasting of proximal and distal lower limb
muscles
• Scars
• Skin changes
• Signs of denervation (injuries, neuropathic
ulcers, Charcot joints)
• Contractures
• Pes cavus
• Foot drop
• Deformities
• Abnormal movements
Inspects patient’s back:
• Spinal scars
• Kyphosis, scoliosis
MOTOR EXAMINATION
Gait: Asks patient to walk and turn, and
observes gait carefully and any walking aids the
patient uses. Assesses heel–toe gait and patient’s
ability to stand on tiptoes
Romberg’s test:
• Asks patient to stand with both feet together
and their arms to their sides, first with their
eyes open and then with their eyes closed
• Positive if patient appears to be falling
(indicates dorsal column or sensory nerve
pathology) – ensure that patient does not
fall!
Lower limbs
Checklist
P
MP
F
Tone:
1) Lifts the knees quickly off the ground
2) ‘Rolls’ both hips gently
3) Checks for clonus (using ankle dorsiflexion)
Power:
Hip flexion: L1, L2
Hip extension: L5, S1
Knee flexion: L5, S1
Knee extension: L3, L4
Ankle dorsiflexion: L4, L5
Ankle plantarflexion: S1, S2
Foot inversion: L4, L5
Foot eversion: L5, S1
Toe movements: L5, S1
Reflexes:
Reinforces if absent (clench teeth or Jendrassik*
manoeuvre)
Knee: L3/4
Ankle: L5/S1
Plantar: Up (upper motor neurone lesion) or
down (lower motor neurone lesion/normal)
Coordination: Heel–shin testing bilaterally, gait
SENSORY EXAMINATION
Explains examination to patient and checks their
sensation on a part of the body known to have
normal sensation (such as forehead or sternum)
Examines following modalities on all
dermatomes:
• Pin-prick (spinothalamic tract): uses a
Neurotip
• Vibration (dorsal column): uses a 128 Hz
tuning fork on most distal phalanx, and only
proceeds proximally if a deficit is identified
• Joint proprioception (dorsal column):
• Holds great toe and shows patient that ‘up’
means extension and ‘down’ means flexion.
Then asks them to close their eyes, and
moves the toe, asking patient to say if it is
moving ‘up’ or ‘down’
• Only proceeds proximally if a deficit is
identified
• Offers to perform two-point discrimination
using calipers

Examinations:
4 Peripheral nervous system 23
*If the reflexes are difficult to elicit, reinforce them by asking the
patient to interlock their fingers and pull them in opposite directions
(Jendrassik manoeuvre).
Checklist
P
MP
F
• Light touch (dorsal column): uses a wisp of
cotton wool
• Temperature (spinothalamic tract): offers to
use syringes of hot and cold water
• Identifies pattern of sensory loss:
• Identifies if the pattern is dermatomal or
‘glove and stocking’
• Identifies level if it is dermatomal
Thanks patient
Checklist
P
MP
F
Offers to help patient get dressed
Washes hands
Presents findings
Offers appropriate differential diagnosis
Suggests appropriate further investigations and
management
OVERALL IMPRESSION:
Summary of common conditions seen
in OSCEs
List of common cases
Lower limb
Upper limb
Foot drop
Carpal tunnel syndrome
Post stroke
Ulnar nerve palsy
Cerebellar degeneration
Wrist drop
Sensory neuropathy
Axillary nerve palsy
Radiculopathy secondary to spinal
pathology
Volkmann’s contracture
Cerebral palsy
Cervical rib
Muscular dystrophy
Cerebellar degeneration
Pes cavus
Tremor – Parkinson’s
disease, essential tremor
Old cauda equina syndrome
Post stroke
Old polio
Motor neurone disease
Brown–Sequard syndrome
Erb’s or Klumpke’s palsy
Common patterns of weakness,
and common causes for them
Pattern of weakness
Common causes
Proximal muscle weakness
Myopathy
Distal weakness
Inherited myopathies
Hemiparesis
Cerebral pathology
Paraparesis
Thoracic or lumbar cord lesion
Cauda equina syndrome
Tetraparesis
Cervical cord lesion
Monoparesis
Plexus lesion

24
Examinations:
4 Peripheral nervous system
Upper motor neurone (UMN)
conditions
Lower motor neurone (LMN) conditions
Combined UMN and LMN lesions
Stroke:
• Unilateral hemiplegia
• Patient is commonly elderly
Peripheral neuropathy: secondary to:
• Common causes:
• Diabetes (most common)
• Alcohol
• Vitamin B/B12 deficiency
• Excess toxins (e.g. from liver or renal
failure)
• Malignancy
• Inflammatory disease (such as vasculitis)
• Rarer causes:
• HIV
• Guillain–Barré syndrome
• Chronic inflammatory demyelinating
polyneuropathy
• Lead poisoning
Motor neurone disease:
• Elderly
• Dysarthria
• Fasciculations
• Weakness
• Hypertonia
Multiple sclerosis:
• UMN signs
• Cerebellar signs
• Often a young woman in a wheelchair
Nerve root lesion:
• Specific dermatome/myotomal signs
• Sensory level
Subacute combined degeneration of
spinal cord:
• Features of pernicious anaemia or vitamin
B12 deficiency
Spinal cord lesion/damage:
• Spastic paraplegia
Proximal myopathy:
• Secondary to endocrine causes (Cushing’s
disease, Addison’s disease)
• Polymyalgia rheumatica
Friedreich’s ataxia:
• Upgoing plantars and weak ankle reflexes
• Kyphoscoliosis
• Pes cavus
• High-arched palate
Hereditary neuropathies:
• e.g. Charcot–Marie–Tooth disease
Mononeuritis multiplex:
• Secondary to anything that damages the
nerve intrinsically, e.g. diabetes, excess
toxins
Summary of common conditions and findings in the peripheral nervous system
UMN (brain and spinal cord)
LMN (distal to anterior horn cells)
Inspection
Spastic gait
Muscle wasting
Fasciculations
Tone
Increased tone (spastic – pyramidal, or rigid – extrapyramidal)
Reduced/normal tone
Power
Weakness
Weakness
Reflexes
Brisk reflexes
Hyporeflexia
Plantars
Upgoing plantars
Downgoing plantars
UMN vs LMN signs

Examinations:
4 Peripheral nervous system 25
LMN
With LMN lesions, the pattern of the clinical findings
often helps to distinguish the diagnosis. The most
common patterns of presentation are as follows.
Asymmetrical weakness
For a structured answer that will demonstrate a robust
understanding of the pathological processes of the
peripheral nervous system, consider where the lesion
could be, working your way from the proximal area of
the CNS near the spinal cord, to the distal part areas
the peripheries:
• Anterior horn cell: This lies at the border of the
spinal cord and peripheral nerves, and hence lesions
will exhibit both UMN and LMN signs, for example
in motor neurone disease, syringomyelia or cervical
myelopathy.
• Nerve root lesion: Commonly due to prolapsed
spinal cord discs, these lesions usually cause a mixed
motor and sensory neuropathy, and the level of the
lesion can be localised.
• Plexus lesion (brachial plexus in the upper limbs,
sacral plexus in the lower limbs): These lesions usually
cause problems in a diffuse group of multiple nerves,
so would not be easily defined to a spinal cord level or
a specific nerve.
• Mononeuritis multiplex: If you are grilled in your
viva after the OSCE on any asymmetrical LMN lesion,
an easy ‘one-size-fits-all’ answer is mononeuritis mul-
tiplex. This basically describes a group of nerves being
affected and could result from a huge variety of meta-
bolic and structural causes.
• Neuromuscular junction: This includes conditions
such as Guillain–Barré syndrome and Eaton–Lambert
syndrome. There would usually be a global affect on all
the nerves of an upper or lower limb, or there would
be a clear pattern, as there is in both of the above-
mentioned conditions.
Proximal symmetrical weakness/proximal
myopathy
• Inflammatory/rheumatological: polymyositis, der-
matomyositis, vasculitis, rheumatoid arthritis
• Endocrine: Cushing’s disease, Addison’s disease, dia-
betes, hypothyroidism
• Paraneoplastic
• Muscular dystrophy:
• Duchenne muscular atrophy
• Becker’s muscular dystrophy
• Fascio-scapulo-humeral dystrophy
• Drugs: such as statins and insulin
• Metabolic: osteomalacia
Hints and tips for the exam
Before going any further, it is important to remove
from your mind the myth that neurology is difficult,
and ingrain some structures that will simplify your
examination findings and help you come to the right
conclusions.
First of all, always ask yourself the following two
questions when encountering neurological cases:
1. Where is the lesion?
If the findings relate to an UMN, the lesion is affecting
the brain or the spinal cord. If it is an LMN lesion, it is
affecting the peripheral nerves.
In UMN lesions, tone and power are increased,
whereas in LMN lesions they are decreased.
2. What is the lesion?
Once you have localised the lesion, you need to have a
list of causes that you systematically go through.
UMN
• Neoplastic: primary, secondary, benign
• Vascular: ischaemic stroke, haemorrhage
• Trauma
• Demyelination: multiple sclerosis
• Inflammation: vasculitis, post-infectious inflammation
These causes could affect the brain or spinal cord, and
could all be considered and presented in an OSCE as
potential differential diagnoses for a UMN lesion.
Type of gait
Findings
Spastic gait
Both legs affected
Hemiplegic gait
Circumduction, usually post stroke
Waddling gait
Proximal myopathy
Festinant gait with freezing
and no arm movements
Parkinson’s disease
Broad-based ataxic gait
Cerebellar dysfunction
Antalgic gait
Joint or back pain in which the
patient takes their weight off
the affected side
High-stepping gait
Sensory neuropathy, and in foot
drop
Scissor gait
Cerebral palsy and multiple
sclerosis
Stamping gait
Sensory neuropathy
Apraxic gait
Diffuse cerebral disease and
dementia
Gait in examination of the peripheral
nervous system

26
Examinations:
4 Peripheral nervous system
Know your tracts
This is important when diagnosing the cause of a spe-
cific sensory deficit. In summary:
• Spinothalamic tract: temperature, sharp pain
sensory
• Dorsal column: vibration, proprioception, fine
touch
Increased tone in UMN lesions
Remember that it takes a good few weeks for tone to
become increased following an UMN lesion – so don’t
be surprised if you elicit UMN signs in a patient but
find that he or she has normal tone. If you are aiming
for a merit or distinction, use this knowledge to diag-
nose whether an UMN lesion is acute or chronic.
What is pronator drift?
Pronator drift is a sign of an UMN lesion. It is present
when there is spasticity from a pyramidal lesion and
occurs due to an imbalance between pronation and
supination of the forearms. Upwards drift may repre-
sent cerebellar dysfunction.
Remember the pain factor
Movement can sometimes be limited by pain, so try to
distinguish whether a muscle weakness is neurological
or the result of pain. At the very least, if the patient is
in pain, state during your presentation that the patient
was in pain, and that this made it difficult to accurately
assess power.
Bladder, bowel and sexual function
Patients with lower limb neurology as a result of spinal
pathology may also have bladder, bowel and sexual dys-
function. Although it is not appropriate to check these
in an OSCE, it is worth mentioning that you would
consider a rectal examination and would check the
residual bladder volume in cases where leg neurology
was caused by spinal pathology.
Distal symmetrical weakness
• Peripheral neuropathy: This is by far the most
common neurological condition. It is caused by a vast
number of pathologies that affect the intrinsic nerve,
usually metabolically, but sometimes physically com-
pressing it. Common causes to remember for OSCEs
are given above. Most peripheral neuropathies affect
both sensory and motor modalities in the distal limbs.
• Mononeuritis multiplex: Again, there is a vast list of
pathologies that can cause this, most of which overlap
with those of peripheral neuropathy. However, the
nerve distribution is not necessarily distal and sym-
metrical, which makes this a useful differential diagno-
sis, as virtually any LMN condition can potentially be
due to mononeuritis multiplex.
Grading power using the Medical Research
Council scale
As a finalist, you would pass if you described power
subjectively as normal, weak or absent. But if you
are aiming for a merit, you should use the Medical
Research Council’s (MRC) grading scale, which is more
specific – and actually very easy to remember and use
(Table 4.1).
Plegia versus paresis
If you are going to use the terms ‘paresis’ and ‘plegia’,
make sure you know the difference: ‘plegia’ refers to
when there is absolutely no ability to move the limb,
whereas ‘paresis’ refers to a weakness in which some
ability to move is retained.
Grading reflexes
As with power, you could pass by describing reflexes as
present, absent or hyperreflexic. However, you will look
much more slick if you use the descriptions shown in
Table 4.2.
Table 4.2 Grading of reflexes
+
Present
++
Brisk
+++
Pathologically brisk
+/−
Present with reinforcement
−
Absent
Table 4.1 MRC grading of muscle power
0
No movement at all
1
Flicker of muscle
2
Can move but cannot oppose gravity
3
Can oppose gravity
4*
Can perform resisted movements but weak
5
Normal power
*Grade 4 is sometimes broken into 4
+ and 4– to further quantify
the degree of resistance. This is not much use other than in serial
examinations to show the change from one examination to the
next.

Examinations:
4 Peripheral nervous system 27
Questions you could be asked
Q. Name some Parkinson-plus syndromes and their
salient signs.
A. • Multisystem atrophy: autonomic dysfunction,
postural hypotension, bladder dysfunction
• Progressive supranuclear palsy: loss of vertical
gaze, then loss of horizontal gaze (causing frequent
falls), pseudobulbar palsy, proximal rigidity, demen-
tia later on
Q. What is the difference between ‘plegia’ and ‘paresis’
(e.g. hemiplegia and hemiparesis)?
A. As described in the text above, plegia
= paralysis,
paresis
= weakness.
Q. How do you elicit Hoffman’s test?
A. See the upper limb checklist at the start of the
chapter.
Q. What is the pronator drift test used to assess?
A. See the section on pronator drift above.
Q. How long does it take for tone to become increased
after a UMN lesion?
A. A few weeks, as described in the text.

28
5 Central nervous system
Checklist
P
MP
F
HELP:
H: ‘Hello’ (introduction and gains consent)
Explains that needs to examine the nerves of the
face
E: Exposure of head and eyes – sits opposite the
patient at eye level
L: Lighting
P: Positions correctly (sits opposite patient at eye
level), asks if patient is in any pain
Washes hands
Inspection:
• Facial asymmetry (stroke, parotid gland
tumour)
• Ptosis (complete – cranial nerve III palsy, or
partial – Horner’s syndrome)
• Convergent or divergent squint (congenital or
muscle/nerve pathology)
• Medical aids – glasses, eye patch, hearing aids,
pen and paper for communication
• Hearing aids (deafness – peripheral or central
cause)
• Fasciculations (LMN)
• Dyskinesia
• Wasting (LMN, UMN, disuse atrophy)
• Abnormal movements (tremor, chorea,
myoclonus)
• Speech defects (see Chapter 8 on speech)
• Scars (back of ear – acoustic neuroma,
craniotomy; in front of ear – parotid gland
tumour, and may have associated ipsilateral
facial nerve palsy)
• Tracheostomy, nasogastric or PEG tubes (lower
cranial nerve dysfunction leading to breathing
difficulties and unsafe swallow)
Cranial nerve I: olfactory nerve (sensory):
• Sense of smell can be tested with smelling
salts
• Any change/loss of smell?
• Most likely cause of abnormal sense of smell is
conductive/mechanical (e.g. due to obstruction)
Checklist
P
MP
F
Cranial nerve II: optic nerve (sensory):
• Any change in vision?
• ‘AFRO-C’:
• Acuity: With glasses (if worn), gets to the
patient to identify how many fingers are
held up, and then tests with a Snellen chart
• Fields:
• Confrontation (can the patient see the
student’s face? – central vision)
• Asks them to cover their right eye with
their right hand. Student covers their own
left eye with the left hand, and asks
patient to keep looking into their eye.
Using free hand, student tests fields, and
then swaps hands and repeats on other
side
• During this part of the exam, maps the
blind spot (the area where the patient’s
view of the finger temporarily disappears)
• Tests each eye separately: brings in
fingers from outside the field of vision.
Does this match the student’s field
(peripheral vision)?
• Pupillary Reflexes:
• Comments on whether the pupils are the
same size
• Direct and consensual
• Accommodation (pupils constrict on
convergence)
• Considers testing for relative afferent
pupillary defect (RAPD) – damage to
optic nerve on one side results in a delay
in constriction when swinging a light
between the eyes. Pupil appears to dilate
when the light is swung to the eye with
the damaged optic nerve
• Red pins for colour desaturation
• Fundi: See Chapter 6 on Ophthalmoscopy
• Colour vision: Ishihara plates
• Uses a pinhole to correct refractive error

Examinations:
5 Central nervous system 29
Checklist
P
MP
F
Cranial nerves III, IV and VI: oculomotor, trochlear,
abducens (all motor):
• Tests nerves individually:
• IV: superior oblique
• Damage means eye is unable to look
down when abducted
• VI: lateral rectus
• Damage means eye is unable to abduct
• III: Other movements: Examine smooth
pursuit and nystagmus with a hat pin
moved in a ‘H’ pattern
• Damage causes dilated pupil, ptosis and
restricted eye movements
• Look for exophthalmos
• Double vision
• Whether it is going across/up/down and in
which direction
• Nystagmus
Cranial nerve V: trigeminal nerve (motor and
sensory):
• Tests sensation in three areas supplied by
branches V1, V2 and V3 (light touch and
pin-prick)
• States intent to elicit a corneal reflex (wisp of
cotton on the sclera of the eye – both eyes
should blink)
• Opens the patient’s mouth against resistance
and moves it from side to side (pterygoids)
• Feels the temporalis and masseter muscles
while the patient clenches their teeth
• Jaw jerk
Cranial nerve VII: facial nerve (motor and
sensory):
• Asymmetry – look for a Bell’s palsy
• Is the forehead spared?
• Asks the patient to raise their eyebrows and
shut their eyes tight against resistance
• Asks them to show their teeth
• Asks them to puff out their cheeks
• Taste in anterior two-thirds of the tongue
Cranial nerve VIII: vestibulocochlear (sensory):
• Simple test of hearing – whispers a number
into each of patient’s ears while rubbing the
fingers next to the other ear (to prevent the
whisper being heard in that ear)
• Rinne and Weber tests (256 Hz tuning fork)
– see ‘Hints and tips for the exam’ below
• States intent to perform caloric testing
Checklist
P
MP
F
Cranial nerves IX and X: glossopharyngeal and
vagus (both motor and sensory):
• Assesses cough (
′bovine′ cough if Xth nerve
lesion)
• Listens and identifies hoarseness of voice
• Asks patient to say ‘Ah’ (uses a torch to see if
the palate rises uniformly bilaterally and the
uvula is central)
• Taste: posterior third of tongue
• Offers to test gag reflex (using a tongue
depressor, carefully touches the back of the
throat. Patient should gag. Positive reflex
shows intact afferent cranial nerve IX and
efferent cranial nerve X)
Cranial nerve XI: accessory (motor):
• Asymmetry of muscles
• Asks patient to shrug shoulders against
resistance – trapezius
• Asks patient to turn head to left and right
against resistance – sternocleidomastoid
Cranial nerve XII: hypoglossal (motor):
• Visualises tongue at rest (fasciculation)
• Asks patient to protrude tongue (deviation)
• Asks patient to moves tongue to left and right
Thanks patient
Offers to help patient get dressed
Washes hands
Presents findings
Offers appropriate differential diagnosis
Suggests appropriate further investigations and
management
OVERALL IMPRESSION:

30
Examinations:
5 Central nervous system
Condition
Cranial nerves
involved
Symptoms and signs
Causes
Bulbar palsy
IX, X, XI, XII
Lower motor neurone
Fasciculating tongue
Normal or absent jaw jerk
Quiet/nasal speech
Motor neurone disease
Guillain–Barré syndrome
Myasthenia gravis
Brainstem tumour
Central pontine myelinolysis
Pseudobulbar palsy
V, VII, X, XI, XII
Upper motor neurone
Expressionless face
Cannot protrude tongue
Increased jaw jerk
Emotional instability
Disease of corticobulbar tracts
Motor neurone disease (UMN and LMN signs)
Multiple sclerosis
Stroke
Central pontine myelinolysis associated with
progressive supranuclear palsy
Cerebellopontine angle
tumour
V, VII, VIII
Scar behind ear
Unilateral hearing loss
Vertigo
Signs of nerve palsy
Acoustic neuroma
• Neurofibromatosis type 2
Oculomotor nerve palsy
III
Down and out
Large pupil (surgical)
Complete ptosis
Surgical or medical
Surgical (unlikely in finals – result of posterior
communicating artery aneurysm)
Medical – diabetes (pupil spared)
Facial nerve palsy
VII
Contralateral facial weakness (UMN)
Loss of nasolabial fold
Inability to wrinkle forehead only in
LMN (in UMN forehead is spared
due to dual cortical representation)
Hyperacusis
Scar in front of ear – tumour resection
(involving nerve
= malignant)
UMN:
• Multiple sclerosis
• Stroke
• Space-occupying lesion
LMN:
• Neuromuscular:
• Myotonic dystrophy
• Myasthenia gravis
• Guillain–Barré syndrome
• Bilateral Bell’s palsy
• Compressive:
• Sarcoidosis
• Cerebellopontine lesion
• Parotid tumour
• Mononeuritis multiplex:
• Diabetes
• Lyme disease
Vagus nerve palsy
X
Uvula pulled away from side of lesion
Hypoglossal nerve palsy
XII
Tongue pushed towards side of lesion
Cavernous sinus
III, IV, VI, V1
Jugular foramen
IX, X, XI
Horner’s syndrome –
damage to
sympathetic ganglion
Ipsilateral:
• Partial ptosis
• Miosis (small pupil)
• Anhydrosis
• Enophthalmos
See below
Apical lung tumour: Pancoast tumour –
invades sympathetic plexus. If invades
brachial plexus: arm pain. If invades
recurrent laryngeal nerve: hoarse voice
Myasthenia gravis
Fatigability
Sternotomy scar
Antibodies to acetylcholine receptor
Thymoma
Summary of common conditions seen in OSCEs

Examinations:
5 Central nervous system 31
Cranial nerves
Write in your mnemonic and tick whether you think
the nerve is motor/sensory or both. (Refer to the exami-
nation mark sheet for the answers).
Number Name
Mnemonic Motor Sensory
I
Olfactory
II
Optic
III
Oculomotor
IV
Trochlear
V
Trigeminal
VI
Abducens
VII
Facial
VIII
Vestibulocochlear
IX
Glossopharyngeal
X
Vagus
XI
Accessory
XII
Hypoglossal
Cranial nerves Site of pathology
Investigation
I–IV
Above (cranial nerves I and II)
and within the midbrain
CT or MRI
V–VIII
Pons
IX–XII
Medulla
Where is the lesion?
Upper motor neurone
Cause
Investigation
Compression
Nerve conduction studies
Trauma
Mononeuritis multiplex
Lower motor neurone
Large pupil
Small pupil
Palsy of cranial nerve III
Horner’s syndrome
Holmes–Adie syndrome
(young women, absent
ankle and knee reflexes)
Argyll Robertson pupil – neuro-
syphilis: accommodates (on
convergence) but does not
react to light
Traumatic (may be irregular)
Age-related miosis
Drugs (dilating eye drops –
tropicamide, atropine, illicit
drugs (cocaine, ecstasy)
Drugs (opiates)
Anisocoria (difference in pupil
sizes)
Common eye signs
Pupillary defects commonly turn up in finals, so know
your differential diagnoses well.
Central lesion
Preganglionic
lesion
Postganglionic lesion
Stroke
Pancoast tumour
Carotid artery dissection
Syringomyelia
Thyroidectomy
Carotid aneurysm
Multiple sclerosis
Trauma
Cavernous sinus
thrombosis
Tumour
Cervical rib
Cluster headache
Infection
Horner’s syndrome
Identifying Horner’s syndrome is easy, but diagnosing
the cause is much more difficult. The table below shows
how you do it systematically according to the site of the
lesion.

32
Examinations:
5 Central nervous system
Hints and tips for the exam
Examination of the cranial nerves is testing to say the
least. It is feared among students, and most students
take longer to prepare for it than for examination of
any other area. Yet doing it well will definitely distin-
guish you from other candidates.
Know the names of the cranial nerves
The first step to learning this examination is to know
the names of the 12 cranial nerves.
It is unlikely that you will have to examine the entire
12 nerves at one station, and you will most likely be
directed by the blurb outside your station (e.g. ‘Examine
this patient’s lower cranial nerves: V and VII–XII’ or
‘Examine this patient’s eyes’ – therefore implying nerves
II–IV and VI).
But you don’t have to examine
in that order
It is not necessary to examine the cranial nerves in the
order I–XII. An alternative way to examine all the
Hearing
Air conduction (AC) should be louder than bone con-
duction (BC), i.e. AC
> BC.
Start with a simple test by covering one of the
patient’s ears with your finger and whispering a number
into the other. Ask the patient to repeat what you have
said.
Rinne test
Use a 256 Hz tuning fork. Place it near the ear (air
conduction). Tell the patient that this is sound 1.
Then place the tuning fork behind the ear (bone
conduction). Tell the patient this is sound 2
Ask which was louder. Repeat it if necessary, and
remember to test both ears.
Weber test
Place a 256 Hz tuning fork on the centre of the patient’s
forehead. Ask whether the sound is heard in the middle
of the head or towards one side.
Interpreting the Rinne and Weber tests
Rinne test
Result
Findings
Normal
Rinne positive
Air
> bone
Conductive
Rinne negative
Bone
> air
Sensorineural
Rinne positive
Air
> bone
Weber test
Findings
Normal
Heard in centre of head
Conductive
Lateralises to same side
Sensorineural
Lateralises to opposite side
Visual field defects
You should know the following information inside out by the time you sit finals.
Field defect
Visual fields
Site
Monocular blindness
Lesion in front of nerve (vitreous, retina)
Ipsilateral optic nerve lesion
Homonymous hemianopia
Contralateral optic radiation
Contralateral occipital lobe
Bitemporal hemianopia
Optic chiasm
Left/right superior
quadrantanopia
Contralateral temporal optic radiation
Left/right inferior quadrantanopia
Contralateral parietal optic radiation
Left/right homonymous
hemianopia with macular
sparing
Contralateral occipital lobe infarct due to posterior cerebral
artery infarct (the middle cerebral artery also supplies
the occipital pole – the area representing the macula)
Arcuate scotoma
Glaucoma
Central scotoma
Macular degeneration
Macular oedema
Figure 5.1 Visual field defects
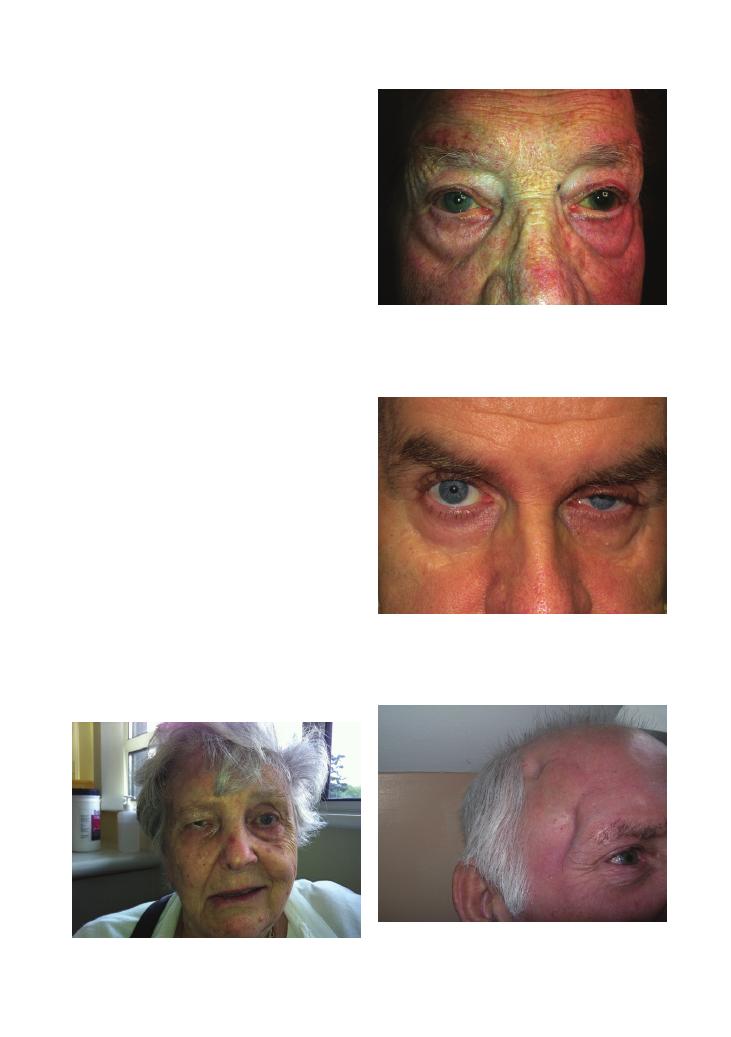
Examinations:
5 Central nervous system 33
Figure 5.2 Right facial nerve palsy
Figure 5.3 Mydriasis of the left pupil
Figure 5.4 Ptosis
Figure 5.5 Surgical clipping of a berry aneurysm following a
subarachnoid haemorrhage
cranial nerves is to examine each part of the head sepa-
rately in an orderly manner that covers all the cranial
nerves (but not necessarily in numerical order). A pos-
sible order could be:
1. Inspection: face, eyelids, symmetry of the pupils,
back of the ears for an acoustic neuroma scar
2. Simple test of fields and acuity: ‘Can you see my
face?’ ‘Is any part of my face missing?’
3. Eyes:
• AFRO-C (II, III, IV, VI)
• Corneal reflex
4. Face:
• Sensation (V)
• Facial expression/muscles (VII)
• Jaw muscles
5. Ears (VIII):
• Hearing
• Weber/Rinne tests
6. Tongue and throat (IX, X, XII):
• Tongue movement
• Gag
• Taste
• Cough
• Voice
7. Shoulders and neck (XI):
• Power
See some pathology – real or otherwise
In preparation for this station, include pathology into
your practice once you have mastered the slick routine.
Have people pretend to have cranial nerve lesions such
as of III (ptosis with a down and out eye) or a pseudo-
bulbar palsy (difficult but possible to mimic!). This
topic can really put you off in the OSCE so it’s worth
preparing for it.

34
Examinations:
5 Central nervous system
Simple versus complex ophthalmoplegia
To further understand eye movement disorders (oph-
thalmoplegias), you can classify them as simple or as
complex.
Simple ophthalmoplegias refer to disorders of move-
ment in one direction. These are most often due to the
neurogenic causes. Complex ophthalmoplegias most
often arise from disorders related to muscles and neu-
romuscular junctions (the myogenic causes).
Complex ophthalmoplegias are:
• Myopathies (examine muscle fatigability)
• Graves’ disease (check thyroid function tests and MRI
of the orbits)
• Retro-orbital tumour
Internuclear ophthalmoplegia
A CNS cause of eye movement disorder that is rather
rare but often finds its way into finals, either physically
or on questioning from your examiner, is internuclear
ophthalmoplegia (INO).
INO describes the phenomenon in which there is
failure of adduction of an eye when the other eye is
abducting. The neuroanatomy of this eye movement
disorder is covered in the questions at the end of this
chapter. INO is often associated with infarction or mul-
tiple sclerosis. WEBINO (wall-eyed bilateral INO) is
very rare (Figure 5.7).
Master the technique from a neurologist
The real finesse of cranial nerve examination cannot
be brought to life by reading, and I would advise those
with a passion for neurology to have a neurologist show
them the examination on the wards.
Know your neuroanatomy
Those who really want to shine at this station should
have a good grasp of neuroanatomy. Some medical
schools have been known to ask the path of various
nerves in the head. Two of the more common ones are
outlined below:
• Abducens nerve (VI):
• Leaves the brainstem at the pontomedullary
junction.
• Ascends on the front of the brainstem and then
turns sharply forwards over the petrous temporal
bone (where it is stretched and damaged, giving rise
to the ‘false localising sign’).
• It then runs forwards into the carotid sinus to enter
the orbit via the superior orbital fissure.
• Finally, it runs laterally to supply the lateral
rectus.
Diplopia could be myogenic or neurogenic
Diplopia can be caused by either myogenic/myopathic
(muscle) or neurogenic (CNS) dysfunction. Myopathic
causes result in diplopia being greatest when looking in
the direction of the affected muscle.
• Neurogenic:
• UMN:
• Brainstem
• LMN:
• Mononeuritis multiplex
• Nerve compression/trauma
• Myogenic:
• Myasthenia gravis
• Hypothyroidism
• Myositis
• Myotonic dystrophy
• Lambert–Eaton syndrome
The ‘outer image’ is produced by
the abnormal eye
Of the two images seen, that furthest away is the false
image caused by the damaged muscle. Ask the patient
to cover each eye and tell you when the outer image
disappears – the eye producing the outer image is the
defective eye.
Figure 5.6 Scar from resection of an acoustic neuroma

Examinations:
5 Central nervous system 35
• Buccal
• Marginal mandibular
• Cervical
If you have managed to be asked and answer these
questions, you have more than likely gained a
distinction.
Possible variations at this station
You could be asked to examine a patient with a possible
subarachnoid haemorrhage (SAH). This would be a
rather shorter station than the CNS and might involve
an actor who is visually in distress.
• Before starting the examination, tell the examiner
you would resuscitate the patient with regard to ABC.
• Acknowledge the patient’s distress early on, ask them
to tell you if anything you do is painful, and say that
they can tell you to stop at any point.
• Facial nerve (VII):
• The motor part arises from within the pons.
• The sensory part arises from the naevus
intermedius.
• It enters the petrous temporal bone and then the
internal auditory meatus.
• It then forms the geniculate ganglion.
• It runs through facial canal and the then stylomas-
toid foramen.
• Branches within the skull are:
• Greater petrosal nerve
• Nerve to stapedius
• Chorda tympani
• Finally, the nerve passes through parotid gland and
divides into give branches:
• Temporal
• Zygomatic
Figure 5.7 Cranial nerves with their corresponding eye muscles
Primary gaze
Oculomotor
(CN III)
LR
6
SO
4
Superior
rectus
Oculomotor
(CN III)
Oculomotor
(CN III)
Trochlear
(CN IV)
Inferior
oblique
Inferior
rectus
L
Superior
oblique
Abducens
(CN VI)
Lateral
rectus
Oculomotor
(CN III)
Medial
rectus
Looking to right (both
eyes move appropriately)
On looking to the right two faces
are seen (diplopia). When the left
eye is covered the inner image
disappears. When the right eye is
covered the outer image disappears.
This is the false image. Therefore
there is a problem with the right
eye muscles
Looking to left (right-sided
INO: left eye nystagmus)
WEBINO
R

36
Examinations:
5 Central nervous system
• CT followed by lumbar puncture.
• Early: red blood cells appear in each bottle.
• Late: xanthochromia (a yellow colour) appears
after 12 hours.
Questions you could be asked
Q. What is the difference between a medical and surgi-
cal IIIrd cranial nerve palsy?
A. • A medical IIIrd nerve palsy is due to ischemia of
the IIIrd nerve. As the parasympathetic fibres travel
peripherally, they are not affected. Hence the
patient’s pupil is ‘down and out’ but not dilated.
• Cause: Diabetes mellitus
• In a surgical IIIrd nerve palsy, the parasympa-
thetic fibres are damaged so the pupil is also dilated.
• Cause:
Posterior
communicating
artery
aneurysm
Q. What symptoms might lead you to consider
the presence of an acoustic neuroma (vestibular
schwannoma)?
A. • Sensorineural hearing loss
• Tinnitus
• Loss of sensation of the ipsilateral face
Q. What are the features of internuclear ophthalmo-
plegia and where is the lesion?
A. • A lesion in the ipsilateral medial longitudinal fas-
ciculus will result in failure of adduction of the
ipsilateral eye (IIIrd cranial nerve) and nystagmus
of the contralateral eye during abduction.
• The medial longitudinal fasciculus connects the
ipsilateral IIIrd cranial nerve nucleus to the contral-
ateral VIth nerve nucleus.
• Comment on their state at rest and on any signs of
(head) trauma.
• You may try to perform a brief Glasgow Coma Scale
assessment – this is, however, optional.
• Your examination should aim to elicit the signs of
raised intracranial pressure (ICP) and meningism.
• Comment on pupil size. (You may have to ask the
patient to open their eyes first.)
• Tell the patient before you shine a light in their eyes.
Test for photophobia and for direct and consensual
light reflexes.
• Test the eye movements. Comment on any palsies
such as of the lateral rectus (possibly a false localising
sign in raised ICP).
• Ask about diplopia.
• State that you would like to look at the back
of the eye with a fundoscope (SAH/raised ICP:
papilloedema).
• State that you would like to test visual acuity (may be
reduced).
• Test for Kernig’s sign – flexing the patient’s knee to
90 degrees and then extending it causes pain.
• Test for Brudzinski’s sign: ask patient to flex their
neck – this causes flexion at the hips.
• Note that Kernig’s and Brudzinski’s signs are signs
of meningism.
• Other signs of a raised ICP that may feature include
Cushing’s reflex – hypertension and bradycardia. This
is a late sign.
• How would you investigate the likely diagnosis?
• 15–30-minute neurology observations (Glasgow
Coma Scale, pupils, heart rate, blood pressure, respi-
ratory rate, temperature)

37
6 Ophthalmoscopy
Checklist
P
MP
F
HELP:
H: ‘Hello’ (introduction and gains consent)
E: Exposure
L: Lighting
P: Positions correctly (sitting in a chair), asks if
the patient is in any pain
Washes hands
Explains need to darken the room and to use
dilating eye drops
Explains and consents need to use drops to dilate
pupils
Asks patient if they use glasses/contact lenses
(asks patient to remove any glasses)
Inspection:
• Around the room: glasses, visual aids, Braille charts
• Facial asymmetry
• Scars (edges of lids and cornea)
• Strabismus (convergent or divergent squint)
• Ptosis
• Pupil size and asymmetry
• Red eyes
Checks the ophthalmoscope light is ‘bright and
white’
Asks patient to fixate their eye on a distant object
Fixates patient’s upper eyelid with a thumb
Uses right eye to examine patient’s right eye, and
left eye to examine patient’s left eye
Approaches eye from an angle of 30 degrees
Checks red reflex in both eyes (sets the
ophthalmoscope to ‘0’)
• This is lost if any opacity is present (e.g.
cataract, vitreous haemorrhage)
Examines fundus (sets the ophthalmoscope to
own refractive error to focus):
• Examines the anterior chamber (between the iris
and cornea – starts by focusing on iris or sclera)
• Cataracts
• Hyphaema
Checklist
P
MP
F
• Colour of the retina
• Disc (colour, contour, cupping, pigmentation,
new vessels, haemorrhages, laser
photocoagulation scars)
• Examines the retina and blood vessels
systematically in anatomical quadrants
• Superior temporal arcade
+ retina (vessel
tortuosity, haemorrhages, exudates,
hypertensive changes, colour of retina)
• Inferior temporal arcade
+ retina (as above)
• Inferior nasal arcade
+ retina (as above)
• Superior nasal arcade
+ retina (as above)
• Fovea (light reflex)
• Macula (fovea is at the centre of the macula)
• Asks patient to look directly at the light, or
angles ophthalmoscope temporally
• Macula appears as a slightly darker/dense
area on temporal aspect of fundus
Repeats with other eye
Tells examiner he or she would like to complete
the examination by doing the following:
• Assess visual acuity
• Assess visual fields
• Assess light reflexes
• Assess range of eye movements
• Undertake further examinations based on the
diagnosis:
• Urine dipstick/blood glucose for suspected
diabetic retinopathy
• Blood pressure in suspected hypertensive
retinopathy
Thanks patient
Washes hands
Presents findings
Offers appropriate differential diagnosis
Suggests appropriate further investigations and
management
OVERALL IMPRESSION:

38
Examinations:
6 Ophthalmoscopy
Condition
Findings on examination
Management
Diabetic retinopathy
Background retinopathy: blot haemorrhages,
microaneurysms, hard exudates
Pre-proliferative: cotton wool spots,
intraretinal microvascular abnormalities
(IRMAs), venous loops
Proliferative: new vessels at disc or
elsewhere
Maculopathy: exudates at macula
Regular referral to ophthalmology if
background retinopathy
All other findings require urgent referral
Tighter control of diabetes: conservative and
medical management
Hypertensive
retinopathy
Grade 1: Silver wiring
Grade 2: Arteriovenous nipping
Grade 3: Flame haemorrhages, cotton wool
spots
Grade 4: Papilloedema
Macular star
Antihypertensive (oral and intravenous)
Grades 3 and 4 are regarded as medical
emergencies
If hypertension is refractive to treatment, look
for rarer causes:
• Phaeochromocytoma
• Conn’s syndrome
Optic atrophy
Pale optic disc
Investigate for a cause and treat accordingly:
• Ischaemic optic neuropathy
• Optic neuritis
• Toxins: tobacco
Papilloedema
Raised disc
Blurred disc margin
Treat cause: hypertension, raised intracranial
pressure
Age-related macular
degeneration (AMD)
Elderly patient
Drusen at macula
New vessels (neovascularisation) – wet AMD
Urgent ophthalmology referral
Dry AMD: No treatment. Smoking may be a
risk factor
Wet AMD: Intravitreal anti-VEGF
Retinitis pigmentosa
Black specks following retinal veins
Optic atrophy
Cataract
Urgent ophthalmology referral
No treatment is available
Genetic counselling may be appropriate for
inherited forms
Central retinal artery
occlusion
Pale retina
Cherry red spot on macula
Urgent ophthalmology referral
No treatment is available
Look for a cause:
• Atherosclerosis
• Embolic: carotid, cardiac
• Vasculitis: giant cell arteritis
Central retinal vein
occlusion
Haemorrhages along venous distribution
Partial areas may be affected from retinal
vein branch occlusion
‘Stormy sunset’
Urgent ophthalmology referral
Treat cause:
• Compression by atherosclerotic retinal artery
• Chronic glaucoma
• Hyperviscosity, e.g. hyperlipidaemia,
myeloma
Cataract
Absence (partial or complete) of red reflex
If early onset, investigate for a cause:
congenital infection, hyperparathyroidism,
corticosteroids
Treatment: Cataract removal and implantation
of intraocular lens
Summary of common conditions seen in OSCEs

Examinations:
6 Ophthalmoscopy 39
2. Retinal vessels: Examine these by quadrant.
3. Macula and peripheral retina.
Pathological signs may be seen at any of these points,
and these should also be commented upon. This will
usually be followed by the examiner asking for your
differential diagnosis and management options.
A simple statement at the end of your examination
mentioning the importance of examining the posterior
chamber and using a slit lamp will guide you towards
the marks earmarked for merit students. The posterior
chamber is not to be confused with the vitreous area
behind the lens: it is the area in front of the lens and
behind the iris, and is important in the pathology of
glaucoma.
Questions you could be asked
Q. What are the causes of an absent red reflex?
A. • Cataract (acquired or congenital)
• Retinoblastoma
• Coloboma
• Ocular toxocariasis
Q. What are the causes of optic atrophy?
A. • Multiple sclerosis
• Compression of the optic nerve: tumour/
glaucoma
• Central retinal artery occlusion
Q. What is normal intraocular pressure?
A. 11–21 mmHg.
Q. What drugs dilate/constrict the pupil?
A.
Hints and tips for the exam
Ophthalmoscopy is a difficult technique to master.
Under the pressure of an OSCE, those who have
neglected to practise this station sufficiently are likely
to unravel.
Communication, communication,
communication . . .
As with many of the stations, your opening communi-
cation with the patient is absolutely fundamental, and
that starts with your introduction and explanation of
the examination. You can avoid making them anxious
by explaining that you will be getting very close to
them, resting your thumb on their eyebrow, and shining
a very bright light in their eye. Add that they should
look at a point on the wall and try to keep still; if they
become uncomfortable at any point, the examination
can be stopped.
Get your technique right
Try to familiarise yourself with the ophthalmoscope
used at your medical school. First test the light from the
ophthalmoscope by shining it onto the back of your
hand. Then assess for a red reflex by looking through
the scope at the patient’s eyes while standing at approxi-
mately 15 degrees from the midline. At this point, the
lens on the scope should be set to zero. You should only
start to focus the lens as you move in towards the
patient.
Remember to use your right hand with your right
eye to look into the patient’s right eye (and vice versa).
A common mistake is to stand too far from the midline.
Be clear and systematic when describing
your findings
You will probably have to examine a model in which
various retinal slides have been placed. Be sure to look
carefully into both eyes as different pathologies might
be presented. To maximise your marks, give your
description in the following order:
1. Optic disc: If you cannot see this straight away,
follow the blood vessels medially to the disc. Then
comment on the ‘3 Cs’ – colour, contour and cupping.
Dilate/mydriatic
Constrict/miotic
Antimuscarinic:
• Tropicamide
• Cyclopentolate
• Atropine
Sympathomimetic:
• Phenylephrine
Pilocarpine

40
7 Cerebellar
Checklist
P
MP
F
HELP:
H: ‘Hello’ (introduction and gains consent)
E: Exposure
L: Lighting
P: Positions correctly (supine), asks if the patient
is in any pain
Washes hands
Asks patient which hand is dominant
Inspection:
• Posture (truncal instability, titubation of the
head)
• Walking aids
• Catheter
Assesses eye movements for nystagmus:
• Asks patient to keep their head still while they
follow student’s finger from side to side and
then up and down. A few beats of nystagmus
can occur at the extremes of gaze – this is
normal
Assesses articulation (dysarthria):
• ‘Baby hippopotamus’/‘British Constitution’
Tests for cerebellar drift in the arms:
• Asks patient to hold their arms out in front of
them with the palms facing up – ‘like holding
a plate’. (The ipsilateral arm will drift upwards
and hyperpronate – Riddoch’s sign – due to
hypotonia)
Tests for cerebellar rebound:
• Patient holds arms out in front of them but
now with palms facing down. Student briskly
pushes down on each hand. (Positive rebound
will result in the arm bouncing up higher than
its neutral position)
Finger–nose test (intention tremor and
past-pointing – dysmetria)
Checklist
P
MP
F
Assesses for dysdiadochokinesis. (Asks patient to
clap quickly while turning top hand back and
forth – test is positive if patient is unable to
smoothly perform rapidly alternating movements)
Assesses precision movements of the fingers
(patient touches each finger to their thumb and
‘plays the piano’)
Heel–shin test (coordination – can be done while
in seated position)
• Asks patient to place one heel on the opposite
knee, then run it down the front of the shin,
lift it off and then place it back on the knee.
Asks them to do this three times quickly and
then repeat on the other side. (Movement will
not be smooth in cerebellar disease)
Assesses tone in the limbs (for hypotonia)
Assesses reflexes in limbs (for hyporeflexia):
• Knee reflex. (Pendular reflex in cerebellar
disease – the lower leg swings back and forth
like a pendulum)
Assesses gait:
• With a walking aid if required
• Asks patient to walk to end of the room, turn
around and walk back
• Asks the examiner to walk alongside patient
ready to support them if required, or offers to
do this themself
• Notes which direction patient deviates towards
(falls towards side of lesion in cerebellar
disease)
• A wide stance (base) may signify ataxia (hence
widening the feet for stability)
Assesses heel–toe (tandem) gait:
• Demonstrates heel–toe gait while explaining
the test – ‘walking on a tightrope’
• By lowering the base, tandem gait will reveal
finer ataxia that would otherwise be missed

Examinations:
7 Cerebellar 41
Checklist
P
MP
F
Romberg’s test:
• Asks patient to stand with feet together and
arms by their sides, and then to close their
eyes
• Test will help to differentiate between sensory
ataxia and cerebellar ataxia
• Positive result occurs when patient is more
unstable with the eyes closed – sensory ataxia
due to dorsal column damage. (Patients are
unable to use visual feedback to steady
themselves)
• Negative result signifies cerebellar disease
(unstable with the eyes open)
States intent to complete the examination with
the following:
Checklist
P
MP
F
• Full examination of central and peripheral
nervous systems
• Examination of the fundus for signs of optic
atrophy in cases of multiple sclerosis
• Examination of speech
Thanks patient
Washes hands
Presents findings
Offers appropriate differential diagnosis
Suggests appropriate further investigations and
management
OVERALL IMPRESSION:
Summary of common conditions seen
in OSCEs
Causes of cerebellar symptoms
Multiple sclerosis
Stroke
Posterior fossa tumour
Degenerative: alcohol, Friedreich’s ataxia
Iatrogenic (anticonvulsants: carbamazepine, phenytoin)
Hypothyroidism
Paraneoplastic syndrome (lung cancer)
Figure 7.1 Scar from resection of a cerebellar tumour. This patient
presented with classical cerebellar symptoms. He was found to have
a cerebellar haemangioblastoma that was successfully resected
surgically
Hints and tips for the exam
The mnemonics in the table below will make it easier
to remember the signs and causes of cerebellar disease.
D
Dysmetria & dysdiadochokinesis
A
Ataxia
N
Nystagmus
I
Intention tremor
S
Slurred/staccato speech
H
Hypotonia
P
Posterior fossa tumour
A
Alcohol
S
Multiple sclerosis
T
Trauma
R
Rare
I
Inherited (e.g. Friedreich’s ataxia)
E
Epilepsy medication (carbamazepine, phenytoin toxicity)
S
Stroke
Describing gait
In the cerebellar examination, the gait can point to a set
of diagnoses, so it is important to get this right. It may
be valuable to start with the gait assessment to localise
the side of the cerebellar damage, which you can
confirm with the rest of your examination. In cerebellar
disease, the patient will deviate (or fall!) to the side of
the lesion.
A wide-based gait is classic in cerebellar disease, with
patients choosing to place their feet wide apart to
improve their stability. This may not be very obvious

42
Examinations:
7 Cerebellar
and is the reason for subsequently performing a tandem
(heel–toe or tightrope) gait assessment.
Things to note when assessing gait
Use of walking aids
Stance-phase symmetry (how long the patient spends on each
foot)
Heel strike
Toe-off
Stride length
Arm swing (symmetrical, reduced, absent)
Time to turn and smoothness of turn (turn slowly, en bloc –
Parkinson’s disease)
Types of gait
Type
Description
Cause
Ataxic
Wide base (feet apart for greater stability)
Unable to walk heel-to-toe
Falls to side of lesion
Cerebellar disease
Antalgic
Decreased stance phase on one leg (patient spends less time on
the painful leg)
Pain
Festinant
Difficulty starting, turning and stopping
Small hurried steps
‘Forever in front of one’s centre of gravity’
Parkinson’s disease
Stomping
Broad base
Slams feet down
Patient looks at feet
Romberg’s text positive
Peripheral neuropathy
Dorsal column loss (proprioception)
• Freidreich’s ataxia
High stepping
Patient steps high to avoid foot scraping the floor
Inability to dorsiflex (foot drop)
Common peroneal palsy (e.g. trauma)
Sciatic nerve palsy
L4 or L5 root lesion
Peripheral motor neuropathy (e.g. alcoholic)
Distal myopathy
Motor neurone disease
Waddling
Unable to stand from sitting or climb stairs
Muscular dystrophy
Proximal myopathy
Spastic/scissoring
Stiff
Circumduction movements (patient moves leg out and up as
unable to flex knee to prevent scuffing foot)
Stroke
Multiple sclerosis
Figure 7.2 Scar after posterior craniotomy and resection of an
infarcted cerebellar mass

Examinations:
7 Cerebellar 43
Looking for an intention tremor
A common mistake students make when assessing this
aspect is to have their finger too close to the patient.
The sign can be very faint so make sure the patient’s
arm is fully extended when reaching to touch your
finger. This gives you the best chance of revealing an
intention tremor.
Neuroanatomy
The cerebellum can be separated for the purpose
of OSCEs into the midline and the cerebellar
hemispheres.
With midline damage, the patient will exhibit imbal-
ance and ataxia. He or she may also have titubation
(bobbing) of the head. Eye movements may also be
affected with nystagmus.
Damage to the cerebellar hemispheres will result in
incoordination of movement such as dysdiadochokine-
sis and intention tremor.
The key investigation for these conditions is an MRI
scan of the brain.
When in doubt, think cerebellum
Within the finals OSCE, it is likely that any sign of
incoordination is due to cerebellar pathology. So if
you are stuck for a diagnosis, mention a cerebellar
syndrome within your differential diagnosis.
Questions you could be asked
Q. Name some causes of a cerebellar syndrome.
Q. List possible cerebellar signs.
Q. Where is the lesion in this patient?
A. The answers can all be found in the text above.

44
8 Speech
Checklist
P MP
F
HELP
H: ‘Hello’ (introduction and gains consent)
E: Exposure
L: Lighting
P: Positions correctly (sitting in chair), ask if
patient is in any pain
Washes hands
Inspection:
• Any signs of stroke: facial asymmetry, arm
flexed across chest
• Hearing aids
• Scars on neck (e.g. thyroid surgery, carotid
endarterectomy)
Identifies dominant side (is patient right- or
left-handed?)
Assesses orientation:
• Time
• Place
• Person
Simple questions for general initial assessment of
speech (‘How did you get here today?’):
• Fluency (are words used correctly?)
• Volume
• Coherence
• Quality
Assess articulation for dysarthria (patient repeats
words with increasing difficulty; if wrong, student
asks once more):
• Brown
• Butter
• Artillery
• British constitution
• Baby hippopotamus
Assess language for dysphasia (expression,
comprehension and repetition):
Checklist
P MP
F
• Expression (naming with increasing difficulty,
allows time and prompts):
• Watch
• Strap
• Winder
If incorrect responses, asks ‘Is it a watch?’, etc.:
• Comprehension (one-, two- and three-step
commands, no visual prompts):
• Asks patient to point to ceiling
• Asks patient to point to ceiling and floor
• Asks patient to point to ceiling, floor and
window
• Repetition (asks patient to repeat):
• ‘No ifs, ands or buts’ or ‘Today is Tuesday’
Assesses phonation for dysphonia:
• Lips: ‘Ma ma ma’
• Tongue: ‘La la la’
• Palate: ‘Ka ka ka’
• Vocal cords: asks patient to cough
States intent to complete the examination by
assessing the following:
• Reading
• Writing (assessing dysgraphia, hand
dominance, other neurological signs such as
tremor)
• Swallow
• Abbreviated Mental Test Score
• CNS – ‘Nerves in head and neck’
Thanks patient
Washes hands
Presents findings
Offers appropriate differential diagnosis
Suggests appropriate further investigations and
management
OVERALL IMPRESSION:

Examinations:
8 Speech 45
Summary of common conditions seen
in OSCEs
Dysphasia: language problem
Conditions
Specific signs
Lesion
Broca’s expressive
dysphasia (BED)
Non-fluent speech
Can understand
Cannot answer appropriately and is aware of this (naming
objects) – may become frustrated
Word-finding difficulty
Reading and writing affected
Inferolateral dominant frontal lobe
Wernicke’s receptive
dysphasia
Fluent speech
Confident in responses
Paraphasias (incorrect words)
Neologisms (made-up words)
Does not understand questions
Reading and writing affected
Posterior superior dominant temporal lobe
Global aphasia
Unable to speak or understand
Dominant lobe infarction
Conduction aphasia
Repetition affected
Connecting fibres (arcuate fasciculus) between
Wernicke’s and Broca’s areas
Nominal dysphasia
Only naming objects is affected
Posterior dominant temporoparietal lesion
Conditions
Specific signs
Cause
Cerebellar disease
Slow and deliberate speech
Slurring
Scanning/‘staccato’ speech
Multiple sclerosis
Stroke
Pseudobulbar palsy
(UMN)
‘Donald Duck’ speech
Slow
Indistinct
Jaw jerk increased
Tongue cannot protrude, is ‘stuck’ at base of mouth
Tongue is ‘spastic’
Disease of corticobulbar tracts
Motor neurone disease (UMN and LMN signs)
Multiple sclerosis
Stroke
Bulbar palsy
(LMN)
Nasal quality
Quiet
Slurred
Jaw jerk decreased/normal
Tongue hangs out
Motor neurone disease
Guillain–Barré syndrome
Myasthenia gravis
Brainstem tumour
Myogenic (muscular) defect
Features of underlying condition
Hypothyroidism
Any myopathy
Dysarthria: articulation (difficulty coordinating muscles of speech)

46
Examinations:
8 Speech
Figure 8.1 Quick algorithm to identify where a lesion is located
Normal
Repetition
Repetition
Repetition
Repetition
Comprehension
Comprehension
Fluency
YES
NO
Conductive dysphasia
Transcortical sensory
Wernicke’s dysphasia
Transcortical motor
Broca’s dysphasia
Mixed transcortical
Global
Conditions
Specific signs
Cause
Myasthenia gravis
Fatigability (ask patient to say letters of alphabet/count to 100)
Nasal quality
Poor swallow
Sternotomy scar
Antibodies to acetylcholine receptor
Thymoma
Guillain–Barré syndrome
History of infection (gastroenteritis)
Ascending weakness
Various infections
Autoimmune
Idiopathic
Vagal nerve palsy
Dysphonia
Uvula dropping away from side of lesion
Trauma
Compression
Medullary pathology
Vocal cord weakness/paralysis
Recurrent laryngeal nerve damage:
• Tumour
• Surgery
Hypothyroidism
Signs of hypothyroidism
Causes of hypothyroidism
Dysphonia: speech volume (weak respiratory muscles and vocal cords)
Hints and tips for the exam
The speech station is can be tricky. Having a speedy
system that covers all possible causes is key. The algo-
rithm outlined in Figure 8.1 will allow you to diagnose
any defect.
Look around for clues
On entering the station, you should inspect carefully
for clues to what is going on with the patient. They may
be sitting in a chair with their right arm across their lap,
imitating a left hemisphere stroke (i.e. one that may
result in a speech deficit). Most people are left-side
dominant, even those who are left-handed.
Remember the three components
of speech
• Articulation – mechanical action to produce speech
(dysarthria)

Examinations:
8 Speech 47
R
Give the patient an address to RECALL at the end: 42 West
Register Street
A
AGE
T
TIME
Y
YEAR
2
Recognise 2 people
B
Date of BIRTH
2
Dates of the 2nd World War
M
Name of current MONARCH
H
Name of HOSPITAL
20
Count backwards from 20
station for assessing your professionalism when faced
with disability. Marks are awarded at this station for
maintaining an open body posture and active
listening.
The patient may say things that are both unexpected
and random. If patients are exhibiting a Broca’s dyspha-
sia, they may also become visibly frustrated at their
inability to answer your questions appropriately. Be
empathetic towards the patient’s situation and stay
calm. And try not let it put you off what you are doing
(although this is easier said than done!)
Take your time and listen carefully
Continue with your examination and make sure you
give the patient an appropriate time to answer your
question without interruption. Rushing the patient is
likely to lose you communication marks. A mark will
be awarded for active listening. If you suspect that
the patient has not understood your question, try to
rephrase it once (do this for only one question during
the examination for sake of time). If you are unsure
about a response, do not be afraid to ask the patient to
repeat the answer.
Multidisciplinary team
The multidisciplinary team is instrumental to the man-
agement of speech problems:
• Speech and language therapist (SALT) (who will also
test for a safe swallow)
• Counsellor for psychological support
• Physiotherapist for associated stroke rehabilitation
Remember that dysphasia following stroke is associated
with a poor prognosis, and that ongoing multidiscipli-
nary team interventions may be needed by specific
stroke therapists.
Questions you could be asked
Q. What speech defect is this patient exhibiting?
Q. Where is the lesion?
Q. What other symptoms and signs could they have?
Q. What are the causes?
Q. How would you treat this patient?
Q. What are the different components of speech?
A. The answers to these can all be found in the text
above, although the answer to the first question obvi-
ously depends on your specific case.
• Phonation – the act of producing voice sounds
(dysphonia)
• Language – the content of what is said (dysphasia)
Confusion versus speech defect
If you suspect that the patient is exhibiting signs of
confusion or dementia and you have time to complete
the station comfortably, quickly run through the AMTS
at the end of your speech examination. RATY2B2MH20
is an easy acronym (see below) to remember for the
Abbreviated Mental Score Test – a score of
<7 suggests
cognitive impairment. Having a shot at this is (if
cognitive impairment is a possibility) may push you
into the realms of distinction – even if you don’t quite
complete it.
Finding the right words
A skilful trick to use is to ask directly ‘Are you able to
understand me but are just having difficulty finding the
right words?’ In patients with a Broca’s dysphasia, you
may be greeted with a reassuring nod. This will show
the examiner that you are both acknowledging the
patient’s frustration and exploring the diagnosis.
Make sure the patient is orientated and
can hear you
This will show the examiner that you have learnt this
examination not just for an OSCE but for real life,
where such questions can guide whether or not it is
appropriate to conduct a speech examination.
Be calm, professional and empathetic
Maintaining a professional manner at this station can
be difficult but is important. There are marks at this

48
9 Thyroid
Checklist
P
MP
F
HELP:
H: ‘Hello’ (introduction and gains consent)
E: Exposure (neck)
L: Lighting
P: Positions correctly (supine), asks if the patient
is in any pain
Washes hands
Inspects from end of bed:
• Relevant paraphernalia (e.g. drugs:
levothyroxine, propranolol, amiodarone)
• Body habitus
• Clothing (e.g. suggestion of heat or cold
intolerance)
Examination of thyroid gland:
• Identifies neck swelling
• Examines for JVP, distended neck veins
• Palpates lobes of thyroid:
• At rest
• During swallowing
• During tongue protrusion
• Appropriate technique for palpating thyroid
gland (e.g. stabilises ipsilateral lobe while
palpating contralateral lobe)
• Assesses tracheal deviation
• Palpates carotid pulses
• Palpates cervical lymph nodes
• Percusses downwards from sternal notch to
detect retrosternal extension of goitre
• Auscultates for bruits over thyroid lobes
Checklist
P
MP
F
• Auscultates over aortic area to rule out
radiated aortic stenosis murmur
• Attempts/states intension to examine for
Pemberton’s sign
Examination of peripheral signs of thyroid
disease:
• Examines hands:
• Inspects for palmar erythema, warmth, tar
staining and acropachy
• Checks pulse for rate and rhythm
• Examines for a tremor
• Examines legs:
• Inspects for pretibial myxoedema
• Correctly tests for proximal myopathy
• Examines for slow-relaxing knee reflex
• Examines eyes:
• Inspects from front, sides and above for
proptosis, lid retraction and exophthalmos
• Ensures patient is able to shut eyes
completely (if appropriate)
• Correctly tests for lid lag
• Correctly tests for ophthalmoplegia
Thanks patient
Offers to help patient get dressed
Washes hands
Presents findings
Offers appropriate differential diagnosis
Suggests appropriate further investigations and
management
OVERALL IMPRESSION:

Examinations:
9 Thyroid 49
Pathology
Gener
al
inspection
Neck
Hands
Legs
Eyes
Additional
information
Hyperthyroidism
Agitated,
restless
patient
Sweating
Clothing
suggesting
heat
intoler
ance
Thin
hair
Underweight
Goitre
(Figure
9.1)
Impalpable
thyroid
gland
Thyroid
acropachy
W
arm,
excess
sweating
Tremor
Palmar
erythema
Tar
staining
Pretibial
myxoedema
Pro
ximal
myopathy
Exophthalmos
Proptosis
Ophthalmoplegia
(worst
on
upw
ard
gaze)
Conjunctiv
al
oedema
Corneal
ulcers
Normal
If
you
see
a
patient
with
clinical
features
of
hypothyroidism
with
Gr
aves
eye
disease
, this
may
be
due
to
overtreatment
If
patient
has
mark
ed
scoliosis
with
clinical
features
of
hyperthyroidism,
this
may
be
due
to
a
predisposition
to
osteoporosis
Hypothyroidism
Pallor
Hair
loss
Lack
of
facial
expression
Loss
of
outer
third
of
eyebrows
Obese
Goitre
Normal
Cool
Low
pulse
rate
Irregular
pulse
due
to
heart
block
Ankle
swelling
Slow-relaxing
reflexes
Pro
ximal
myopathy
Puffy
eye
lids
Other
signs
include
ataxia,
ascites
and
pleur
al
effusions
Post-thyroidectomy
hypothyroidism
May
be
signs
of
Gr
aves
eye
disease
Thyroidectomy
scar
(Figure
9.2)
Impalpable
thyroid
gland
Signs
of
Gr
aves
eye
disease
possible
Thyroglossal
cyst
Spherical
neck
lump
in
midline
Small
spherical
lump
that
moves
upw
ards
on
tongue
protrusion
Summary
of
common
conditions
in
OSCEs
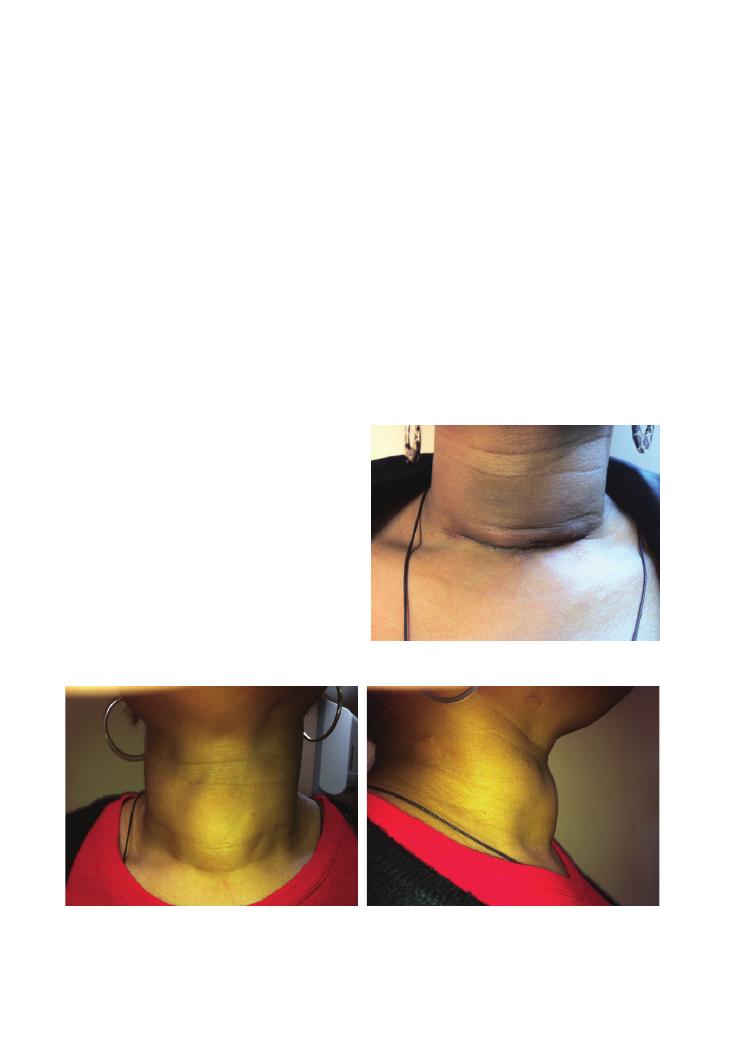
50
Examinations:
9 Thyroid
Key treatment modalities for thyroid
disease
Hyperthyroidism
• Drugs:
• Symptom control: beta-blockers, e.g. propranolol.
• Disease modification: carbimazole
+ thyroxine
(simultaneously) for 12–18 months. (NB. Agranulo-
cytosis is a serious complication of carbimazole
therapy.)
• Radioiodine: This is contraindicated in active
hyperthyroidism (due to an increased risk of thyrotoxic
storm), pregnancy and breast-feeding.
• Complete or partial thyroidectomy: This is reserved
for cases refractory to medical treatment, compression
of important structures, and patient preference for cos-
metic reasons. (NB. Damage to local structures, includ-
ing the recurrent laryngeal nerve and parathyroid
glands, is a serious complication.)
The three main pathologies likely to appear in the
examination are as follows:
• Thyroglossal cyst
• Hyperthyroidism
• Hypothyroidism
Patients with hyper- or hypothyroidism may be brought
to the examination, but it is equally likely that these
conditions will be simulated by actors (particularly in
short-station OSCEs). Simulating the signs of hyperthy-
roidism (e.g. tremor, irritability/fidgeting, ophthalmo-
plegias, heat intolerance) is particularly easy for well-
trained actors. Therefore it is very important to inspect
for subtle signs such as restlessness, frequent yawning,
over- or underweight body habitus and tremor from the
end of the bed as these signs can instantly give away the
diagnosis.
Key investigations
• Thyroid function tests: Free thyroxine and triio-
dothyronine levels are more useful than total levels.
• Thyroid autoantibodies: Anti-thyroid peroxidase
may be increased in Hashimoto’s and Graves diseases.
Its presence in Graves disease signifies an increased like-
lihood of post-treatment hypothyroidism.
• Thyroid-stimulating hormone receptor anti-
body: Increased in Graves disease.
• Blood lipids and glucose: Patients with hypothy-
roidism are at risk of cardiovascular disease and
diabetes.
• Ultrasound scan: Useful to distinguish cystic from
solid lumps (which are more likely to be malignant).
• Isotope scan: Can be used to differentiate different
causes of a goitre and identify ectopic thyroid tissue and
hot and cold nodules. Note that cold nodules are much
more likely to be malignant than hot nodules.
Figure 9.2 After successful resection of the goitre
Figure 9.1 Multinodular goitre: (a) frontal and (b) lateral view. Remember that patients with a goitre may have hyperthyroidism or
hypothyroidism, or may be euthyroid. This patient was euthyroid
(a)
(b)

Examinations:
9 Thyroid 51
hypothyroidism – the twitch is normal but relaxation
back to the resting position afterwards is delayed.
• Examining the eyes: If there is proptosis or exoph-
thalmos, you should check that the eyes can be shut
because inability to shut the eyes can result in corneal
damage. To test lid lag, instruct the patient to keep their
head still and follow your rapidly downwards-moving
horizontal finger with the eyes only. It is sometimes
necessary to place your other hand gently on the
patient’s forehead to prevent head movements. To test
for, test eye movements in an ‘H’ pattern (see Chapter
5 on the central nervous system) and on vertical
upwards and downwards gaze. Ophthalmoplegia in
hyperthyroidism is typically most marked on upwards
gaze.
Potential variations at this station
• Focused history followed by examination of thyroid
function:
Ask about:
• Changes in weight and appetite
• Changes in mood and energy level
• Changes in bowel habit
• Changes in menses (in females)
• Heat/cold intolerance
• Palpitations
• Previous history of thyroid disease
• Past medical history of other autoimmune disease
• Drug history (e.g. amiodarone)
• Family history of thyroid disease
• Smoking
• Thyroid examination followed by interpretation of
thyroid function tests.
• Thyroid examination followed by focused examina-
tion for other autoimmune disease:
Hypothyroidism
Treatment is with levothyroxine – but remember that:
• Enzyme-inducing drugs increase the breakdown of
levothyroxine
• Thyroxine can increase the risk of a myocardial inf-
arction in patients with ischaemic heart disease.
Hints and tips for the exam
Examination of the thyroid gland and thyroid function
are very commonly tested in short- and long-station
finals. Beware as there is a lot to do, especially in just 5
or 10 minutes. There is no ‘right’ or ‘wrong’ order in
which to perform the examination, but it would be wise
to dedicate most of your time examining the thyroid
gland itself (as opposed to peripheral stigmata), espe-
cially if it appears abnormal in any way upon general
inspection.
Performing a slick examination
• Inspection from the end of the bed: Be quick! Have
a system. For example, start with the bedside parapher-
nalia, then move on to the general body habitus and
then on to the face.
• Examining the thyroid gland: Do not forget to ask
about pain and check for scars (even underneath neck-
laces and collars!). To palpate the gland, stabilise one
lobe with one hand and palpate the other lobe with the
other hand using the flat of your fingers. Once you have
started palpating, try not to lift your hand off the neck
until you finish palpating that lobe so that you do not
miss small lumps. If you detect a lump, use the same
protocol to describe it as you would for any other lump
– comment on site, size, surface, texture, temperature,
tenderness, consistency, pulsatility and adherence to
any underlying or overlying structures. Specifically for
thyroid lumps, you must also comment on whether
they move with swallowing or tongue protrusion. It
is extremely important to palpate the cervical lymph
nodes. If you notice a lump, it may be wise to examine
Pemberton’s sign.
• Examining the hands: Again, be quick because this
is probably the easiest part of the examination and
could give you vital clues to the diagnosis. Look for
tar staining because Graves eye disease is much more
common in smokers.
• Examining the legs: Expose the shins to look for
pretibial myxoedema (Figure 9.3). When testing for
proximal myopathy, sit the patient on the edge of the
couch, and instruct them to fold their arms and then
stand from the sitting position without using their
hands. Remember that reflexes are slow-relaxing in
Figure 9.3 Pretibial myxoedema caused by hypothyroidism

52
Examinations:
9 Thyroid
• Examine skin for depigmented patches of vitiligo.
• Examine fingertips for evidence of regular blood
glucose testing suggestive of diabetes mellitus.
• Examine skin folds/creases in the palms and axillae,
and examine any old scars for increased pigmenta-
tion – its presence suggests Addison’s disease.
Questions you could be asked
Q. What are the causes of goitre?
A. Physiological, autoimmune thyroid disease, multin-
odular goitre, solitary adenoma, malignancy, pregnancy-
induced.
Q. How would you manage Graves eye disease?
A. • Treat underlying hyperthyroidism
• Advise/assist patient with smoking cessation
• Conservative measures: artificial tears, taping the
eyelids together at night, use of a Fresnel prism to
reduce diplopia
• Medical
measures:
high-dose
intravenous
methylprednisolone
• Surgery: surgical decompression

53
10 Breast
Checklist
P
MP
F
HELP
H: ‘Hello’ (introduction and gains consent)
E: Exposure
L: Lighting
P: Position – asks patient to lie down or sit up
Washes hands
Asks for a CHAPERONE
Inspects the breasts with patient in the positions
below for asymmetry, lumps, dimples, scars, skin
changes, peau d’orange:
• With her hands by her sides
• With her arms raised above her head (for
masses tethered to the skin)
• Underneath the breasts
Palpates the breasts with patient lying flat or at
45 degrees:
• Asks about pain and lumps felt by patient
– starts examining away from these areas
• All four quadrants (see below)
• Nipple, including for discharge and underlying
lumps
Palpates axillary lymph nodes:
Checklist
P
MP
F
• Supports the patient’s arm with their
non-dominant arm and palpates following
areas:
• Superior aspect
• Inferior aspect
• Anterior aspect
• Posterior aspect
• Apex
Covers patient and offers to help her get dressed
Tells the examiner that they would like to do the
following to look for secondary metastasis:
• Palpate for cervical lymphadenopathy
• Palpate for hepatomegaly
• Auscultate the lung bases for effusions
• Percuss the spine for tenderness
Advises the patient to sign up to breast screening
Suggests a mammogram for greater diagnostic
certainty
Thanks patient
Washes hands
Presents findings
Offers appropriate differential diagnosis
Suggests appropriate further investigations and
management
OVERALL IMPRESSION:

54
Examinations:
10 Breast
Hints and tips for the exam
Patient welfare and dignity
This is arguably the most intimate clinical examination
of all, and it requires a specific and deliberate emphasis
on showing respect for the patient and her dignity. If
you appear to make the patient uncomfortable or treat
her without adequate respect, the examiners will almost
certainly fail you, even if your technique is clinically
sound. Remember the following points:
• Chaperone, chaperone, chaperone: You will defini-
tively fail if you do not ask the examiner for a chaper-
one, even if the patient says that she does not mind you
examining without one.
• Explain what you will be doing: Be clear in your
wording, and ensure that the patient understands that
you will be feeling her breasts for lumps or any other
abnormalities.
• Don’t leave the patient naked while you present
the findings: Although your patient will be a person
dressed normally with a breast manikin, it is essential
that you treat the patient as if she were undressed. So
make sure that you cover the patient with a blanket (if
one is available), and offer to help her get dressed – you
will never be asked to do this, but it will show that you
Breast
malignancy
Fibroadenosis
Fibroadenoma
Abscess
Mammary
duct ectasia
Fat necrosis
Borders
Irregular
Well-circumscribed
Well-circumscribed
Regular,
symmetrical
Usually
peri-areolar
Irregular
Skin changes
Often tethered to
underlying skin
None
None
None
None
May be tethered
to skin
Changes with
menstruation
None
Pain and size often
vary during
menstruation
None
None
None
None
Age group
Rare under 30
years
<30 years
Middle-aged
Often lactating
women
Around
menopause
Any age, often
post-trauma
Commonly 50–70
years old
Pain
Painless
Painful
Painless
Very painful,
tender
Painful,
tender
Painful
Consistency
Hard
Firm
Firm
Firm, fluctuant
Firm
Hard
Summary of common conditions seen in OSCEs
have a robust grounding in basic professional medical
etiquette.
Techniques for palpation
Students often find it difficult to decide which tech-
nique to use when palpating the breasts. Ultimately it
does not matter how you do it, as long as you cover all
four quadrants using a technique that minimises the
chances of missing lumps. It is also vital that you com-
plete the examination in the time frame given, so keep
an eye on the watch. Use the pulp of the fingers and
move them in a rotatory manner in each area being
palpated. We have described a number of techniques
below (see also Figure 10.1)– use whichever you feel
most comfortable with.
Lawnmower technique
This describes ‘up and down’ movements in parallel
lines on a breast as for a lawnmower in a garden. You
could start from the superior medial aspect of the
breast and then palpate down that aspect of the breast
in a straight line. Once you reach the inferior aspect of
the breast, move your fingers 2 or 3 cm laterally, and
then go up in a straight line. Carry on up and down the
breast in lines until you reach the most lateral aspect,
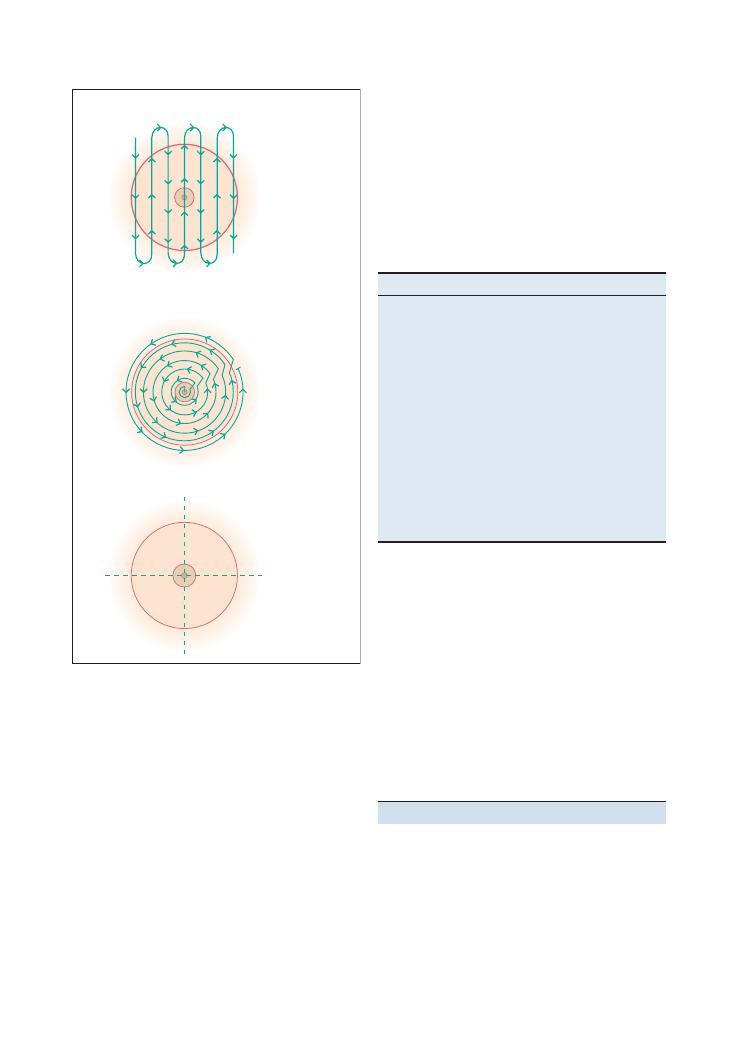
Examinations:
10 Breast 55
Figure 10.1 Breast examination techniques
(a) Lawnmower technique
(b) Concentric rings
Start at nipple and work your way outside
(c) Quadrants
Quadrant by quadrant
This is where you palpate each of the four quadrants of
the breast in turn, ensuring that you cover the whole
area of each quadrant. The area around the nipple is
usually done separately at the end (Figure 10.1c).
Describing the lump
A clear and logical description of a breast lump is the
icing on the cake of any post-examination presentation.
Use the parameters in the table to describe any lumps.
Parameter
Description
Number of lumps
Location within
the breast
There are five areas:
• Superior-medial
• Inferior-medial
• Superior-lateral
• Inferior-lateral
• Nipple region
Shape
Round, circular, oval
Borders
Regular, well-circumscribed, irregular
Consistency
• Soft (like your lips feel)
• Firm (like your nose feels)
• Hard (like your forehead feels)
Size
In millimeters or centimetres
Tenderness
Tender or non-tender
Tethering
Tethered to skin/underlying structures
where you can finish. This is a very thorough technique,
but often time-consuming (Figure 10.1a).
Concentric rings
Here, you palpate the breast in concentric rings, each
ring moving closer and closer to the centre of the breast
and the nipple. So you would start at the outermost
border of the breast, palpating in a clockwise or anti-
clockwise direction until you reached the point at
which you started. You would then move your fingers
about 2 cm closer to the centre, and palpate the ‘next’
concentric ring. And carry on doing that until you
reached the nipple (Figure 10.1b).
An easy way to remember this is to use the ‘4Ss/4Cs/4Ts’
– see Chapter 13 on testicular examination.
Breast screening
This can be done quickly and always impresses examin-
ers as it demonstrates a consideration for wider health
promotion and prevention issues.
• Advise the patient to self-examine on a regular basis,
and to see her GP immediately if she feels any lumps.
• Ensure that the patient is under the National Breast
Screening Programme. All women aged 50–70 years old
receive regular mammograms every 3 years, and any
suspicious lumps are biopsied.
Questions you could be asked
Q. How would you distinguish between a benign and
a malignant lump on examination?
Q. What age group does the NHS Breast Screening
programme cover, and how frequently is screening
offered?
A. The answers appear in the text above.

56
11 Rectal
Checklist
P
MP
F
HELP
H: ‘Hello’ (introduction and gains consent)
E: Exposure
L: Lighting
P: Positions correctly (lying on side, fetal position
with hips and knees flexed), asks if the patient is
in any pain
Washes hands
Explains purpose and routine of examination in a
sensitive manner
Explicitly asks for consent before proceeding
Explains that having a CHAPERONE is essential
for the examination, and requests one from
examiner
Explains repositioning on couch (e.g. ‘Please
remove your trousers and undergarments down
to your knees, and lie on your left hand side on
the couch with your knees tucked in to your
chest and your bottom close to the edge’)
States intention to draw the curtain/step outside
to allow privacy to undress
Gathers appropriate equipment: tray, gloves,
tissues, lubricating gel
States intention to optimise lighting
Wears gloves
Parts buttocks and inspects for: skin tags, ulcers,
abnormal growth, warts, fissures, fistulas
Tells patient before inserting finger
Inserts one lubricated finger into anus
Examines sensation of the perianal skin
Instructs patient to ‘bear down’ and squeeze on
finger to examine anal tone
Checklist
P
MP
F
States intention to feel for:
• Entire wall of rectum by moving finger 180
degrees in either direction:
• Polyps
• Lumps
• Faecal impaction/hard stool
• Prostate: Comments on:
• Size
• Symmetry
• Midline sulcus
• Texture
Tells patient before removing finger
Inspects glove of finger for melaena, mucus, fresh
blood
Removes gloves and disposes of them
appropriately in clinical waste
Thanks patient, says examination is complete and
allows patient to re-dress with dignity and
privacy
States intention to complete examination by
examining abdomen
States intention to perform neurological
examination of lower limbs (if told by examiner
that anal tone was reduced)
Washes hands
Presents findings
Offers appropriate differential diagnosis
Suggests appropriate further investigations and
management
OVERALL IMPRESSION:

Examinations:
11 Rectal 57
Summary of common conditions seen in OSCEs
Condition
Appearance on manikin
Investigations
Treatment
Melaena
Black tarry stool
Characteristic foul smell
Full blood count
Oesophago-gastro-duodenoscopy
Colonoscopy
Blood transfusion
Identify and treat cause
Cauda equina
syndrome
Impaired perianal and anal
sensation
Anal atony
LMN weakness below L1
Reduced sensation below L1
Urgent MRI of whole spine
Transfer to neurosurgical centre
Urgent neurosurgical intervention
Benign prostatic
hypertrophy
Symmetrical increase in
firmness, size and
‘knobbly’ texture
compared with the model
of the normal prostate
Palpable midline sulcus
Prostate-specific antigen
Transrectal ultrasound scan
Biopsy
Conservative: bladder training exercises, avoidance
of caffeine, alcohol and anticholinergic drugs
Medical: first line are alpha-blockers (e.g.
tamsulosin), second line are 5-alpha-reductase
inhibitors (e.g. finasteride)
Surgical: TURP, TUIP, prostatectomy
Prostate
carcinoma
Localised area of the
prostate that will be
harder and more ‘knobbly’
than the remainder
Also, the midline sulcus may
be impalpable
Prostate-specific antigen
Transrectal biopsy
Bone X-ray or bone scans
MRI for staging
Symptom control: TURP (to relieve obstruction),
NSAIDs/bisphosphonates/radiotherapy for relief
of pain from bony metastases
Management:
• Prostatectomy
• Radiotherapy
+ hormone therapy
Rectal tumour
Palpable irregular mass high
up on wall of internal anal
canal
Full blood count
Liver function tests
Sigmoidoscopy
Colonoscopy
CT, MRI, liver ultrasound for staging
Abdominoperineal resection if distal
Perianal
haematoma
Visible blue lump when
buttocks are parted
(Clinical diagnosis)
Drain under local anaesthetic
Perianal abscess Visible white/green lump
when buttocks are parted
Microscopy, culture and sensitivity
of drained pus
Incision
+ drainage + antibiotics
Rule out underlying causes (diabetes mellitus,
Crohn’s disease, malignancy)
Haemorrhoids
Protruding tissue from the
anus
Alternatively you may be
able to palpate them
when you insert your
finger in to the anal canal
of the manikin
Proctoscopy
Conservative: increase dietary fibre and fluid
intake
Medical: topical anaesthetic, band ligation
Surgery
NB. Treatment of acutely thrombosed external
piles is conservative if patient presents after 72
hours. With presentation within 72 hours,
treatment of choice is surgical excision
Anal fissure
Crack in lining of external
anal canal exuding blood
Examination under anaesthesia if
required
Classified as acute if present
<6 weeks:
• Conservative: dietary advice
• Medical: bulk-forming laxatives, lubricants prior
to defecation, topical anaesthetic
Classified as chronic if present
>6 weeks. In
addition to treatment for acute fissure:
• Topical GTN
• Refer for surgery if GTN ineffective after 6–8
weeks of treatment

58
Examinations:
11 Rectal
your chest. I will examine your back passage with a gloved,
lubricated index finger. It may be slightly uncomfortable,
but if it hurts don’t hesitate to stop me. It should take no
more than 5 minutes. If you are happy with my explana-
tion, do you give consent for me to examine you?
Although this may take up a few seconds of your pre-
cious time in the exam, it is extremely important to
demonstrate clear communication before performing
any intimate examination. There are certain to be a
sizeable proportion of marks for good communication
in this station.
Ask if the patient is in any pain
This is specifically important in the PR station because
anal fissures (which can be simulated on the manikin)
are exquisitely painful.
Tell the patient before you insert or
remove your finger from the back passage,
and say what you are doing as you
proceed through the examination
This is important because the examiner will not be
able to see what you are doing when your finger is
in the rectum. There are five important things to
comment on:
• External abnormalities around the anus
• Abnormalities palpated on the walls of the anal canal
• Prostate (size, symmetry, sulcus, texture/hardness)
• Anal tone
• Presence of blood, melaena or mucus on the glove
Inform the patient clearly when
the examination is complete
This is an intimate examination, and often a very
uncomfortable one, especially if there is a significant
pathological abnormality. Therefore it is very impor-
tant that you tell the patient when you have finished.
Potential variations at this station
• Examine the abdomen (on an actor patient) and
perform a PR examination (on a manikin) (5–10
minutes)
• Examine this patient’s rectum and then explain
to the patient what you have found. Answer the
patient’s questions regarding further management
(10 minutes). This is perhaps the most difficult possible
variation at this station. Remember to stick to your
generic management template. For example, if the
examination reveals benign prostatic hypertrophy, talk
about conservative measures (e.g. avoiding anticholin-
Summary of relevant investigations
and management
• Proctoscopy (to visualise anus)
• Sigmoidoscopy ( to visualise rectum)
• Colonoscopy (to visualise colon)
• Haemoglobin and iron studies (to check if the patient
has iron deficiency anaemia)
• Tumour markers (carcinoembryonic antigen for
bowel cancer)
• Prostate-specific antigen (if prostate is enlarged)
• MRI of the spine (if cauda equina suspected)
Hints and tips for the exam
This is a relatively easy OSCE station. You may get
opportunities to practise on actual patients during
colorectal surgery and gastroenterology outpatient
clinics. However, it is highly likely that you will be asked
to perform the examination on a manikin in the OSCE.
Therefore it is important to go to the clinical skills
centre at your medical school and practise this exami-
nation before the OSCE. There are several important
things to remember for this station.
Do NOT forget to request a chaperone
This is vitally important for any intimate examination,
and could easily make the difference between a fail and
a pass.
Cauda equina syndrome
This is exceedingly rare, but is an acute neurosurgical
emergency that requires immediate neurosurgical
intervention. The spinal cord ends at L1/L2, below
which the spinal cord branches into smaller roots –
similar to how a horsetail roots out into smaller
branches at the end; these branches are called the ‘cauda
equina’ (cauda meaning tail, equina relating to horse).
Anything that causes compression of these roots will
result in cauda equina syndrome. Symptoms can very
quickly become irreversible, resulting in permanent
disability, which necessitates urgent neurosurgical
intervention and decompression.
Communicate clearly when explaining how
the examination will be carried out
One suggestion is to say something like:
Hello Mr Jones. I’m —, one of the junior doctors. I under-
stand you have recently noticed some bleeding from your
back passage so is it OK if I examine your back passage to
try and find out what may be causing the bleeding? You
will need to undress down to your knees and lie down on
your left side on the couch with your knees tucked in to

Examinations:
11 Rectal 59
ergic drugs), medical measures (e.g. alpha-blockers)
and surgery as the last line (TURP).
Questions you could be asked
Q. How many hours does it take for cauda equina
symptoms to become irreversible?
A. Potentially within 4–6 hours.
Q. Above which point in the gastrointestinal tract
does bleeding cause melaena (as opposed to fresh red
bleeding)?
A. Although there is no specific point immediately
after which fresh red blood suddenly becomes melaena,
generally speaking bleeding from an area proximal to
the terminal ileum is more likely to be melaena, as
there is scope for significant ‘digestion’ in that part of
the gastrointestinal tract.

60
12 Hernia
Checklist
P
MP
F
HELP
H: ‘Hello’ (introduction and gains consent)
E: Exposure (ideally waist downwards)
L: Lighting
P: Positions correctly (initially standing, then lying
supine), asks if the patient is in any pain
Washes hands
Inspects from end of bed for any relevant
paraphernalia
Requests CHAPERONE
Asks patient to stand
Inspection:
• Inspects patient with them in a standing
position:
• Scars
• Swellings
• Lumps
• Inspects scrotum
• Inspects groin
• Inspects abdomen
• Asks patient to cough to exaggerate the
hernia, observing for any impulse around groin
and scrotum
Palpation:
• Identifies relevant anatomical landmarks:
• Pubic tubercle
• Anterior superior iliac spine
• Mid-inguinal point
• External (superficial) ring
• Internal (deep) ring
Checklist
P
MP
F
• Attempts to palpate external ring through
scrotum (or states intent to do so)
• Identifies any swelling/lump
• Examines swelling/lump thoroughly:
• 4 Ss
• 4 Cs
• 4 Ts
• Attempts to get ‘above’ swelling
• Attempts to manually reduce the hernia
• Asks patient to cough to exaggerate the hernia
and feel a ‘cough impulse’
• Uses finger to obstruct internal ring (at the
mid-inguinal point) and asks patient to cough
• Direct hernia appears
• Indirect hernia does not appear
Auscultates swelling for bowel sounds
Examines both sides for comparison
Tells examiner he or she would like to complete
the examination by examining the scrotum
Thanks patient
Offers to help patient get dressed
Washes hands
Presents findings
Offers appropriate differential diagnosis
Suggests appropriate further investigations and
management
OVERALL IMPRESSION:

Examinations:
12 Hernia 61
Key anatomical
landmarks
Inguinal ligament
From pubic tubercle to anterior superior
iliac spine
Internal (deep) ring
Mid-inguinal point
10–15 mm above femoral artery pulse
External
(superficial) ring
Superior and medial to pubic tubercle
Inguinal canal
Starts at internal ring
Ends at external ring
Contains spermatic cord in men
Contains round ligament in women
4–5 cm in length
Femoral canal
Inferior and anterior to inguinal ligament
Contains fat and a lymph node
Femoral vein, femoral artery and femoral
nerve lie lateral to the femoral canal (in
that order)
Types of hernia
Inguinal hernias
Superior and medial to pubic tubercle
Femoral hernias
Lateral and inferior to pubic tubercle
Protrude through femoral canal
More common in females
Commonly strangulate: as the femoral
canal is very narrow
Direct versus
indirect
hernias
Direct inguinal
hernias
Protrude through a muscular defect in the
transversalis fascia (which is the
posterior wall of the inguinal canal)
Rarely strangulate: as the opening is wider
Indirect inguinal
hernia
Protrude after exiting through internal
inguinal ring
>75% of inguinal hernias are indirect
Occur due to existence of processus
vaginalis and non-closure of internal
inguinal ring after birth)
Can protrude down to scrotum
Commonly strangulate: as the internal ring
is narrow
Summary of key points for OSCEs
Cause of lump
Key diagnostic features
Saphena varix
Soft
Disappears when supine
Cough impulse present
Positive tap test
Blue tinge
Femoral aneurysm
Pulsatile
Bruit
Lymph node
Firm
Round
Well-circumscribed
Fixated to underlying soft tissue
Could be tender (depending on cause)
Lipoma
Soft/firm consistency
Well-circumscribed
Testes
Characteristic features
Summary of common groin lumps
Key features and location of different
types of hernia (Figure 12.1)
Inguinal (indirect/direct)
Femoral
Umbilical and paraumbilical
Incisional
Epigastric
Most common
Least common
Hints and tips for the exam
Hernia examinations are traditionally neglected by stu-
dents before they reach their exams, despite hernias
being a common and easily examinable clinical finding.
Moreover, with a bit of practice, the examination is easy
to carry out and interpret.
Standing or supine?
Most hernias are easier to examine with the patient
standing, as the hernia is less likely to reduce and more
likely to protrude outwards. But do not spend too much
time thinking about what to do – you will be fine as
long as you do a comprehensive logical examination
and devise a reasonable list of differential diagnoses.
Request a chaperone
As with all examinations of an intimate nature, this is
vital. It obviously depends on the level of exposure, but
you will never lose marks for unnecessarily requesting
a chaperone – although you will if you do not request
one when one is required.

62
Examinations:
12 Hernia
tive, quick and non-invasive, and does not involve
radiation.
The only options for managing hernias are as follows:
• Emergency surgery for strangulated or obstructed
hernias
• Elective surgery for hernias that are either sympto-
matic or the patient would like resected
• Conservative management if the hernia is asympto-
matic, if the patient does not want surgery, or if the
patient is not fit for surgery. This includes the following
measures:
• Treat any cause of chronic/severe cough
• Avoid lifting heavy weights
Remember that hernias are more common
on the right side, and more common
in males
This is because the processus vaginalis is more likely to
exist in adulthood in males and on the right side
(although no one seems to know quite why this is the
case). The size of the external ring is also larger in
males, so there is a bigger space for the bowel to pro-
trude through.
Investigations and management
This is really simple. The only investigation that helps
with diagnosing a hernia is an ultrasound – it is sensi-
Figure 12.1 Types of hernia
Umbilical
Epigastric
Femoral
Inguinal
1
1
2
3
4
5
Spigelian
Inguinal hernias
Inguinal hernias are the most common type of hernias. The anatomical landmark of the hernia is
superior and medial to the pubic tubercle. The majority are indirect, the remaining being direct or
a combination of both. Direct hernias pass through the posterior wall of the inguinal canal into
the abdominal wall. Inguinal hernias may be congenital or acquired e.g. straining. Do ask about
pain radiation as the patient can have referred pain. Do learn about the management options,
e.g. conservative or surgical management (use of mesh)
3
Umbilical hernias
These develop around the umbilicus and are called paraumbilical hernias. There is usually a
congenital defect in the umbilical area. In children this hernia may close and surgery can be
prevented unless it becomes symptomatic. However, in adults it will require surgical repair if it
causes problems
2
Femoral hernias (see above)
Femoral hernias are more common in females (remember ‘F’ for Femoral and Females) and are
acquired. The anatomical landmark is below and lateral to the pubic tubercle. These are more
likely to strangulate so early diagnosis is of paramount importance
5
Spigelian hernia
These occur due to a defect in the fascia between the external oblique and rectus abdominis. They
appear lateral to the umbilicus and medial to the anterior superior iliac spine
Obturator hernia
This will not appear in your OSCE. However, you may be asked about it in the viva. It presents with
a vague pain in the medial aspect of the thigh. The investigation of choice is an MRI scan. As it
occurs in the obturator canal, it may be palpable on a bimanual pelvic examination
4
Epigastric hernias
Epigastric hernias develop in the upper part of the mid abdomen. These are small in size and can
be very uncomfortable especially if pinched
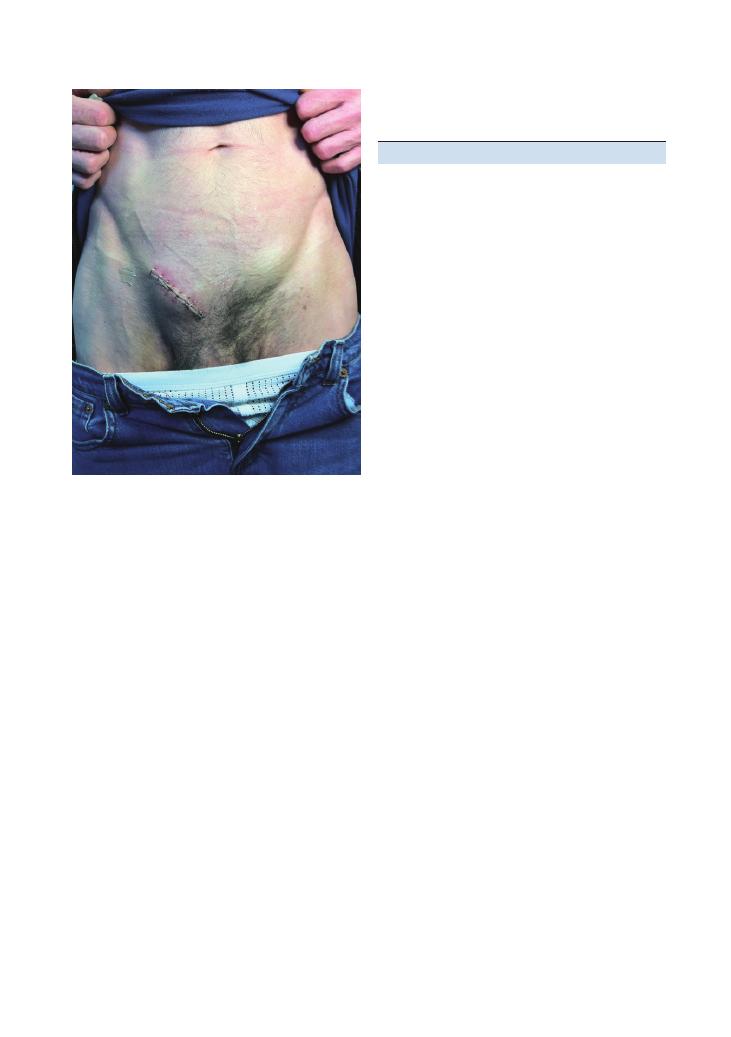
Examinations:
12 Hernia 63
• Avoid/treat constipation
• Use a ‘truss’ or tight-fitting underwear
Questions you could be asked
Q. On which side are hernias generally more common?
Q. What is the difference between direct and indirect
hernias?
Q. What are your differential diagnoses for lumps in
the groin?
A. The answers to these three other questions can be
found in the text above.
Q. What in the management for a strangulated hernia?
A. The management of a strangulated hernia is urgent
surgical repair.
Figure 12.2 After surgical repair of an inguinal hernia

64
13 Testicular
Checklist
P
MP
F
HELP
H: ‘Hello’ (introduction and gains consent)
E: Exposure
L: Lighting
P: Positions correctly (supine), asks if the patient
is in any pain
Washes hands
Requests CHAPERONE
Inspection:
• Comments on patient’s general appearance
(secondary sexual characteristics,
gynaecomastia – if shirt has been removed)
• Hair distribution (face, axilla, pubis)
• Skin of pubic region and scrotum (scars, colour,
rash, lumps, ulcers)
• Examines penis from base to shaft
• Prepuce (if present) is examined and retracted
(phimosis, paraphimosis)
• Asks patient for permission to retract foreskin
• Meatus (hypospadias, epispadias, discharge)
• Scrotum (front and back, size, shape, symmetry,
height of testes – left usually lower than right)
• Returns foreskin to normal position
Palpation:
• Testicles (number, size, consistency, other
masses, epididymis, vas deferens)
Checklist
P
MP
F
• Epididymis (location, swellings)
• Spermatic cord
• Uses correct technique, ‘rolling’ the testes
between finger and thumb, and covering the
entire surface area of the testes
• Examines any swellings if present (size, shape,
fluctuance, transilluminable, cough impulse)
• Tries to palpate ‘above’ swelling to
determine where it originates from (testes,
inguinal canal)
• Examines inguinal lymph nodes
• Asks patient to stand and comments on any
changes (varicocele, hernia)
Complete examination:
• Examine abdomen
• Hernial orifices
• Rectal examination for prostate
• If a lump was felt, offers to examine the lungs,
liver and spine for bony tenderness
Thanks patient
Offers to help patient get dressed
Washes hands
Presents findings
Offers appropriate differential diagnosis
Suggests appropriate further investigations and
management
OVERALL IMPRESSION:

Examinations:
13 Testicular 65
Testicular mass
How to differentiate
Testicular tumour
Woody hard/firm
Smooth or craggy surface
Not separate from testicle
Not transilluminable
Can get above it
Patient is young to middle-aged
May show signs related to side effects of chemotherapy (e.g. hair loss)
Inguinal hernia (usually indirect)
Cannot get above it
Does not transilluminate
Above and medial to the pubic tubercle
Can be controlled once reduced by pressure on the deep inguinal ring
Epididymal cyst
Separate from testicle
Transilluminates
Varicocele
‘Bag of worms’ consistency
Seen when standing and disappears on lying down
Left-sided is more common:
• Right testicular vein drains directly into inferior vena cava
• Left testicular vein drains into left renal vein and then inferior vena cava
May be the presenting sign of a renal cell carcinoma that has invaded the renal vein
Penile ulcer
May be on glans (so retract foreskin)
Offer to take a swab for microscopy, culture and sensitivity
Hydrocele
Soft, smooth, not separate from testicle
Transilluminates
Cannot get above it
Summary of common conditions seen in OSCEs
Making a diagnosis
The algorithm in Figure 13.1 will help you make a
diagnosis quickly and systematically.
Look out for an absent vas deferens. This may be the
only clue to the patient having cystic fibrosis.
Key investigations
• Bedside: swab discharge for microscopy, culture and
sensitivity (? sexually transmitted infection)
• Ultrasound scan: confirm solid or cystic
• Tumour markers (alphafetoprotein – yolk sac
tumour; beta-human chorionic gonadotropin – terato-
mas and seminomas; lactate dehydrogenase)
• Chest X-ray: metastases
• Staging CT: metastatic disease
• Excision biopsy
• Four stages:
1. No metastases
2. Infradiaphragmatic nodes (remember para-aortic
spread)
3. Supradiaphragmatic nodes
4. Haematogenous spread: lung involvement
Hints and tips for the exam
Chaperone
The importance of this cannot be emphasised enough,
and could well be the difference between a pass and
a fail.
Respect the mannequin
In your OSCE, it is more than likely that a model will
be in place of a real patient (for obvious reasons!). This
can make the station easier for some, but make sure you
conduct yourself as if a patient were in front of you.
Take the same care you would if faced with a real
patient, and talk to the model as you proceed with the
examination. Warn the patient before retracting their
foreskin and talk to the patient during the examination,
explaining what you are doing.

66
Examinations:
13 Testicular
• Mixed teratoma-seminoma: 20–40 years old,
about 15–20%
• Lymphoma: non-Hodgkin’s, 60–70 years old,
least common
Q. List some risk factors for testicular malignancy.
A. • Cryptorchidism
• History of malignancy in the contralateral
testis
• Male infertility
• Family history
• Klinefelter’s syndrome
• Infantile hernia
• Testicular microlithiasis
Q. What symptoms may a patient complain of?
A. • A painless lump in the scrotum
• Pain
• A dragging feeling
• Back pain
Q. What is the prognosis of common testicular
malignancies?
A. Your answer should begin by stating that this will
depend on:
• Staging
• Tumour type
• Tumour marker levels
Seminoma:
• 5-year survival of 90% survival with stage I and
II disease
• Radiosensitive
• Spreads late
Non-seminomatous:
• 5-year survival of approximately 90%
• Early haematogenous spread
Marks will be awarded for trying to maintain the
patient’s dignity throughout the station. Use appropri-
ate language and, when the examination is complete,
cover the patient with a sheet if provided.
When palpating the testes, look at the patient’s face
and ask about tenderness. Comment on anything you
find and attempt to get above it.
Know the basics of the lymphatic system
The lymphatic drainage of the penis and scrotum runs
into the inguinal lymph nodes. These can be felt in the
inguinal crease. The testicles drain via the para-aortic
nodes.
Describing a lump
These are easy marks to remember to famous 4Ss, 4Ts
and 4Cs.
Figure 13.1 Algorithm for making a good diagnosis
Solid:
Tumour
Orchitis
Cystic
Hydrocele
(3) Solid
or cystic?
(3) Solid
or cystic?
(2) Is it separate
from the testicle?
(1) Can I get
above it?
Indirect
inguinal
hernia
Solid:
Epididymitis
Cystic:
Epididymal
cyst
YES
YES
NO
NO
Ss
Ts
Cs
Site
Tender
Colour
Size
Transilluminability
Consistency
Shape
Tethering
Contour
Skin
Temperature
Cough
Questions you could be asked
Q. Which testicular tumours are malignant?
A. • Seminoma: peak incidence 30–40 years old, most
common, 35–45% of all cases
• Teratoma: peak incidence 20–30 years old, about
a third of cases

Examinations:
13 Testicular 67
Q. How is testicular malignancy managed?
A. • Multidisciplinary team approach
• Exploration and orchidectomy if malignant
• Radiotherapy
• Chemotherapy (BEC: bleomycin, etoposide, cis-
platin) – used if there is spread beyond the regional
lymph nodes
• Monitor treatment success with CT and tumour
marker levels
• Before treatment is started, patients should be
counselled on the risk of infertility and offered
sperm collection

68
14 Vascular (arterial)
Checklist
P
MP
F
HELP
H: ‘Hello’ (introduction and gains consent)
E: Exposure (entire leg up to groins)
L: Lighting
P: Positions correctly (supine), asks if the patient
is in any pain
Washes hands
Inspection (patient on bed):
• From end of the bed:
• Comfortable, cyanosis, pallor
• Obvious pathology (amputation, stockings,
scars)
• Around the bed (cigarettes, medication
[GTN], walking stick)
• Skin colour (pallor, cyanosis)
• Trophic changes (hair loss, muscle wasting,
shiny skin)
• Scars (e.g. vein harvesting)
• Ulceration (heel, tips of toes, in between toes,
lateral malleolus, punched-out, painful, over
pressure points)
• Gangrene (dry/wet – infected)
• Amputation
• Dressings (states would ideally examine
underneath)
• Stigmata of vascular disease: nicotine staining
(smoking), xanthoma, xanthelasmata
(hypercholesterolaemia), necrobiosis lipoidica
(diabetes)
Palpation:
• Examines abdomen for abdominal aortic
aneurysm (size)
• Skin temperature with back of hands
• Assesses capillary refill in both feet
(
<2 seconds)
Checklist
P
MP
F
• Palpates pulses bilaterally: femoral (mid-
inguinal point), popliteal, dorsalis pedis
(between 1st and 2nd metatarsals) and
posterior tibial (half way between tip of heel
and medial malleolus)
• Comments on rhythm (atrial fibrillation
– increased risk of embolic disease)
• If unable to palpate, states intent to use
Doppler ultrasonography
• Measures Buerger’s angle and performs
Buerger’s test, commenting on reactive
hyperaemia if present (feet become a dusky
red colour)
• Assess for venous guttering (elevate leg to 15
degrees)
Auscultates:
• Bruits (abdominal aorta, femoral pulses)
States intention to do the following to complete
the examination:
• Examine remainder of peripheral vascular
system
• Examine cardiovascular system
• Measure ankle–brachial pressure indexes
(ABPIs) using Doppler assessment
• Conduct a neurological assessment of the
lower limbs
• Conduct a musculoskeletal examination
Thanks patient
Offers to help patient get dressed
Washes hands
Presents findings
Offers appropriate differential diagnosis
Suggests appropriate further investigations and
management
OVERALL IMPRESSION:
Lower limb

Examinations:
14 Vascular (arterial) 69
Summary of common conditions seen in OSCEs
Condition
Symptoms
Signs
Intermittent
claudication
Pain on exercise
Relief on rest
Location of pain dictates site of narrowing:
• Aortoiliac disease – buttock claudication and impotence
(Leriche’s syndrome)
• Weak/absent leg pulses (all)
• Iliofemoral – thigh pain , popliteal and foot pulses weak/absent
• Femoropopliteal – calf pain, foot pulses absent/weak
ABPI
= 0.8–0.06 (falsely high in diabetes
mellitus due to calcified arteries)
Critical ischaemia
Intermittent claudication
> rest pain > ulceration > gangrene
Hangs leg out of bed while sleeping (which improves blood flow)
– may sleep sitting up
The ‘6 Ps’ of an acutely ischaemic limb:
• Pain
• Pallor
• Perishingly cold
• Pulselessness
• Paraesthesia
• Paralysis
ABPI
= <0.5
Diabetic foot
Pain
Skin changes
Charcot joint: severe joint deformity due to lack of sensation and
repetitive trauma
Loss of ankle jerk (autonomic neuropathy)
Reduced vibration sense
Ulcers
Amputation
Toes, lower leg or entire leg
Social impact
Buerger’s disease:
• Young male
• Heavy smoker
• Severe Raynaud’s phenomenon
Above knee
Through knee
Below knee
Features of arterial and venous lower limb
disease
Arterial
Venous
Shiny skin
Brown pigmented skin
Lateral malleolus
Medial malleolus
Deep ulcer
Shallow ulcer
Punched-out
Irregular sloping edge
Little exudate
Lots of exudate
Little/no swelling
Oedematous
Cold skin
Warm skin
No granulation tissue
*
Granulation tissue* present
Pulses weak/absent
Pulses normal
Increased capillary refill time
(
>3 seconds)
Normal capillary refill
*Granular dark red or pink tissue is seen in wound healing.
Important investigations to remember
for this station
• Bedside: ABPI, ulcer swab, ECG (arrhythmias and
ischaemic heart disease), urine dipstick (glycosuria –
diabetes mellitus screen)
• Blood: Full blood count, Us
+Es, lipid profile, glucose
• Special tests: Colour duplex ultrasound, angi
ography
Basic management of peripheral
vascular disease
• Conservative and medical:
• Exercise (there is evidence that this may have even
better outcomes than surgery)
• Addressing risk factors (weight, smoking, blood
pressure, cholesterol, glucose and aspirin).
• Other medications that may be used: cilostazol and
naftidrofuryl

70
Examinations:
14 Vascular (arterial)
problem is above this level and the pulses below are
unlikely to be felt. Never say that you can feel a pulse
when you cannot! Simply add that you would like to
have a Doppler scan at the end of the examination to
assess the pulses you could not palpate.
The popliteal pulse is best felt with the patient’s legs
slightly bent and relaxed. Grasp the calf with both
hands. Place your thumbs on the tibial tuberosity and
use your fingers to feel behind the knee in the popliteal
fossa. The popliteal pulses can be difficult to feel so do
not waste much time attempting this.
To save time, palpate both pairs of femoral and the
foot pulses simultaneously. The abdominal aorta
should be felt in the midline above the umbilicus (it
bifurcates at L4 – below the umbilicus).
Don’t forget to check the capillary refill time as this
is also a good indicator of perfusion – up to 2 seconds
is normal, whereas more than 3 seconds shows that the
limb is poorly perfused.
Buerger’s test
This has traditionally been one of the most feared parts
of the vascular examination – the following bullet point
plan should make it easier for you:
• Ask the patient about pain in the hips, and ask
whether you can lift their legs up.
• Lift both legs and note the angle at which the sole of
the foot goes white.
• Note the angle made between the leg and the bed –
this is Buerger’s angle (
<20 degrees signifies severe
ischaemia; normal is
>90 degrees).
• Ask the patient to sit up from this position with their
legs over the side of the bed:
• Comment on any change in colour of the legs:
bluish (deoxygenated blood) and then red (reactive
hyperaemia) if present.
As the station is quite straightforward, it can be incor
porated with measuring an ABPI or be followed by
questions on management of the common conditions.
Knowing the arterial tree of the lower limb can assist
you in your examination and impress the
examiner when you finally present your findings
(Figure 14.1).
How to measure an ABPI
Although it is unlikely that this will appear in the OSCE,
you may well be asked to describe the process – espe
cially if you are aiming for a merit or distinction:
• The patient lies on the bed.
• Their legs must be at rest for 20 minutes before the
measurement and the patient must be horizontal
(remember to state this).
• Surgical:
• Endovascular: percutaneous transluminal angi
oplasty
• Bypass
• Amputation
• Outcomes: approximately onethird improve, one
third stay the same, and onethird deteriorate.
Hints and tips for the exam
The arterial examination is an easy station and can
allow you to demonstrate a number of clinical skills.
Although you should undoubtedly look for and
comment on features of acute conditions (such as acute
limb ischaemia), seeing such a patient is almost impos
sible in the OSCE – if you do, it would be reasonable
to stop your examination and get the patient admitted
to the nearest surgical ward!
Adequate exposure
When asking the patient to expose appropriately,
ensure that you are clear and unambiguous. Ask them
to remove their trousers, shoes and socks, leaving their
underwear on. Some actors are told to keep their socks
on unless specifically asked to remove them – forgetting
this can lose you valuable seconds in the OSCE.
It is even more important to treat the patient in a
dignified respectful manner, as many patients feel quite
anxious when asked to expose their legs and abdomen.
Inspect systemically
Inspection is fundamental in all of the vascular exami
nation, and it is imperative that you are systematic –
inspect either from the hips towards the feet or vice
versa.
Ulcers
When examining for ulcers, make sure that you inspect
all the pressure points and in between the toes (where
an ulcer can easily be missed.) Lift each foot up to look
at the heel, and use this opportunity to comment on
the back of the leg as well. Arterial ulcers are classically
‘punchedout’.
When describing an ulcer comment on:
• Site
• Size
• Shape
• Edge
• Floor
• Exudate
• Surrounding skin
Palpating peripheral pulses
When palpating the pulses, it is easiest to start at the
femoral arteries. If these pulses cannot be felt, the
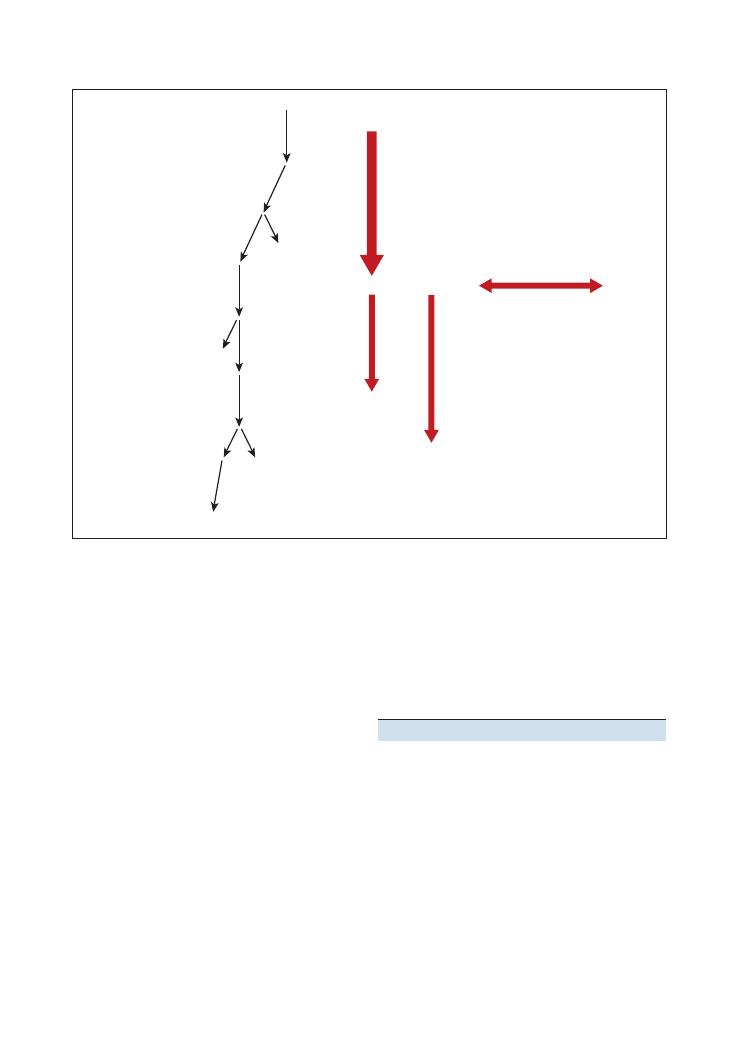
Examinations:
14 Vascular (arterial) 71
• If the result is normal, you should offer to repeat
the test after the patient has undertaken a bout of
exercise.
• Diabetic patients may have falsely reassuring ABPIs
due to calcification of their arteries.
Questions you could be asked
Q. Describe the anatomy of the lower limb arterial tree
A. See Figure 14.1.
Q. Identify and describe common vascular surgical
scars.
A. Try to find these on the wards – even if it takes a
whole day:
• Open aneurysm: midline laparotomy
• Femorofemoral crossover: bilateral longitudinal
groin incisions
• Femoropopliteal bypass: longitudinal incisions
above and below the knee
• Carotid artery: longitudinal incision in the neck
• Select an appropriately sized cuff for the patient’s
arm.
• Measure the systolic blood pressure in the arm.
• Use the appropriate cuff for the calf and place the cuff
above the malleoli at midcalf level.
• Use Doppler scanning at either the dorsalis pedis or
posterior tibial pulses (if you are struggling to locate
the dorsalis pedis, move to the posterior tibial).
• Inflate above the systolic blood pressure measured in
the arm.
• Slowly deflate until the pulse is again heard on the
Doppler.
• Use the higher of two readings (although you will
only have time to take one in the exam).
• Offer to repeat on the other leg.
• Calculate ABPI
= ankle pressure/arm pressure
• Normal
= 1 or more
• Intermittent claudication
= 0.6–0.8
• Rest pain
= 0.3–0.6
• Ulceration and gangrene
= <0.3
Figure 14.1 Diagram of the arterial tree of the lower limb
Popliteal (felt in popliteal fossa)
Abdominal aorta
Aorto-bifemoral bypass –
for aortoiliac disease
10% mortality (therefore
may initially attempt iliac
stent and femoro-femoral
crossover)
Femoropopliteal or femorodistal
bypass – ideally use long
saphenous vein and destroy
valves with valvulotome
Dorsalis pedis
(felt between
1st and 2nd
metatarsals)
Anterior tibial
Profunda femoris
External iliac
Common iliac
Internal iliac
Femoral (pulse felt at mid-inguinal point)
Superficial femoral
Posterior tibial
(felt just below and
behind medial malleolus)

72
Examinations:
14 Vascular (arterial)
Q. Discuss the potential complications of vascular
surgery.
A. In your answer, classify these as:
• Intraoperative: bleeding, infection, thrombosis
• Early: compartment syndrome (treat with fasci
otomy), reperfusion injury
• Late: infection, stenosis, false aneurysm (haem
atoma outside the arterial wall), amputation
Q. What are the indications for elective abdominal
aortic aneurysm repair (placing an endovascular stent
through the femoral artery)?
A. • Size
>5 cm
• Expansion rate
>1 cm/year
• Symptomatic (back pain, distal emboli, tender
abdomen)

73
15 Vascular (venous)
Lower limb
Checklist
P
MP
F
HELP
H: ‘Hello’ (introduction and gains consent)
E: Exposure (expose legs up to groins)
L: Lighting
P: Positions correctly (supine), asks if the patient
is in any pain
Washes hands
Inspection from end of bed:
• Comfortable
• Varicose veins – note which vein
• Coexistent arterial pathology (amputation,
pallor)
• Relevant paraphernalia (walking aids)
Inspection of legs: front, side and behind:
• Trophic changes (venous eczema, haemosiderin
deposition, lipodermatosclerosis,
thrombophlebitis, atrophie blanche)
• Scars (e.g. vein harvesting, healed ulcer)
• Ulceration (gaiter area – medial malleolus)
• Oedema (around ankles)
• Dressings (states would ideally examine
underneath)
Palpation:
• Skin temperature with back of hands, moving
up leg from feet in distribution of the long and
short saphenous veins
• Skin thickening (lipodermatosclerosis)
• Thrombophlebitis (warmth and tenderness over
a vein)
• Locate saphenofemoral junction (SFJ) (4 cm
below and lateral to pubic tubercle):
• Feel for saphena varix
• Assess for cough impulse
• Tap test:
• Place your hand over varicose vein and tap
proximally. Test is positive if pulsation is felt
over the varicose vein
Checklist
P
MP
F
• Oedema
Auscultates:
• Bruits (listen over any varicose veins – bruit
may signify a vascular malformation)
Special tests:
• Trendelenburg test:
• Lay patient flat
• Empty varicose veins by lifting leg
• Place your fingers at SFJ
• Ask patient to stand up and look for refilling
of the veins
• If veins refill, incompetence is below the SFJ
• Tourniquet test:
• Lay patient flat
• Empty varicose veins by lifting leg
• Apply a tourniquet at level of the SFJ and
tighten it (this acts as an artificial valve)
• Ask patient to stand up and look for refilling
of the veins
• If they do not refill, incompetence is at the
level of the SFJ
• If they do refill, incompetence is below the
SFJ
• If they refill, work your way down leg by
applying tourniquet just above knee, then
below it, then at mid-calf region, and look
for refilling of vein
• Perthes test:
• Lay patient flat
• Empty varicose veins by lifting leg
• Apply a tourniquet around mid-thigh area
(4–5 cm above knee)
• Ensure this is not very tight (so that it
compresses only the superficial veins and
not the deep veins)
• Ask patient to stand up and tiptoe up and
down about 10 times (so that calf muscles
contract)
• If varicose veins remain full of blood, may
be a deep vein obstruction (e.g. thrombosis)
• If varicose veins empty, there is no deep
vein obstruction

74
Examinations:
15 Vascular (venous)
Checklist
P
MP
F
• Doppler test:
• Place Doppler probe over varicose vein.
Squeeze distal to vein and listen for double
‘whoosh.’ This indicates an incompetent
valve
States intent to complete the examination with
the following:
• Examine remainder of the peripheral vascular
system
• Examine abdomen for masses
• Do a rectal examination for masses
• Examine external genitalia
Checklist
P
MP
F
• Carry out brief local neurological examination
Thanks patient
Offers to help patient get dressed
Washes hands
Presents findings
Offers appropriate differential diagnosis
Suggests appropriate further investigations and
management
OVERALL IMPRESSION:
Pathology
Notes
Varicose veins
Abnormal dilatation and tortuosity of superficial
venous circulation due to incompetent valves
and resulting venous hypertension
Saphena varix
Dilatation of saphenous vein at the SFJ
May have a cough impulse and can be
differentiated from a femoral hernia by its
blue colour and the fact that it disappears
when the patient lies flat
Chronic venous
insufficiency
Presence of valvular dysfunction and chronic
venous hypertension will cause a number of
trophic changes to occur
See the above checklist for features of trophic
disease
Venous ulcers
See Chapter 14 for notes on arterial
examination
Summary of common conditions seen
in OSCEs
Hints and tips for the exam
Venous examination of the lower limb is fairly straight-
forward and is likely to appear as these patients have a
chronic illness and are plentiful in number. To do well
at this station, you must first have a sound understand-
ing of the venous anatomy of the legs, and then dem-
onstrate it during the examination. For example, when
palpating the vasculature, remember to go from the feet
upwards (as the veins take blood towards the heart!).
Inspect thoroughly
Inspect the room carefully for any walking aids. If you
manage to complete your examination in good time,
you can try to perform a functional assessment to show
the examiner you are trying to clarify the level of dis-
ability caused by the disease. This can also guide man-
agement as painful varicose veins are an indication for
surgical treatment.
Figure 15.1 illustrates various features of chronic
venous disease, including thread veins, lipodermato-
sclerosis and haemosiderin deposition.
Examine a varicose as an
autonomous entity
If you see a varicose vein, examine it as you would any
lump or skin lesion. Do this before proceeding with the
rest of the examination. Look carefully for scars from
previous vascular surgery as these can often be hard to
spot.
Remember that a large proportion
of venous pathology coexists with
arterial pathology
Mention this in your closing statement. It is an impor-
tant safety issue as the compression bandaging used to
treat venous disease is contraindicated in those with
severe arterial disease. Hence an ABPI should be under-
taken before compression bandaging is issued.
Questions you could be asked
Q. What are varicose veins?
Q. How are they treated?
Q. What are the trophic skin changes of chronic
venous insufficiency?
Q. How do you treat a venous ulcer?
Q. What investigations would you perform for an
ulcer?
Q. What is the management of an ulcer?
A. Answers to all these questions can be found in the
text above.
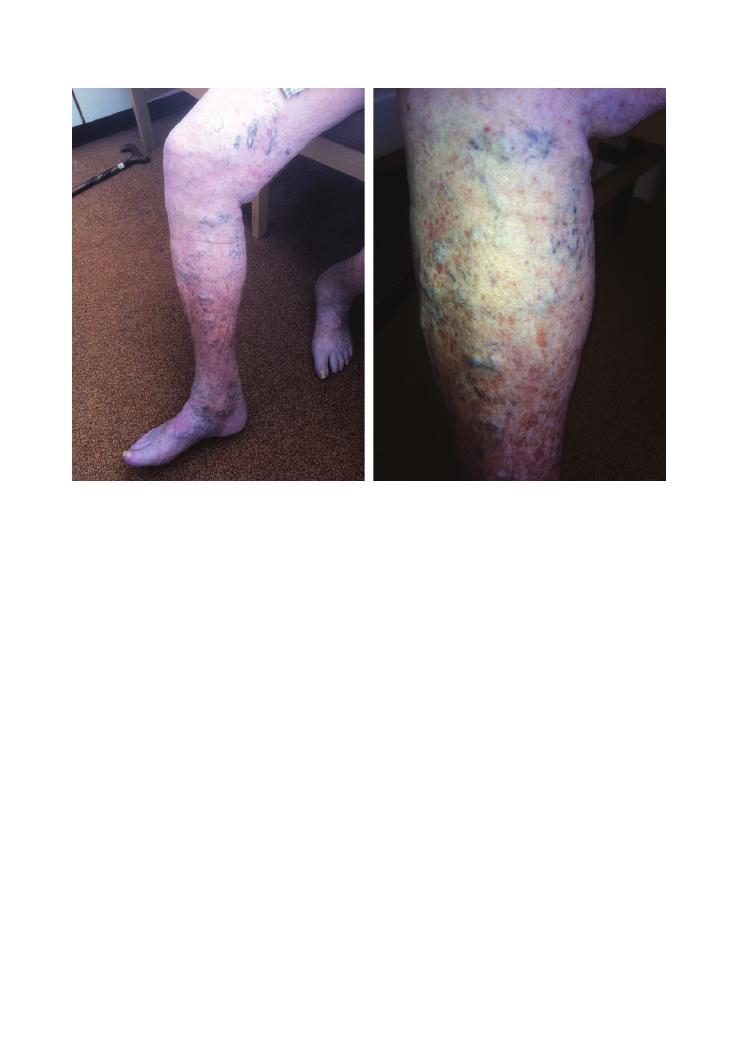
Examinations:
15 Vascular (venous) 75
Figure 15.1 (a, b) Features of chronic venous disease
(a)
(b)

76
16 Ulcer
Checklist
P
MP
F
HELP
H: ‘Hello’ (introduction and gains consent)
E: Exposure
L: Lighting
P: Positions correctly, asks if patient is in any pain
Washes hands and wears gloves
Inspects from end of bed:
• Surgical scars (e.g. bypass grafts for arterial
disease, varicose vein stippling)
• Amputations
• Diabetes paraphernalia (e.g. insulin pens)
• Ischaemic heart disease paraphernalia
Inspection:
• Number
• Site/distribution
• Size (in two dimensions)
• Shape
• Surrounding skin
• Edge
• Depth
• Base
• Colour
• Discharge (blood, pus, fluid)
Palpates:
• Temperature of surrounding skin
• Tenderness of surrounding skin
Brief neurovascular examination:
• Assesses sensation in surrounding dermatomes
Checklist
P
MP
F
• Assesses power in surrounding myotomes
• Palpates peripheral pulses
Examines regional lymph nodes (sign of infection
or malignancy)
Examines for other systemic signs related to
cause of ulcer:
• Necrobiosis lipoidica
• Corneal arcus, xanthelasmata
• Signs of chronic venous disease
• Signs of rheumatological, autoimmune or
vasculitic conditions
States intent to carry out relevant investigations:
• Microscopy, culture and sensitivity on any fluid/
discharge
• Relevant blood tests to find cause:
• Cholesterol (ischaemic heart disease)
• Fasting blood glucose (diabetes)
• Autoantibody screen (vasculitis)
• Tumour markers (malignancies)
• Investigations for arterial and venous disease
(see Chapters 14 and 15, respectively)
• X-ray (to rule out osteomyelitis, if appropriate)
Thanks patient
Offers to help patient get dressed
Washes hands
Presents findings
Offers appropriate differential diagnosis
Suggests appropriate further investigations and
management
OVERALL IMPRESSION:

Examinations:
16 Ulcer 77
Summary of common conditions seen in OSCEs
Type of ulcer
Signs on examination
Management
Arterial
See Chapters 14 and 15
Venous
Diabetic/neuropathic
Punched-out ulcer
Amputations
Charcot joints
Scars from bypass surgery
Insulin by bedside
Educate patient about the illness
Lifestyle modification (diet, exercise and smoking)
Medical (optimise monitoring and
antihyperglycaemic regimens)
Surgical (bypass surgery and amputation)
Pressure
Over pressure points (e.g. sacrum)
Walking aids
Signs associated with reduced mobility or peripheral
neuropathy (altered sensory perception)
Educate patients and carers
Encourage movement
Frequent repositioning
Special mattresses
Basal cell carcinoma
(rodent ulcer)
On the face
Rolled edge
Pearly colour
Overlying telangiectasias
Necrotic centre
Local spread (rarely associated with lymphadenopathy)
Medical (topical 5-fluorouracil)
Surgery (resection)
Keratoacanthoma
Central necrosis and horn
Reassure as lesion should resolve spontaneously
Surgery may leave a scar that is bigger than the
lesion!
Describing the edges of an ulcer
Descriptive term
Pathology
Likely cause
Picture
Punched-out
Full-thickness skin death
Relatively quick onset
Arterial
Neuropathic
Rarely syphilis
Flat, sloping
Healing ulcer
Shallow
Venous
Undermined
Infection at ulcer site
Damages subcutaneous tissue
Infection
Heaped/everted
Edge is growing quickly
Carcinoma
Pearly rolled
Slow growth at the edge, telangiectasia in ulcer
Basal cell carcinoma
Hints and tips for the exam
The ulcer examination station may be encountered as
a medical, surgical or dermatology case in finals. It is a
short station, and in most cases candidates will have a
brief viva or questions to answer.
Find out about function/activities
of daily living
Before attending to the ulcer, remember to inspect the
patient and the surroundings. A walking aid or wheel-
chair will aid in your functional assessment and guide
your management plan when you come to summarise.
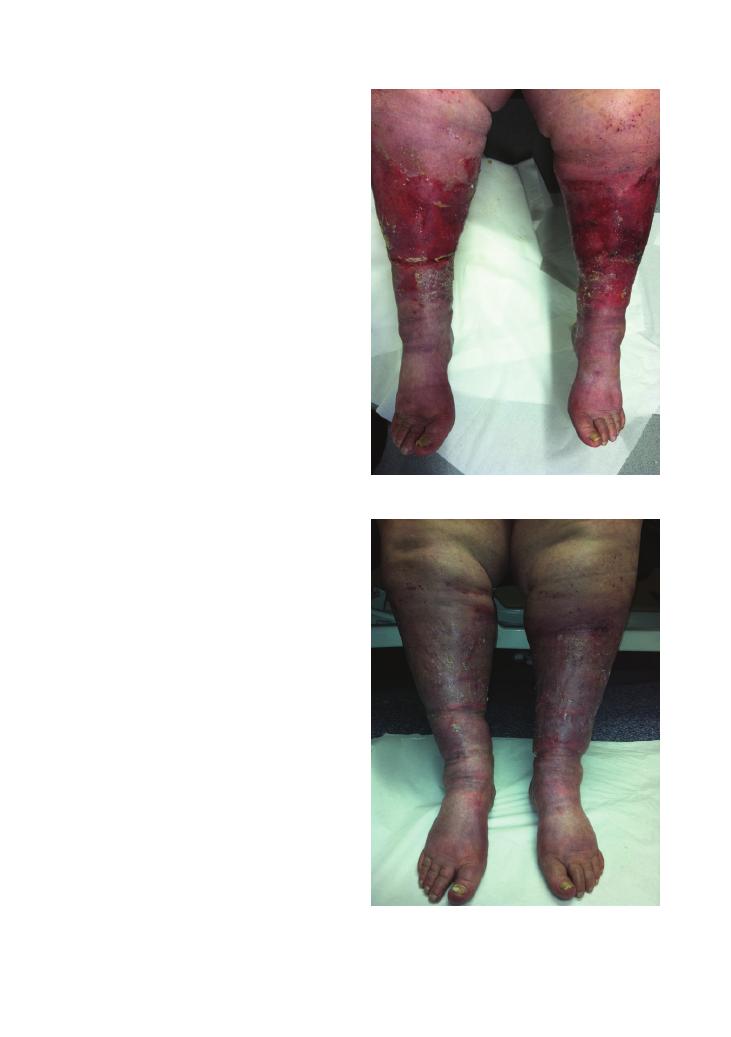
78
Examinations:
16 Ulcer
Looking at the patient from a holistic and functional
perspective will help you stand out as a candidate for
merit or distinction.
Be clear and systematic in your description
of the ulcer
The key to this station is in the description of the ulcer,
and that is where most of your marks can be gained.
The best way to master this is through practice!
When you embark on describing the ulcer, be sure
to use the correct terminology, as in most cases it is
likely be a spot diagnosis. Use the internet (when not
on the wards) to look up and describe pictures of
ulcers with a friend. Try not to skip parts of the
description because they are ‘obvious’. The point is to
engrain the method of describing an ulcer, rather than
the description itself.
To begin with, comment on the site of the ulcer as a
distance from a bony landmark or obvious point of
reference (e.g. the medial malleolus). The distribution
of an ulcer may give you a clue to its cause so it is
important to mention this too.
You should then attempt to measure the size and
shape of the ulcer. Look around as there may be a ruler
to help with this (if not have a guess). The larger an
ulcer, the longer it will take to heal and the more likely
it will be to become infected. Mentioning this rather
obvious fact in your summary will show the examiner
you are thinking of both the current clinical picture and
the prognosis.
The edge of an ulcer is one of its most defining
characteristics (at least for finals!). It can allow you to
show the examiner you are aware of the diagnosis and
also the pathological processes underway within the
ulcer (see the table above).
When palpating, use the back of your hand to assess
the temperature of the surrounding skin.
After thanking the patient, remember to cover them
appropriately and complete your examination, tailor-
ing any further examination to your most likely diag-
nosis, such as an examination of the peripheral nerves
if a neuropathic ulcer is found, or a peripheral vascular
examination if arterial or venous insufficiency is the
suspected aetiology.
Here is one example of describing an ulcer:
There is a single lesion 1 cm above the left nostril. It is
round and approximately 1 cm by 1 cm in size, and 3 mm
deep, with a rolled edge. The border is well circumscribed
and shiny (opalescent) with several overlying telangiecta-
sias. The base is necrotic. The surrounding skin is not
erythematous. There is no associated lymphadenopathy.
Figure 16.2 Chronic venous ulcers after appropriate dressing has
been used
Figure 16.1 Chronic venous ulcers before appropriate dressing

Examinations:
16 Ulcer 79
This is the classical description of a basal cell carcinoma
(rodent ulcer).
Questions you could be asked
The questions are likely to be specific to the case. Here
are a few general questions that you should consider
before your OSCE.
Q. What is an ulcer?
A. An ulcer is a breach in the epithelial surface of the
skin with complete loss of the mucosa.
Q. What is an erosion?
A. An erosion is a breach in the epithelial surface with
partial loss of the mucosa.
Q. What are the four stages of wound healing?
A. • Haemostasis
• Inflammation
• Proliferation
• Remodelling
Q. What is granulation tissue?
A. This is the pink, soft, granular tissue that is seen
after injury. Histologically, new blood vessel formation
is seen alongside the proliferation of fibroblasts.
Q. What factors affect wound healing?
A. • Local factors:
• Blood supply
• Infection
• Mechanical stress
• Systemic factors:
• Age
• Anaemia
• Diabetes
• Malnutrition
Q. How would you manage an arterial/venous leg
ulcer?
A. To answer this question, be sure to include
community-based services in your answer in addition
to conservative, medical and surgical management. See
Chapters 14 and 15 for more information on how to
treat these.

80
17 Shoulder
Checklist
P
MP
F
HELP
H: ‘Hello’ (introduction and gains consent)
E: Exposure (remove top)
L: Lighting
P: Positions correctly (supine), asks if patient is in
any pain
Washes hands
Inspects from end of bed for relevant
paraphernalia:
• Slings, casts, splints
• Walking aids
• Zimmer frames
Inspects patient (patient standing – takes a
360-degree look):
• Muscle wasting
• Deformities
• Scars – arthroscopy portals, surgical scars
• Sinuses
• Swelling
• Erythema
• Position of the shoulders – Bryant’s sign
(lowering of the axillary fold demonstrates
dislocation)
• Bony deformity (fractures, winging of the
scapula)
Does a quick screening test for all main muscle
groups:
• Arms raised above head with shoulder fully
abducted
• Hands raised and placed behind back of head
• Hands placed at lower lumbar back
Palpates shoulder joint:
• Temperature
• Swelling
• Muscle bulk around joint, scapula
• Joints: sternoclavicular, acromioclavicular,
glenohumeral joints
• Scapula
Checklist
P
MP
F
Assesses movements:
• Flexion (0–180 degrees)
• Extension (0–50 degrees)
• Abduction (0–180 degrees)
• Adduction (0–50 degrees)
• External rotation (0–90 degrees)
• Internal rotation (0–70 degrees)
• Assesses passive, active and resisted
movements
• Assesses degree of passive and active
movement
• Assesses for pain and crepitus
• Stabilises with other hand while assessing
movement
• Checks for painful arc (70–120 degrees) upon
abduction
Assess for winging of scapula – push against
wall
Special tests:
• Rotator cuff tests:
• Full can test
• Lift-off test
• Infraspinatus and teres minor test
• Impingement tests:
• Neer’s impingement test
• Hawkins–Kennedy test
• Instability test:
• Anterior instability test
• Sulcus sign
• Load shift sign
• Yergason’s test:
• Biceps – resisted supination with long head
of the biceps pathology causes pain in the
bicipital groove
Thanks patient
Offers to help patient get dressed
Washes hands
Offers to examine elbow (joint below) and neck
(joint above)
Offers to examine neurovascular function of
lower limbs
Presents findings
Offers appropriate differential diagnosis
Suggests appropriate investigations and
management

Examinations:
17 Shoulder 81
Summary of common conditions seen in OSCEs
Condition
History
Symptoms and signs
Most common conditions
Adhesive capsulitis (frozen
shoulder)
Two phases: pain, then stiffness
Common in diabetics and middle-aged
patients (age around 50 years)
Lasts about 18 months
Pain often worse at night
Pain in all directions of movement
Worse on external rotation
Rotator cuff impingement
(supraspinatus tendonitis)
Pain on abduction
Pain on abduction in characteristic ‘arc’ (70–120
degrees)
Rotator cuff tear
Trauma
Cannot lift objects above head
Pain on abduction in characteristic arc (70–120 degrees)
Pain worse on resisted abduction
Active movements more painful than passive movements
Others – inflammatory/
degenerative
Biceps tendonitis
Anterior shoulder pain
Pain lifting heavy objects
Tenderness at bicipital groove upon palpation
Calcific tendonitis
Three different presentations:
• Sporadic flares, mild pain, chronic
• Obstruction of elevation of shoulder due
to calcific deposit
• Acute pain with inflammatory symptoms
Stiffness, weakness, crepitus. Radiation of pain from
shoulder tip to deltoid insertion
Decreased range of movement, painful arc 70–120
degrees
Pain on abduction of shoulder or lying on shoulder
Acromioclavicular joint
arthritis
Decreased range of movement
Pain at tip of shoulder
Pain on overhead lifting
Pain with cross-body movements
Tenderness upon palpation at the acromioclavicular joint
Rotator cuff tendonitis
Pain over shoulder at night
Painful arc relieved by external rotation, worsens with
internal rotation
Others – conditions
causing instability
Acute anterior dislocation
Trauma
Decreased range of movement
Humeral head projects anteriorly
Axillary nerve palsy
Deltoid muscle dysfunction
Acute posterior dislocation
Seizures
Elderly
Electric shock
Limitation of external rotation
Recurrent shoulder instability
Young
Trauma
Joint laxity: Ehlers–Danlos syndrome
Examine other joints for laxity, including hands, elbows
and knees
Sulcus sign
Load shift sign
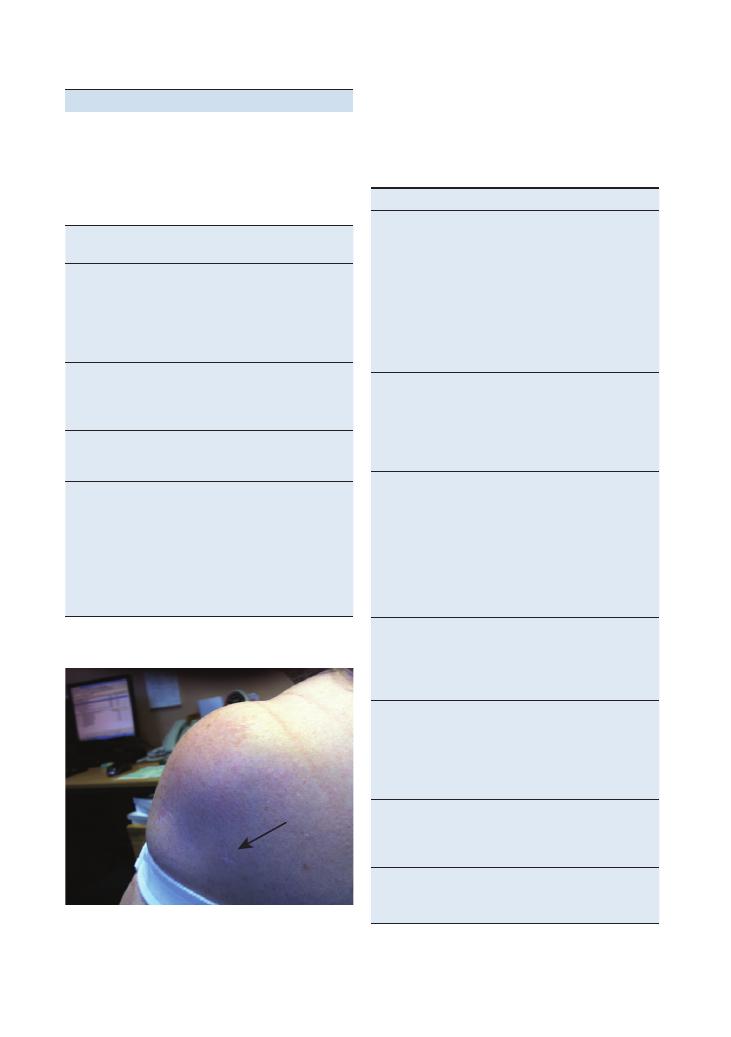
82
Examinations:
17 Shoulder
Figure 17.1 Arthroscopy insertion site
Movement
Muscle
Flexion
0–60 degrees
• Pectoralis major
• Biceps brachii
• Anterior deltoid
• Coracobrachialis
60–120 degrees
• Trapezius
• Serratus anterior
120–180 degrees
• Deltoid plus the all the above muscles
Extension
0–20 degrees
• Teres major
• Deltoid
20–50 degrees
• Rhomboids
• Trapezius
Abduction
0–90 degrees
• Supraspinatus
• Deltoid
90–150 degrees
• Serratus anterior
• Trapezius
150–180 degrees
• Serratus anterior plus all the above
muscles
Adduction
0–50 degrees
• Coracobrachialis
• Teres major
• Latissimus dorsi
• Pectoralis major
Internal rotation
0–70 degrees
• Subscapularis
• Teres major
• Latissimus dorsi
• Pectoralis major
• Deltoid
External rotation
0–90 degrees
• Teres minor
• Deltoid
• Infraspinatus
Circumduction
All the muscles listed above as being
involved in extension, adduction, flexion
and abduction
Scar
Location of
incision
Indication
Anterior
Lateral side of
clavicle
downwards
following medial
border of
deltoid muscle
Shoulder replacement
Open reduction/internal
fixation of fracture of
humerus
Posterior
Along border of
scapular spine
Fractures of scapula or
glenoid neck
Posterior stabilisation
surgery
Superior strap
Lateral to the
border of the
acromion
Rotator cuff surgery
Arthroscopy
portals
(Figure 17.1)
Through deltoid
and posterior
lateral edge of
acromion
Adhesive capsulitis
Loose bodies
Chronic synovitis
Impingement syndrome:
rotator cuff tears
and tendonitis
Osteoarthritis
Shoulder instability
Hints and tips for the exam
Know your scars
Upon inspecting the patient, you may be faced with a
multitude of scars, the indications for which may help
with your diagnosis.
Know your muscle groups
The following muscles are responsible for the move-
ments elicited within the shoulder examination.
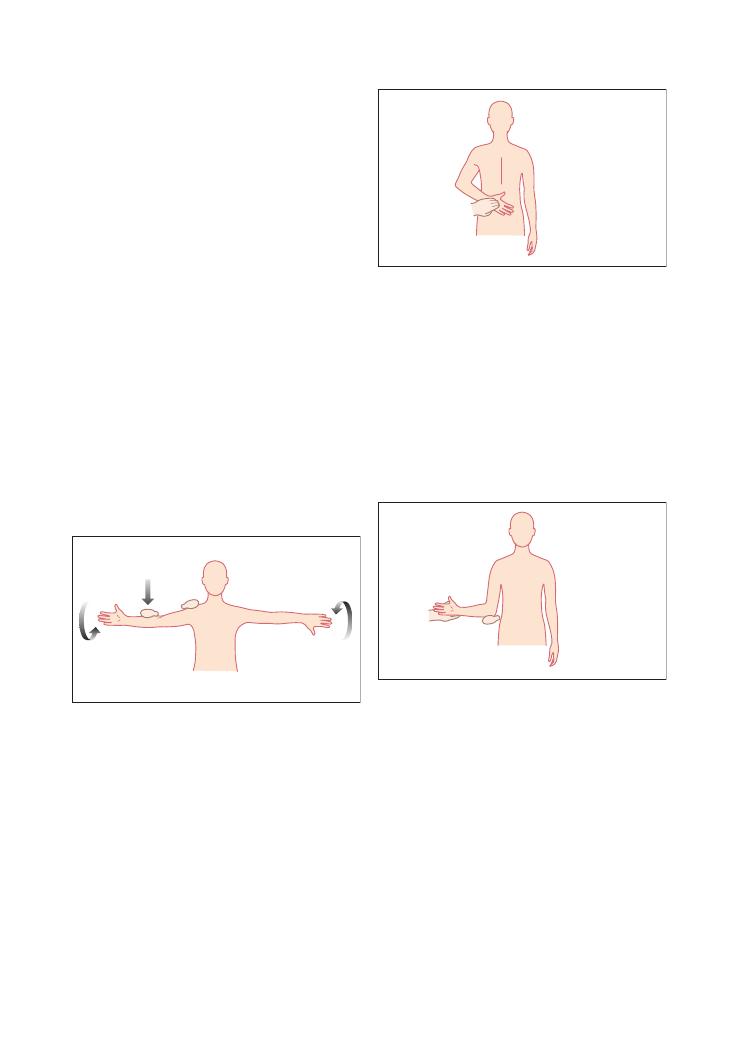
Examinations:
17 Shoulder 83
Infraspinatus and teres minor test
Aim – To test for infraspinatus and teres minor
weakness.
Patient position – The patient stands with the arm
by the side, with the elbow flexed to 90 degrees.
Clinician position – The clinician stands next to the
arm, stabilising the elbow and wrist while the patient
resists external rotation.
Clinical significance –
• Positive test: Pain and weakness indicate a rotator cuff
tear.
• Negative test: Good resistance, no pain or weakness.
Impingement tests
Hawkins–Kennedy test
Aim – To assess for impingement.
Patient position – The patient stands with the arm
flexed to 90 degrees and the elbow flexed to 90 degrees.
Clinician position – The clinician stabilises the
elbow and wrist, and swiftly passively internally rotates
the arm.
Clinical significance –
• Positive test: Pain upon internal rotation. This action
creates impingement of the structures of the greater
tuberosity of the humerus against the coracohumeral
ligament.
• Negative test: No pain.
An easy way to remember the names of the muscles that
form the rotator cuff is to use the mnemonic SSIT:
• Subscapularis
• Supraspinatus
• Infraspinatus
• Teres minor
Know your special tests
There are many ‘special tests’ you can do when examin-
ing the shoulder, but if time is limited you may have to
utlilise them selectively.
Rotator cuff tests
Empty can test
Aim – To assess the supraspinatus.
Patient position – The patient stands with the arms
abducted to 90 degrees. The hand imitates holding
an empty can for full internal rotation and imitates
holding a full can with thumbs up for external
rotation.
Clinician position – The clinician stands behind the
patient applying downward stress at the mid-forearm
while stabilising the patient’s shoulder joint.
Clinical significance –
• Positive test: Weakness, pain located in the subacro-
mial region
• Negative test: No pain or weakness
Downward pressure
by examiner
External rotation
Internal rotation
Lift off test
Aim – To test for a subscapularis tear.
Patient position – The patient stands with the shoul-
der held in a position of internal rotation. The patient’s
hand gently rests on the lumbar spine.
Clinician position – The clinician passively lifts the
hand from the lumbar spine.
Clinical significance –
• Positive test: If the arm extends and the patient is
unable to maintain the position of internal rotation,
this is evidence of a subscapularis tear.
• Negative test: The arm is maintained in an position
of internal rotation.
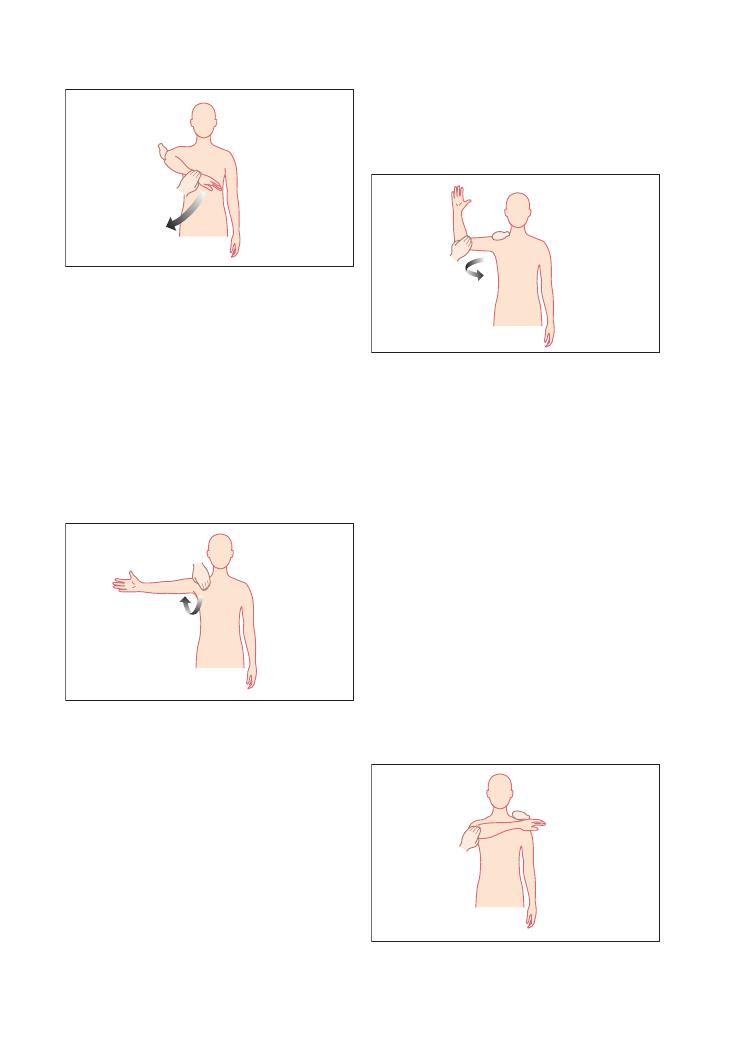
84
Examinations:
17 Shoulder
elicited at the point of full external rotation, extension
and abduction, the ideal position from which to dislo-
cate the shoulder.
• Negative test: No pain or fullness at the shoulder
joint.
Sulcus sign
The arm is gently pulled downwards, creating an
observable enlarged subacromial space and a clear deep
skin sulcus.
Load shift sign
Anterior or posterior dislocation can be detected by
gripping the humerus with one hand and grasping the
scapula with the other hand. The injured shoulder joint
will shift more with movement than it does on the
normal side.
Test for acromioclavicular joint: Scarf test
Aim – To assess for acromioclavicular joint pathology.
Patient position – The patient sits with the arm
abducted to 90 degrees and the elbow flexed to 90
degrees with the palms supinated.
Clinician position – The clinician attempts forcibly
to adduct the flexed arm across the chest while support-
ing the posterior aspect of the shoulder on contralateral
side.
Clinical significance –
• Positive test: Pain on the posterior aspect of the
affected side.
• Negative test: No pain.
Neer’s impingement test
Aim – To assess for subacromial impingement.
Patient position – The patient stands or sits relaxed
with the arms in the anatomical position and allows the
clinician to carry out the passive movement.
Clinician position – The clinician passively raises
the patient’s arm in a pronated position while stabilis-
ing the scapula to prevent scapulothoracic movement.
Clinical significance –
• Positive test: Pain upon abduction in the subacromial
space or anterior edge of the acromion. This demon-
strates impingement of the long head of the biceps,
supraspinatus or infraspinatus.
• Negative test: No pain upon full flexion.
Tests for instability
Anterior instability test
Aim – To assess for anterior instability of the gleno-
humeral joint.
Patient position – The patient lies supine with the
arm abducted to 90 degrees and the elbow flexed to 90
degrees.
Clinician position – The clinician attempts to exter-
nally rotate the arm to 90 degrees and gently pushes
downwards on the anterior aspect of the humerus,
assessing the degree and direction of instability.
Clinical significance –
• Positive test: An anterior fullness can be palpated that
denotes subluxation of the glenohumeral joint. Pain is

Examinations:
17 Shoulder 85
Brachial plexus
Long thoracic
nerve injury
Suprascapular
nerve injury
Musculocutaneous
nerve injury
Aetiology
Fall on shoulder
Traction of arm
Entrapment from
backpacking,
weightlifting or volleyball
Frontal blows
Symptoms/signs
Paraesthesia
Upper limb weakness
Does not typically affect
motor component
Serratus anterior palsy
– winging of
scapula medially
Spinal accessory nerve
palsy – winging of
scapula laterally
Supraspinatus and
infraspinatus weakness
Muscle – weak elbow flexion
and forearm supination
Absent biceps tendon reflex
Cutaneous – sensory loss
over lateral and volar
aspects of forearm
Management
Conservative:
• Rest
• Anti-inflammatories
• Physiotherapy
Conservative:
• Rest
• Anti-inflammatories
• Physiotherapy
Conservative:
• Rest
• Anti-inflammatories
• Physiotherapy
Conservative:
• Rest
• Anti-inflammatories
• Physiotherapy
Know your shoulder nerves and how they could be affected by a shoulder injury
Shoulder injuries are common and can often result in nerve injuries producing classical signs that are ideal for
OSCE situations. We have summarised the common ones in the table.
Winging of the scapula
The scapula, also known as the shoulder blade, has a
multitude of muscles attached to it in order to create
fluid shoulder movement. Dysrhythmia relates to the
abnormal movement of these antagonist and agonist
muscles when one or many muscles do not function.
The result is ‘winging of the scapula’ – the protrusion
of the medial border of the scapula.
The most common cause is paralysis of the serratus
anterior muscle, but other causes must not be excluded
as follows:
• Trapezius muscle paralysis
• Dislocation of the acromioclavicular joint, causing
rupture of the coracoclavicular ligaments
• Secondary to pain – an overcompensation of
movement
• Brachial plexus injury
• Recurrent dislocations of the shoulder
• Facioscapulohumeral dystrophy – an inherited bilat-
eral displacement
Referred pain
Shoulder pain is not an exclusive symptom confined to
this joint. Other causes not directly related to the shoul-
der may cause pain, falling under the umbrella of
referred pain. These include:
• Cervical spine trauma
• Myocardial ischaemia
• Referred diaphragmatic pain, such as from gallblad-
der disease
• Malignancy, for example apical lung disease
Therefore, upon examining your patient, ensure you do
not forget to examine the other systems if you suspect
an alternative cause.
Thoracic outlet syndrome – a rare but
serious condition
Thoracic outlet syndrome deserves a special mention.
Although it is not a common cause of shoulder pain, it
is an important diagnosis that must not be missed.
Anatomy
Thoracic outlet syndrome relates to the compression of
the following structures within the small anatomical
space of the interscalene triangle:
• Neurology: Brachial plexus (B)
• Venous: Subclavian artery (A)
• Arterial: Subclavian vein (V)
The diagram shows how these structures pass through
the interscalene triangle.
A
B
V
Anteriorly –
Scalene muscle
Posteriorly –
Middle scalene
Inferiorly –
First rib

86
Examinations:
17 Shoulder
Aetiology
• Venous: thrombosis of the subclavian vein
• Arterial: subclavian artery stenosis or aneurysm
• Neurological: repetitive strain injury, for example
keyboard typing, or trauma.
Presentation
• Venous: pain in the shoulder, engorgement of the
veins producing a unilateral swollen arm
• Arterial: pulseless, pain, paraesthesia, paralysis,
pallor (the ‘5Ps’)
• Neurological:
• Involvement of the roots of C8 and T1 is most
common, with pain and paraesthesia in the ulnar
nerve distribution.
• The second most common root involvement is of
C5, C6, C7, with pain and paraesthesia in the median
nerve distribution.
• Special tests: elevated arm stress test (EAST):
• The shoulder is abducted to 90 degrees and the
hand alternately makes a grip and then an extended
gesture for 3 minutes.
• Positive test:
• The patient cannot continue for a full 3 minutes
due to reproduction of the symptoms.
• Negative test
• The patient can continue for the whole 3 minutes.
• Patients with carpal tunnel syndrome will dem-
onstrate paraesthesia but not shoulder pain.
Differential diagnoses
• Rotator cuff injury
• Multiple sclerosis
• Acute coronary syndrome
• Spinal cord injury
Investigations
• Imaging:
• Chest X-ray:
• First rib deformity
• Clavicle deformity
• Pancoast tumour
• Cervical radiography: bony deformity
• Doppler ultrasound: obstruction
• Venography: thrombosis
• Arteriography: emboli, aneurysm, stenosis
• MRI: cervical spine disease
• Nerve conduction tests
Treatment
• Physiotherapy
• Anticoagulation
• Vascular surgery
Questions you could be asked
Q. How would you do a 2-minute screening test for all
the major shoulder muscle groups?
Q. How would you distinguish between a rotator cuff
impingement syndrome and a rotator cuff tear?
Q. What are the common nerve palsies resulting from
shoulder injuries, and what are their signs?
Q. What is thoracic outlet syndrome, and how would
you manage it?
A. Answers to these questions are to be found in the
text above.

87
18 Hand
Checklist
P
MP
F
HELP
H: ‘Hello’ (introduction and gains consent)
E: Exposure (hands ideally up to elbows)
L: Lighting
P: Positions correctly (supine, ideally resting on a
desk or table), asks if the patient is in any pain
Washes hands
Observation:
• Skin: scars, colour, rashes, thinning (steroid
use), bruises, wrist/elbow nodules
• Nails: clubbing, splinter haemorrhages, pitting,
onycholysis, nailfold vasculitis
• Joints: erythema, swelling, deformity
• Muscle: wasting, fasciculation
• Posture: characteristic abnormalities (e.g. claw
hand)
• Observes and palpates the elbows for
rheumatoid nodules
• Looks behind the ears for psoriatic plaques
Palpation:
• Temperature
• Radial pulses
• Muscle bulk (thenar and hypothenar
eminences)
• Palmar fascia
• Squeeze across metacarpophalangeal joints
• Bimanual palpation of individual joints
• Bony swellings
• Sensation in radial, median and ulnar nerve
territories
Movement (active and passive):
• Wrist:
• Pronation
• Supination
• Flexion
• Extension
• Abduction
• Adduction
Checklist
P
MP
F
• Digits:
• Flexion and extension at
metacarpophalangeal and proximal
interphalangeal joints
• Abduction and adduction (spread fingers
apart)
• Grip (making a fist)
• Thumb:
• Abduction
• Adduction
• Extension
• Flexion
• Opposition with 5th digit
Special tests:
• Tinel’s/Phalen’s tests
• Froment’s sign
Function:
• Pincer grip
• Squeezing student’s fingers
• Doing up buttons
• Opening jar
Offers to examine elbow and shoulder
Offers to examine neurovascular function in detail
Thanks patient
Offers to help patient get dressed
Washes hands
Presents findings
Offers appropriate differential diagnosis
Suggests appropriate further investigations and
management
OVERALL IMPRESSION:

88
Examinations:
18 Hand
Summary
of
common
conditions
seen
in
OSCEs
Disease
Look
Feel
Move
Special
test
Function
Examiner
questions
Carpal
tunnel
syndrome
W
asted
abductor
pollicis
brevis
Loss
of
sensation
over
median
nerve
territory
Signs
of
rheumatoid
arthritis
(discussed
below)
Signs
of
hypothyroidism
(see
Chapter
9)
NAD
NAD
Positive
Tinel’
s
and
Phalen’
s
tests
W
eak
pincer
grip
What
are
the
causes
of
carpal
tunnel
syndrome?
How
is
it
managed?
Radial
nerve
palsy
Wrist
drop
Reduced
sensation
in
skin
over
dorsal
area
of
root
of
thumb
Wrist
and
digit
extension
against
resistance
is
weak
ened
NAD
What
are
the
causes?
Ulnar
nerve
palsy
Claw
hand
Reduced
sensation
over
medial
one-and-a-half
digits
W
eakness
of
abductor
pollicis
brevis
and
dorsal
interossei
Digit
abduction/
adduction
is
weak
ened
NAD
Difficulty
with
performing
any
tasks
, e
.g.
opening
jar
, pincer
grip
What
is
the
ulnar
nerve
palsy
par
ado
x?
Rheumatoid
arthritis
Symmetrical
red,
swollen
pro
ximal
interphalangeal,
metacarpophalangeal
and
wrist
joints
Ulnar
deviation
of
digits
Boutonnière
and
sw
an
neck
deformities
of
digits
Z-deformity
of
thumb
W
asting
of
small
muscles
of
hand
Affected
joints
are
painful
and
feel
boggy
Restricted
movement
at
affected
joints
NAD
Function
may
be
restricted
or
lost
What
are
the
different
w
ays
in
which
rheumatoid
arthritis
can
present?
What
is
the
treatment
of
rheumatoid
arthritis?
What
factors
are
associated
with
a
poor
prognosis
in
rheumatoid
arthritis?

Examinations:
18 Hand 89
Disease
Look
Feel
Move
Special
test
Function
Examiner
questions
Psoriatic
arthritis
Asymmetrical
swelling
of
distal
interphalangeal
joints
Symmetrical
poly
arthritis
indistinguishable
from
rheumatoid
arthritis
Psoriatic
plaques
on
extensor
aspect
of
elbows
Pitting/onycholysis
of
nails
Affected
joints
are
painful
and
feel
boggy
, telescoping
of
digits
(in
arthritis
mutilans)
Restricted
movement
at
affected
joints
NAD
Function
may
be
restricted/lost
What
are
the
patterns
of
joint
involvement
in
psoriatic
arthritis?
Nodal
osteoarthritis
Heberden’
s/Bouchard’
s
nodes
Squaring
of
base
of
thumb
Bony
hard
swellings
at
nodes
Pain
on
palpation
of
affected
joints
(wrist,
1st
carpometacarpal,
distal
interphalangeal)
Crepitus
Restricted
movement
at
affected
joints
NAD
Function
may
be
restricted
or
lost
What
X-r
ay
changes
are
associated
with
osteoarthritis?
How
is
osteoarthritis
treated?
What
are
the
indications
for
surgery?
Systemic
sclerosis
Sausage-lik
e
digits
(sclerodactyly)
Heliotrope
rash
across
knuckles
Microstomia
with
furrowing
of
skin
around
mouth
on
observ
ation
of
face
Loss
of
normal
skin
creases
Tight
skin
tethered
to
underlying
structures
Flexion
contr
actures
of
joints
Difficulty
achieving
full
extension
of
digits
NAD
NAD/difficulty
forming
a
fist
What
antibodies
are
associated
with
the
two
types
of
systemic
sclerosis?
How
is
it
managed?
Dupuytren’
s
contr
acture
Fifth
digit
held
in
partial
flexion
Thick
ened
palmar
fascia
Difficulty
extending
5th
digit
NAD
NAD
What
are
the
causes
of
this
condition?
Trigger
finger
Fixed
flexion
of
affected
finger
Palpable
nodule
over
tendon
of
affected
finger
Finger
in
fixed
flexion
can
be
‘flick
ed’
into
extension
NAD
What
is
the
treatment
of
this?
De
Querv
ain’
s
tenosynovitis
Affected
tendons
are
swollen
(abductor
pollicis
longus
,
extensor
pollicis
brevis)
Trigger
finger
or
thumb
Affected
tendon
is
tender
to
palpate
and
crepitus
is
felt
If
nodules
develop
on
affected
tendons
, finger
may
have
to
be
flick
ed
to
complete
movement
when
tendon
catches
NAD
W
eak
ened
pincer
grip
with
thumb
What
is
the
treatment
of
this
condition?
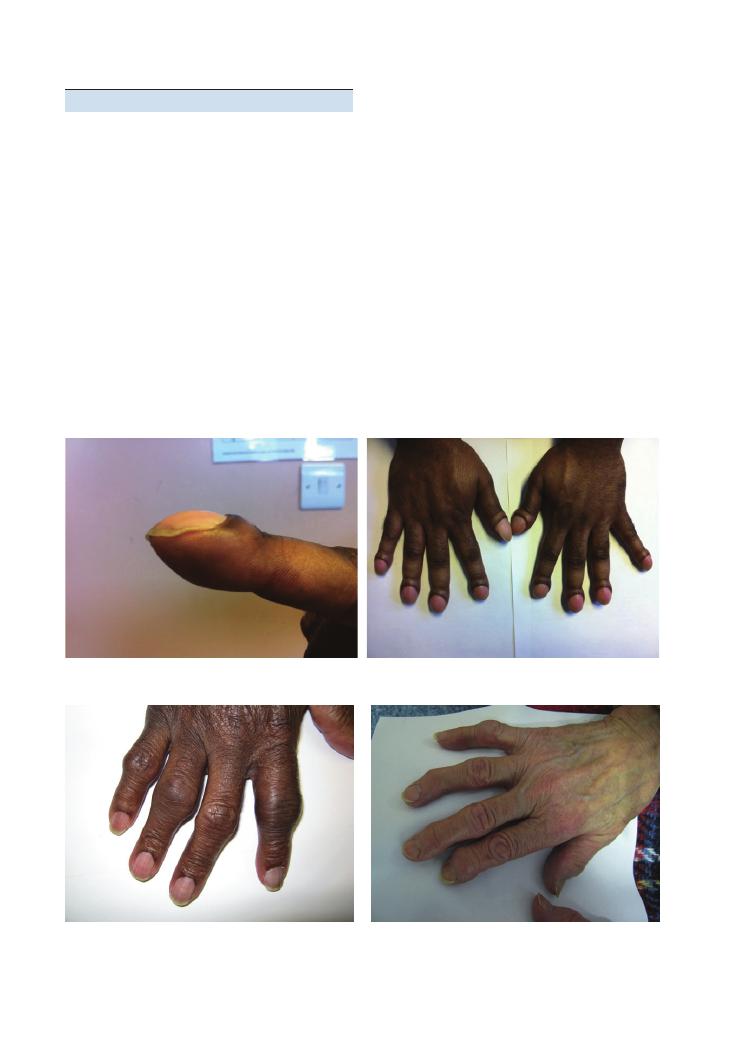
90
Examinations:
18 Hand
Hints and tips for the exams
Doing the examination
• Careful observation is very important because
most hand diagnoses such as scleroderma, rheumatoid
arthritis (RA) and common nerve palsies can often be
picked up on observation alone. State what you see but
do not list all the negatives.
• Feel the temperature using the back of your hand
over the wrist and metacarpophalangeal (MCP) joints
to check for joint inflammation.
• Bimanual palpation of joints: Squeeze gently with
the index finger and thumb in an anteroposterior direc-
tion with one hand and in a mediolateral direction with
the other hand.
• Get the patient to shut their eyes and familiarise them
with the test for sensation by touching the chest.
• Radial nerve: Touch over the web space between
the thumb and index finger on the posterior surface
of the hand.
Figure 18.1 Severe clubbing
(a)
(b)
Figure 18.2 Bouchard’s nodes
Figure 18.3 Heberden’s and Bouchard’s nodes in osteoarthritis
• Median nerve: Touch over the thenar eminence.
• Ulnar nerve: Touch over the hypothenar eminence.
• Fix the elbow by pinning it to the patient’s side before
testing supination and pronation. Test wrist abduction
and adduction with the elbow in the same position. Test
flexion and extension at the wrist by asking the patient
to perform the prayer and inverse prayer positions.
• When testing movement at a particular joint, use
your other hand to fix the joint above that being tested.
Performing the special tests
• Tinel’s test: Extend the wrist and tap over the carpal
tunnel to see whether symptoms of carpal tunnel syn-
drome can be reproduced.
• Phalen’s test: Forced flexion of the wrists for 60
seconds can reproduce the symptoms of carpal tunnel
syndrome.
• Froment’s sign: This is a test for ulnar nerve palsy.
If the thumb adductor is weak, the interphalangeal joint
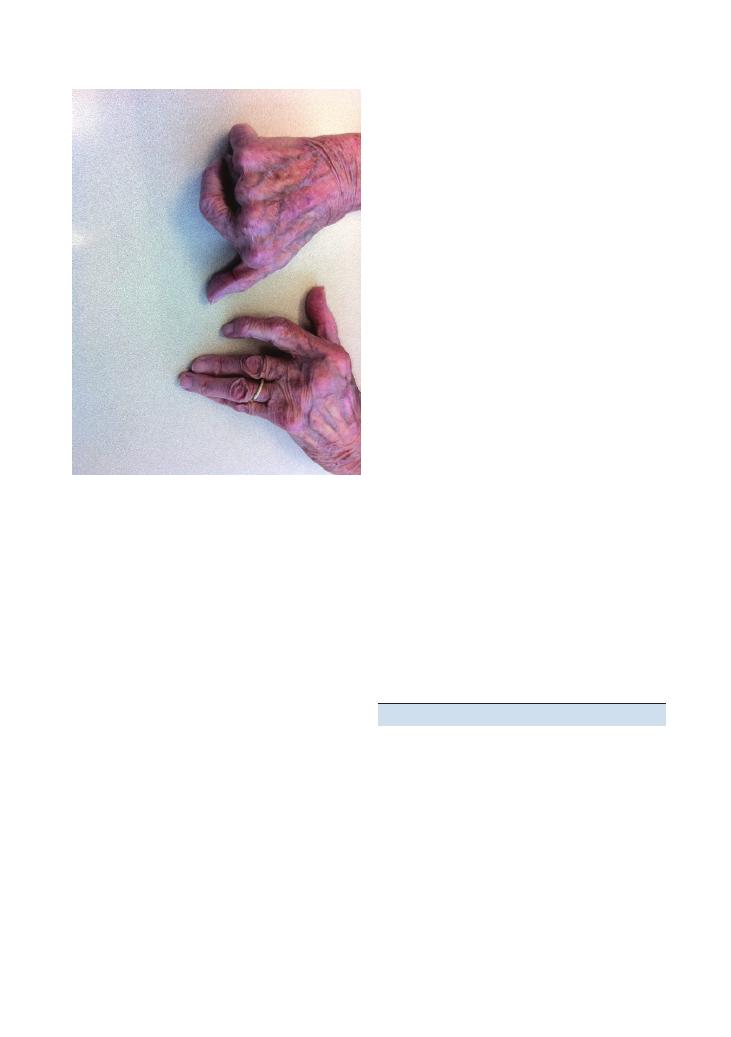
Examinations:
18 Hand 91
Figure 18.4 (a, b) Ulnar deviation in rheumatoid arthritis
Common variations at this station
• Task (7–10 minutes): ‘This is a 29-year-old who com-
plains of painful hands. Take a brief focused history and
examine the patient’s hands.’
There are some key questions to ask in the focused
history (see also Chapter 40 on history of joint pain for
more detail):
• Are your joints stiff in the morning?
• Which joints are involved?
• Are there any extra-articular features?
• Is there any functional impairment?
• Task (7–10 minutes): ‘Perform a GALS screen of
this patient’s musculoskeletal system and then examine
the hands’. You should aim to spend no more than
2–3 minutes performing the GALS screen at this
station. Look particularly for large-joint pathology,
axial involvement and psoriatic plaques.
• Task (5–10 minutes): ‘This patient complains of pins
and needles in her hand at night. Examine her hands and
then give her some brief advice on management.’
• This is probably the most difficult variation at this
station. This type of scenario is frequently tested in
finals OSCEs, and it is important to follow the generic
structure:
• Confirmation of diagnosis (e.g. nerve conduction
studies)
• Conservative measures: splinting, weight loss
• Medical measures: analgesia, treatment of underly-
ing disorders
• Steroid injections
• Surgery: surgical decompression of the carpal
tunnel
• Safety netting: for example, carpal tunnel syn-
drome can be a first presentation of RA so you must
tell your patient to report development of any joint
pain or extra-articular features
Questions you could be asked
Q. What are the causes of carpal tunnel syndrome?
A. Pregnancy, RA, osteoarthritis, acromegaly, diabetes
mellitus, hypothyroidism, obesity and idiopathic.
Q. How is it carpal tunnel syndrome managed?
A. For management, see the main text above.
Q. What are the causes of radial nerve palsy?
A. Fracture of the humeral shaft, elbow fracture/injury,
forearm injury (the posterior interosseous branch
passes between the two heads of the supinator muscle)
or as part of mononeuritis multiplex.
Q. What is the treatment of RA?
A. Analgesia, disease-modifying antirheumatic drugs
(including methotrexate), anti-tumour necrosis factor
of the thumb flexes when an attempt is made to pull
out a piece of paper held between the thumb and index
finger.
• Finkelstein’s test: This is performed if De Quervain’s
tenosynovitis is suspected. The thumb is flexed, and the
fingers are then flexed over it to form a fist (with the
thumb under the fingers). The wrist is then adducted
– if this causes pain, the test is positive and confirms
De Quervain’s tenosynovitis.
Presenting the findings
This is where most candidates slip up, especially if
several hand joints are involved. As usual, it is wise
to start by stating any obvious abnormalities that
strongly point to a diagnosis. If several joints are
involved, do not individually state each joint that is
involved. This is very time-consuming, is boring for the
examiner and adds little information to your presenta-
tion. A better approach is to state the groups of joints
involved and the disease this pattern is consistent with,
for examples ‘The wrists, PIP and MCP joints are red,
hot and swollen in a symmetrical distribution; this is
consistent with a diagnosis of RA.’

92
Examinations:
18 Hand
medications, and intramuscular or oral steroids (for
exacerbations).
Q. What factors are associated with a poor prognosis
in RA?
A. Rheumatoid nodules, positive rheumatoid factor,
systemic symptoms and late onset of joint involvement.
Q. What are the different patterns of joint involvement
in psoriatic arthritis?
A. Symmetrical polyarthritis involving the small joints
of the hands, synovitis of the distal interphalangeal
joints, asymmetrical oligoarthritis, axial arthritis and
arthritis mutilans.
Q. What X-ray changes are associated with
osteoarthritis?
A. Loss of joint space, subchondral sclerosis, subchon-
dral cysts and osteophytes.
Q. How is osteoarthritis treated?
A. • Conservative: for example, walking aids and
weight loss
• Medical: topical or oral analgesics, steroid injec-
tions for rapid pain relief.
• Surgical: for example, arthroscopy and partial or
complete joint replacement
Q. What are the indications for surgery in
osteoarthritis?
A. Persistent severe pain or stiffness not amenable to
medical management, and loss of joint function.
Q. What antibodies are associated with the two types
of systemic sclerosis?
A. For limited disease, anticentromere antibodies, and
for diffuse disease anti-scl70
+ anti-RNA polymerase in
about 20–30% of patients.
Q. How is systemic sclerosis managed?
• Conservative: for example, gloves
• Medical: for example, immunosuppression to
control disease activity, antihypertensives, angi-
otensin-converting enzyme inhibitors to decrease
the chance of renal crisis, and drugs to reduce pul-
monary hypertension
Q. What is the treatment of trigger finger?
A. Steroid injections and surgery.
Q. What is the treatment of De Quervain’s
tenosynovitis?
A. Thumb splinting, steroid injections and surgery.
Q. What are the predisposing factors for Dupuytren’s
contracture?
A. White ethnicity, family history, chronic liver disease
(particularly secondary to alcohol), diabetes mellitus,
chronic obstructive pulmonary disease, epilepsy and
antiepileptic medication.

93
19 Hip
Checklist
P
MP
F
HELP
H: ‘Hello’ (introduction and gains consent)
E: Exposure (nipples to knees/down to groins)
L: Lighting
P: Positions correctly (supine), asks if the patient
is in any pain
Washes hands
Inspects from the end of the bed for relevant
paraphernalia:
• Walking stick
• Zimmer frame
Assesses gait:
• Symmetry (symmetrical – normal, parkinsonian,
marche à petits pas, wide-based; asymmetrical
– hemiplegic gait, antalgic, orthopaedic)
• Size of paces (normal – waddling, small
– parkinsonian, marche à petits pas)
• Distance between feet (normal, scissoring,
cerebellar, broad-based)
• Knees (normal, high-stepping)
• Painful gait (arthritis, trauma)
• Phases of walking (heel strike, stance, push-off,
swing)
• Arm swing (present or absent)
Inspection (patient standing, inspect all around
patient, 360 degrees):
• Skin – trophic, sinuses, scars (e.g. total hip
replacement)
• Muscle (gluteal muscle bulk)
• Leg length (disparity)
• Bony deformity (scoliosis)
• Posture (lumbar lordosis for fixed flexion
deformity)
• Erythema/swelling (rheumatoid arthritis,
osteoarthritis, trauma, tumour, septic arthritis)
• Position (degree of rotation of leg, fixed flexion
deformity)
Checklist
P
MP
F
Trendelenburg test (see below)
Measure (patient lying):
• Leg length
Palpate (patient lying):
• Skin – temperature (infection, inflammation)
• Bone – tenderness (fracture, trochanteric
bursitis, labral tears)
Move (patient lying):
• Flexion (normal: flexion arc 0–120 degrees)
• Extension (patient prone, normal: 0–10
degrees)
• Abduction (normal: 0–40 degrees)
• Adduction (normal: 0–25 degrees)
• Rotation (normal: internal 0–45, external
0–60)
• Assess pain and any reduction in range of
movement (ROM)
Special tests (patient lying):
To assess the joint:
• FABER test
• FAIR test
To assess the muscles and tendons:
• Thomas test
Thanks patient
Offers to help patient get dressed
Washes hands
Offers to examine sacroiliac (joint above) and
knee (joint below)
Offers to examine neurovascular function of
lower limbs
Presents findings
Offers appropriate differential diagnosis
Offers appropriate investigations and
management plan
OVERALL IMPRESSION:

94
Examinations:
19 Hip
Summary of common conditions seen
in OSCEs
Painful hip
Condition
History
Symptoms and signs
Osteoarthritis
Primary
Secondary – infection, trauma,
developmental dysplasia of the hip
Local
Pain on weight-bearing
Restricted ROM
Referred pain – knee, buttocks
Flexion contracture
Rheumatoid arthritis
Morning stiffness
Age younger than for osteoarthritis
Muscle wasting
Bilateral pain
Trophic skin changes
Avascular necrosis of
the hip
Trauma
Alcohol intake
Gout
Diabetes
Groin pain upon walking
Stiffness
Bursitis
Repetitive movement – ballet,
rowing, dancing
Trochanteric – pain on adduction
Ischiogluteal – pain upon sitting for long periods
Spondyloarthropathies
Ankylosing spondylitis
Inflammatory bowel disease
Psoriatic arthritis
Painful sacroiliac joint referred to the lower buttock and thigh
Pain elicited by extension and compression of the hip
Piriformis syndrome
Compression of the sciatic nerve
Pain upon sitting
Septic arthritis
Immunocompromised
Fever
Acute pain
Erythema
Swelling
Hot
Decreased motion
Gait abnormalities you may encounter in a hip station
Type of gait
Pathology
Condition
Waddling
(Trendelenburg)
Weak proximal muscles
Muscular dystrophy
Congenital hip dysplasia
Parkinsonian
Basal ganglion dysfunction
Parkinson’s disease
Drugs – phenothiazines, haloperidol, thiothixene, metoclopramide
Carbon monoxide poisoning
Scissoring
Spastic paraparesis
Multiple sclerosis
Cord compression
Cerebral palsy
Syringomyelia
Pernicious anaemia
Liver failure
Cerebellar ataxia
Ipsilateral cerebellar lesion
Multiple sclerosis
Alcohol
Stroke/transient ischaemic attack
Foot drop
Common peroneal nerve palsy (unilateral)
Trauma to knee
Fracture of fibula
Marche à petits pas
Diffuse cerebrovascular disease – lacunar state
Sensory ataxia
Peripheral neuropathy
Diabetes
Alcohol intake
Multiple sclerosis
Antalgic gait
Trauma
See table above
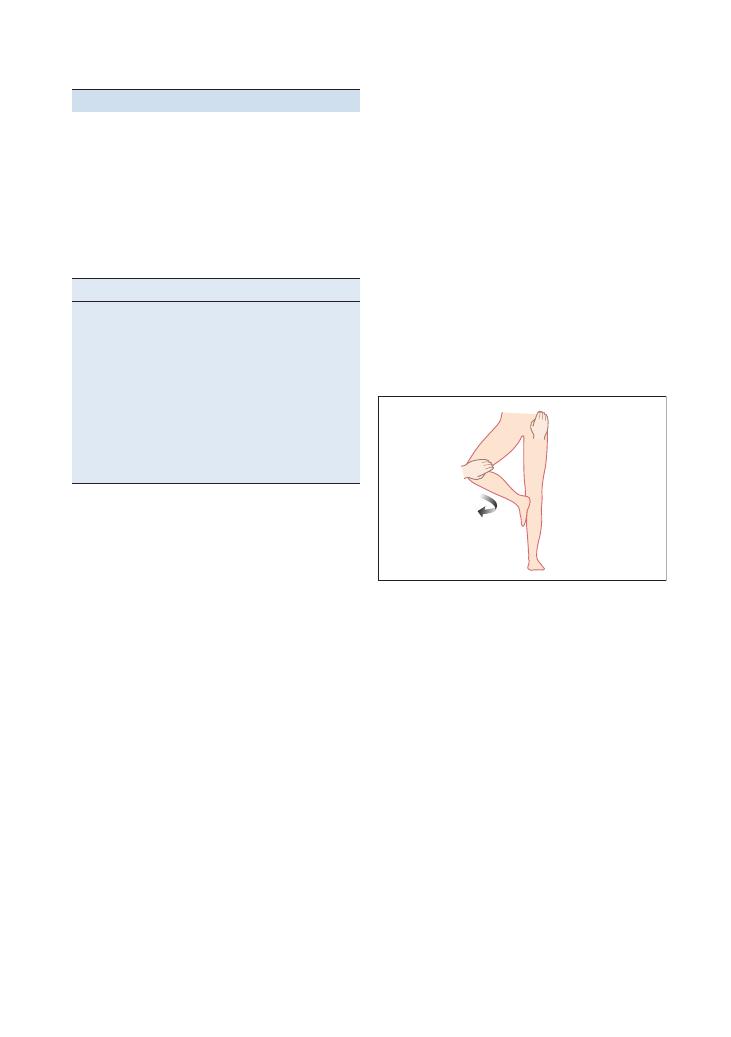
Examinations:
19 Hip 95
Movement
Muscles
Flexion of hip
Iliacus
Psoas major
Extension of hip
Hamstring muscles
Gluteus maximus
Adduction of hip
Adductor brevis
Adductor longus
Adductor magnus
Abduction of hip
Gluteus medius
Gluteus minimus
Lateral rotation of hip
Tensor fasciae latae
Gluteus medius and minimus
Hints and tips for the exam
Know your anatomy
The hip is a ball and socket joint in which the acetabu-
lum is the ‘socket’ and the head of the femur is the ‘ball’.
This musculoskeletal structure is used for weight-
bearing and supporting bipedal movements. The fol-
lowing table exhibits the complexity of the muscular
origins of the hip movements and will help in diag-
nosing a labral tear if one is apparent in the hip
examination.
Special tests
Apparent limb length and true limb length
• Apparent limb length
= distance from the xiphister-
num to the medial malleolus bilaterally.
• True limb length
= distance between the anterior
superior iliac spine and the medial malleolus
bilaterally.
The clinical significance of this is that a fixed adduction
deformity of the hip can be diagnosed if the apparent
limb lengths are different but true limb lengths are
equal. In hip dislocations, Perthes disease or slipped
femoral epiphysis, there is a difference in true limb
length.
Trendelenburg test
Aim – To assess the abductor muscles of the hip (gluteus
medius, gluteus minimus).
Technique – If you are assessing the left hip, the
patient should stand upright, and then lift the right foot
off the ground while flexing the right knee. The right
hip should then move upwards as the left hip muscles
contract to pull it up.
• If this happens, the test is negative as the left hip
muscles are functioning normally.
• If the right hip sags down, the test is positive as the
left hip muscles are unable to contract and pull the
right hip upwards.
As easy way to remember this is that the ‘sound side
sags’ – is if there is sagging of the hip (i.e. it does not
move upwards when the foot is raised off the floor), the
defect is in the contralateral hip abductors.
FABER test
Aim – To assess hip joint pathology.
Technique –The patient lies supine with one leg
flexed at the knee and externally rotated. The ankle rests
upon the opposite knee joint. The patient extends the
flexed knee while pressure is applied over the hip and
knee joint by the examiner. This is repeated for the
opposite hip joint (FABER
= Flexion, Abduction, Exter-
nal Rotation).
Clinician’s position – The clinician stands by the
flexed knee and applies pressure to the medial aspect of
the knee and opposite hip joint.
Clinical significance –
• Negative test: No pain upon movement, equal range
of movement bilaterally, both knees are level at the end
of the examination.
• Positive test: Hip pain upon movement and
decreased ROM.
The pelvis articulates with the sacroiliac joint and the
lumbar spine. The iliopsoas muscle functions as a hip
flexor and external rotator of the femur. Thus, pressure
exerted upon the hip joint exerts tension on these struc-
tures, causing pain if pathology is present. Articular hip
pathology, for example synovitis or loose bodies, also
presents with pain upon movement.
FAIR test
Aim – To assess articular pathology.
Patient’s position – The patient lies in the lateral
recumbent position, the upper hip and knee both flexed
to 90 degrees.
Clinician’s position – The clinician stands placing a
stabilising pressure on the hip while depressing the
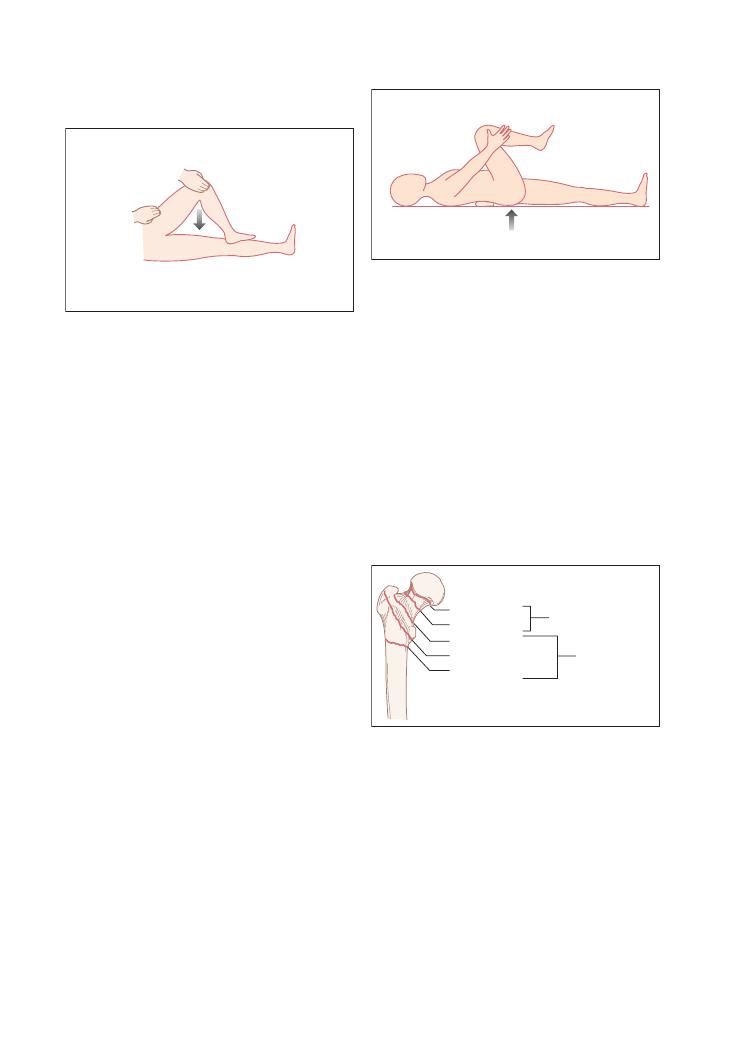
96
Examinations:
19 Hip
Management of hip fractures
There are some specific anatomical considerations to
bear in mind when deciding how a hip fracture should
be managed. The most important distinction is between
intracapsular and extracapsular fractures (the numbers
corresponding to the diagram below):
• Intracapsular fractures proximal to the capsular
insertion:
• (1) Subcapital
• (2) Transcervical
• Extracapsular fractures (trochanteric and subtro-
chanteric – which can be further subdivided into undis-
placed and displaced)
• (3) Basicervical
• (4) Intertrochanteric
• (5) Subtrochanteric
Subcapital
Transcervical
Intracapsular
Extracapsular
Basicervical
Inter-trochanteric
Sub-trochanteric
To understand the reasoning behind this, it is impor-
tant to appreciate the blood supply of the hip. The
femoral artery divides to form the medial and lateral
circumflex arteries, which act as an arterial ring around
the femoral neck. The posterior–superior retinacular
arteries ascend from the arterial ring and ultimately
form the lateral epiphyseal arteries. Thus, extracapsular
fractures have a decreased risk of avascular necrosis
due to the relatively extensive blood supply. In contrast,
the more distal the fracture is, as with intracapsular
fractures, the higher the risk of avascular necrosis – as
the blood supply there is relatively limited.
flexed knee, which internally rotates and adducts the
hip (FAIR
= Flexion, Adduction, Internal Rotation).
Clinical significance –
• Negative test: No pain upon movement or compres-
sion of the hip.
• Positive test: Sciatic symptoms are recreated. There
is hip pain upon movement.
The piriform muscle is attached to the superior
medial aspect of the greater trochanter and inserts into
the obturator internus. The piriform muscle has mul-
tiple functions, including acting as a flexor, abductor
and internal rotator of the hip. The sciatic nerve pierces
the piriformis muscle, so trauma or strenuous activity,
for example long-distance running, leading to inflam-
mation of the muscle, may compress the nerve, produc-
ing an intense shooting pain following the distribution
of the sciatic nerve. Reproduction of the symptoms is
achieved by the FAIR manoeuvre.
The psoas bursa is a fluid-filled sac that lies between
the psoas tendon and the lesser trochanter of the femur.
Strenuous repetitive exercise, such as ballet, rowing or
gymnastics, can cause psoas bursitis. The FAIR manoeu-
vre can indicate towards a psoas bursitis or articular
pathology if pain or an audible snap from the inguinal
region is elicited.
Thomas test
Aim – To assess for fixed flexion deformity.
Patient’s position – The patient lies supine, holding
one knee flexed.
Clinician’s position – The clinician slides their hand
under the spine and assesses the curvature of the
lumbar spine. A normal patient will exhibit a flat plane.
Clinical significance –
• Negative test: No flexion of the pelvis.
• Positive test: Increased lumbar lordosis. The hip
cannot remain extended and straight, and starts to flex.
The test is positive if a fixed flexion deformity is
present. A variety of pathologies can cause this, oste-
oarthritis being a common one.

Examinations:
19 Hip 97
Questions you could be asked
Q. Describe the blood supply to the hip, and
explain the implications for the management of a hip
fracture.
Q. Explain the surgical management of a fracture of
the neck of the femur.
A. The answers can be found in the text above.
Extracapsular fractures
A dynamic hip screw is implanted into the femoral
head, and a plate is fixed to the shaft of the femur with
further screws. The dynamic hip screw allows control-
led sliding of the femoral head component along the
construct.
Undisplaced intracapsular fracture
The approach is internal fixation with the insertion of
parallel screws that course through the neck and into
the head of the femur to hold it in position.
Displaced intracapsular fracture
•
<65 years and active patients undergo an open reduc-
tion and internal fixation.
•
>65 years and those with pre-existing joint pathol-
ogy have a hemiarthroplasty (replacing the femoral
head): Austin Moore prosthesis, which has three
components:
• Acetabular cup: cemented to the acetabulum.
• A femoral component: stem and femoral head
cemented/non-cemented to the shaft of the femur.
• Articular interface: between the acetabular cup and
the femoral component.
Figure 19.1 Total hip replacement

98
20 Knee
Checklist
P
MP
F
HELP
H: ‘Hello’ (introduction and gains consent)
E: Exposure (patient should undress down to
underwear, making sure the whole leg is
exposed)
L: Lighting
P: Position correctly (supine), asks if patient is in
any pain
Washes hands
Observation:
• Paraphernalia: walking stick, joint support,
wheelchair
• Skin: colour, rash, bruising, scars
• Joint: erythema, swelling
• Muscle: wasting (measures quadriceps
circumference)
• Popliteal fossa: swelling, nodules
• Posture: genu varus, genu valgus, flexion
deformity, patellar alignment
Palpation:
• Temperature
• Swellings
• Muscle bulk around joint
• Palpates medial joint line with knee flexed
• Palpates lateral joint line with knee flexed
• Palpates around borders of patella
• Palpates patellotibial ligament and tibial
tuberosity
• Palpates in popliteal fossa for Baker’s cyst
• Palpates for joint effusion using patellar tap
test or bulge test
Movement:
• Assesses degree of passive and active flexion
possible
• Assesses degree of passive and active
extension possible
• Assesses hyperextension
• Assesses for pain and crepitus
Checklist
P
MP
F
Special tests:
• Collateral ligaments:
• Flexes knee approximately 30 degrees
• Applies valgus strain to test for integrity of
medial collateral ligament:
• Technique: stabilises thigh just proximal
to knee, holds lower leg with other hand
just distal to knee, and moves medial
aspect of lower leg laterally
• Pain
+ movement indicates medial
collateral ligament damage
• Applies varus strain to test for integrity of
lateral collateral ligament:
• Technique: stabilises thigh just proximal
to knee, holds lower leg with other hand
just distal to knee, and moves lateral
aspect of lower leg medially:
• Pain
+ movement indicates lateral
collateral ligament damage
• Cruciate ligaments:
• Inspects for posterior sag with knee flexed
to 90 degrees
• Performs anterior and posterior draw test to
test anterior and posterior cruciate
ligaments (respectively)
• Technique:
• Sits on patient’s ipsilateral foot
• Holds lower leg just distal to knee
• Pulls lower leg forward: pain
+ movement
indicates anterior cruciate ligament
damage
• Pushes lower leg backwards: pain
+
movement indicates posterior cruciate
ligament damage

Examinations:
20 Knee 99
Checklist
P
MP
F
• Menisci:
• Performs McMurray’s test
or Apley’s grinding
test
• Technique for Apley’s grinding test:
• Asks patient to lie on prone on their front
• Flexes knee to 90 degrees
• Stabilises upper leg with left hand
• Holds lower foot with right hand
• Pushes lower foot (and thereby tibia/
fibula) down and rotates it in a ‘grinding’
manner
• Pain indicates a positive test and possible
meniscal injury
• Patellofemoral joint:
• Tests for patellar apprehension
• Technique:
• Extends knee and pushes patella laterally
• If patient is in pain or tries to flex the
knee due to apprehensiveness, the test is
positive, indicating an unstable patella
and possible previous dislocations
Checklist
P
MP
F
Function:
• Comments on gait (ease of walking, speed of
turn, antalgia)
Thanks patient
Offers to help patient get dressed
Washes hands
Offers to examine ankle (joint below) and hip
(joint above)
Offers to examine neurovascular function of the
lower limbs
Presents findings
Offers appropriate differential diagnosis
Offers appropriate investigations and
management
OVERALL IMPRESSION:

100
Examinations:
20 Knee
Disease
Look
Feel
Move
Special
test
Function/gait
Examiner
questions
Total
knee
replacement
Vertical
scar
over
anterior
aspect
of
knee
NAD
Active
and
passive
flexion
may
or
may
not
be
limited
NAD
NAD
What
are
the
indications
for
a
total
knee
replacement?
Paget’
s
disease
Varus
deformity
of
knees
Bew
are
of
other
bony
lumps
,
particularly
on
femur
, that
may
be
an
osteosarcoma
W
arm
overlying
skin
bilater
ally
May
be
restricted
flexion
and
extension
and
crepitus
due
to
secondary
osteoarthritis
NAD
NAD
What
are
the
complications
of
Paget’
s
disease?
How
is
it
diagnosed?
Bak
er’
s
cyst
Swelling
on
medial
side
of
popliteal
fossa
Round,
smooth,
transilluminable
mass
Foucher’
s
sign
is
positive:
knee
extension
tenses
the
swelling,
flexion
to
45
degrees
causes
disappear
ance
or
softening
of
the
swelling
NAD
NAD
, antalgic
gait
if
severe
What
are
the
important
differential
diagnoses
of
a
Bak
er’
s
cyst?
How
can
a
Bak
er’
s
cyst
present?
Osteoarthritis
Varus
deformity
Fixed
flexion
Swelling
(without
effusion)
W
asted
quadriceps
Crepitus
Joint
line
tenderness
Restricted
flexion
and
extension
Locking
NAD
Antalgic
gait
What
are
the
indications
for
surgery
in
osteoarthritis
of
the
knee?
Effusion
in
rheumatoid
arthritis
Red,
swollen,
nodules
on
posterior
aspect
Varus
(most
common),
but
can
get
valgus
or
fixed
flexion
deformities
W
arm
Joint
line
tenderness
W
asted
quadriceps
Limited
flexion
and
extension
May
experience
pain
but
tests
should
be
negative
Circumduction
on
affected
side/
NAD
How
should
rheumatoid
arthritis
in
the
knee
be
managed?
Seronegative
arthritis
Psoriatic
plaques
(anterior
aspect
of
knee)
Erythema
nodosum
(on
shins)
Question
mark
posture
(associated
with
ankylosing
spondylitis)
Thin
body
habitus
(if
associated
with
inflammatory
bowel
disease)
W
arm
Joint
line
tenderness
Painful/reduced
ROM
May
experience
pain
but
tests
should
be
negative
NAD/circumduction
on
affected
side
What
are
the
features
of
seronegative
arthritides?
What
is
the
differential
diagnosis
in
this
case?
Meniscal
lesions
Swollen
knee
Effusion
Tender
ipsilater
al
joint
line
Decreased
extension
due
to
locking
of
knee
McMurr
ay’
s
or
Apley’
s
test
Knee
gives
w
ay
on
turning
How
can
meniscal
tears
be
treated?
Summary
of
common
conditions
seen
in
OSCEs

Examinations:
20 Knee 101
Disease
Look
Feel
Move
Special
test
Function/gait
Examiner
questions
Collater
al
ligament
lesion
Swollen
knee
Effusion
Tender
ipsilater
al
joint
line
Pain
on
movement/NAD
Opening
up
of
joint
line
(>
5–10
degrees)
on
application
of
contr
alater
al
(v
arus/
valgus)
str
ain
What
are
the
causes
of
collater
al
ligament
injuries?
Torn
cruciate
ligament
Swollen
knee
Effusion
NAD
Positive
anterior
dr
aw
test
(if
anterior
ligament
is
torn);
positive
posterior
dr
aw
test
+
posterior
sag
(if
posterior
ligament
is
torn)
How
can
torn
cruciate
ligaments
be
treated?
Osgood–Schlatter
syndrome
Swollen
tibial
tubercle
Adolescent/young
adult
patient
Pain/grimacing/
withdr
aw
al
on
palpation
of
tibial
tubercle
NAD
NAD
NAD
What
advice
do
you
w
ant
to
give
to
this
patient?
Recurrent
dislocation
of
the
patella
NAD
NAD
NAD
Patient
grimaces/tenses
muscles
when
patella
is
pushed
later
ally
and
knee
is
slowly
flexed
from
full
extension
NAD
What
are
the
causes
of
recurrent
dislocation
of
the
patella?
What
is
the
management
of
recurrent
dislocation
of
the
patella?
Bursitis
Prepatellar:
swelling
over
patella
Infr
apatellar:
superficial
swelling
inferior
to
patella
Tenderness
on
palpation
of
swelling
NAD
NAD
NAD
What
are
the
causes
of
bursitis?
How
can
it
be
managed?
Fr
actured
neck
of
femur
(NB
. T
his
is
a
very
easy
scenario
to
simulate)
Affected
leg
appears
shortened
and
is
held
in
flexion
(at
hip
and
knee)
and
external
rotation
(at
hip)
Poorly
localised
pain
on
palpation
of
knee
Poorly
localised
pain
on
movements
of
knee
Poorly
localised
pain
on
performing
special
tests
Unable
to
weight-bear
on
the
affected
side
What
would
you
do
next
if
you
saw
this
patient
in
A&E?
Septic
arthritis
(NB
.
This
is
a
very
easy
scenario
to
simulate)
The
examiner
may
tell
you
to
assume
the
joint
is
red
and
swollen
Tenderness
on
palpation
of
all
areas
of
knee
Flexion
and
extension
vastly
restricted
Pain
on
performing
special
tests
Unable
to
weight-bear
on
affected
side
What
is
your
next
step
in
management?
What
are
the
differential
diagnoses?
What
investigation
would
you
lik
e
to
perform?
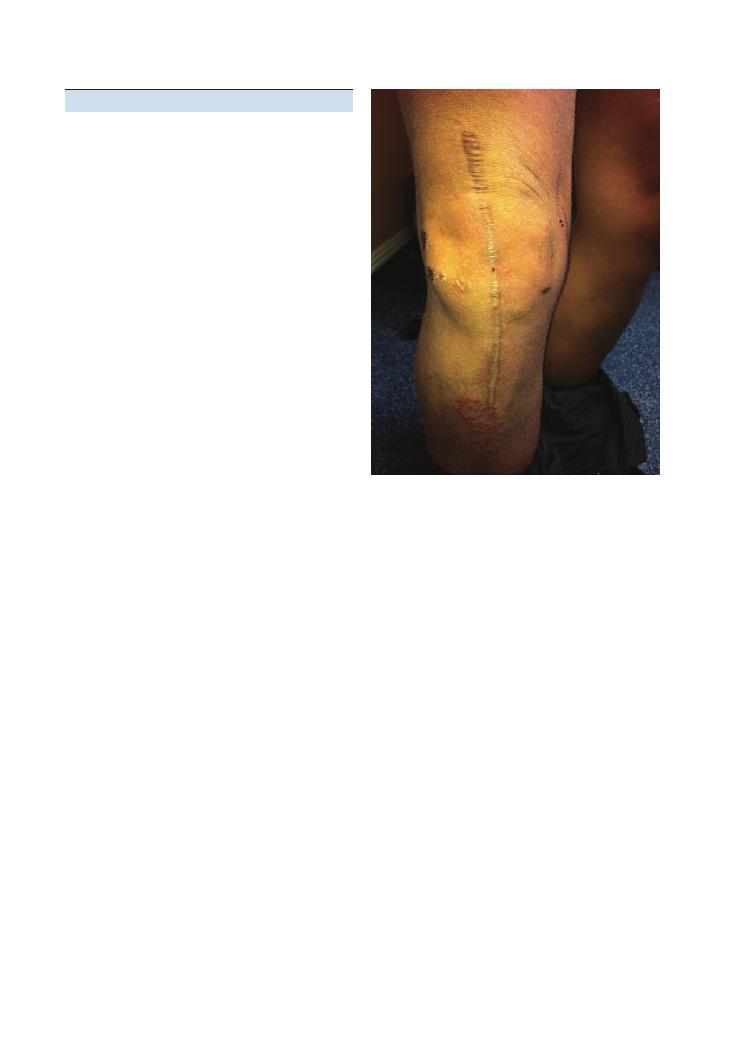
102
Examinations:
20 Knee
examination, but it also shows that you are thinking
about the impact of the condition on the patient’s
general functional ability. Remember, an examination
is not complete without eliciting the effect of the disease
on the patient’s functional ability.
Remember the joint above and
the joint below
Do not forget to state that you would finish by examin-
ing the hip and ankle joints and the neurovascular
function. Remember that hip fractures can sometimes
present with knee pain.
Variations at this station
• Task (7–10 minutes): ‘Perform a GALS screen of this
patient’s musculoskeletal system and then examine the
knees.’ You should aim to spend no more than 2–3
minutes performing the GALS screen at this station.
• Task (5–10 minutes): ‘This patient suffered an injury
while playing football. Examine his knee and then give
him some brief advice on management.’ This is the most
difficult variation at this station. This type of scenario
is frequently tested in finals OSCEs, and it is important
to follow the generic structure:
Hints and tips for the exam
Most students practise the knee examination thor-
oughly, especially the ‘special tests’, while preparing for
finals. As important as these are, remember to stick to
the ‘look – feel – move – special-test – function’ routine
in order to look slick and avoid missing important signs
of disease. Here are some tips to prevent you from com-
mitting some common errors.
One knee or both knees?
There is a lot to do in this station in the 5 or 10 minutes
available. Candidates are often confused over whether
they should examine one or both knees. If the instruc-
tions are not explicit, examine the knee that looks
abnormal, or is said to be painful by the patient, and
compare it with the other knee to interpret the findings
from special tests. In the unlikely scenario that both
knees appear normal, you must examine both knees
fully and hence pace your work appropriately.
Don’t inspect for too long
Do not spend too long looking at the knees. If they
appear normal, say so and move on to avoid wasting
time. Mention significant positive findings, but if time
is short do not list all the negatives as there are unlikely
to be many marks for doing this – and the examiner
will probably ask you anything he or she deems impor-
tant. If there is an obvious abnormality, state this at the
start when presenting your findings. If this is not the
case, follow the same routine that you used to examine
when you are presenting your findings.
Joint line tenderness
Make sure you palpate the medial and lateral joint
lines one at a time so that you can tell which side is
causing pain. Look at the patient’s face for grimacing.
Examining effusions
If there is a large effusion visible to the naked eye,
perform the patellar tap test, and if there is no visible
effusion perform the bulge test.
Assessing the menisci
Ask the examiner before performing McMurray’s or
Apley’s test because many examiners will not want you
to actually perform them on the patient and may
instead ask you to talk through how you would perform
them. Apley’s test is generally easier and quicker to do.
Gait
If the patient is able to walk, make sure you examine
the gait. Not only does this add valuable signs to your
Figure 20.1 Total knee replacement

Examinations:
20 Knee 103
• Confirmation of diagnosis (e.g. imaging)
• Conservative measures: Rest, Ice, Compression,
Elevation
• Medical measures: analgesia
• Physiotherapy
• Safety netting for complications
• Future prevention
• Task (7–10 minutes): ‘This is a 19-year-old who
recently sustained an injury playing football. Take a brief
focused history and examine his knee.’ At this station, you
must find out about the injury itself and how function
has been limited after sustaining it. There are three key
questions to ask in addition to this:
• Did the knee swell up after the injury?
• Does the knee give way when you try to turn?
• Does the knee lock?
Questions you could be asked
Arthritis
Q. What are the indications for surgery in osteoarthri-
tis of the knee?
A. Arthroscopy if there is knee locking, and knee
replacement for refractory pain/stiffness.
Q. How should rheumatoid arthritis in the knee be
managed?
A. Medical: analgesia, disease-modifying antirheu-
matic drugs, anti-tumour necrosis factor alpha inhibi-
tors. Surgery is used with refractory pain/stiffness, or
secondary septic arthritis.
Acutely swollen painful knee
Q. What would your next step be in the management
of such a patient in A&E?
A. Admit and resuscitate the patient with respect to
airway, breathing and circulation. Give empirical intra-
venous antibiotics (e.g. flucloxacillin or Augmentin),
aspirate the joint and send the specimen for micros-
copy, culture and sensitivity and polarised light micro-
scopy for crystals. Take a full history and examination
to identify predisposing factors (e.g. intravenous drug
use, diabetes, sickle cell disease).
Q. What are the differential diagnoses of an acutely
swollen painful knee?
A. Septic arthritis, crystal arthropathy (gout or
pseudogout), inflammatory disease (e.g. rheumatoid
arthritis, systemic lupus erythematosus) and haemo-
chromatosis.
Q. What investigations would you like to perform?
A. C-reactive protein level, blood culture, aspiration of
the joint for microscopy, culture and sensitivity and
microscopy under polarised light, and imaging (joint
X-ray, MRI).
Knee fracture
Q. What would your initial management be if you saw
a patient with a knee fracture in A&E?
A. • Resuscitate with respect to airway, breathing, cir-
culation, and the examine the neurovascular status
of the limb distal to the fracture.
• Reduce the fracture under anaesthesia
• Immobilise/restrict the fracture
• Take a focused history to elucidate the impact of
the injury, the possible underlying causes of the fall,
co-morbidities and other injuries (especially head
injury)
• Request a specialist orthopaedic review
Q. What are the indications for a total knee
replacement?
A. Osteoarthritis causing pain or stiffness that is
refractory to medical treatment, rheumatoid arthritis
with refractory joint pain, stiffness or deformity, and
some cases of septic arthritis.
Patellar dislocation
Q. What are the causes of recurrent dislocation of the
patella?
A. A ‘high-riding’ patella, joint hypermobility, family
history, connective tissue disease.
Q. What is the management of recurrent dislocation
of the patella?
A. Exclusion of a secondary cause (e.g. connective
tissue disease) and vastus medialis strengthening
exercises
Knee ligaments and menisci
Q. What are the causes of collateral ligament
injuries?
A. Typically sport-related injuries, such as being
tackled from the side, and also car accidents in which
impact has been from the side – it is quite common to
see torn lateral collateral ligaments together with a
common peroneal nerve palsy.
Q. How are torn cruciate ligaments managed?
A. Arthroscopic reconstructive surgery with a pros-
thetic ligament. If the patient not fit for general anaes-
thesia, conservative management includes knee support
and physiotherapy to strengthen the surrounding
musculature.
Q. How can meniscal tears be treated?
A. Arthroscopic joint washout, meniscal repair,
meniscectomy.
Osgood–Schlatter disease
Q. What advice do you give to a patient with Osgood–
Schlatter disease?

104
Examinations:
20 Knee
A. Avoid painful activities such as running, squatting
and jumping for up to 6 months. Analgesic medication
can be used for symptom relief. Refer to physiotherapy
for advice on quadriceps strengthening exercises.
Baker’s cyst
Q. What are the important differential diagnoses of a
ruptured Baker’s cyst?
A. Deep venous thrombosis, cellulitis.
Q. How can a Baker’s cyst present?
A. Popliteal fossa swelling, walking difficulty, swollen
painful calf secondary to rupture.
Bursitis of the knee
Q. What are the causes of bursitis?
A. Trauma (e.g. housemaid’s knee), infection, inflam-
matory disease (e.g. rheumatoid arthritis), idiopathic.
Q. How can it be managed?
A. Drainage of bursal fluid, treatment of the under-
lying cause (e.g. antibiotics, immunosuppressants),
steroid injection
Paget’s disease
Q. What are the complications of Paget’s disease?
A. Deafness, high-output cardiac failure, osteosarcoma,
pathological fractures, secondary osteoarthritis.
Q. How is it diagnosed?
A. Isolated raised alkaline phosphatase level (usually
very high), characteristic radiological features.

105
21 Confirming death
Checklist
P
MP
F
Introduces self to nurse
Asks patient’s details and whether death was
expected
Asks to see patient’s notes
Confirms patient is not for resuscitation
Washes hands before entering room
States intention to draw curtains/ensure privacy
Confirms patient’s identity from wristband
Checks for a pacemaker
Exposes patient adequately
Attempts to elicit a response from the patient to
voice and then deep stimulation
States intention to observe for signs of life for 5
minutes from end of bed
Palpates both carotid and femoral pulses for 1
minute to confirm absence of circulation
States intention to auscultate for heart sounds at
apex for 1 minute to confirm absence of cardiac
output
States intention to auscultate both lungs for 3
minutes to confirm absence of breath sounds
Confirms both pupils are fixed in dilation when a
light is shone into the eyes
Confirms absence of corneal reflexes in both eyes
Checklist
P
MP
F
States intention to visualise fundi using an
ophthalmoscope to check for segmentation of
retinal columns
Covers patient up to neck and states intention to
close patient’s eyes
Washes hands
States intention to inform nurse that death can
be confirmed
States intention to make arrangements to inform
next of kin
Documents confirmation of death in the notes:
• Date, time, name of nurse, patient’s
resuscitation status
• Comments on responsiveness to voice and
deep stimulation
• Comments on signs of life after 5 minutes of
observation
• Comments on central pulses and heart sounds
• Comments on breath sounds
• Comments on pupils, corneal reflexes and
fundi
• States date and time that death was confirmed
• Prints name and signs notes
Documentation is organised and clearly legible
Task (5 minutes): You are an FY1 attached to the care
of the elderly firm. Sister Jones has just bleeped you
regarding a terminally ill 85-year-old man who has
become unresponsive and has stopped breathing. She
thinks he has passed away and has asked you to come
to the ward as soon as possible to confirm this and
document it in the notes. Please demonstrate how you
would confirm death on the manikin provided and
complete the patient notes provided.

106
Examinations:
21 Confirming death
Hints and tips for the exam
Confirming death is a very commonly tested OSCE
station in finals. You are very unlikely to get any oppor-
tunities to practise this during clinical attachments, so
it is important to practise it several times within your
study groups before the OSCE.
There are several ‘easy’ marks to be picked up in this
station so do not forget to pick up these up by perform-
ing simple steps such as washing your hands at the start
and the end, checking the patient’s identity, exposing
and covering the manikin fully when appropriate and
documenting your findings in the notes appropriately.
Although it may feel slightly odd, remember to treat
the manikin with respect as if it were a real patient. Do
not make the mistake of asking the ‘dead’ manikin for
consent to perform the examination as many candi-
dates do in the heat of the moment!
Potential variations at this station
• Confirming death on a manikin and filling out a
death certificate using the information provided. This
may be a 5-minute station or a 10-minute station. (NB.
This station is covered separately in Chapter 70.)
• Confirming death on a manikin and answering ques-
tions on criteria for referral to the coroner.

OSCEs for Medical Finals, First Edition. Hamed Khan, Iqbal Khan, Akhil Gupta, Nazmul Hussain, and Sathiji Nageshwaran.
© 2013 John Wiley & Sons, Ltd. Published 2013 by John Wiley & Sons, Ltd.
107
Part 2: Histories
Top tips
Do:
• Use SOCRATES to explore any symptom (SOCRA-
TES
= site, onset, character, radiation, associated
symptoms, timing, exacerbating factors, sever-
ity): Although this is generally used for pain, it can be
used as a basis for any symptom. For example, if you
are taking a history of shortness of breath, site and
radiation are clearly irrelevant – but onset, alleviating/
exacerbating factors, severity and character are deci-
sively important.
• Know your ‘red flags’: In 5 or 10 minutes, it may be
difficult to cover every single aspect that could possibly
have even a vague relevance. This is why it is important
to be as focused as possible, and to rule out serious and
life-threatening problems as soon as possible – espe-
cially if you are running out of time. The key to this is
to rule out ‘red flag’ symptoms that signify diagnoses
such as cancer and other serious pathologies. Different
parts of the body have different ‘red flags’, but in general
the following symptoms are generic for all systems:
• Weight loss
• Loss of appetite
• Bleeding (this applies to bleeding from virtually any
part of the body, depending on the history – rectal
bleeding or melaena, haematuria, vaginal bleeding,
haematemesis, haemoptysis and even unexplained
skin bruising)
• Night sweats
• Take a thorough social history: This is important
and there are lots of easy marks for it. Remember that
social histories are not only about smoking and alcohol
– make sure you explore the points listed below. Also
find out about how the patients symptoms affect the
patient’s life.
• Activities of daily living (ADLs): An easy way to
remember the ADLs is to work through the normal
activities that most people do when they wake up:
• Get out of bed (transfer)
• Walk to the bathroom (mobility
→ walking aids)
• Use the toilet (continence
→ urinary and faecal)
• Brush the teeth, wash the face (personal hygiene)
• Use the stairs
• Cook meals
• Eat meals (does the patient need help with
feeding?)
• Shop
• Work/occupation
• Job
• What the job involves
• Whether the patient travels to work
• Social activities: hobbies, meeting other people
• Driving: the DVLA ordains driving restrictions for
various conditions, such as strokes, heart attacks and
epilepsy
• Travel: this could be prove to be a ‘clincher’, for
example for pulmonary embolism, tuberculosis,
malaria or viral hepatitis
• ICE – ideas, concerns, expectations: Although these
are not as important as they are for the communication
skills stations, they usually carry significant marks even
for the basic history stations.
• Listen carefully: Demonstrate this actively using
non-verbal skills – nod, say ‘yuh’, or whatever feels
comfortable and appropriate. It is vital that the patient
feels you are listening and feels encouraged to give you
the information you need – and it will also get you
valuable marks.
• Summarise: There is often a specific mark for this,
and it is also an excellent way for you to organise your
own thoughts and identify anything you may have
missed.
• Be specific and think before you speak: This may
sound too obvious to mention, but it is always disap-
pointing to hear candidates take excellent histories and
ruin it by making silly mistakes with their words. For
example, we have often heard candidates use IBS and

108
Histories
IBD interchangeably, despite these being fundamentally
different conditions.
• Practise reading the instructions: Nervousness,
anxiety and a rush to get cracking within the limited
time may cause even the best candidate to miss the
instructions and jump straight into the scenario. So
when you are practising histories, make sure that
whoever is assessing you gives you instructions so that
you can practise the process of reading and absorbing
them.
• Practice with different colleagues: Try to practise
with different people as different actor-patients will
have different ways of presenting their histories, which
may make eliciting the history easier or more difficult
in different ways.
• Women’s health is different from men’s health:
Remember to ask about periods in all women with any
systemic conditions. Various endocrinological, haema-
tological and inflammatory problems can cause a
change in the menstrual cycle.
• Start with open questions, and then move on to
closed specific questions: Demonstrating your ability
to utilise both types of question is important. There are
usually marks for this, and they are easy to gain, so don’t
miss them.
• Remember the obvious – introduce yourself prop-
erly and get consent: Yes, it is obvious, but as examin-
ers we have seen finalists say ‘Hello’ in the most pleasant
manner and tell the patient that they will be taking a
history. There will always be a significant number of
marks for a proper introduction. This includes the
following:
• Tell the patient your name
• Confirm the patient’s name
• Tell the patient who you are (medical student, FY2,
consultant, professor!)
• Explain what you would like to do (i.e. take a
history)
• Ask the patient if they are happy for you to do this
• Ask the patient an open question (e.g. what brings
you here today?)
• Define smoking in pack–years: This will impress the
examiner. Twenty cigarettes per day for 1 year is a pack
year. You can use this to calculate how many pack–years
the patient’s smoking history represents:
• 20 cigarettes per day for 1 year
= 1 pack–year
• 40 cigarettes per day for 10 years
= 20 pack–years
• 10 cigarettes per day for 3 years
= 1.5 pack–years
• Know your alcohol units: 1 unit
= 8 g of pure
alcohol, which is equivalent to:
• Half a pint of standard beer or lager
• Half a glass of wine
• One standard measure of spirit or sherry
Don’t:
• Don’t ask leading questions: It is important not to
direct the patient towards a certain line of history or a
certain diagnosis. It could push you towards the wrong
diagnosis, and separately to that there will often be
marks for using a line of enquiry that does not involve
leading questions.
• Don’t use medical jargon: As a student, it is terribly
embarrassing when a patient asks you what you mean
by ‘myocardial infarction’. More importantly, you will
almost definitely lose marks for doing this.
• Don’t ignore the patient’s concerns: As important
as it is, it is not enough merely to elicit patients’ ideas,
concerns and expectations. It is absolutely imperative
that you also act on them, or at least acknowledge and
react to them. Ignoring them and carrying on as if the
patient never said anything will lose you marks.
• Don’t ignore cues: see the Top Tips for the com-
munication skills station.
Generic points for all history stations
Appropriate introduction
Confirms patient’s name
Explains reason for consultation
Obtains consent
Establishes rapport
Open question to elicit presenting complaint
History of presenting complaint
Past medical history
Family history
Drug history
Allergies
Social history
‘Red flags’
Review of systems
Systematic approach
Explores and responds to ICE
Shows empathy
Non-verbal skills
Avoids technical jargon
Devises holistic management plan and addresses psy-
chosocial issues as well as medical problems
Summarises
Offers to answer any questions
Thanks patient

109
22 General lethargy and tiredness
Checklist
P
MP
F
Appropriate introduction
Confirms patient’s name and age
Explains reason for consultation
Obtains consent
Open question to elicit presenting complaint
Allows patient to open up, listens carefully,
remains silent and does not interrupt the patient
Signposts: e.g. ‘Mr Gregory, thank you for telling
me about this problem. I would like to ask a few
more detailed questions. Is that all right?’
History of presenting complaint:
• Onset (how it started)
• Character (what the patient means by
tiredness)
• Time (duration)
• Alleviating factors
• Exacerbating factors
• Severity (in comparison with other episodes of
tiredness)
• Asks if there is a pattern with activities/daily
routine
• Asks about menstrual disturbances (if patient
female)
• Establishes sleep pattern
• Asks if patient is suffering from any other
symptoms
• Asks about any recent illnesses
• Previous episodes of lethargy/tiredness
Depression screening: asks about mood, previous
history of depression and sleeping patterns
Asks closed focused questions to rule out specific
common causes of lethargy:
Checklist
P
MP
F
• Thyroid dysfunction (sweating, tremor, dry hair,
neck discomfort, eye symptoms, bowel
changes, menstrual irregularities)
• Anaemia (shortness of breath, chest pain,
palpitations, menorrhagia)
• Diabetes mellitus (polydipsia, polyuria,
recurrent infection)
• Cancer (weight loss, night sweats, family
history of cancers, cough, diarrhoea, melaena)
• Hypopituitarism (loss of appetite, nipple
discharge, loss of libido)
• Chronic kidney disease/nephrotic syndrome
(ankle swelling, orthopnoea)
• Chronic infection (fevers)
• Chronic fatigue syndrome symptoms (sore
throat, headaches, muscle pains, exacerbated
by exertion)
• Obstructive sleep apnoea (unrefreshing sleep,
feeling sleepy in the day, loud snoring, waking
up suddenly in the night, loss of libido,
irritability)
• Depression (mood, anhedonia, sleep, appetite,
concentration)
Review of systems
‘Red flags’:
• Night sweats
• Fevers
• Weight loss
• Loss of appetite
• Palpable lymph nodes
Past medical history
Family history:
• Cancers
• Endocrine disorders, especially thyroid disorders
and diabetes
• Depression
Drug history:
• Over-the-counter medication

110
Histories:
22 General lethargy and tiredness
Summary of common conditions seen
in OSCEs
System
Conditions
Cardiovascular
Heart failure
Infective endocarditis
Respiratory
Lung cancer
Tuberculosis
Obstructive sleep apnoea
Gastrointestinal
Bowel cancer
Coeliac disease
Liver
Viral hepatitis
Chronic liver disease
Neurological
Myasthenia gravis
Motor neurone disease
Endocrine
Hypothyroidism Hypopituitarism
Addison’s disease
Pituitary adenoma
Diabetes
Renal
Chronic kidney disease
Rheumatological
Rheumatoid arthritis
SLE
Haematological
Anaemia from any cause
Leukaemia/lymphoma
Genitourinary
HIV
Sexually transmitted disease
Urological
Prostate cancer
Bladder cancer
Gynaecological
Menorrhagia
Psychiatric
Depression
Others
Chronic fatigue syndrome
Poor sleep hygiene
Illicit drug use
Benzodiazepine overuse
Crash dieting
Checklist
P
MP
F
Allergies
Social history:
• Smoking
• Alcohol
• Illicit drug use
• Stressors in social life (relationship, financial,
etc.)
• Change in work/occupation
• Symptoms of depression or anxiety
• Recent foreign travel
Use of non-verbal cues, e.g. good eye contact,
nodding head and good body posture
Systematic approach
Checklist
P
MP
F
Explores and responds to ICE:
• Ideas
• Concerns
• Expectations
Shows empathy
Non-verbal skills
Avoids technical jargon
Devises holistic management plan and addresses
psychosocial issues as well as medical problems
Summarises
Offers to answer any questions
Thanks patient
Hints and tips for the exam
Like weight loss, tiredness is a common non-specific
symptom. GPs see several patients every day who com-
plain of feeling tired without any other specific symp-
toms. There is a vast array of potential underlying
causes ranging from the most serious, such as underly-
ing malignancies, to absolutely nothing.
Like the weight loss station, this station is in many
ways a vast ‘review of systems’ where you have to work
through most of the systems and narrow down the
potential causes to one of them. The most important
thing is to confirm or rule out potentially serious
causes, such as diabetes and cancer. Weight loss is a
symptom that should start ringing alarm bells.
Don’t forget depression and
psychiatric causes
Many students forget that generalised lethargy is a
common symptom of depression. The NICE guidelines
(2009) suggest using the following two questions to
screen for depression:
During the last month, have you often been
bothered by:
• Feeling down, depressed or hopeless?
• Having little interest or pleasure in doing things?
If the patient answers yes to either of these, carry out
a full assessment for depression.
Basic initial investigations for fatigue
If you have absolutely no idea about the cause of the
underlying fatigue, tell the examiner that you would
like to do a full systemic examination and the following
investigations. They are relatively quick and non-

Histories:
22 General lethargy and tiredness 111
Imaging
• Chest X-ray:
• Lung cancer, especially if the patient is a smoker
• Cardiomegaly in heart failure
• Tuberculosis
Urine
• Urine dipstick:
• Blood: bladder cancer, glomerulonephritis, infec-
tive endocarditis
• Protein: renal impairment, nephrotic syndrome,
glomerulonephritis
• Nitrites: urinary tract infection – chronic urinary
tract infections can cause general chronic lethargy in
the elderly
• Glucose: diabetes
Other
• Epstein–Barr virus/Monospot: for glandular fever
Questions you may be asked
Q. What is the key diagnostic investigation for chronic
fatigue syndrome?
A. None – it’s a clinical diagnosis. The most important
thing is to rule out any other diagnosis.
Reference
National Institute for Health and Clinical Excellence
(2009) Depression: treatment and management of
depression in adults, including adults with a chronic
physical health problem. Available from: www.nice.
org.uk/nicemedia/live/12329/45890/45890.pdf
(accessed June 2010).
invasive, and you could decide how to proceed after you
get the results.
Blood tests
• Full blood count: anaemia, raised white cell count,
abnormal white cell differential
• ESR:
• A raised ESR could indicate an inflammatory/
rheumatological aetiology
•
>100 mm/hour indicates serious causes such
as malignancies, sepsis, tuberculosis, polymyalgia
rheumatica/giant cell arteritis or myeloma
• Us
+Es:
• Hyponatraemia (Addison’s disease)
• Chronic kidney disease/any renal impairment
• Liver function tests: Liver or bone problems (alkaline
phosphatase for bone)
• Bone profile:
• Hypercalcaemia: This causes lethargy in itself, but
more importantly it may result from ectopic parathy-
roid secretion from a malignancy, or a myeloma
• Hypocalcaemia may result from malabsorption, for
example due to coeliac disease
• Fasting blood glucose: for diabetes mellitus
• Thyroid function tests: hypothyroidism
• Ferritin, vitamin B12 and folate levels:
• Dietary deficiencies, which are not uncommon in
the elderly
• Pernicious anaemia
• A low ferritin level with a microcytic anaemia,
which needs further investigation to rule out a gas-
trointestinal malignancy
• Malabsorption
• Brain natriuretic hormone: for heart failure

112
23 Weight loss
Checklist
P
MP
F
Appropriate introduction
Confirms patient’s name and age
Explains reason for consultation
Obtains consent
Open question to elicit presenting complaint
Allows patient to open up, listens carefully,
remains silent and does not interrupt the patient
Signposts: e.g. ‘Mr Smith, thank you for telling
me about this problem. I would like to ask a few
more detailed questions. Is that all right?’
History of presenting complaint:
• Onset (how it started)
• Time (duration – over what length of period
did the patient lose weight, or if it was a brief
transient phase)
• Severity – quantifies weight loss, either in
kilograms/pounds or waist circumference
• Asks if anybody else around the patient
(family, work colleagues, friends) has noticed
the loss of weight
• Asks if patient intended to lose weight (e.g.
exercise regime)
• Establishes patient’s appetite and eating habits
• Establishes whether there has been any
change in the patient’s activity levels (e.g. has
he or she started walking to work or taken up
a new exercise regime?)
• Asks about menstrual disturbances (if the
patient is female)
• Asks if patient is suffering from any other
symptoms
• Asks about any recent illnesses
• Previous episodes of weight loss
Checklist
P
MP
F
Psychiatric disorder screening:
• Depression screening: asks about mood,
previous history of depression and sleeping
patterns
• Eating disorder screening:
• Sick (has the patient been vomiting?)
• C
= lost control = does the patient feel as if
they have lost control over their eating
habits?
• One stone weight loss in last 3 months?
• F
= does the patient feel fat?
• F
= does the patient spend a lot of time
thinking about food?
• Needs further investigation if two or more of
the five criteria are positive
Asks closed focused questions to rule out specific
common causes of weight loss:
• Hyperthyroidism (sweating, tremor, neck
discomfort, eye symptoms, bowel changes,
menstrual irregularities)
• Diabetes mellitus (polydipsia, polyuria,
recurrent infection)
• Addison’s disease (tiredness, pigmentation,
faintness)
• Cancer (weight loss, night sweats, family
history of cancers, cough/haemoptysis if
smoker, diarrhoea/melaena if suspecting bowel
cancer)
• Chronic infection (fevers)
• Laxative abuse/overuse
‘Red flags’:
• Night sweats
• Fevers
• Palpable lymph nodes
• Symptoms of cancer (as above)
Past medical history

Histories:
23 Weight loss 113
Checklist
P
MP
F
Family history:
• Cancers
• Endocrine disorders, especially thyroid disorders
and diabetes
• Bowel disorders
Drug history :
• Over-the-counter medication
Allergies
Social history:
• Smoking
• Alcohol
• Illicit drug use
• Stressors in social life (relationship, financial,
etc.)
• Change in work/occupation
• Symptoms of depression
• Recent foreign travel
Review of systems
Use of non-verbal cues, e.g. good eye contact,
nodding head and good body posture
Checklist
P
MP
F
Systematic approach
Explores and responds to ICE:
• Ideas
• Concerns
• Expectations
Shows empathy
Non-verbal skills
Avoids technical jargon
Devises holistic management plan and addresses
psychosocial issues as well as medical problems
Summarises
Offers to answer any questions
Thanks patient
Summary of common conditions seen
in OSCEs
System
Conditions
Respiratory
Lung cancer
Tuberculosis
Gastrointestinal
Bowel cancer
Coeliac disease
Irritable bowel disease
Liver
Viral hepatitis
Chronic liver disease
Neurological
Motor neurone disease
Endocrine
Hyperthyroidism
Addison’s disease
Diabetes
Renal
Chronic kidney disease
Haematological
Leukaemia/lymphoma
Multiple myeloma
Genitourinary
HIV
Urological
Prostate cancer
Bladder cancer
Gynaecological
Ovarian cancer
Psychiatric
Eating disorder/anorexia
Depression
Others
Exercise!
Secondary metastatic cancer
Hints and tips for the exam
Weight loss should always ring alarm bells, so its vital
– both for OSCEs and in clinical practice – to find the
cause and deal with it swiftly.
Go through the systems
The weight loss station is fundamentally an extensive,
thorough review of systems, with a specific focus on
certain areas. So it is vital that you go through each of
the systems and associated symptoms.
Energy in: dietary history
Although most candidates will take a thorough history
to rule out important organic causes, most do not
appreciate delving into the details of the patient’s daily
food intake. A change of job, house or other circum-
stances may result in a marked change in the patient’s
eating habits. For example, if the patient used to have
a regular high-calorie meal that they now miss out, it
is likely that there would be a significant weight loss
resulting from this. However, such a weight loss should
not persist.
Energy out: exercise
Find out whether the patient has started a new exercise
regime, or if their work or leisure pursuits now require
much more physical activity than before.
Don’t forget possible psychiatric
causes of weight loss
Many students will have had their psychiatry modules
in the fourth year of their course, and finals will be

114
Histories:
23 Weight loss
largely based around medicine and surgery. However,
the odd station might still have a psychiatric slant to it,
and ‘weight loss’ is perfect for this. It is one of the key
‘biological symptoms’ of depression, and is naturally a
result of eating disorders such as anorexia nervosa and
bulimia. So make sure you ask about mood and anhe-
donia, and that you go through the ‘SCOFF’ questions
listed in the checklist. The SCOFF questionnaire was
published in the BMJ in 1999 after being devised by Dr
John Morgan, a research fellow in psychiatry in the UK
at the time it was published.
Questions you may be asked
Q. What questions would you ask to assess the possi-
bility of eating disorders in a patient?
Q. What psychiatric disorders could lead to weight
loss?
A. Answers to both these questions are given in the text
above.

115
24 Chest pain
Checklist
P
MP
F
Appropriate introduction
Confirms patient’s name and age
Explains reason for consultation
Obtains consent
Open question to elicit presenting complaint
Allows patient to open up, listens carefully,
remains silent and does not interrupt the patient
Signposts: e.g. ‘Mr Gregory, thank you for telling
me about this problem. I would like to ask a few
more detailed questions. Is that all right?’
History of presenting complaint
Elicits further details of chest pain:
• Site
• Onset: retrosternal
• Character: burning, crushing, stabbing
• Radiation: jaw, left arm and back (myocardial
infarction), back (dissection)
• Associated symptoms: asks specifically about
nausea, sweating, light-headedness/loss of
consciousness, shortness of breath,
palpitations, fever, cough, heartburn,
abdominal pain
• Exacerbating factors: inspiration, lying down,
coughing, physical activity
• Alleviating factors: stopping physical activity,
sitting up, drugs (e.g. GTN)
• Time course: changes in the pain between
onset and now
• Severity
• Asks if patient is suffering from any other
symptoms
• Asks about any recent illnesses
• Previous episodes of chest pain
Elicits cardiac risk factors:
• Family history of myocardial infarction in
first-degree relative
<55 years of age
• Smoking
• Hypertension
• Diabetes mellitus
• Hyperlipidaemia
Checklist
P
MP
F
Elicits risk factors for pulmonary embolism/deep
venous thrombosis:
• Calf pain/swelling
• Recent travel
• Recent surgery
• Family history of clotting disorders
• Malignancy
• Oral contraceptive pill (if female patient)
• Pregnancy (if female patient)
Review of systems
Past medical history
• Myocardial infarction, angina, other heart
disease
• Stroke, peripheral vascular disease
• Asthma, COPD
• Diabetes mellitus
• Lung cancer
Family history:
• Cardiac disease
• Pulmonary embolism
• Asthma
• Lung cancer
• Sudden death
Drug history
Allergies
Social history
• Alcohol
• Smoking
• Occupation
• Diet and lifestyle
Use of non-verbal cues, e.g. good eye contact,
nodding head and good body posture
Systematic approach
Explores and responds to ICE:
• Ideas
• Concerns
• Expectations
Shows empathy

116
Histories:
24 Chest pain
Summary of common conditions seen in OSCEs
‘Red flags’
Common errors
Acute coronary
syndrome (ACS)
Past medical history of ACS
Mistaking pain from an aortic dissection for an ACS. The
management of aortic dissection and ACS are
completely different so it is imperative to be sure
what you are dealing with before implementing a
management plan. Thrombolysing a dissecting
aneurysm will result in death, so if unsure mention
that you would do a CT scan to rule out dissection
Central crushing pain
Radiation to left arm and/or jaw
Not relieved by GTN spray in a known angina sufferer
Aortic dissection
Tearing central pain of sudden onset radiating to the
back
Past medical history of hypertension
Past medical history and/or family history of
connective tissue disease, e.g. Marfan syndrome
Pneumothorax
Young male typically in teens or twenties
Sudden onset
Associated with shortness of breath
Pulmonary
embolism
Positive risk factors
Assuming that pulmonary embolism has been ruled out
if there are no symptoms of a deep vein thrombosis
(DVT). Remember that a significant proportion of
DVTs are initially asymptomatic or cause only mild
discomfort, and most pulmonary embolisms occur
without clinical evidence of a DVT
Past medical history of pulmonary embolism
Family history of thrombophilia
Pain increased by inspiration
Associated with red, swollen, painful leg
Pneumonia
Cough productive of green/blood-stained phlegm
Chest pain alone is an uncommon presenting symptom
of pneumonia so ensure you have ruled out all the
other causes listed in this table before diagnosing this
Recent upper respiratory tract infection
Pericarditis
Pain improved by sitting forward
Any of the ‘red flags’ may be ‘red herrings’ so it is
important to take a thorough history to rule out ACS
and other diagnoses even if pericarditis is strongly
suspected from the history
Fever or recent viral illness
Recent myocardial infarction (associated with
Dressler’s syndrome)
Past medical history of rheumatoid arthritis, SLE,
sarcoid or radiotherapy
Peptic ulcer
disease or
gastritis
Associated symptoms include dysphagia, acid reflux,
weight loss and melaena
About 1 in 10 patients diagnosed with ‘gastritis’ in A&E
actually have inferior myocardial infarction, so even if
gastritis is strongly suspected from the history, you
must do an ECG to rule out inferior myocardial
infarction
Drug history includes NSAIDs, steroids or any other
drugs that predispose to peptic ulcer disease
Location of pain is epigastric with retrosternal
radiation
Ruptured
oesophagus
Upper gastrointestinal endoscopy in the last 48 hours
Recent endoscopy could be a ‘red herring’ so rule out
other causes before settling on this rare condition
Violent vomiting, e.g. after an alcohol binge
Costochondritis
Point tenderness when asked about site of pain
Settling with these diagnoses without ruling out
life-threatening differential diagnoses through
appropriate questioning
Shingles
Associated with rash
Pain radiating out across chest in a dermatomal
distribution
Pain made worse by contact with clothing
Checklist
P
MP
F
Non-verbal skills
Avoids technical jargon
Devises holistic management plan and addresses
psychosocial issues as well as medical problems
Checklist
P
MP
F
Summarises
Offers to answer any questions
Thanks patient

Histories:
24 Chest pain 117
Hints and tips for the exam
History of chest pain is an examiner’s favourite because
it is a common presenting complaint, there are a wide
range of differential diagnoses and it should have been
practised by students on numerous occasions on clini-
cal attachments. But beware – this is not an easy station
because forgetting to ask the key questions (as candi-
dates often do) will be deemed unsafe and can prevent
you passing. The essentials to pass this station and
common pitfalls to avoid are as follows.
Key points to demonstrate safety
• You MUST ask questions to rule out ALL the poten-
tially life-threatening causes of chest pain even if you
have a good idea of what the diagnosis is after your first
question.
• Establish risk factors for ischaemic heart disease.
These are listed on the mark sheet but don’t forget that
the name and age of the patient can provide valuable
information. Age
>55 years and being of South-Asian
origin substantially increases the risk of ischaemic heart
disease.
• Beware of red herrings. A flu-like illness 3 weeks
previously does not necessarily mean that a patient is
suffering from pericarditis. You must rule out other
causes.
• If asked about management, remember the impor-
tance of resuscitating the patient with respect to airway,
breathing and circulation before implementing more
complex management plans aimed at correcting the
underlying cause of the chest pain.
• When eliciting the past medical history, beware of
conditions that may contraindicate the use of certain
drugs. For example, a patient with myocardial infarc-
tion and a past medical history of cerebral neoplasm
cannot be treated with thrombolytic drugs. Such
knowledge will be expected from candidates to be con-
sidered for merits.
Key points to demonstrate good
communication skills
• Start with an open question such as ‘How can I help
you?’ even if an acute situation is being simulated.
Allowing the actor-patient to express themselves ini-
tially will usually give you a good indication of the
diagnosis. Closed questions can subsequently be used
to rule out each of the other potentially life-threatening
conditions and their risk factors.
• Do not forget to ask the actor-patients about their
main concerns. You will typically be asked what you
think is causing the chest pain, or what will happen
next. It is important to use phrases that demonstrate
empathy, but you must NOT provide false reassurance
that everything is fine if you are suspecting a serious
diagnosis – this could result in a fail.
• Do NOT miss out on opportunities to demonstrate
empathy. Actor-patients often give cues such as men-
tioning bereavement during the family history. It is a
good idea to briefly express commiseration by saying
‘I’m sorry to hear that’ before moving on.
Questions you may be asked
Q. If you were an FY1 doctor in A
+E, how would you
hand this patient with central crushing chest pain over
to the cardiology team?
A. See Chapter 56 on the handover.
Q. Take a history of this patient presenting with chest
pain and interpret the ECG shown to you by the
examiner.
A. The answer to this obviously depends on the spe-
cific case.

118
25 Palpitations
Checklist
P
MP
F
Appropriate introduction
Confirms patient’s name and age
Explains reason for consultation
Obtains consent
Open question to elicit presenting complaint
Allows patient to open up, listens carefully,
remains silent and does not interrupt the patient
Signposts: e.g. ‘Mr Gregory, thank you for telling
me about this problem. I would like to ask a few
more detailed questions. Is that all right?’
History of presenting complaint:
• Duration of episode(s)
• Frequency (if more than one episode)
• Precipitants and relieving factors
• Asks about activities before onset
• Asks about intake of caffeine and alcohol
• Asks about learned methods of termination
• Rhythm of palpitations (regular, irregular)
Associated symptoms:
• Chest pain, shortness of breath
• Loss of consciousness
• Symptoms of hypoglycaemia: jitteriness,
hunger, sweating, on insulin
• Symptoms of anxiety: anxiety, tingling,
headaches, nausea
• Symptoms of hyperthyroidism: weight loss,
diarrhoea, eye symptoms, agitation, sweating
• Symptoms of the menopause: last menstrual
period, vaginal dryness, mood changes
Establishes cardiovascular risk factors:
• Smoking
• Diabetes mellitus
• Hyperlipidaemia
• Hypertension
• Family history of premature cardiac disease
Review of symptoms
Checklist
P
MP
F
Past medical history:
• Cardiac disease, multiple sclerosis
• Thyroid disease/surgery
• Anxiety disorders
• Diabetes mellitus
Establishes family history:
• Cardiac disease
• Thyroid disease
• Sudden death
• Arrhythmias
Drug history:
• Salbutamol
• Over-the-counter medication
Social history:
• Smoking
• Alcohol intake
• Illicit drug use
• Occupation
• Stress levels
• Exercise
• Impact of symptoms on patient’s lifestyle
Use of non-verbal cues, e.g. good eye contact,
nodding head and good body posture
Systematic approach
Explores and responds to ICE:
• Ideas
• Concerns
• Expectations
Shows empathy
Non-verbal skills
Avoids technical jargon
Devises holistic management plan and addresses
psychosocial issues as well as medical problems
Summarises
Offers to answer any questions
Thanks patient

Histories:
25 Palpitations 119
Condition
Key
points
in
history
Key
points
in
management
Atrial
fibrillation
Elderly
patient
Past
medical
history
of
ischaemic
heart
disease
, hypertension,
congestive
heart
failure
,
mitr
al
valve
disease
Recent
onset
coinciding
with
symptoms
suggestive
of
lower
respir
atory
tract
infection
See
Chapter
65
on
ECGs
Supr
aventricular
tachycardia
Past
medical
history
of
COPD
(predisposes
to
multifocal
atrial
tachycardia)
Associated
with
symptoms
of
compromise
, e
.g.
chest
pain,
shortness
of
breath,
pre-syncope
Previous
episodes
terminated
by
vagal
manoeuvres
, e
.g.
blowing
the
nose
See
Chapter
65
on
ECGs
Ventricular
tachycardia
Symptoms
of
compromise
, e
.g.
chest
pain,
shortness
of
breath,
pre-syncope
, cold
peripheries
, sweating
History
of
recent
myocardial
infarction
Past
medical
history
of
ischaemic
heart
disease
Family
history
of
sudden
death,
known
long
QT
syndrome
See
Chapter
65
on
ECGs
Thyroto
xicosis
(causing
sinus
tachycardia
or
atrial
fibrillation)
W
eight
loss
, increased
appetite
, heat
intoler
ance
, diarrhoea,
tremor
, mood
disturbance
Past
medical
history
of
thyroid
disease
Past
medical
history
of
other
autoimmune
disease
(insulin-dependent
diabetes
mellitus
,
vitiligo
, Addison’
s
disease
, pernicious
anaemia,
etc.)
Follow
protocol
for
atrial
fibrillation
Medical/surgical
correction
of
thyroto
xicosis
Hypertrophic
obstructive
cardiomyopathy
(HOCM)
Family
history
of
sudden
death
Collapse
while
playing
sport
family
history
of
HOCM
Amiodarone
Anticoagulate
if
paro
xysmal
atrial
fibrillation
Implantable
defibrillator
Septal
myomectomy
Excess
caffeine
intak
e
History
of
excessive
caffeine
intak
e
(definition
of
‘excessive’
varies
from
patient
to
patient)
No
symptoms
suggesting
compromise
Palpitations
self-limiting
Past
medical
history
of
cardiac
or
thyroid
disease
Decrease
caffeine
intak
e
Rule
out
cardiac
and
thyroid-related
causes
Phaeochromocytoma
Triad
of
episodic
headache
, sweating,
fast
palpitations
W
eight
loss
Symptoms
of
anxiety
NB
. T
his
must
be
ruled
out
before
ascribing
symptoms
to
gener
alised
anxiety
disorder
Urgent
referr
al
to
endocrine
surgeons
Investigate
for
multiple
endocrine
neoplasia
type
2,
neurofibromatosis
, von
Hippel–Lindau
syndrome
Summary
of
common
conditions
seen
in
OSCEs
(Continued
)

120
Histories:
25 Palpitations
Condition
Key
points
in
history
Key
points
in
management
Simple
anxiety
Associated
with
important/stressful
event
No
symptoms
of
compromise
No
history
of
cardiac
or
thyroid
disease
Reassur
ance
Behaviour
al
ther
apy/cognitive-behaviour
al
ther
apy
Beta-block
ers
if
severe
symptoms
Fever
Localising
symptoms
of
infection
(e
.g.
cough,
ear
ache)
First
episode
or
episodes
only
coincide
with
febrile
illness
Antipyrexial
medication
(e
.g.
par
acetamol)
Gener
alised
anxiety
disorder
Associated
with
important/stressful
event
No
symptoms
of
compromise
No
history
of
cardiac
or
thyroid
disease
Past
medical
history
of
depression
Avoidance
of
predisposing
situations
Referr
al
to
psychiatry
Beta-block
ers
for
symptom
control
Ventricular
ectopics
Recent
myocardial
infarction
Past
medical
history
of
ischaemic
heart
disease
Description
of
missed
beat
followed
by
heavier
beat
Usually
no
treatment
required
if
asymptomatic
and
infrequent
Amiodarone
if
>10/min
or
symptomatic
Pacemak
er
failure
Past
medical
history
of
pacemak
er
insertion
Replacement/repair
of
pacemak
er
Hypoglycaemia
Associated
with
sweating,
anxiety
, hunger
, tremor
, dizziness
Past
medical
history
of
diabetes
mellitus
Drug
history
of
hypoglycaemic
medication
(not
metformin)
History
of
liver
disease
, Addison’
s
disease
Or
al
sugar
followed
by
slow-release
carbohydr
ate
Intr
avenous
dextrose
(if
unable
to
sw
allow)

Histories:
25 Palpitations 121
Relevant investigations you may need to
discuss at this station
Investigation
Justification
ECG
Instant detection of underlying rhythm
Detection of long QT syndrome
Full blood count
Anaemia precipitates palpitations
High white cell count suggests infection
Thyroid function tests
Diagnosis of thyrotoxicosis
Blood glucose
Diagnosis of hypoglycaemia
Risk assessment for cardiovascular
disease
Us
+Es
Hypokalaemia/hyperkalaemia can cause
fatal arrhythmias
Mg and Ca
Low levels of Ca and Mg predispose to
long QT syndrome and therefore
polymorphic ventricular tachycardia
24-hour ECG
monitoring
Identification of paroxysmal arrhythmias
Echo
Identification of structural heart
disease, e.g. HOCM or mitral
stenosis, that may predispose to
arrhythmias
Exercise ECG
Detection of arrhythmias precipitated
by ischaemic heart disease
Even if you are reasonably sure that the cause is
benign, it is imperative to ask questions that may impli
cate serious pathology.
• Be careful about diagnosing ‘panic attacks’ when
questioned by the examiner at the end. Remember that
organic causes must be ruled out before any
psychiatric/psychological cause is ascribed. Panic
attacks can be caused by phaeochromocytoma and
hyperthyroidism, so mention that you would like to
test for this before instigating management for the
panic attacks.
• Beware of ‘red herrings’ – just because a patient
drinks ‘a lot’ of coffee, it does not necessarily mean it is
the cause of the palpitations.
• A detailed social history is key. Remember that the
actor is unlikely to offer information about stress levels,
alcohol/illicit substance use and the impact on their
lifestyle unless you ask in a sensitive manner. Do NOT
hurry the actor if he or she appears to be going into
‘unnecessary’ detail – it is probably important.
• Address the patient’s concerns appropriately. For
example, if the patient is worried that they may be suf
fering from ischaemic heart disease (because a close
family member suffered from a myocardial infarction),
offer simple options to investigate this further or rule
it out, such as an ECG and formal calculation of
cardiovascular risk. This is perhaps the most difficult
aspect of this station because it requires the candidate
to apply basic knowledge in a clinical setting to for
mulate a simple plan that is in line with a patient’s
expectations.
You are almost guaranteed to be asked about baseline
investigations and your reasons for using them – the
‘investigations’ table summarises this.
Potential variations at this station
• Take a history from this patient presenting to your
GP surgery with palpitations and explain your steps in
management to the patient. (5–10 minutes)
• Take a history from this patient presenting to your
GP surgery with palpitations. Hand the patient over to
the medical registrar who is on call at the local hospital.
(5–10 minutes)
Questions you could be asked
Q. What is the investigation of choice for paroxysmal
atrial fibrillation?
A. 24hour ECG.
Q. What is the treatment of choice for asymptomatic
ventricular ectopics?
A. Nothing – see the text above.
Hints and tips for the exam
Palpitations are an extremely common complaint in
general practice and A&E settings so this is a popular
station in the OSCE exam. The underlying causes range
from being benign (e.g. anxiety prior to an OSCE) to
being potentially catastrophic (e.g. paroxysmal ven
tricular tachycardia after a myocardial infarction). This
can make the task of taking a history in 5 minutes chal
lenging. However, your task will be made easier if you
remember the following six tips:
• The importance of starting with an open question
to get the patient talking cannot be stressed enough.
The information from this alone will often go a long
way towards formulating a differential diagnosis to
guide further history-taking BUT . . .
• You MUST enquire about the following ‘red flag’
symptoms in order to pass:
• Past medical history of cardiac disease
• Family history of sudden death, cardiac disease or
arrhythmias
• Loss of consciousness, shortness of breath
• Weight loss

122
26 Cough
Checklist
P
MP
F
Appropriate introduction
Confirms patient’s name and age
Explains reason for consultation
Obtains consent
Open question to elicit presenting complaint
Allows patient to open up, listen carefully,
remains silent and does not interrupt the patient
Signposts: e.g. ‘Mr Gregory, thank you for telling
me about this problem. I would like to ask a few
more detailed questions. Is that all right?’
History of presenting complaint:
• Onset (how it started)
• Character (dry or productive)
• Time (duration)
• Alleviating factors: work/home
• Exacerbating factors:
• Exertion/exercise
• Season (worse in winter, e.g. COPD; worse
in summer, e.g. allergic)
• Pollen/chemicals (asthma)
• Posture (worse when lying flat)
• Severity
• Variability:
• Diurnal (worse at night/in early morning)
• Continuous/intermittent
• Environment (home, work, indoors,
outdoors)
• Season
• Asks if patient is suffering from any other
symptoms
• Asks about any recent illnesses
• Previous episodes of coughing
Checklist
P
MP
F
Asks about other respiratory/other relevant
symptoms:
• Shortness of breath: orthopnoea
• Sputum:
• Fresh/bright red
• Dark clots
• Colour (white, yellow, green, pink)
• Offensive smell
• Wheeze
• Chest pain
→ pleuritic, sharp, worse with
inspiration?
• Ankle oedema
• Throat symptoms/irritation
• Fevers
• Sleep disturbance
‘Red flags’:
• Haemoptysis
• Weight loss
• Night sweats
• Hoarseness
Review of systems:
• Musculoskeletal/rheumatological symptoms
→
related to pulmonary fibrosis
• Arthralgia
• Morning stiffness
• ENT symptoms:
• Rhinitis
• Nasal drip
• Throat pain/symptoms
• Symptoms of gastro-oesophageal reflux
disease: burning epigastric pain/heartburn
Past medical history

Histories:
26 Cough 123
Checklist
P
MP
F
Family history:
• Atopy:
• Asthma
• Eczema
• Hayfever
• Lung cancer
• Tuberculosis
• Pulmonary fibrosis
Drug history:
• Angiotensin-converting enzyme inhibitors
• Beta-blockers
• NSAIDs
• Methotrexate
• Amiodarone
• Over-the-counter medication
Allergies
Social history:
• Smoking
• Alcohol
• Illicit drug use
• Occupation (dusty environment)
• Exposure to asbestos
• Pets (especially birds and cats)
• Activities of daily living
Checklist
P
MP
F
Use of non-verbal cues, e.g. good eye contact,
nodding head and good body posture
Systematic approach
Explores and responds to ICE:
• Ideas
• Concerns
• Expectations
Shows empathy
Non-verbal skills
Avoids technical jargon
Devises holistic management plan and addresses
psychosocial issues as well as medical problems
Summarises
Offers to answer any questions
Thanks patient
Summary of common conditions seen in OSCEs
Throat/ENT
Trachea/bronchus
Lung
Others
Foreign body in ear canal
Upper respiratory tract
infection
Lower respiratory tract
infection, pneumonia
Angiotensin-converting enzyme inhibitor
Rhinitis
Tracheitis, bronchitis
Tuberculosis
Gastro-oesophageal reflux disease
Post-nasal drip
Obstructive airway diseases
(asthma, COPD)
Malignancy
Left ventricular failure
Laryngeal cancer
Inhaled foreign body
Interstitial lung disease,
pulmonary fibrosis
Diaphragmatic irritation (e.g. abscess)
Throat cancer
Bronchiectasis
Cystic fibrosis
Smoking
Malignancy
Pulmonary oedema
Yellow nail syndrome
Vasculitic, inflammatory causes
(Goodpasture’s syndrome,
Wegener’s granulomatosis)
Psychogenic
Pneumonitis

124
Histories:
26 Cough
cant. The key here is to be thorough and work through
all the associated symptoms in a systematic way. Below
we have summarised some key points that students
often tend to forget:
• A persistent cough can often be a sign of poor asthma
control so it is important to check compliance with
medication and inhaler technique.
• A travel history is important to elicit, for example,
atypical pneumonia and tuberculosis.
• Occupational history is equally important as irritant
exposure at work could be the reason for the cough. In
such cases, peak expiratory flow rate measurements at
home and work would be a useful investigation.
• Nocturnal cough can occur as a result of gastro-
oesophageal reflux, and a course of a proton pump
inhibitor will often alleviate the symptoms.
• Remember to consider issues related to isolation and
contact tracing if you suspect tuberculosis.
Questions you could be asked
Q. In which part of the lungs are you most likely to see
changes associated with tuberculosis on a chest X-ray?
A. The apices.
Q. Which bronchus is a foreign body more likely to
lodge in?
A. The right, as it is shorter and wider in diameter than
the left.
Q. What is yellow nail syndrome?
A. A rare disorder in which patients have yellow dis-
coloured nails, pleural effusions and lymphoedema.
Key investigations
• Chest X-ray: to look for abnormal shadowing, areas
of consolidation, bronchiectasis, cardiac failure, etc.
• Lung function tests, spirometry: to differentiate
restrictive from obstructive lung disease and to assess
flow–volume loops
• Peak expiratory flow rate: to look for diurnal varia-
tion in asthma
• Sputum microscopy, culture and sensitivity: to find
the cause of a chest infection
• Sputum acid-fast bacillus: for tuberculosis
• Sputum cytology: for suspected lung cancer
• Full blood count: haemoglobin could be low in
malignancy, raised white cell count in infection
• Us
+Es:
• Hyponatraemia in small-cell carcinomas, Legion-
naire’s disease
• Hypercalcaemia in squamous cell carcinomas
• ESR raised in connective tissue diseases, any inflam-
matory conditions and malignancy
• High-resolution CT scan: for lung cancer and pulmo-
nary fibrosis
• Bronchoscopy: for tracheal/bronchial carcinomas
and for washings for sputum acid-fast bacillus and
microscopy, culture and sensitivity
• Cardiac investigations, e.g. ECG, echocardiogram (if
heart failure is a cause of cough)
• Nasoendoscopy: for ENT-related causes
• 24-hour pH manometry: for gastro-oesophageal
reflux disease
Hints and tips for the exam
Everyone gets a cough at some point in their lives, and
the underlying cause is not usually serious or signifi-

125
27 Shortness of breath
Checklist
P
MP
F
Appropriate introduction
Confirms patient’s name and age
Explains reason for consultation
Obtains consent
Open question to elicit presenting complaint
Allows patient to open up, listens carefully,
remains silent and does not interrupt the patient
Signposts: e.g. ‘Mr Gregory, thank you for telling
me about this problem. I would like to ask a few
more detailed questions. Is that all right?’
History of presenting complaint:
• Onset (how it started, gradual/sudden)
• Time (duration)
• Alleviating factors
• Exacerbating factors:
• Exertion/exercise
• Pollen/chemicals (asthma)
• Orthopnoea (worse when lies flat)
• Severity:
• Exercise tolerance on a flat surface
• Exercise tolerance when walking upstairs/up
an incline
• Shortness of breath (SOB) at rest
• Variability: Is the SOB continuous throughout
the day, intermittent or progressively worse? If
intermittent, when is it worse/better?
• Asks if patient is suffering from any other
symptoms
• Asks about any recent illnesses
• Previous episodes of SOB
Asks about other respiratory symptoms:
• Cough
• Sputum
• Wheeze
• Orthopnoea
• Paroxysmal nocturnal dyspnoea
• Chest pain
→ is it pleuritic, sharp, worse with
inspiration?
• Ankle oedema
• Fevers
‘Red flags’:
• Haemoptysis
• Weight loss
• Night sweats
• Hoarseness
Checklist
P
MP
F
Past medical history
Family history:
• Lung cancer
• Atopy:
• Asthma
• Eczema
• Hayfever
• Ischaemic heart disease/myocardial infarction
• Pulmonary fibrosis
Drug history:
• Methotrexate
• Amiodarone
• NSAIDs
• Over-the-counter medication
Allergies
Social history:
• Smoking
• Alcohol
• Illicit drug use
• Occupation
• Exposure to asbestos
• Activities of daily living/functional assessment
and impairment due to SOB
Review of systems
Use of non-verbal cues, e.g. good eye contact,
nodding head and good body posture
Systematic approach
Explores and responds to ICE:
• Ideas
• Concerns
• Expectations
Shows empathy
Non-verbal skills
Avoids technical jargon
Devises holistic management plan and addresses
psychosocial issues as well as medical problems
Summarises
Offers to answer any questions
Thanks patient

126
Histories:
27 Shortness of breath
• Lung function tests/spirometry: to distinguish between
and diagnose obstructive and restrictive lung conditions
• Bronchoscopy: for bronchial/tracheal malignancies
• CT pulmonary angiogram and ventilation/perfusion
scan: for pulmonary embolism
• High-resolution CT scan: for some lung cancers and
pulmonary fibrosis
Others
• Nerve conduction studies: for Guillain–Barré syn-
drome and myasthenia gravis
• Spine/back X-rays: for kyphosis, scoliosis, etc.
Hints and tips for the exams
There may be more than one aetiology
Patients who are suffering from SOB often have more
the one coexisting condition to account for their symp-
Key investigations
Blood tests
• Full blood count: anaemia is a common cause of SOB
• Us
+Es and liver function tests: SOB can be a present-
ing feature of renal failure/hepatic failure if this has
resulted in fluid overload and pleural effusions
• Brain natriuretic peptide: for heart failure
Cardiac investigations
• ECG: for arrhythmias and left ventricular failure
• Echocardiogram: for valvular heart diseases and heart
failure
• Cardiac
catheter
studies:
for
pulmonary
hypertension
Respiratory investigations
• Chest X-ray: for pneumonias, lung cancer, cardiome-
galy and pleural effusions
Cardiovascular
Trachea/bronchus
Lung
Neuromuscular
conditions
Others
Heart failure
Obstructive airway
diseases (asthma/COPD)
Lower respiratory tract
infection, pneumonia
Guillain–Barré
syndrome
Anaemia
Infective endocarditis
Bronchiectasis
Tuberculosis
Motor neurone disease
Anxiety, psychogenic
Primary pulmonary
hypertension
Malignancy
Malignancy
Myasthenia gravis
Aortic stenosis/other
valvular heart disease
Obstructive sleep apnoea
Interstitial lung disease,
pulmonary fibrosis
Obesity hypoventilation
syndrome
Arrhythmias – especially
paroxysmal atrial
fibrillation and
superventricular
tachycardia
Pulmonary embolism
Kyphosis, scoliosis
Pulmonary oedema
Pleural effusions
Vasculitic/inflammatory causes
(Goodpasture’s syndrome,
Wegener’s granulomatosis)
Pneumonitis
Pneumothorax
Primary pulmonary
hypertension/pulmonary
hypertension from any cause
Summary of common conditions seen in OSCEs

Histories:
27 Shortness of breath 127
toms; for example, heart failure may be exacerbated by
anaemia.
Know your emergencies
Acute SOB is a common presenting symptom in
A&E, so don’t be surprised if it appears as an
OSCE station. You should know how to manage
common medical emergencies causing SOB such
as acute severe asthma, pulmonary embolism and
pneumothorax.
Questions you could be asked
Q. What is yellow nail syndrome?
A. A rare disorder in which patients have yellow dis-
coloured nails, pleural effusions and lymphoedema.
Q. If you suspect an inpatient has a deep vein throm-
bosis or a pulmonary embolism and you are awaiting a
definitive diagnosis, what treatment should you get the
patient started on?
A. Low molecular weight heparin. See the BNF for
dosing details.

128
28 Haemoptysis
Checklist
P
MP
F
Appropriate introduction
Confirms patient’s name and age
Explains reason for consultation
Obtains consent
Open question to elicit presenting complaint
Allows patient to open up, listens carefully,
remains silent and does not interrupt the patient
Signposts: e.g. ‘Mr Gregory, thank you for telling
me about this problem. I would like to ask a few
more detailed questions. Is that all right?’
History of presenting complaint
Elicits further details of haemoptysis:
• Onset (how did it start)
• Duration of symptoms
• Approximate quantity of blood
• Appearance of blood (and sputum)
• Streaks
• Fresh red
• Dark clots
• Exacerbating factors: smoke, dust, exertion
• Alleviating factors
• Asks whether patient is suffering from any
other symptoms
• Asks about any recent illnesses
• Previous episodes of chest pain
Associated symptoms:
• Weight loss
• Night sweats (TB)
• Fevers (TB, pneumonia, vasculitis)
• Hoarseness (cancer)
• Chest pain (cancer)
• Shortness of breath (pulmonary embolism)
• Ankle swelling
• Wheeze (cancer)
• Bony pains (cancer)
• Throat pain (throat malignancy)
• Nosebleeds
• Bleeding elsewhere (haematological disorders):
haematuria, haematemesis, epistaxis, bruising,
blood in stool
Checklist
P
MP
F
Elicits risk factors for pulmonary embolism/deep
vein thrombosis:
• Calf pain/swelling
• Recent travel
• Recent surgery
• Family history of clotting disorders
• Malignancy
• Oral contraceptive pill (if patient female)
• Pregnancy (if patient female)
Review of systems
Past medical history:
• Lung disease
• Heart disease
• Blood disorders
• Any cancer
• Kidney disease, haematuria
• Autoimmune conditions
Family history:
• Lung disease
• Vasculitis
• Bleeding/coagulation disorders
• Kidney disease
Drug history:
• Anticoagulant medication
• NSAIDs
Allergies
Social history:
• Smoking:
• Type of cigarettes/pipes, roll-ups, ‘sheesha’
• Number
• Duration
• Exposure to asbestos
• Alcohol
• Travel history and BCG
• Contact with possible TB patients
• Current and previous occupation(s)
• Pets
Use of non-verbal cues, e.g. good eye contact,
nodding head and good body posture
Systematic approach

Histories:
28 Haemoptysis 129
Checklist
P
MP
F
Explores and responds to ICE:
• Ideas
• Concerns
• Expectations
Shows empathy
Non-verbal skills
Avoids technical jargon
Checklist
P
MP
F
Devises holistic management plan and addresses
psychosocial issues as well as medical problems
Summarises
Offers to answer any questions
Thanks patient
Condition
‘Red flags’
Common errors
Lung cancer
Current, ex- or passive smoker
Weight loss
Change in voice
Bone pain
Working with asbestos
Settling for a diagnosis of chest infection if there is
a small amount of haemoptysis in a heavy
smoker
Remember that lung cancer must be ruled out in
a smoker with any amount of haemoptysis, even
if the other features from the history suggest it is
not the likeliest diagnosis
TB
Weight loss
Night sweats
Travel to areas with high prevalence
Failing to take a travel history
Failing to ask about BCG vaccination if suspecting
TB (but remember that the BCG is only around
40% protective against TB)
Pulmonary embolism
Risk factors (see above)
Red, swollen, painful leg
Insufficient questioning on risk factors
Assuming pulmonary embolism is impossible if there
are no clinical features of deep vein thrombosis
Pneumonia
Cough productive of rusty or green sputum with
small amounts of blood mixed in
Fever
Recent upper respiratory tract infection
Bronchiectasis
Recurrent chest infections
Croup during childhood
Presence of wheezing
Pulmonary oedema
Ankle swelling
Known mitral valve disease
Pink frothy sputum
Inhalation of toxic fumes
Pregnancy
Failing to ask about symptoms of congestive cardiac
failure, e.g. orthopnoea, paroxysmal nocturnal
dyspnoea, ankle oedema, shortness of breath on
exertion
Insufficient questioning about coughed-up blood
Goodpasture’s syndrome
Haematuria
Family history
Failing to ask about haematuria
Wegener’s granulomatosis
Nasal discharge and/or epistaxis
Oral ulcers
Purpuric skin rash
Arthralgia
Haematuria
Not able to recollect common clinical features
Lack of time to complete a thorough systems review
Summary of common conditions seen in OSCEs
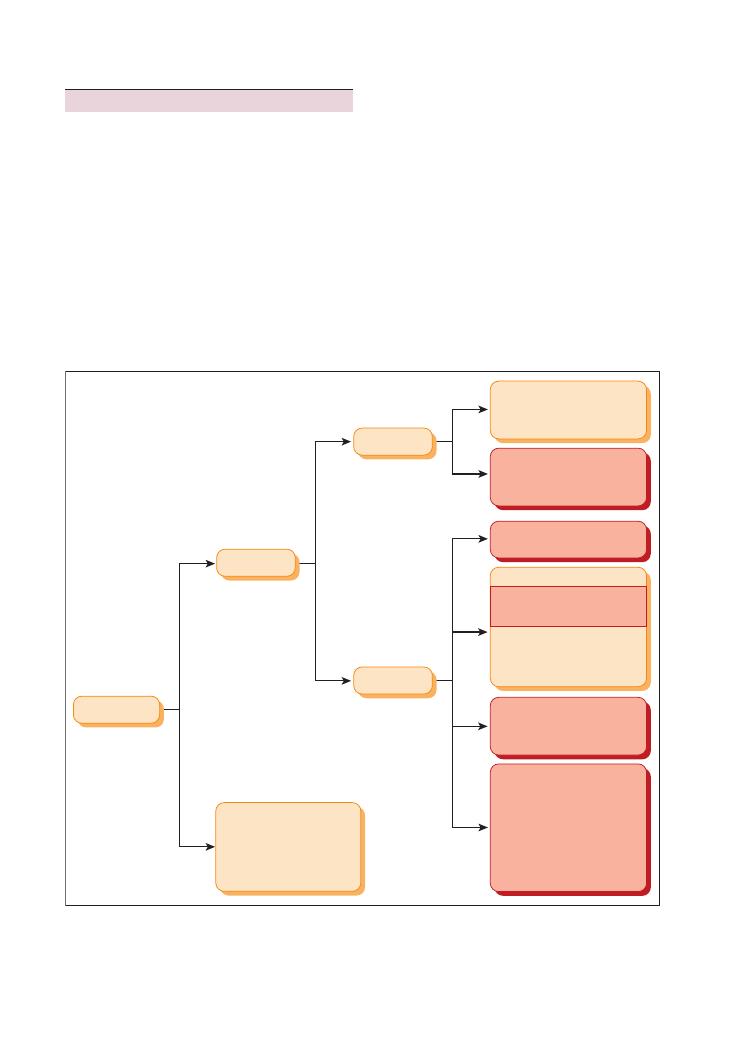
130
Histories:
28 Haemoptysis
usually enough to narrow down your differential diag-
nosis from the outset. You can then dedicate your
efforts to focusing your questioning on this. Questions
relating to other less likely causes can subsequently be
asked to demonstrate that you are also thinking about
them. The sample mark sheet outlines the key questions
that need to be asked to rule out serious and life-
threatening causes of haemoptysis.
You are likely to be asked to provide a differential
diagnosis based on your history. It is worth remember-
ing a few ‘rules of thumb’ that are applicable in most
cases:
• Haemoptysis in a patient with a long-standing
smoking history (usually considered to be
>20 pack–
years) is lung cancer until proven otherwise.
Hints and tips for the exam
Haemoptysis is a very worrying symptom for patients.
It is important to elicit concerns and respond to them
empathically. You will get marks for doing this.
It is a potentially life-threatening symptom if blood
loss is profuse. Therefore a sound knowledge of the
common and serious underlying causes is essential to
direct good history-taking. These can be divided into
general and local causes. The most common and serious
of these are tinted in red in the algorithm.
Using open questions to initiate the interview is par-
ticularly useful because these allow the actor-patient to
describe the characteristics of the coughed-up blood
and volunteer any other associated symptoms. This is
Figure 28.1 Algorithm for diagnosis of haemoptysis. AF, atrial fibrillation; PMH, past medical history; RCC, renal cell carcinoma; RF, rheumatic
fever; SOB, shortness of breath
Haemoptysis
General bleeding
disorders
(associated nosebleeds,
haemarthrosis, prolonged
bleeding after minor
surgery)
Mitral stenosis
(pink frothy sputum,
palpitations due to
AF, PMH of RF)
Right-sided/congestive
cardiac failure
(pink frothy sputum,
ankle swelling)
Bacterial pneumonia
(fever, SOB)
Vascular
PE
(risk factors present,
SOB, pleuritic chest pain)
Inflammation
(Churg-Strauss, Wegener’s)
Autoantibody
(Goodpasture’s haematuria)
TB
(fever, night sweats, weight
loss, foreign travel, swollen
neck glands)
Primary neoplasm
(Smoking history, weight loss,
night sweats, symptoms
related to metastases)
Secondary neoplasm
(haematuria, loin pain if
from RCC, change in bowel
habit, bloody stools if from
bowels)
Heart
Lungs
Local

Histories:
28 Haemoptysis 131
• Neoplasm
• Abscess
• Granuloma
• Aspergilloma
• Foreign body
• Skin tumour
• D-dimer testing has a very low sensitivity but a rela-
tively high specificity for pulmonary embolism. In
other words, it is increased above normal in several
conditions, such as pulmonary embolism, pneumonia,
etc., and hence is not sufficient to confirm a diagnosis
of pulmonary embolism. However, a negative D-dimer
result suggests that a pulmonary embolism is highly
unlikely. Therefore it can be used to rule out suspected
pulmonary embolism but not to confirm it.
Questions you could be asked
Q. Take a history and explain your management plan
to the patient. (5–10 minutes)
Q. Take a history from this patient presenting to your
GP surgery with haemoptysis and write a referral letter
to the appropriate hospital team to hand the patient
over. (10 minutes)
Q. Take a history from this patient presenting with
haemoptysis and present the chest X-ray to the exam-
iner. (5–10 minutes)
• Haemoptysis associated with fever and weight loss in
a traveller recently returned from the tropics is likely to
be caused by TB.
• Acute-onset haemoptysis with pleuritic chest pain
and/or shortness of breath is pulmonary embolism
until proven otherwise.
Time permitting, you may be asked to offer first-line
investigations to support or rebuke your preliminary
diagnosis. The list below outlines some key investiga-
tions that can be requested:
• Chest X-ray (neoplasm, consolidation secondary to
infection or pulmonary oedema, TB)
• D-dimer test (pulmonary embolism)
• Ventilation/perfusion scan (pulmonary embolism)
• Sputum microbiology (bacterial pneumonia)
• Sputum auramine stain (TB)
• Echocardiogram (right heart failure)
Candidates being considered for merits or distinc-
tions may be asked further questions, but it is difficult
to predict what these may be. It is likely they will relate
to more challenging aspects of the scenario, for example
the limitations of the investigations. Here are a few
limitations that it may be worthwhile remembering:
• A ventilation/perfusion scan can give a false-positive
result when investigating for a pulmonary embolism if
there is alveolar consolidation.
• The differential diagnosis for a round opacity in a
lung field on a chest X-ray is vast and includes:

132
29 Diarrhoea
Checklist
P MP
F
Appropriate introduction
Confirms patient’s name and age
Explains reason for consultation
Obtains consent
Open question to elicit presenting complaint
Allows patient to open up, listens carefully,
remains silent and does not interrupt the patient
Signposts: e.g. ‘Mr Gregory, thank you for telling
me about this problem. I would like to ask a few
more detailed questions. Is that all right?’
History of presenting complaint
• Clarify what the patient means by diarrhoea in
their own words
• Onset (how it started)
• Character:
• Consistency:
• Watery
• Loose
• Greasy and difficult to flush away
• Well formed
• Mucus
• Colour:
• Black (melaena)
• Red (blood)
• Green
• Smell: offensive
• Pellets
• Time:
• Duration
• Intermittent, continuous, progressive
• Frequency
• Volume (more or less than usual)
• Alleviating factors: dietary factors
• Exacerbating factors:
• Dietary factors
• Gluten-containing foods (coeliac disease)
• Severity
• Asks if patient is suffering from any other
symptoms
• Asks about any recent illnesses
• Previous episodes of diarrhoea
• Family members/contacts with similar
symptoms
Checklist
P MP
F
Asks about other gastrointestinal/colorectal and
other relevant symptoms:
• Nausea/vomiting
• Bloating
• Abdominal pain: is it reduced with defecation?
• Abdominal swelling
• Anal pain
• Constipation
• Tenesmus
• Faecal incontinence
• Fevers
• Symptoms of IBS:
• Constipation
• Psychosocial stressors
• Flatulence
• Symptoms of anaemia:
• Lethargy
• Shortness of breath
• Dizziness
→ postural
• Symptoms of malabsorption: generalised
weakness/lethargy
• Symptoms of IBD:
• Blood
• Arthralgia
• Back pain (sacroiliitis)
• Oral ulcers
• Skin problems
• Pyoderma gangrenosum
• Erythema nodosum
• Eye pain
• Risk factors for
Clostridium difficile:
• Recent hospital admissions
• Recent antibiotic courses
‘Red flags’:
• Rectal bleeding:
• Mixed with stool
• Around stool
• Dripping from rectum, separate from stool
• Black stools (melaena)
• Weight loss
• Loss of appetite
Review of systems:
• Gynaecological symptoms: related to ovarian
cancer

Histories:
29 Diarrhoea 133
Checklist
P MP
F
Past medical history:
• Any bowel disorders
• Diabetes (for autonomic neuropathy)
• Radiotherapy (for radiation colitis)
• Previous abdominal/intestinal surgery
Family history:
• Colon cancer
• IBD (Crohn’s disease, ulcerative colitis)
• Coeliac disease
Drug history:
• Laxatives
• Metformin
• Iron tablets
• Antibiotics (e.g. erythromycin)
• Thyroxine
• Over-the-counter medication
Allergies
Social history:
• Recent foreign travel/foreign contacts
• Similar symptoms in other members of
travelling party
• Accommodation
• Rural/forest exposure
• Water consumed (mineral water, tap water,
boiled water)
• Diet:
• Recent changes
• Takeaways
• Barbecues
• Contact with anyone suffering from diarrhoea
• Smoking
• Alcohol
• Occupation (dusty environment)
• Accommodation: institution, residential home
• Activities of daily living
Checklist
P MP
F
Use of non-verbal cues, e.g. good eye contact,
nodding head and good body posture
Systematic approach
Explores and responds to ICE:
• Ideas
• Concerns
• Expectations
Shows empathy
Non-verbal skills
Avoids technical jargon
Devises holistic management plan and addresses
psychosocial issues as well as medical problems
Summarises
Offers to answer any questions
Thanks patient

134
Histories:
29 Diarrhoea
Summary of common conditions seen in OSCEs
Condition
Key features in history
Key investigations
Infective causes
Bacterial/viral
gastroenteritis
Recent takeaway/restaurant
Recent barbecue
Raw/undercooked meat or seafood,
unpasteurised milk
Foreign contacts, travel abroad
Contacts with diarrhoea
Stool microscopy, culture and sensitivity if suspecting
bacterial cause
Full blood count and Us
+Es (for haemolytic-uraemic
syndrome or
Escherichia coli )
Clostridium difficile
Recent antibiotic use
Green, foul-smelling diarrhoea
Clostridium difficile toxin
Malignancies
Bowel cancer
Melaena (tarry black stool)
Rectal bleeding
Weight loss, loss of appetite
Colonoscopy and biopsy
Full blood count
+ mean corpuscular volume (microcytic
anaemia)
Ferritin (iron deficiency)
Inflammatory
Inflammatory bowel
disease (ulcerative
colitis, Crohn’s disease)
Young
Blood and mucus in stool
Systemic symptoms of IBD:
• Arthralgia
• Back pain (sacroileitis)
• Oral ulcers
• Skin problems:
• Pyoderma gangrenosum
• Erythema nodosum
• Eye pain
Colonoscopy and biopsy
Barium studies
Erythrocyte sedimentation rate
Malabsorption
Coeliac disease
Steatorrhoea (offensive-smelling ‘floaters’
that are difficult to flush away)
Correlation with gluten intake
Failure to thrive (if child)
Anti-tissue transglutaminase antibodies
Small bowel biopsy
Chronic pancreatitis
Steatorrhoea (offensive-smelling ‘floaters’
that are difficult to flush away)
Imaging of pancreas (ideally CT scan)
Short bowel syndrome
Steatorrhoea (offensive-smelling ‘floaters’
that are difficult to flush away)
History of small bowel resection
Exclude other diagnoses
Drug abuse, iatrogenic
Laxative abuse/overuse
Psychological stressors
Us
+Es (hypokalaemia)
Laxative screen
Excess alcohol intake
History of excess alcohol intake
Symptoms of chronic liver disease
Investigations for chronic liver disease
Liver function tests and gamma-glutamyl transpeptidase
Ultrasound

Condition
Key features in history
Key investigations
Drugs
Recent history of drug use
Common drugs that cause diarrhoea:
• Antibiotics (especially erythromycin)
• Metformin
• Colchicine
• Magnesium-based antacids
• Proton pump inhibitors
None – clinical diagnosis
Exclude other causes
Diet
Recent changes to diet, e.g. new
vegetarians
None – clinical diagnosis
Exclude other causes
Endocrine causes
Autonomic neuropathy
secondary to diabetes
Symptoms of diabetes:
• Polydipsia
• Polyuria
• Weight loss
• Lethargy
Other autonomic symptoms:
• Dry mouth
• Constipation
• Urinary retention
Fasting blood glucose
HbA
1c
if already diabetic
Hyperthyroidism
Symptoms of hyperthyroidism:
• Increased appetite and weight loss
• Menstrual disturbance
• Tremor
• Excessive sweating
• Irritability
• Heat intolerance
Thyroid function tests
Others/rare causes
IBS
Both constipation and diarrhoea
Abdominal pain and/or bloating
Symptoms improve after opening bowels
Correlation with stress
Rule out organic diseases
Full blood count, erythrocyte sedimentation rate, coeliac
screen
Overflow diarrhoea
Elderly
History of constipation
Constipation-inducing medications (e.g.
codeine-based analgesia)
Rectal examination (faecal impaction)
Carcinoid
Flushing
Wheezing
Abdominal pain
Cardiac symptoms (from right-sided valve
problems)
24-hour urinary 5-HIAA
CT chest/abdomen
Radiation enteritis/colitis
Enteritis: steatorrhoea
Colitis: blood in stool
Both:
• History of radiotherapy
• Abdominal pain
Barium studies
Colonoscopy with histology
VIPoma
Massive volumes of diarrhoea
Dehydration
Raised vasoactive peptide levels
Imaging (usually CT scan)
Hypokalaemia
Whipple’s disease
Steatorrhoea
Cognitive impairment, dementia
Chest pain, cardiac symptoms (pericarditis)
Lymphadenopathy
Joint pains
Fevers
Jejunal biopsy: macrophages with PAS stain-positive
granules

136
Histories:
29 Diarrhoea
Hints and tips for the exam
Diarrhoea is a very common symptom and one that
absolutely everyone will suffer from at some point in
their lives. The vast majority of cases are caused by viral
gastroenteritis, which is self-limiting and requires only
rehydration either with water or oral rehydration
therapy (such as Dioralyte).
However, various other potentially serious patholo-
gies can also cause diarrhoea, and the characteristics of
the diarrhoea and its associated symptoms can vary
immensely depending on the aetiology. This is why
diarrhoea lends itself particularly well to OSCEs.
What does the patient mean by diarrhoea?
The patient may be referring to the character/type
of stool, frequency or volume when they refer to
diarrhoea. Although definitions vary, most clinicians
would agree that the following features constitutes
diarrhoea:
• Amount of
>200–300 mL or g per day
• Stools that are liquid/loose
• Increased frequency (more than three times a day is
unusual)
Acute versus chronic
Again, different clinicians have different definitions of
these terms. Generally, diarrhoea that persists for more
than 4 weeks is deemed chronic.
‘Red flags’
Any of the following symptoms should prompt you to
request further investigations urgently:
• Rectal bleeding
• Melaena
• Weight loss
• Chronic diarrhoea
If you are in any doubt about which investigations to
suggest, you can rest assured that the following will be
a good answer in the vast majority of diarrhoea-related
cases:
• Colonoscopy with histological analysis/biopsy:
Visualising the lesion and getting a tissue sample will
usually lead to a definitive diagnosis.
• Full blood count and ferritin studies: A microcytic
anaemia with low ferritin levels usually indicates
gastrointestinal bleeding. Severe anaemia causing
symptoms and haemodynamic instability is a medical
emergency that needs urgent intervention.
• Imaging: Barium studies, CT abdomen and CT
colon may all be useful in certain cases, particularly if
the patient is not fit enough for a colonoscopy.
Questions you could be asked
Q. What are the symptoms of a VIPoma, and
which investigations would you do to help you
diagnostically?
Q. Name some endocrinological causes of diarrhoea.
Q. What non-gastroenterological symptoms may present
in a patient with IBD?
A. The answers to all of these questions can be found
in the text above.

137
30 Abdominal pain
Checklist
P
MP
F
Appropriate introduction
Confirms patient’s name and age
Explains reason for consultation
Obtains consent
Open question to elicit presenting complaint
Allows patient to open up, listens carefully,
remains silent and does not interrupt the patient
Signposts: e.g. ‘Mr Gregory, thank you for telling
me about this problem. I would like to ask a few
more detailed questions. Is that all right?’
History of presenting complaint
• Site (see also Chapter 3)
• Onset (how it started):
• Sudden
• Gradual
• Character:
• Colicky (renal stones)
• Sharp/sudden (rupture of viscus)
• Burning (peptic ulcer disease)
• Dull
• Radiation:
• To back (abdominal aortic aneurysm,
ruptured duodenal ulcer)
• To testicles/groin (hernia)
• To shoulders (gallbladder)
• Loin to groin (renal stone)
• Time:
• Duration
• Intermittent, continuous, progressive
• Alleviating factors:
• Dietary factors
• Opening bowels
• Exacerbating factors:
• Dietary factors
• Swallowing (oesophagus/stomach)
• Fatty foods (gallstones)
• Acidic/spicy foods, hot drinks (peptic ulcer
disease)
• Severity
• Asks if patient is suffering from any other
symptoms
• Asks about any recent illnesses
• Previous episodes of abdominal pain
• Family members/contacts with similar
symptoms
Checklist
P
MP
F
Associated symptoms:
Gastrointestinal/colorectal symptoms:
• Nausea/vomiting
• Bowel habit, diarrhoea/constipation
• Dysphagia
• Dyspepsia
• Bloating/abdominal swelling (generalised/
localised)
• Flatulence
• Fevers
• IBD symptoms: arthralgia, eye symptoms,
skin features, oral ulcers, bloody diarrhoea
Liver/hepatic symptoms:
• Right upper quadrant pain
• Jaundice
• Ankle swelling
Gallstone symptoms:
• Jaundice
• Right upper quadrant pain radiating to
shoulders
• Dark stools
• Pale urine
Renal symptoms:
• Location and character:
• Loin to groin
+ flank + colicky: renal
stones
• Flank
+ burning dysuria: pyelonephritis
• Generalised lethargy
• Pruritus
• Ankle swelling
Females: gynaecological symptoms:
• Correlation with menstrual periods
• Menorrhagia
• Irregular periods
• Vaginal discharge
Females: obstetric symptoms:
• Possibility of patient being pregnant
• Last menstrual period
• Unprotected sexual intercourse: must
signpost before taking sexual history
• Contraception
• Vaginal bleeding (with severe abdominal
pain
= ectopic pregnancy until proven
otherwise)

138
Histories:
30 Abdominal pain
Checklist
P
MP
F
‘Red flags’:
• Bleeding:
• Rectal: fresh red, melaena
• Vaginal: intermenstrual, postcoital
• Haematemesis
• Haematuria
• Weight loss
• Loss of appetite
Review of systems:
• Gynaecological symptoms: related to ovarian
cancer
Past medical history:
• Any bowel disorders
• Diabetes (for autonomic neuropathy)
• Radiotherapy (for radiation colitis)
• Previous abdominal/intestinal surgery
Family history:
• Colon cancer
• IBD (Crohn’s disease, ulcerative colitis)
• Recent abdominal surgery
Drug history:
• NSAIDs
• Over-the-counter medication
Allergies
Checklist
P
MP
F
Social history:
• Alcohol (peptic ulcer, gastritis)
• Smoking
• Illicit drug use
• Diet:
• Spicy foods (peptic ulcer disease)
• High-fibre foods (low intake may correlate
with diverticulitis)
• Occupation
• Activities of daily living
Use of non-verbal cues, e.g. good eye contact,
nodding head and good body posture
Systematic approach
Explores and responds to ICE:
• Ideas
• Concerns
• Expectations
Shows empathy
Non-verbal skills
Avoids technical jargon
Devises holistic management plan and addresses
psychosocial issues as well as medical problems
Summarises
Offers to answer any questions
Thanks patient
Lower
gastrointestinal
tract/colon
Upper
gastrointestinal
tract
Hepatobiliary
tract
Kidneys/
ureter/
bladder
Obstetric and
gynaecological/
genitourinary
Metabolic
Others
IBD exacerbation
Perforated peptic
ulcer
Biliary colic,
cholecystitis,
cholangitis
Renal/ureteric
stones
Ectopic pregnancy
Diabetic
ketoacidosis
Any perforated
viscus leading to
peritonitis
Ischaemic bowel
Small bowel
obstruction
Hepatitis,
hepatic pain
Urinary tract
infection
Ruptured ovarian
cyst
Addisonian crisis
Rupture or dissection
of abdominal
aortic aneurysm
Appendicitis
Severe
gastroenteritis
Pancreatitis
Pyelonephritis
Ovarian torsion
Hypercalcaemia
Psychogenic
Diverticulitis
Strangulated
hernia
Testicular torsion
Porphyria
Myocardial infarction
Large bowel
obstruction
Sickle cell crisis
Abscess in any part
of the abdomen
Summary of common conditions seen
in OSCEs
Causes of abdominal pain can be broadly divided into
acute and chronic.
Acute abdominal pain

Histories:
30 Abdominal pain 139
Investigations to consider for
abdominal pain
Blood tests
• Full blood count: anaemia may be present in cases
of gastrointestinal malignancy or a perforated peptic
ulcer. A raised white cell count would be found in infec-
tive or inflammatory conditions.
• Us
+Es: renal impairment may be found in pyelone-
phritis or any other renal/renal tract pathology.
• C-reactive protein: raised in IBD, infections and any
other pathologies causing inflammation.
• Liver function tests: deranged in hepatitis, raised
alkaline phosphatase in cholecystitis (often follows
biliary colic and will be associated with constant pain
and fever).
• Amylase: raised levels in pancreatitis.
• Arterial blood gasses: this is very useful in an ‘acute
abdomen’. A low base excess and a high lactate level may
indicate severe general physiological decompensation.
A metabolic acidosis will help narrow down the poten-
tial causes (e.g. pancreatitis).
Chronic abdominal pain
Lower
gastrointestinal
tract/colon
Upper
gastrointestinal
tract
Hepatobiliary
tract
Kidneys/
ureter/
bladder
Obstetric and
gynaecological/
genitourinary
Metabolic
Others
Diverticular
disease
Gastritis
Gallstones
Recurrent
urinary tract
infection
Endometriosis,
adenomyosis
Addison’s
disease
Psychogenic/
functional
abdominal pain
Constipation
Peptic ulcer
Chronic
pancreatitis
Renal/ureteric
stones
Fibroids
Porphyria
Mesenteric artery
ischaemia
Malignancy
Hiatus hernia
Malignancy
(gallbladder
or liver)
Adult polycystic
kidney
disease
Pelvic inflammatory
disease
Lead
poisoning
Lower lobe/basal
pneumonia
Malignancy
Malignancy
(renal cell,
bladder)
Dysmenorrhoea
Hip joint pain
IBS
Ovarian cyst
Psoas abscess
Subacute
obstruction
(due to
adhesions, etc.)
Pregnancy
Sexually transmitted
disease
Testicular cancer
Epididymitis, orchitis
Malignancy (ovarian/
endometrial)
Urine
• Urine dipstick on midstream urine sample: to
look for haematuria in renal colic due to renal stones,
nitrites if a urinary tract infection or pyelonephritis is
present.
• Urine beta-human chorionic gonadotropin: for
pregnancy.
Imaging
• Erect chest X-ray: to look for air under the diaphragm
due to a perforated viscus.
• Abdominal X-ray: to assess for abnormal fluid air
levels, loops of dilated bowel, etc.
• Ultrasound/CT: for any structural hepatobiliary or
gynaecological pathologies.
• MRCP: for hepatobiliary pathology.
• Intravenous urogram: for suspected ureteric obstruc-
tion due to calculi.
• Mesenteric angiogram for suspected mesenteric
ischaemia (remember that this can occur in atrial
fibrillation).

140
Histories:
30 Abdominal pain
• Group and save
• Vaginal swabs in women.
• Do a pregnancy test.
• Do a urine dipstick.
• Do an erect chest X-ray to look for air under the
diaphragm.
• Request a specialist assessment by the general surgical
and/or gynaecology on-call team.
Women’s health
In women, remember to consider pathologies related to
obstetric and gynaecological causes – it is unusual to
encounter obstetrics and gynaecology-related patholo-
gies in a finals OSCE, but it is still possible.
Pregnancy test
This should be one of the first tests you do in a woman
of child-bearing age presenting with lower abdominal
pain. A urinary beta-human chorionic gonadotropin
test is quick and easy to do.
Ectopic pregnancy
A pregnant woman with acute lower abdominal pain
is a case of ectopic pregnancy until proven otherwise.
Ectopic pregnancies can rupture, bleed, cause peritoni-
tis and ultimately be fatal. Most women will have had
their first pregnancy-related scan by around 12 weeks,
which will reveal whether or not the baby is in the
uterus.
Deciding where the pain originates from
The key to this lies in appreciating some basic anatomy
and embryology (as distant in your training as it may
sound):
• Visceral pain: This is the pain that the patient feels
first. It occurs as a result of stretching of the viscera
(such as the intestines, the wall of the stomach, and
anything that forms the gastrointestinal or hepatobil-
iary tract). This pain is usually quite vague and often
difficult to localise to a very specific area.
To appreciate the origin of visceral pain, one has to
appreciate how the gastrointestinal tract was formed.
To cut a long story short, the zygote develops in three
layers – the endoderm (the innermost layer), the meso-
derm (the middle layer) and the ectoderm (the outer-
most layer). The only one that is relevant here is the
endoderm. This develops into foregut, midgut and
hindgut, which later develop into various parts of the
gastrointestinal system. This is relevant is because the
area of the abdomen where the pain is first felt corre-
lates with these three divisions – abdominal pain in the
Others
• Oesophago-gastro-duodenoscopy/colonoscopy: for
cases of suspected gastrointestinal bleeding or any
pathology in the lumen of the oesophagus or colon.
• ERCP: for diagnosing cholangiocarcinoma and for
close visualisation of the hepatobiliary tract.
• Helicobacter pylori: can be detected either by a
stool antigen test or a CLO test (via oesophago-gastro-
duodenoscopy); serology is of limited clinical value.
• Vaginal/endocervical swabs: if suspecting pelvic
inflammatory disease/genitourinary infection.
Hints and tips for the exam
Work through the systems
Abdominal pain is potentially more difficult to manage
due to the wide variety of systems from which it may
originate. To help narrow down your list of differential
diagnoses, it may be helpful to work your way through
the different organs or systems in your mind. The fol-
lowing list summarises these:
• Oesophagus/stomach
• Small intestine
• Large intestine
• Liver/hepatobiliary tract
• Abdominal aorta
• Kidneys, renal tract, bladder
• Gynaecological/pelvic organs (ovaries, fallopian
tubes, uterus)
• Scrotal/testicular
• Metabolic
Don’t forget non-abdominal causes of
abdominal pain
These could be as serious and potentially life-
threatening as the classical causes that originate from
the abdomen – the tables above list them in the
‘Others’ column.
Managing an acute abdomen
This is a common surgical emergency that every junior
doctor should know inside out. Although there is an
absolute plethora of possible causes, the initial manage-
ment is generic for most of them:
• Make the patient nil by mouth.
• Start intravenous fluids.
• Administer adequate analgesia: remember to pre-
scribe an antiemetic with any opioid-based analgesia.
• Take bloods for the following:
• Full blood count, Us
+Es, liver function tests,
C-reactive protein level, amylase
• Blood cultures

Histories:
30 Abdominal pain 141
epigastric area usually originates from structures
derived from the foregut, pain in the umbilical area
originates from structures derived from the midgut,
and pain in the suprapubic area originates from struc-
tures derived from the hindgut. Figure 30.1 illustrates
this more simply.
• Peritoneal pain: This is the pain that the patient feels
later. In contrast to visceral pain, peritoneal pain is
Figure 30.1 Foregut, midgut and hindgut
Midgut
Small intestine
Ascending colon
Proximal 2/3 of transverse colon
Foregut
Stomach
Duodenum
Liver
+ Gallbladder
Pancreas
Hindgut
Distal 1/3 of transverse colon
Remainder of colon
Genitourinary structures
Figure 30.2 Location of organs in the abdomen
Lung
Liver
Gallbladder
Stomach
Pancreas
Abdominal
aorta
Lung
Spleen
Pancreas
(rarely)
Liver
Kidney
Ureter
Stomach
Small intestine/
transverse colon
Abdominal
aorta
Spleen
Kidney
Ureter
Ureter
Ovary
Fallopian tube
Caecum
(appendix)
Bladder
Uterus
Cervix
(referred pain
from testicles)
Ureter
Ovary
Fallopian tube
Sigmoid colon
more clearly defined and easier to localise. It occurs
after the painful organ either touches, stretches or
inflames the peritoneal peritoneum, which is why it
happens after visceral pain (which is due to stretching
of an organ or other structures). To localise where peri-
toneal pain is coming from, you need to know the
structures that underlie the peritoneum, as illustrated
in Figure 30.2.

142
Histories:
30 Abdominal pain
Questions you could be asked
Q. If a Turkish patient presented with unexplained
acute abdominal pain and had a family history of such
presentations, what diagnosis might you consider?
A. Familial Mediterranean fever.
Q. What is the difference between a normal abdominal
aorta and an abdominal aortic aneurysm on clinical
examination?
A. A normal aorta is only pulsatile, whereas an abdom-
inal aortic aneurysm is both pulsatile and expansile.
Q. What comprises ‘triple therapy’ for Helicobacter
pylori eradication?
A. This can vary depending on local guidelines but
usually includes a combination of a proton pump
inhibitor, clarithromycin and amoxicillin (or metroni-
dazole if the patient is allergic to penicillin) for 1 week
(see the BNF for other combinations and dosages).

143
31 Abdominal distension
Checklist
P
MP
F
Appropriate introduction
Confirms patient’s name and age
Explain reason for consultation
Obtains consent
Open question to elicit presenting complaint
Allows patient to open up, listens carefully,
remains silent and does not interrupt the patient
Signposts: e.g. ‘Mr Gregory, thank you for telling
me about this problem. I would like to ask a few
more detailed questions. Is that all right?’
History of presenting complaint:
• Site:
• Generalised
• Localised
• Onset (how it started):
• How did the patient first notice it?
• Sudden
• Gradual
• Character:
• Soft fluctuant/fluid swelling
• Hard, mass-like swelling
• Radiation:
• To testicles/groin (hernia)
• Time:
• Duration
• Intermittent/continuous/progressive
• Correlation with menstrual periods
• Alleviating factors:
• Dietary factors
• Opening bowels
• Exacerbating factors:
• Dietary factors/meals
• Position (e.g. worse on lying down/standing
– hernia), coughing (hernia)
• Worse at the end of the day (oedema)
• Pain/tenderness
• Bloating/discomfort
• Local compression-related symptoms (e.g. urge
incontinence)
• Asks if patient is suffering from any other
symptoms
• Asks about any recent illnesses
• Previous episodes of abdominal distension
• Family members/contacts with similar
symptoms
Checklist
P
MP
F
Associated symptoms:
• Gastrointestinal/colorectal symptoms:
• Abdominal pain
• Flatulence
• Nausea/vomiting
• Bowel habit/diarrhoea/constipation: any
correlation of distension with opening
bowels?
• Dysphagia/dyspepsia
Ascites:
• Facial swelling
• Ankle swelling
• Shortness of breath/orthopnoea
Liver/hepatobiliary symptoms: right upper
quadrant pain, jaundice, dark stools, pale
urine
Renal symptoms: urinary symptoms, frothy
urine (nephrotic syndrome), lethargy, pruritus
Heart failure symptoms: chest pain
Hypothyroidism
Females: gynaecological symptoms:
• Correlation with menstrual periods
• Irregular/painful periods
• Intermenstrual/postcoital bleeding
• Pelvic pain
Females: obstetric symptoms:
• Possibility of patient being pregnant
• Last menstrual period
• Unprotected sexual intercourse: must
signpost before taking sexual history
• Contraception
‘Red flags’:
• Bleeding (rectal, melaena, vaginal)
• Weight loss, loss of appetite, night sweats
(malignancy)
Review of systems
Past medical history:
• Constipation
• Abdominal surgery –especially laparoscopic
surgery
• Gynaecological history: fibroids, ovarian cysts
• Heart failure
Family history:
• Colorectal cancer
• Ovarian cancer
• Polycystic kidney disease
• Hernia
• Fibroids

144
Histories:
31 Abdominal distension
Checklist
P
MP
F
Drug history:
• Laxative history: any recent changes, stopped
taking
• Oral contraceptive pill (OCP, if patient female)
• Over-the-counter medication
Allergies
Social history:
• Alcohol (peptic ulcer disease, gastritis)
• Smoking
• Illicit drug use (especially intravenous drug
abuse for hepatitis B/C)
• Diet:
• Intake of fibre
• Recent change in diet
• Occupation
• Activities of daily living
Use of non-verbal cues, e.g. good eye contact,
nodding head and good body posture
Checklist
P
MP
F
Systematic approach
Explores and responds to ICE:
• Ideas
• Concerns
• Expectations
Shows empathy
Non-verbal skills
Avoids technical jargon
Devises holistic management plan and addresses
psychosocial issues as well as medical problems
Summarises
Offers to answer any questions
Thanks patient
Condition
Key points
‘Red flags’
Management
Small bowel obstruction
Adhesions (70%)
Acute hernia (20%)
Malignancy
Stricture
Foreign body – gallstone
Intussusception
Volvulus
Vomiting (early)
Colicky abdominal pain
(high in abdomen)
Constipation
Investigations: full blood count, Us
+ Es,
amylase, abdominal X-ray, erect chest X-ray,
Gastrograffin follow-through, CT
Strangulation
(blood supply compromised) – surgery
Nil by mouth
Nasogastric tube insertion and intravenous
fluids – drip and suck
Analgesia
Monitor fluid status
Large bowel
obstruction
Malignancy (60%)
Stricture – diverticular,
Crohn’s disease (20%)
Volvulus – sigmoid, caecal
Impacted faeces
Vomiting (late)
Constant abdominal pain
Constipation
Call surgeon
Surgery
Hernia
See Chapter 12 on hernia
examination
Malignancy
Abdominal distension may
be due to cancer mass,
bowel obstruction,
ascites or organomegaly
Generalised symptoms
Smoker
Older patient
Family history
Bloods: full blood count, Us
+ Es, liver
function tests, carcinoembryonic antigen,
faecal occult blood
Imaging: sigmoidoscopy, colonoscopy, CT/MRI,
liver ultrasound scan
Special test: genetic testing (hereditary
non-polyposis rectal cancer)
Management: surgery (some scope for
radiotherapy and chemotherapy)
Summary of common conditions seen in OSCEs

Histories:
31 Abdominal distension 145
Condition
Key points
‘Red flags’
Management
Irritable bowel
syndrome
Abdominal pain
Mucous per rectum
Related to mood/stress
May be postinfectious
Chronic course
Check the ROME III criteria
Alternating diarrhoea and
constipation
Reassurance: in 50%, symptoms improve by 1
year
Explore food allergies
Constipation: ispaghula, methylcellulose
Diarrhoea: fibre, loperamide
Bloating: mebeverine
Proton pump inhibitor
Amytriptyline
Pregnancy
Missed period(s)
History of unprotected intercourse
Poor compliance with OCP
Drug interaction with OCP (e.g. antibiotics and OCP)
Folic acid
Follow-up in antenatal clinic
Splenomegaly
See Chapter 3 on
abdominal examination
Hepatomegaly
See Chapter 3 on
abdominal examination
Ascites
See Chapter 3 on
abdominal examination
Abdominal aortic
aneurysm
Abdominal/back pain
Pulsatile
Expansile
Trauma
Peripheral vascular disease
Risk factors for atheroma
See Chapter 14 on arterial examination
Pelvic mass
Fibroids
Bladder
Fetus
Ovarian cyst/malignancy
Cannot get below it on
palpation
Pelvic ultrasound
Refer to gynaecologist
Renal cell carcinoma
Haematuria
Flank pain
Abdominal mass
Generalised symptoms
Left varicocele
Bloods: full blood count, Us
+ Es, alkaline
phosphatase, erythrocyte sedimentation rate
Urine microscopy and cytology
Imaging: renal ultrasound, CT/MRI, chest
X-ray, IVU
Surgery
Robson Staging
Hints and tips for the exam
Remember the ‘5 Fs and 1 T’ of abdominal
distension (Figure 31.1)
• Fat (hypothyroidism, Cushing’s disease)
• Fluid (is this ascites?)
• Faeces (constipation, obstruction – is it complete?)
• Flatus (complete obstruction, food intolerance, irri-
table bowel syndrome)
• Fetus (pregnancy test)
• Tumour
Women’s health
The sex of the patient will help rule out a number of
pathologies that only affect women. If your patient is
Figure 31.1 Abdominal distension

146
Histories:
31 Abdominal distension
• Remember to look for loops of bowel in the hernial
orifices.
Ascites – transudates versus exudates
Abdominal distension caused by fluid has a broad dif-
ferential diagnosis. Fluid may collect in the peritoneal
cavity or in the bowel (e.g. third-space losses as a result
of obstruction or ileus). Hence the patient may have
symptoms of dehydration such as a dry mouth, thirst
and light-headedness. Distension may be a sign of fluid
overload so be sure to ask about swelling of the ankles,
orthopnoea and paroxysmal nocturnal dyspnoea.
Ascites is the term used to describe fluid in the
abdominal peritoneal cavity. The most common cause
is cirrhosis of the liver. When discussing the causes in
your OSCE, subdivide them into transudative and exu-
dative causes (see the table). The key investigation here
is an ascitic tap/drain. This is both diagnostic (as it
should be sent for microscopy, culture, sensitivity and
cytology) and therapeutic (by offloading fluid to reduce
discomfort).
In conjunction with ascites, a fever may signify spon-
taneous bacterial peritonitis (diagnosed by finding
>250/mm
3
neutrophils). This is an emergency and
requires antibiotic therapy.
female, remember to ask about her last menstrual
period and the likelihood that she is pregnant. When
discussing management with the examiner, remember
in your list of investigations to mention offering a
pregnancy test. All women of child-bearing age with
abdominal symptoms should be offered a pregnancy
test. This should also be done before any radiological
investigations such as an abdominal X-ray.
Elderly
+ bloating = high possibility
of malignancy
An elderly patient should make you consider malignant
processes first and aim to rule these in or out. Both
colorectal and ovarian pathology can cause bloating –
although constipation is quite often the underlying
cause.
Acute causes
One of the aims in your history will be to assess the
urgency of the situation. Is the patient in urinary reten-
tion? Does the patient have a toxic dilatation of the
colon (megacolon) or are they just constipated? Know
the ‘red flag’ signs for acute abdominal conditions.
The chronology of the symptoms is important, so
make sure you are comfortable in terms of which came
first (e.g. vomiting shortly after eating – high gastroin-
testinal obstruction; vomiting some time after eating
– small bowel obstruction; constipation followed by
vomiting (bilious and later faeculant) – lower gastroin-
testinal obstruction).
An important question commonly forgotten is to ask
when the patient last opened their bowels and also if
there has been a change. Be sure also to differentiate
simple constipation from absolute constipation by
asking whether, in addition to not passing stool, they
have passed any wind. If not, this may suggest complete
obstruction.
Differentiating between small bowel
and large bowel obstruction on
abdominal X-ray
• Small bowel:
• Prominent loops of bowel in the centre of the
abdomen
• Valvulae conniventes that cross the entire width of
the small bowel
• No gas in the large bowel
• Large bowel:
• Prominent bowel in the periphery of abdomen
• Haustra do not cross the entire width of the bowel
• There is no air distal to the obstruction
Transudate
Exudate
<25 g/L protein
Due to low oncotic pressure
(resulting from low protein
levels) or high hydrostatic
pressure (e.g. right heart
failure)
>35 g/L protein
Local infection or inflammation
Causes
Causes
Cirrhosis (alcoholic liver disease) Cancer
Heart failure
Infection – tuberculosis,
spontaneous bacterial
peritonitis
Constrictive pericarditis
Pancreatitis
Fluid overload
Serositis (inflammation)
Nephrotic syndrome
Budd–Chiari syndrome (hepatic
vein obstruction due to
thrombosis or tumour)
Malabsorption
Hypothyroidism
Meigs syndrome (pleural effusion
secondary to ovarian fibroma)
Splenomegaly and hepatomegaly
See Chapter 3 (abdominal examination).

Histories:
31 Abdominal distension 147
• Advice on symptoms of serious infection.
• MedicAlert bracelet.
Q. Outline the Duke’s staging criteria for colorectal
carcinoma.
A. • Remember the layers of the bowel wall:
• Mucosa (innermost)
• Submucosa
• Muscularis propria
• Serosa
• Mention that staging is now usually by the TNM
classification.
Dukes staging
Questions you could be asked
Q. What signs might you see on an examination of
bowel obstruction?
A. • Distressed patient
• Protuberant abdomen
• Surgical scars
• Hyperresonant percussion note
• Tinkling bowel sounds on auscultation (absent
bowel sounds may indicate ischaemia)
• Signs of peritonism (rigid abdomen, guarding,
rebound tenderness)
• Signs of hypovolaemia and/or shock
Q. How would you differentiate between small bowel
and large bowel obstruction on an abdominal X-ray?
A. The answer can be found in the text above.
Q. What are the key investigations in liver failure
(cirrhosis)?
A. • Blood:
• Liver function tests:
• Aspartate aminotransferase, alanine ami-
notransferase, alkaline phosphatase, gamma
glutamyl transferase (all raised early)
• Albumin (lowered), International Normal-
ised Ratio (raised due to reduction in liver-
derived clotting factors: II, VII, IX, X) – these
indicate the synthetic function of the liver and
are deranged later in the course of disease
• Liver ultrasound and duplex scan
• Ascitic tap: microscopy, culture and sensitivity,
cytology
• Liver biopsy
Q. Describe what is involved in post-splenectomy
prophylaxis?
A. • After splenectomy, patients are susceptible to
infection, especially by encapsulated organisms.
• Vaccination 2 weeks prior to elective splenectomy
or at the next opportunity after an emergency
splenectomy (e.g. rupture).
• Vaccines should be given: Haemophilus influenzae
type B, pneumococcus, meningitis C
• Lifelong penicillin V
Stage
Criteria
5-year survival
after treatment
A
Beneath muscularis mucosae
90%
B
Through muscularis mucosae
(no nodes)
65%
C
Positive lymph nodes
30%
D
Metastases
<10%
Q. Describe the NHS bowel cancer screening
programme.
A. • All men and women between 60 and 69 years of
age are seen.
• Individuals are sent a home faecal occult blood
kit.
Q. What is a colonoscopy, and what are the possible
complications of the procedure?
A. • An endoscope is passed via the rectum to visualise
the entire large colon.
• It can be an outpatient or a day case.
• Laxative is used the day before, both morning and
night (sodium picosulfate).
• Sedation is necessary (patients will need someone
to take them home).
• The procedure takes around 45 minutes.
• A biopsy can be taken.
• Complications are discomfort, bloating and
bleeding after biopsy.

148
32 Haematemesis
Checklist
P
MP
F
Appropriate introduction
Confirms patient’s name and age
Explains reason for consultation
Obtains consent
Open question to elicit presenting complaint
Allows patient to open up, listens carefully,
remains silent and does not interrupt the patient
Signposts: e.g. ‘Mr Gregory, thank you for telling
me about this problem. I would like to ask a few
more detailed questions. Is that all right?’
History of presenting complaint:
• Volume: If large volume, patient needs to
be assessed and resuscitated
immediately
• Number of episodes
• Character/colour:
• Coffee grounds
• Dark clots
• Fresh, bright red
• Mixed with vomitus
• Onset (what brought it on):
• Medications, alcohol
• Vomiting/retching (Mallory–Weiss tear)
• Precipitating factors:
• Alcohol
→ Mallory-Weiss tear
• NSAIDs
• Melaena
• Abdominal/chest pain
• Symptoms of shock (faintness, shortness of
breath)
• Trauma to abdomen
• Asks if patient is suffering from any other
symptoms
• Asks about any recent illnesses
• Previous episodes of haematemesis
Associated symptoms:
• Bleeding, bruising elsewhere, epistaxis
• Anaemia (lethargy, shortness of breath)
• Dysphagia, odynophagia
• Vomiting
• Liver/hepatic symptoms:
• Right upper quadrant pain
• Jaundice
• Ankle swelling
Checklist
P
MP
F
‘Red flags’:
• Weight loss, loss of appetite
• Dysphagia
Review of systems
Past medical history:
• Gastro-oesophageal reflux disease
• Peptic ulcer
• Liver problems, viral hepatitis, varices
• Bleeding/clotting disorders
Family history:
• Oesophageal/stomach cancer
• Osler–Weber–Rendu disease (telangiectasia)
Drug history:
• NSAIDs
• Warfarin
• Bisphosphonates
• Steroids
• Over-the-counter medication
Allergies
Social history:
• Smoking
• Alcohol
• Illicit drug use
• Ethnicity (haemophilia)
• Diet (spicy foods)
• Activities of daily living
Use of non-verbal cues, e.g. good eye contact,
nodding head and good body posture
Systematic approach
Explores and responds to ICE:
• Ideas
• Concerns
• Expectations
Shows empathy
Non-verbal skills
Avoids technical jargon
Devises holistic management plan and addresses
psychosocial issues as well as medical problems
Summarises
Offers to answer any questions
Thanks patient

Histories:
32 Haematemesis 149
Condition
Key points
Management*
Oesophageal varices
Due to portosystemic shunting of blood
Other shunts:
• Caput medusae (veins around umbilicus)
• Rectal varices
Causes:
• Cirrhosis
• Schistosomiasis
Banding
Sclerotherapy
Balloon tamponade
Transjugular intrahepatic portosystemic
shunt
Portocaval shunt (rare)
Peptic ulcer
Pain related to eating:
• Before meals and relieved by eating: duodenal ulcer
(four times more common)
• Worse after eating: gastric ulcer
Peritonism if perforated (pain, rigid abdomen)
Weight loss
Risk factors:
•
Helicobacter pylori
• Smoking
• Drugs (NSAIDs, aspirin, steroids)
Lifestyle interventions
Stop NSAIDs and other offending
medications if possible
Eradicate
H. pylori
†
Reduce acid production (proton pump
inhibitor – omeprazole; H2 agonists
– ranitidine)
Inflammation
(oesophagitis,
gastritis)
Alcohol
Drugs (NSAIDs, corrosive ingestion)
Smoking
Infection (immunocompromised – HIV)
Address causative issue
Mallory–Weiss tear
Longitudinal tear in oesophageal mucosa due to forceful
vomiting
Alcohol binge
Eating disorder
Conservative: most will have stopped
bleeding and heal themselves
Medical: reduce acid production (proton
pump inhibitor), antiemetic
(prochloperazine), endoscopy
Surgical: few require oversewing of the tear
Oesophageal cancer
Risk factors: diet, alcohol, smoking, Barrett’s oesophagus,
achalasia, Plummer–Vinson syndrome (iron-deficiency
anaemia
+ postcricoid web + glossitis)
Dysphagia
Weight loss
Multidisciplinary team
Preoperative chemotherapy
Surgery
Palliation
Gastric cancer
Risk factors: pernicious anaemia, smoking, high-nitrate
diets – Japan, blood group A
Dyspepsia
Weight loss
Anaemia
Vomiting
Multidisciplinary team
Partial or total gastrectomy
Chemotherapy
Palliation
Bleeding diathesis
Any bleeding disorder. May be the result of anticoagulation
Treat cause
Trauma
Dieulafoy lesion
Large arteriole in the stomach wall that erodes and bleeds
Endoscopic injection and sclerotherapy
Boerhaave’s syndrome
Oesophageal rupture due to vomiting
Surgery
Peutz–Jegher
syndrome
Dark freckles on the lips, and gastrointestinal polyps that
can bleed
Conservative
Surgery
Osler–Weber–Rendu
disease
Autosomal dominant
Also known as hereditary haemorrhagic telangiectasia
Telangiectasias on skin and mucous membranes
Aorto-enteric fistula
Aortic graft repair
+ upper/lower gastrointestinal bleed
CT abdomen
Endoscopy
Summary of common conditions seen in OSCEs
40% of patients referred for upper gastrointestinal endoscopy for haematemesis have no identifiable cause of bleeding.
*Remember that the management of all these conditions begins with resuscitation (airway, breathing and circulation).
†
Helicobacter pylori eradication: 7-day regime comprising a proton pump inhibitor (e.g. omeprazole 20 mg twice daily) and two antibiotics
(e.g. metronidazole, amoxicillins, clarithromycin). See the
BNF for further details.

150
Histories:
32 Haematemesis
Cross-match
• This is used if there is an imminent need for
transfusion.
• The patient’s blood is tested for ABO and antibodies
(as in group and save).
• The patient’s blood is tested against the donor sample
to assess whether they are compatible.
Risk-scoring systems
Know about the risk scoring scales for upper gastroin-
testinal bleeding and aim to elicit the relevant aspects
from the history (see below). If you are able to give a
Rockall score in your summary and hence an indica-
tion for rebleeding, endoscopy or surgery, this will
separate you from other candidates and guide the
examiner to question you on this, which you should
be prepared for.
The Rockall scoring system was devised to predict
the risk of rebleeding in patients presenting with upper
gastrointestinal bleeds, and to help estimate mortality.
Remember that the greatest risk of rebleeding exists is
in the first 48 hours, so bear this in mind when con-
sidering whether or not to admit the patient.
A common presentation in this station is of bleeding
oesophageal varices due to chronic liver disease. Hence,
it is fundamental that you assess possible causes of
chronic liver disease (e.g. alcohol, medications, viral
hepatitis) in your history. It is important that you are
also aware of the Child–Pugh grading system and how
to calculate it. This is a score used to grade the severity
of liver cirrhosis and the likelihood of variceal bleeding
– a score
>8 indicates a high risk of bleeding.
You should bear the criteria in mind when you are
asked which blood tests you would like to run. The
scoring is outlined in the table. Binge drinking is often
associated with Mallory–Weiss tears so remember to
ask about the patient’s drinking habits (e.g. do they
drink ‘binge drink’ on the weekend and not drink on
weekdays?, etc.) in addition to how much they drink
(with respect to quantity). Do not waste time assessing
dependency (i.e. applying a CAGE questionnaire) – this
is not the aim of this station.
Rockall score for upper gastrointestinal
bleed
A score
>6 may indicate a need for surgery.
Hints and tips for the exam
Before attempting to practise this station, make sure
you have a sound knowledge of the causes of haemate-
mesis, how to differentiate between them and the early
management of the condition. The station is likely to
be set in an emergency department so remember to
address resuscitation first; you can state this on entering
the station before beginning the history. One way to
give your differential diagnosis for haematemesis is to
group by region of bleeding (e.g. oesophageal, gastric,
duodenal.
Make sure it is definitely haematemesis
As always begin with an open question. An important
point of call in the history is to delineate whether the
patient has experienced haematemesis or haemoptysis.
They are similar in presentation but have different dif-
ferential diagnoses. Be clear and ask whether the patient
coughed up (haemoptysis) or vomited the blood.
Aim early on to comfort the patient as vomiting
blood is undoubtedly a very worrying symptom.
Gaining the patient’s trust early on will make the
station smoother and also earn their preference marks.
Ask early on whether they have any questions as cancer
is a common worry; marks will be awarded for address-
ing patients
′ anxieties. Not addressing the patient’s
agenda is a common error in such a station when faced
with a possible emergency.
Don’t forget the blood in your
blood tests!
Students often forget to ‘group and save’ and/or
cross-match.
Group and save (also known as ‘group and
hold’ and ‘type and screen’)
• The patient’s blood is tested to determine the ABO
type and the rhesus D status. It can also be tested for
antibodies to red cells in the serum (e.g. anti-A, anti-B,
anti-D or anti-Duffy).
• This test is indicated if a blood transfusion will be
necessary in the near future, for example postopera-
tively.
• The sample is kept in the laboratory for a few days.
• On collection, the bottles should be completely filled
and hand-labelled.

Histories:
32 Haematemesis 151
Points
0
1
2
3
Before endoscopy
Age (years)
<60
60–79
>80
Systolic blood pressure
and heart rate
>100 mmHg
<100/min
>100 mmHg
>100/min
<100 mmHg
Co-morbidity
Heat failure
Ischaemic heart disease
Kidney failure
Liver failure
Metastases
After endoscopy
Diagnosis
1. Mallory–Weiss tears, idiopathic
2. Potentially any cause
3. Malignancy
Everything else
Malignancy
Signs of recent bleeding
None
Blood, clot, vessel
Points
1
2
3
Bilirubin (
µmol/L)
<34
34–51
>51
Albumin (g/L)
>35
28–35
<28
Prothrombin time (number of
seconds longer than normal)
1–3
4–6
>6
Ascites
None
Slight
Moderate
Encephalopathy grade
None
1–2
3–4
Child–Pugh grading for cirrhosis and
variceal bleeding
Paracetamol-related
Not paracetamol-related
• Arterial pH
< 7.3 24 hours
after ingestion
• Prothrombin time
>100 s
OR all of the below:
OR three of the criteria
listed below:
• Prothrombin time
>100 s
• Creatinine
>300 µmol/L
• Grade 3–4 encephalopathy
• Drug-induced liver failure
• Age
<10 or >40 years
•
>1 week from jaundice
to encephalopathy
• Prothrombin time
>50 s
• Bilirubin
>300 µmol/L
Kings College Hospital criteria for liver
transplantation
Questions you could be asked
Q. How would you investigate and manage this
patient?
Q. What is their Rockall Score? What does it mean?
Q. When would you refer the patient for an endos-
copy? How urgently? (Start with the golden phrase: ‘I
would consult the local hospital guidelines.’)
Q. Describe the endoscopy procedure.
A. Answers to these questions can be found in the text
above.
Other possible topics include:
• Questions related to managing shock (e.g. parameters
and appropriate fluids)
• Transfusion reactions
• Liver disease
• Liver transplant (the King’s College Transplant Crite-
ria are included in the text)

152
33 Rectal bleeding
Checklist
P
MP
F
Appropriate introduction
Confirms patient’s name and age
Explains reason for consultation
Obtains consent
Open question to elicit presenting complaint
Allows patient to open up, listens carefully,
remains silent and does not interrupt the patient
Signposts: e.g. ‘Mr Gregory, thank you for telling
me about this problem. I would like to ask a few
more detailed questions. Is that all right?’
History of presenting complaint:
• Site:
• Mixed with stool
• Around stool
• Dripping from anus
• Spotting on tissue paper
• Onset (what brought it on)
• Character:
• Fresh, bright red
• Dark, melaena
• Clots
• Liquid
• Mucus
• Smell – offensive
• Time:
• Duration
• Intermittent, continuous, progressive
• Alleviating factors
• Exacerbating factors:
• Dietary factors
• Constipation (fissure)
• Anal intercourse
• Foreign bodies, sexual devices
• Amount, volume
• Frequency
• Trauma
• Straining when opens bowels
• Asks if patient is suffering from any other
symptoms
• Asks about any recent illnesses
• Previous episodes of rectal bleeding
• Family members/contacts with similar
symptoms
Checklist
P
MP
F
Asks about other colorectal/anal symptoms:
• Pain/soreness
• Itching
• Tenesmus
• Lumps, swellings, piles
• Rectal prolapse
• Change of bowel habit:
• Constipation
• Diarrhoea
• Frequency of opening bowels
• Faecal incontinence
• Abdominal pain
• Symptoms of inflammatory bowel disease:
• Blood
• Arthralgia
• Back pain (sacroiliitis)
• Oral ulcers
• Skin problems:
• Pyoderma gangrenosum
• Erythema nodosum
• Eye pain
• Symptoms of anaemia
• Lethargy
• Shortness of breath
• Dizziness – postural
‘Red flags’:
• Weight loss
• Loss of appetite
Review of systems:
• Bleeding elsewhere (vomiting, ears, bruising,
epistaxis)
Past medical history:
• Any bowel disorders
• Any rectal disorders
• Polyps
• Recent anorectal surgery
• Radiotherapy (for radiation colitis)
• Constipation
Family history:
• Colorectal cancer
• Colorectal polyps
• Haemorrhoids
• Inflammatory bowel disease
• Angiodysplasia

Histories:
33 Rectal bleeding 153
Checklist
P
MP
F
Drug history:
• NSAIDs
• Warfarin
• Over-the-counter medication
Allergies
Social history:
• Recent foreign travel/foreign contacts
• Diet:
• Recent changes
• Lack of high-fibre foods
• Takeaways
• Barbecues
• Smoking
• Alcohol
• Activities of daily living
Use of non-verbal cues, e.g. good eye contact,
nodding head and good body posture
Checklist
P
MP
F
Systematic approach
Explores and responds to ICE:
• Ideas
• Concerns
• Expectations
Shows empathy
Non-verbal skills
Avoids technical jargon
Devises a holistic management plan and
addresses psychosocial issues as well as medical
problems
Summarises
Offers to answer any questions
Thanks patient
Summary of common conditions seen in OSCEs
Condition
Key symptoms
Investigations
Treatment
Upper
gastrointestinal
tract cancer
Melaena – black tarry stool
Characteristic foul smell
Oesophago-gastro-duodenoscopy
Full blood count
CT chest, abdomen and pelvis
for staging
Blood transfusion if anaemic
Surgical resection or chemotherapy
Colorectal cancer
If source of bleeding is after
terminal ileum, bleeding is
more likely to be fresh/red
rather than melaena
Colonoscopy
Full blood count
CT chest, abdomen and pelvis
for staging
Blood transfusion if anaemic
Surgical resection or chemotherapy
Distal rectal
tumour
Fresh red bleeding/red blood
mixed with stool
Full blood count
Sigmoidoscopy
Colonoscopy
CT, MRI, liver ultrasound scan for
staging
Abdominoperineal resection if less than
8–10 cm from the anus
Haemorrhoids
Protruding tissue from the
anus
Fresh red blood drips, often
separate from the stool
Proctoscopy
Conservative: increase dietary fibre and
fluid intake
Medical: topical anaesthetic, band ligation
Surgery
NB. Treatment of acutely thrombosed
external piles is conservative if the
patient presents after 72 hours of
symptoms. If they present within 72
hours of the start of symptoms, best
treatment is surgical repair/excision
(
Continued )

154
Histories:
33 Rectal bleeding
Characteristics of
rectal bleeding
Location of source of bleeding
Melaena
Colon proximal to terminal ileum
Red blood mixed with
stool or coating stool
Colon distal to terminal ileum
Fresh red blood dripping
separately from stool
Anus (e.g. fissure) or haemorrhoid
Condition
Key symptoms
Investigations
Treatment
Anal fissure
Severe pain on defecation
Streaks of blood often around
stool
Rectal examination
Proctoscopy
Examination under anaesthesia if
required
Classified as acute if present for
<4–6
weeks:
• Conservative: dietary advice
• Medical: bulk-forming laxatives, lubricants
prior to defecation, topical anaesthetic
Classified as chronic if present for
>4–6
weeks: In addition to treatment for
acute fissure:
• Topical GTN
• Refer for surgery if GTN ineffective at
8–10 weeks
Inflammatory
bowel disease
(ulcerative
colitis and
Crohn’s
disease)
Young
Blood and mucus in stool
Systemic symptoms of
inflammatory bowel disease:
• Arthralgia
• Back pain (sacroileitis)
• Oral ulcers
• Skin problems:
• Pyoderma gangrenosum
• Erythema nodosum
• Eye pain
Colonoscopy and biopsy
Barium studies
Erythrocyte sedimentation rate
See Chapter 3 on abdominal examination
Bleeding/clotting
disorders
Bleeding elsewhere:
• Haematuria
• Bleeding gums
• Bruising
Full blood count
International Normalised Ratio
Blood film
Transfuse if anaemic
Replace platelets if necessary
Vitamin K if International Normalised
Ratio is high
Hints and tips for the exam
Be sensitive
Patients are often reluctant to discuss rectal bleeding as
they see it as a topic that is both intimate to them as
well as somewhat unpleasant to discuss. This is why it
is important to spend some time putting the patient at
ease, expressing empathy, exploring their ideas and con-
cerns, and reassuring them that it is a common com-
plaint and that you are used to seeing patients with it.
Type of bleeding
This is fundamental to locating the site of the bleeding
(see the table).
Remember to take a general
gastroenterological history
It can be easy to take a history that focuses on the
anorectal area. Remember, however, that many serious
causes of rectal bleeding (such as inflammatory bowel
disease and colon cancer) could result in pathology
elsewhere in the gastrointestinal tract, so it is important
that you enquire about the entire gastroenterological
system and any ‘red flags’ that may be unrelated to the
presenting complaint (such as weight loss).
Questions you could be asked
Q. Above which point in the gastrointestinal tract does
bleeding cause melaena (as opposed to fresh red
bleeding)?
A. Although there is no specific point immediately
after which fresh red blood suddenly becomes melaena,
generally speaking bleeding from an area proximal to
the terminal ileum is more likely to be melaena, as
there is scope for significant ‘digestion’ in that part of
the gastrointestinal tract.
Q. How would you manage a bleeding haemorrhoid?
A. See the chapter text.

155
34 Jaundice
Checklist
P
MP
F
Appropriate introduction
Confirms patient’s name and age
Explain reason for consultation
Obtains consent
Open question to elicit presenting complaint
Allows patient to open up, listens carefully,
remains silent and does not interrupt the patient
Signposts: e.g. ‘Mr Gregory, thank you for telling
me about this problem. I would like to ask a few
more detailed questions. Is that all right?’
History of presenting complaint:
• How was the jaundice discovered – did the
patient notice it, or was it someone else?
• Onset (what brought it on, how it started)
• Time:
• Duration
• Intermittent (e.g. Gilbert’s syndrome),
continuous, progressive
• Fevers
• Asks if patient is suffering from any other
symptoms
• Asks about any recent illnesses
• Previous episodes of jaundice
• Family members/contacts with similar
symptoms
Asks about other relevant symptoms:
• Gallstones, biliary duct obstruction:
• Abdominal pain
• Pale stools
• Itching
• Steatorrhoea
• Dark urine
• Liver symptoms:
• Abdominal swelling
• Ankle swelling
• Bleeding, bruising (liver failure and impaired
synthetic function)
• Autoimmune conditions:
• Arthralgia
• Vitiligo
• Skin rashes (systemic lupus erythematosus)
Checklist
P
MP
F
• Risk factors for viral hepatitis
• Hepatitis B and C
• Contaminated needles:
• Intravenous drug abuse
• Blood transfusions (and any transfusions
outside the UK)
• Tattoos
• Ear/body-piercing
• Needlestick injuries (if healthcare
professional)
• Foreign travel/contacts
• Sexual history:
• Must signpost and gain explicit
consent for this
• Number of sexual partners
• New sexual partners
• Type of intercourse (anal, oral, vaginal)
• Use of barrier contraception
• Hepatitis A
• Swimming, diving
• Pregnancy (HELLP, intrahepatic cholestasis of
pregnancy)
• Heart failure
‘Red flags’:
• No abdominal pain
• Weight loss
Review of systems
Past medical history:
• Previous jaundice
• Autoimmune conditions (for primary biliary
cirrhosis and autoimmune hepatitis)
• Haemolytic anaemia
• Heart failure (for congestive liver failure)
• Inflammatory bowel disease (for primary
sclerosing cholangitis)
Family history:
• Viral hepatitis
• Autoimmune hepatitis
• Hepatobiliary cancer

156
Histories:
34 Jaundice
Checklist
P
MP
F
Drug history:
• Hepatitis B and C immunisations
• Antibiotics
• Statins
• Antiepileptics
• Paracetamol
• Tuberculosis medications
• Cytotoxic agents
• Herbal medication
• Over-the-counter medication
Allergies
Social history:
• Alcohol intake
• Recent foreign travel/foreign contacts:
• Jaundice in other members of the travelling
party
• Water consumed (mineral water, tap water,
boiled water)
• Diet:
• Recent changes
• Takeaways
• Barbecues
• Smoking
• Intravenous drug abuse (as above)
Checklist
P
MP
F
Use of non-verbal cues, e.g. good eye contact,
nodding head and good body posture
Systematic approach
Explores and responds to ICE:
• Ideas
• Concerns
• Expectations
Shows empathy
Non-verbal skills
Avoids technical jargon
Devises holistic management plan and addresses
psychosocial issues as well as medical problems
Summarises
Offers to answer any questions
Thanks patient
Underlying
mechanism
Condition
Bilirubin in blood
Bilirubin
in urine
Liver function
tests
Haemoglobin
Unconjugated
Conjugated
Prehepatic
Haemolysis
Thalassaemia
Haematological malignancies
Gilbert’s syndrome
↑
↔
Nil
↔
↓
Hepatic
Any liver causes (see Chapter 3
on abdominal examination)
↑
↔
Nil
↑ (AST > ALP)
↔
Obstructive
Gallstones
Cholangitis
Primary sclerosing cholangitis
Biliary atresia
Lymphadenopathy around
inferior aspect of liver
Benign cyst
Cholangiocarcinoma
Pancreatic cancer
Duodenal cancer
↔
↑
↑
↑ (ALP > AST)
↔
Summary of common conditions seen in OSCEs

Histories:
34 Jaundice 157
questions/questions of an intimate nature/questions
about your personal life to find the cause of this
problem. Is that all right?’
Questions you could be asked
Q. Which type of jaundice would cause a raised
urinary urobilinogen level?
A. Prehepatic jaundice.
Q. What is one of the most common non-fatal causes
of jaundice and splenomegaly?
A. Hereditary spherocytosis.
Q. What are the most common hepatic causes of jaun-
dice, and what investigations would you utilise to find
a cause?
A. See Chapter 3 on abdominal examination.
Hints and tips for the exam
Many of the causes of jaundice have been covered in
the ‘abdominal examination’ station (Chapter 3), so we
have not discussed them at any great length here.
Jaundice is yellow pigmentation of the skin and
occurs when the serum bilirubin level exceeds
35
µmol/L. There are many causes of jaundice, so famil-
iarise yourself with the common ones and know what
questions to ask as well as the relevant investigations.
The causes of jaundice can be divided into prehepatic,
hepatic and obstructive.
Taking a thorough social history, including the use
of recreational drugs and needle-sharing, as well as a
sexual history, is fundamental to this station. Remem-
ber to signpost before you ask these questions, for
example ‘I would now like to ask you some personal

158
35 Dysphagia
Checklist
P
MP
F
Associated symptoms:
• Gastrointestinal:
• Nausea, vomiting
• Dyspepsia
• ENT:
• Hoarseness
• Speech problems
• Neuromuscular:
• Motor weakness, muscle wasting
• Sensory symptoms
• Diplopia
• Pharyngeal pouch:
• Regurgitation
• Halitosis
• Mitral stenosis, left atrial hypertrophy:
• Palpitations, symptoms of congestive cardiac
failure
• Haemoptysis
• Thyroid gland symptoms:
• Neck discomfort
• Symptoms of hyperthyroidism
• Lung cancer symptoms:
• Cough, weight loss, haemoptysis
• Xerostomia:
• Dry mouth
‘Red flags’:
• Weight loss
• Loss of appetite
• Haematemesis, melaena
• Progressive and persistent
Review of systems
Past medical history:
• Stroke
• Thyroid problems
• Mitral stenosis
• ENT surgery
Family history:
• Upper gastrointestinal tract cancer
Drug history:
• NSAIDs
• Bisphosphonates
Allergies
Checklist
P
MP
F
Appropriate introduction
Confirms patient’s name and age
Explain reason for consultation
Obtains consent
Open question to elicit presenting complaint
Allows patient to open up, listens carefully,
remains silent and does not interrupt the patient
Signposts: e.g. ‘Mr Gregory, thank you for telling
me about this problem. I would like to ask a few
more detailed questions. Is that all right?’
History of presenting complaint
• Onset (how it started):
• Sudden
• Gradual
• Character:
• Fluids
• Solids
• Time:
• Duration
• Intermittent, continuous, progressive
• Level: where does food/liquid feel like it is
getting ‘stuck’ – throat/gullet/stomach
• Alleviating factors
• Exacerbating factors
• Define at which stage the dysphagia occurs:
• When initiating swallowing
• After swallowing has been initiated
• Pain (oesophageal/abdominal), odynophagia
• Trauma, foreign body
• Feeling of a lump in the throat
• Asks if patient is suffering from any other
symptoms
• Asks about any recent illnesses
• Previous episodes of dysphagia
• Family members/contacts with similar
symptoms

Histories:
35 Dysphagia 159
Checklist
P
MP
F
Social history:
• Alcohol (peptic ulcer disease, gastritis)
• Smoking
• Illicit drug use
• Diet: spicy foods ( peptic ulcer disease )
• Occupation
• Activities of daily living
Use of non-verbal cues, e.g. good eye contact,
nodding head and good body posture
Systematic approach
Explores and responds to ICE:
• Ideas
• Concerns
• Expectations
Checklist
P
MP
F
Shows empathy
Non-verbal skills
Avoids technical jargon
Devises holistic management plan and addresses
psychosocial issues as well as medical problems
Summarises
Offers to answer any questions
Thanks patient
Summary of common conditions seen in OSCEs
System
Conditions
Key investigations
Neurological
Stroke
Bulbar palsy
Myasthenia gravis
Motor neurone disease
Parkinson’s disease
CT/MRI brain
Electromyogram
Acetyl choline receptor antibodies, CT thymus
ENT
Throat cancer
Pharyngeal pouch
Nasal endoscopy
Xerostomia/Sjögren’s
syndrome
Dry mouth
Symptoms of rheumatological disorders
Schirmer’s test
Anti-Ro and anti-La antibodies
Oesophageal: motility
Achalasia
CREST
Chagas disease
Barium swallow
Oesophageal manometry
Serology for Chagas disease
Scl-70, anticentromere and antinuclear antibodies for CREST
Oesophageal: structural
Malignancy
Benign stricture
Hiatus hernia
Barium swallow
Oesophago-gastro-duodenoscopy
+ biopsy
Full blood count
Gastrointestinal
Stomach cancer
Gastritis
Gastro-oesophageal reflux disease
Peptic ulcer
Oesophago-gastro-duodenoscopy
External compression:
thyroid
Goitre
Thyroid cancer
Fine-needle aspiration
+ biopsy
Ultrasound neck/thyroid
Thyroid function tests
Radioiodine studies
External compression: heart
Mitral stenosis
Left atrial hypertrophy
Aortic aneurysm
Echocardiogram
Chest X-ray
CT chest
External compression: lungs
Lung cancer
Chest X-ray
CT chest
External compression:
mediastinum
Mediastinal lymphadenopathy
Chest X-ray
CT chest
Globus hystericus
Anxiety
Psychological symptoms
Rule out organic causes

160
Histories:
35 Dysphagia
dysphagia for both solids and liquids are more likely to
have a problem with motility (e.g. achalasia), whereas
patients with dysphagia only for solids are more likely
to have a structural defect (e.g. cancer or a mass).
Questions you could be asked
Q. What changes associated with dysphagia might you
see on barium swallow?
A. ‘Tapering’ with achalasia, or an ‘apple core lesion’
with oesophageal cancer.
Q. What is ‘Chagas disease’?
A. An infectious disease predominantly found in
South America. As it is an infectious disease, the
investigation of choice is microscopy, culture and sen-
sitivity of the blood or cerebrospinal fluid. It is treated
with an antiparasitic agent.
Hints and tips for the exam
Malnutrition
Dysphagia is a very concerning symptom, and it is
understandable for any candidate to get fixated on the
diagnosis and treatment. Do not, however, forget that
eating is essential for a patient’s health and well-being,
and a patient who is unable to eat may start to suffer
from the effects of malnourishment if dysphagia is
severe and prolonged. This is especially so in the elderly.
So, in your management plan, make sure you talk about
the importance of carrying out a nutritional assessment
of the patient, and about considering ways of managing
it while a definitive diagnosis and management plan are
established. You could consider liquid supplements
such as Ensure (if the patient is able to take liquids), as
well as nasogastric and PEG feeding.
Liquids or solids or both?
This is often forgotten by students despite being abso-
lutely fundamental to the diagnosis. Patients who have

161
36 Headache
Checklist
P
MP
F
Appropriate introduction
Confirms the patient’s name and age
Explains reason for consultation
Obtains consent
Open question to elicit presenting complaint
Allows patient to open up, listens carefully,
remains silent and does not interrupt the patient
Signposts: e.g. ‘Mr Gregory, thank you for telling
me about this problem. I would like to ask a few
more detailed questions. Is that all right?’
History of presenting complaint:
• Site:
• Unilateral (migraine)
• Scalp or temporal (temporal arteritis)
• Face/in front of ear (trigeminal neuralgia)
• Onset (how it started):
• Sudden (subarachnoid haemorrhage)
• Gradual
• Character:
• Throbbing (migraine)
• Dull
• Radiation:
• To neck (subarachnoid haemorrhage)
• Time:
• Duration of headaches
• Duration of pain-free periods
• Intermittent/continuous/progressive (raised
intracranial pressure)
• Alleviating factors:
• Darkness
• Exacerbating factors:
• Touching scalp (temporal arteritis)
• Worse in early morning (raised intracranial
pressure)
• Light (migraine, meningism)
• Severity
• Asks if patient is suffering from any other
symptoms
• Asks about any recent illnesses
• Previous history of headaches
Checklist
P
MP
F
Associated symptoms:
• Raised intracranial pressure:
• Nausea, vomiting (increased intracranial
pressure)
• Worse on straining/bending down/coughing
• Meningitis:
• Fever
• Photophobia
• Neck stiffness
• Haemorrhagic rash
• Subarachnoid haemorrhage:
• Sudden onset (like being hit on the head
with a cricket bat)
• Occipital
• ‘Worst’ pain the patient has ever had
• Temporal arteritis:
• Scalp tenderness
• Ipsilateral visual disturbance
• Shoulder/hip muscle aches (polymyalgia
rheumatica)
• Migraine:
• Nausea, vomiting
• Photophobia
• Periodic (e.g. every month), correlation with
menstrual periods
• Visual disturbance (zigzag lines, flashing lights)
• Aura
• Trigeminal neuralgia:
• Like ‘electric shock’
• Short duration (seconds to a few minutes)
• Face/in front of ear
• Chewing makes it worse
• Cluster headache:
• Pain around one eye
• Lacrimation/eye watering
• Excruciatingly severe
• Attacks lasting 30–60 minutes persist for a
few weeks to 1–2 months and then stop for
6–12 months
• Tension headache:
• ‘Tight’ headache
• Diffuse, not localised
• Related to stress
• Chronic analgesic-dependent headaches:
• Long-term extensive use of high-dose
analgesics
• Daily occurrence

162
Histories:
36 Headache
Checklist
P
MP
F
‘Red flags’:
• Recent trauma
• Focal neurological symptoms, loss of
consciousness, seizures
• Vomiting
• Worst in the morning/on waking up
• Sudden onset
• Fevers
• Scalp tenderness
• Past medical history of cancer
Review of systems
Past medical history:
• Malignancy
• Hypertension
Family history:
• Migraines
• Berry aneurysms, subarachnoid haemorrhage
• Malignancy
Drug history:
• Analgesics
• Oral contraceptive pill (contraindicated in
certain types of migraine)
• Over-the-counter medication
Allergies
Checklist
P
MP
F
Social history:
• Alcohol (peptic ulcer disease, gastritis)
• Smoking
• Illicit drug use
• Caffeine intake
• Diet
• Occupation
• Effect of headaches on activities of daily living
• Stressors – financial, occupational, relationship
Use of non-verbal cues, e.g. good eye contact,
nodding head and good body posture
Systematic approach
Explores and responds to ICE:
• Ideas
• Concerns
• Expectations
Shows empathy
Non-verbal skills
Avoids technical jargon
Devises holistic management plan and addresses
psychosocial issues as well as medical problems
Summarises
Offers to answer any questions
Thanks patient
Condition
Key points
Key investigations
Migraine
Nausea, vomiting
Photophobia
Periodic (e.g. every month), correlation with menstrual periods
Visual disturbance (zigzag lines, flashing lights)
Aura
None – clinical diagnosis
Tension
headaches
‘Tight’ headache
Diffuse, not localised
Related to stress
None – clinical diagnosis
Meningitis
Fever
Photophobia
Neck stiffness
Haemorrhagic rash
Lumbar puncture and cerebrospinal fluid analysis
Microscopy, culture and sensitivity on blood sample
Trigeminal
neuralgia
Like ‘electric shock’
Short duration (seconds to a few minutes)
Face/in front of ear
Chewing makes it worse
Could consider electrophysiological studies
Largely a clinical diagnosis
Summary of common conditions for OSCEs

Histories:
36 Headache 163
Condition
Key points
Key investigations
Chronic
analgesia
overuse
headaches
Long-term extensive use of high-dose analgesics
Daily occurrence
No ‘red flags’
None – clinical diagnosis
Cluster
headaches
Pain around one eye
Lacrimation/eye watering
Excruciatingly severe
Attacks of 30–60 minutes persist for a few weeks to 1–2
months and then stop for 6–12 months
None – clinical diagnosis
Intracerebral
haemorrhage
Recent trauma
Features of raised ICP
Subdural haemorrhage:
• Acute or chronic
• In chronic subdural haemorrhage, symptoms often
fluctuate and could take days or weeks to develop
• Common in elderly and alcoholic patients
• Could result from relatively minor trauma
Extradural haemorrhage:
• Acute
• Associated with more severe trauma and skull fractures
CT/MRI brain
Subarachnoid
haemorrhage
Sudden onset (like being hit on the head with a cricket bat)
Occipital
‘Worst’ pain the patient has ever had
Lumbar puncture and cerebrospinal fluid analysis
CT brain
Increased
intracranial
pressure
Nausea, vomiting (increased intracranial pressure)
Worse on straining/bending down/coughing
Focal neurological signs
History of malignancy
CT/MRI brain
Temporal
arteritis
Scalp tenderness
Ipsilateral visual disturbance
Shoulder/hip muscle aches (polymyalgia rheumatica)
Temporal artery biopsy
Erythrocyte sedimentation rate
Sinusitis
Pain and tenderness around temples/sinuses
Recent upper respiratory tract infection
None – clinical diagnosis
Referred pain
Pain in teeth or temporomandibular joint
None – clinical diagnosis
Rule out other causes
Hints and tips for the exam
Headaches are a very common presentation in both
primary and secondary care settings. The history may
be very vague, and unless you ask all the relevant ques-
tions you may miss a serious cause, especially with chil-
dren and forgetful elderly patients. The importance of
meticulously working through the acronyms and red
flags cannot be underestimated.
Combined oral contraceptive pill
and migraines
Always ask a woman with suspected migraines if she is
taking the combined oral contraceptive pill as it may
well be contraindicated, especially if she suffers from
auras or focal neurological symptoms. If you are not
sure, it is reasonable to tell the patient that you will
check and get back to her, and to advise her to withhold
the pill and use barrier contraception in the interim.

164
Histories:
36 Headache
Don’t forget trauma
Trauma is often forgotten by students, but is vitally
important. A chronic subdural haemorrhage can
present days after the initial trauma in alcoholics and
elderly patients.
Questions you could be asked
Q. What are the cerebrospinal fluid findings after a
subarachnoid haemorrhage?
A. Xanthochromia (4–5 hours after the episode), red
blood cells and bilirubin.
Q. Give a non-bacterial cause of meningitis.
A. A fungal cause is Cryptococcus. Viral causes are
Epstein–Barr virus, mumps, enterovirus and herpes
virus.

165
37 Loss of consciousness
Checklist
P
MP
F
Appropriate introduction
Confirms the patient’s name and age
Explains reason for consultation
Obtains consent
Open question to elicit presenting complaint
Allows patient to open up, listens carefully,
remains silent and does not interrupt the patient
Signposts: e.g. ‘Mr Gregory, thank you for telling
me about this problem. I would like to ask a few
more detailed questions. Is that all right?’
History of presenting complaint:
• Expresses intent to get a collateral
history from a witness
• Defines the loss of consciousness:
• Does the patient remember what
happened when they were
unconscious?
• Could the patient see or hear anything
while unconscious?
• Duration
• Frequency
• What was the patient doing prior to loss of
consciousness?
• Was the patient sitting, standing or lying flat?
• Where was the patient?
• Trauma to head
• Fall
• Symptoms before loss of consciousness
• Dizziness:
• Faintness
• Vertigo
• Lateral instability
• Symptoms after loss of consciousness
• Asks if patient is suffering from any other
symptoms
• Asks about any recent illnesses
• Previous episodes of loss of consciousness
Checklist
P
MP
F
Asks about other associated symptoms:
• Seizure:
• Tongue bitten
• Urinary incontinence
• Confusion (
>30 minutes) after regaining
consciousness
• Aura (‘feeling funny’, smell of burning)
• Neurological symptoms:
• Headaches
• Motor weakness
• Sensory symptoms
• Visual disturbance
• Speech problems
• Coordination/balance difficulties
• Hypoglycaemia:
• Sweating
• Anxiety
• Palpitations
• Faintness
• Vascular/hypotensive: postural
• Vasovagal symptoms:
• Crowded/warm environment
• Nausea immediately prior to loss of
consciousness
• Short duration (
<5 minutes)
• Cardiovascular symptoms:
• Chest pain
• Palpitations
• Carotid sinus hypersensitivity: after turning
head
• Micturition syncope: during or immediately
after urination
‘Red flags’:
• Headache with features of raised intracranial
pressure:
• Early morning headaches
• Vomiting
• Worse on coughing/bending down/straining
Review of systems

166
Histories:
37 Loss of consciousness
Checklist
P
MP
F
Past medical history:
• Diabetes
• Seizures/epilepsy
• Febrile convulsions (during childhood)
• Cerebrovascular disease, strokes, transient
ischaemic attacks
• Cardiovascular problems:
• Aortic stenosis
• Heart failure
• Arrhythmias
Family history:
• Same as past medical history
Drug history:
• Diabetes medication or insulin
• Sedatives (e.g. benzodiazepines)
• Over-the-counter medication
Allergies
Social history:
• Alcohol
• Illicit drug use
• Smoking
• Occupation
• Driving
• Activities of daily living – especially related
to mobilisation and stairs if elderly
Checklist
P
MP
F
• Effect of symptoms on activities of daily living
• Safety assessment if vulnerable (e.g. lives
alone, dangerous occupation, elderly)
Use of non-verbal cues, e.g. good eye contact,
nodding head and good body posture
Systematic approach
Explores and responds to ICE:
• Ideas
• Concerns
• Expectations
Shows empathy
Non-verbal skills
Avoids technical jargon
Devises holistic management plan and addresses
psychosocial issues as well as medical problems
Summarises
Offers to answer any questions
Thanks patient
System
Condition
Key investigations
Cardiovascular
Aortic stenosis
Arrhythmias (e.g. supraventricular tachycardia)
Acute coronary syndrome
Echocardiogram
24-hour ECG
Respiratory
Pulmonary embolism
Ventilation–perfusion scan or CT pulmonary angiogram
Neurological
Brain tumour
Seizure
Stroke/transient ischaemic attack
Trauma to head (causing contusion, intracerebral bleed)
CT/MRI of brain
EEG
Carotid Doppler scan (carotid stenosis)
Endocrine
Hypoglycaemia
Addison’s disease
Blood glucose
Us
+ Es
Serum cortisol/Synacthen test
Hypotensive
Vasovagal attack
Heart failure
Antihypertensive medications
Lying and standing blood pressure
Tilt-table testing
Echocardiogram
Haematological
Anaemia
Haemoglobin
Other
Carotid sinus hypersensitivity
Micturition/cough syncope
Anxiety, hyperventilation
Summary of common conditions seen in OSCEs

Histories:
37 Loss of consciousness 167
Hints and tips for the exam
Collateral/witness history
Both in clinical practice and for exams, an accurate
history is invaluable in determining the cause of loss of
consciousness and how to investigate it further. Patients
may be able to give a good history of the events before
and after losing consciousness, but they will not be able
to tell you what happened during the episode itself.
This is important as the actual period of unconscious-
ness may reveal clues about the underlying aetiology,
such as jerking of the limbs in an epileptic seizure.
To demonstrate this to your examiner, ask the patient
if anyone saw them while they were unconscious, and
then ask whether they would mind you speaking to the
witness later on. You could also ask the patient what any
witnesses said about what the patient was doing the
episode of unconsciousness.
Rare symptoms
• Beware of severe aortic stenosis as a cause of syncope
or loss of consciousness – this is a poor prognostic sign
as severe aortic stenosis can be associated with sudden
death.
• Recurrent syncopal episodes can be a feature of myo-
cardial infarction in elderly patients, who often do not
present with typical chest pain.
• Syncope can be the first sign of a leaking abdominal
aortic aneurysm.
Questions you could be asked
Q. What are the regulations for driving after an episode
of loss of consciousness?
A. See the official DVLA guidelines, which can
be downloaded from www.dft.gov.uk/dvla/medical/
ataglance.aspx.

168
38 Tremor
Checklist
P
MP
F
Appropriate introduction
Confirms patient’s name and age
Explain reason for consultation
Obtains consent
Open question to elicit presenting complaint
Allows patient to open up, listens carefully,
remains silent and does not interrupt the patient
Signposts: e.g. ‘Mr Gregory, thank you for telling
me about this problem. I would like to ask a few
more detailed questions. Is that all right?’
History of presenting complaint:
• Site (hands, arms, head)
• Bilateral, unilateral, symmetrical
• Onset:
• On deliberate movement (e.g. turning on a
light switch, reaching for a cup of tea)
• At rest
• When anxious/worried
• Constant or intermittent:
• If intermittent, duration and frequency of
episodes
• Time of day
• Alleviating factors: alcohol
• Exacerbating factors:
• Stress, fatigue
• Anxiety
• Caffeine (how many cups of coffee?)
• Coordination, gait
• Previous episodes
• General neurological symptoms:
• Headaches
• Motor weakness, sensory symptoms
• Loss of consciousness
• Asks if patient is suffering from any other
symptoms
• Asks about any recent illnesses
• Previous episodes of tremor
Associated symptoms:
Checklist
P
MP
F
• Parkinson’s disease (slowing, rigidity, falls,
depression)
• Hyperthyroidism (palpitations, weight loss, heat
intolerance)
• Benign essential tremor (family history, eased
by alcohol, exacerbated by stress)
• Cerebellar disease (slurred/staccato speech,
incoordination, imbalance)
• Anxiety (sweating, palpitations)
• Salbutamol overuse (frequency of inhaler use,
poorly controlled asthma)
• Alcohol withdrawal (excess intake, sudden
recent reduction)
‘Red flags’:
• Headache with features of raised intracranial
pressure (early morning, vomiting, worse on
coughing, bending down)
• Loss of consciousness
Review of systems
Past medical history:
• Hyperthyroidism
• Alcohol/drug addiction
Family history:
• Benign essential tremor
• Parkinson’s disease
Drug history:
• Salbutamol
• Thyroxine
• Benzodiazepines (withdrawal)
• Over-the-counter medication
Allergies
Social history:
• Caffeine
• Alcohol
• Illicit drug use
• Smoking
• Occupation
• Driving
• Activities of daily living, functional impairment:
• Drinking from a cup
• Doing buttons
• Writing

Histories:
38 Tremor 169
Checklist
P
MP
F
Use of non-verbal cues, e.g. good eye contact,
nodding head and good body posture
Systematic approach
Explores and responds to ICE:
• Ideas
• Concerns
• Expectations
Shows empathy
Checklist
P
MP
F
Non-verbal skills
Avoids technical jargon
Devises holistic management plan and addresses
psychosocial issues as well as medical problems
Summarises
Offers to answer any questions
Thanks patient
Condition
Key points
‘Red flags’
Common errors
Hyperthyroidism/
Graves disease
Bilateral
Swelling in neck
Hot all the time
Palpitations
Weight loss
Medication overuse
Atrial fibrillation
Graves disease:
• Pretibial myxoedema
• Thyroid acropachy
• Eye problems (exophthalmos,
ophthalmoplegia) – Graves-specific
Swelling in the neck with
voice
change – malignancy
Nodular goitre –
malignancy, adenoma
Drugs – amiodarone,
lithium
Angina, heart failure
Thyroid storm
Goitre can be hyper/hypothyroid or
euthyroid
Parkinson’s
disease
Resting tremor (3–6 Hz)
Often described as ‘pill-rolling’
Unilateral
Bradykinesia (slowing)
Rigidity (unable to turn in bed, turning en bloc)
– ‘lead pipe’ rigidity
Loss of postural reflexes (retropulsion test)
Gait – festinant (trouble initiating and stopping)
Falls (NB. falls
backwards
= progressive
supranuclear palsy)
Mood – depression
Handwriting – micrographia
Soft speech and hypomimia
Loss of arm swing
Bilateral onset
= unlikely
to be Parkinson’s
disease; look at
Parkinson-plus
syndromes
Cogwheel rigidity – rigidity with
superimposed tremor (best
elicited at the wrist:
catch–release–catch–release)
Cerebellar
disease
Intention tremor
Bilateral
Features of stroke/
cerebrovascular accident
Treat the cause
Benign essential
tremor
Postural tremor
Titubation (head tremor)
Bilateral
Family history – autosomal dominant
Alcohol – reduced after a
drink
Anxiety
Nervous person
Psychiatric co-morbidities
Identify precipitants and
underlying concerns
Manage any psychosocial stressors.
Involve a counsellor/psychotherapist
Salbutamol
overuse
Poorly controlled asthma
Poor inhaler technique
Palpitations (arrhythmias)
Hypokalaemia (rare)
Summary of common conditions seen
in OSCEs
Bold type denotes the specific and important points
that help to distinguish the cause.
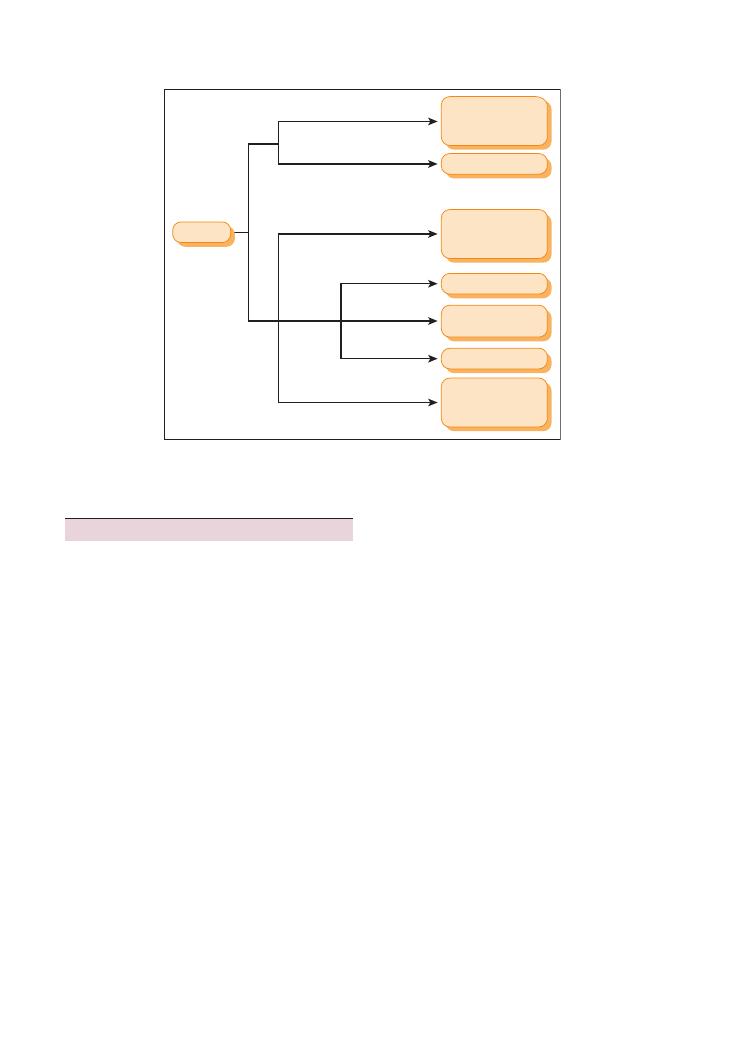
170
Histories:
38 Tremor
tical supranuclear gaze palsy. The latter is the result of
a failure to initiate vertical gaze above the level of the
brainstem nuclei. To confirm a pure supranuclear palsy,
vertical gaze can be elicited by assessing for the presence
of vestibular ocular reflexes by turning the patient’s
head down, with resultant upward eye deviation (the
upward eye deviation is possible despite the vertical
gaze palsy because the reflex does not require the supra
nuclear pathways).
• Multiple system atrophy: early autonomic dysfunc
tion (e.g. postural hypotension), cerebellar signs
(DANISH – dysdiadochokinesis, ataxia, nystagmus,
intention tremor, scanning dysarthria, heel–shin test
positive).
• Corticobasal syndrome: a very rare atypical parkin
sonian syndrome. It is classically unilateral with rapid
motor and cognitive decline. Patients develop apraxia
and alien hand phenomenon.
• Lewy body dementia: early dementia is associ
ated with visual hallucinations and fluctuating
cognition.
• Vascular Parkinsonism (multi-infarct dementia): in
this condition, there is a stepbystep decline. Cardio
vascular risk factors (hypertension, diabetes, hypercho
lesterolaemia) are apparent.
Hints and tips for the exam
Keep an open mind, and don’t forget that there are
several nonneurological causes of a tremor (e.g.
thyroid disease, anxiety and caffeine).
If the cause turns out to be neurological (e.g. Parkin
son’s disease), remember to ask about the psychological
features (depression) and whether the patient has
support at home. These patients have an increased risk
of falls so addressing this issue in the history and also
in your discussion of management will be important.
Mentioning a multidisciplinary review (e.g. a physio
therapist and occupational therapist) will grab those
few marks for considering a holistic approach that are
earmarked for better candidates.
Parkinson-plus syndromes
To grab those extra few marks for a merit or distinction,
you should consider knowing the salient features of the
most common Parkinsonplus syndromes as well as
lithium toxicity:
• Progressive supranuclear palsy: a Parkinson’splus
syndrome in which patients exhibit asymmetrical Par
kinsonism with early falls (often backwards) and a ver
Figure 38.1 Flowchart for diagnosing the cause of a tremor
Tremor
Unilateral
Bilateral
Anxiety
Symptoms of
hyperthyroidism
Recent alcohol
withdrawal
Rest +
intention
Intention
Intention
Rest
Postural + family history
Unilateral
cerebellar
pathology
Parkinson’s
Benign
essential
tremor
Bilateral
cerebellar
pathology
Anxiety
Hyperthyroidism
Alcohol
withdrawal

Histories:
38 Tremor 171
Q. Name some common Parkinsonplus syndromes.
Q. What are the salient features of the most common
Parkinson plus syndromes?
A. The answers to all of the questions can be found in
the text above.
• Lithium toxicity: depends on blood level:
•
>1.5 mmol/L – mild tremor
•
>2.0 mmol/L – coarse tremor, arrhythmias, fitting,
renal failure (may require haemodialysis)
Questions you could be asked
Q. What level of blood lithium is needed for symptoms
of lithium toxicity to develop?

172
39 Dizziness
Checklist
P
MP
F
Appropriate introduction
Confirms the patient’s name and age
Explains reason for consultation
Obtains consent
Open question to elicit presenting complaint
Allows patient to open up, listens carefully,
remains silent and does not interrupt the patient
Signposts: e.g. ‘Mr Gregory, thank you for telling
me about this problem. I would like to ask a few
more detailed questions. Is that all right?’
History of presenting complaint:
• Clarifies/defines what the patient means by
dizziness:
• Rotational – vertigo
• Side-to-side – horizontal instability
• Faintness – prior to loss of consciousness
• Onset (gradual/sudden): what is the patient
usually doing prior to the dizziness?
• Duration of episode
• Frequency of episodes
• Falls or trauma to head
• Loss of consciousness
• Exacerbating factors/precipitating triggers:
• Position (turning head – carotid sinus
hypersensitivity)
• Extending neck, e.g. hanging washing or
painting a ceiling (vertebrobasilar
insufficiency)
• Standing (postural hypotension)
• Alleviating factors:
• Posture/lying down (postural hypotension)
• Eating (hypoglycaemia)
• Recent head/ear trauma
• Asks if patient is suffering from any other
symptoms
• Asks about any recent illnesses
• Previous episodes of dizziness
Checklist
P
MP
F
Asks about other associated symptoms:
• For faintness:
• Vascular/hypotensive: postural
• Anaemia:
• Bleeding/bruising
• Menorrhagia
• Hypoglycaemia:
• Sweating
• Anxiety
• Palpitations
• Cardiovascular, arrhythmias:
• Chest pain, palpitations
• For vertigo:
• Cerebellar symptoms:
• Slurred/staccato speech
• Coordination difficulties
• Gait/balance problems
• ENT symptoms:
• Hearing loss, tinnitus
• Nausea
• When tilt/turn head (benign paroxysmal
positional vertigo)
• Pain, blood, discharge from ear
• Recent viral illness (labyrinthitis)
• For lateral instability:
• Neurological symptoms:
• Headaches
• Motor weakness
• Sensory symptoms
• Visual disturbance
• Speech problems
• Carotid sinus hypersensitivity – after turning
head
• Anxiety
‘Red flags’:
• Headache with raised intracranial pressure
features (early morning, vomiting, worse on
coughing/bending down)
• Loss of consciousness
• Weight loss, night sweats
Review of systems

Histories:
39 Dizziness 173
Checklist
P
MP
F
Past medical history:
• Diabetes
• Strokes (in particular cerebellar strokes)
• Cardiovascular problems (aortic stenosis, heart
failure, arrhythmias)
• Recurrent ear infections, grommets
Family history:
• Same as past medical history
Drug history:
• Any recent changes to medication
• Antihypertensive agents, GTN
• Antidiabetic medication, insulin
• Sedatives (e.g. benzodiazepines)
• Over-the-counter medications
Allergies
Social history:
• Alcohol
• Illicit drug use
• Smoking
• Occupation
• Driving
• Activities of daily living
• Safety assessment if vulnerable (e.g. lives
alone, dangerous occupation, elderly)
Checklist
P
MP
F
Use of non-verbal cues, e.g. good eye contact,
nodding head and good body posture
Systematic approach
Explores and responds to ICE:
• Ideas
• Concerns
• Expectations
Shows empathy
Non-verbal skills
Avoids technical jargon
Devises holistic management plan and addresses
psychosocial issues as well as medical problems
Summarises
Offers to answer any questions
Thanks patient
Summary of common conditions seen
in OSCEs
Vertigo
Condition
Key points
‘Red flags’
Key examinations,
investigations and
treatment
Common errors
Benign paroxysmal
positional
vertigo
Vertigo for seconds after
moving head
Debris in semicircular canal
May have history of
trauma
Diagnose with the Hallpike
manoeuvre, which
causes nystagmus
Epley manoeuvre to treat
Vestibular
neuronitis,
acute
labyrinthitis
Abrupt onset
Severe vertigo
May last for hours
Nausea and vomiting
Hearing not affected
Recent viral illness
Vertigo resolves over
days
Complete recovery in
3–4 weeks
Reassurance
May require sedation
(antihistamine
– prochlorperazine)
Confused with
Ménière’s disease.
NB. Hearing is
unaffected
Ménière’s disease
increased pressure in the
endolymphatic system
Recurrent
Prolonged episodes (20
minutes)
Nausea and vomiting
Tinnitus
Fluctuating sensorineural
hearing loss (may
become permanent)
May complain of
dropping suddenly to
the floor (no loss of
consciousness)
Antihistamine (cinnarizine
or prochlorperazine)
Surgery if severe
(destruction of the
vestibular organ with
gentamicin)
Intermittent hearing
loss is the defining
characteristic
(
Continued )

174
Histories:
39 Dizziness
Faintness
Condition
Key Points
‘Red flags’
Key examinations,
investigations and
treatment
Common errors
Vasovagal
syncope
Fear, pain
Not sudden (seconds)
May fall to ground
Rapid recovery
Standing for a long time
Pre-syncope:
• Nausea
• Pallor
• Sweating
• Tunnel vision
Clonic jerks may occur
(not epilepsy)
No tongue biting
Lying and standing blood
pressure (postural
hypotension)
Reassure: may have to
explain that clonic
jerks are just brains
reaction to lack of
blood, i.e. not epilepsy
Due to bradycardia and
vasodilatation
If patient remains on floor,
they may jerk. This could
be confused with epilepsy
Carotid sinus
hypersensitivity
Excessive bradycardia and
vasodilatation when
baroreceptors are
stimulated
Elderly individuals
Faint on turning head or
shaving
Management depends
on frequency
Education
Lifestyle (increase fluid
intake and salt)
Pacemaker
Epilepsy
Variable depending on type
of epilepsy
Tonic-clonic movements
Triggers (TV, flashing lights)
History of poor sleep the
previous night
Incontinence
Tongue biting
Confusion and drowsiness
after the episode
Wants to sleep
Us
+ Es
Glucose
EEG
MRI
May be confused with
vasovagal syncope but
recovery is not rapid
Hypoglycaemia
Hunger
Sweating
History of diabetes
May be presentation of
diabetes mellitus
Type 1 diabetes mellitus:
weight loss, polyuria and
polydipsia, tiredness
Insulin
Oral hypoglycaemic
agents
Binge drinking
Liver disease
Glucose – BM sticks are
not accurate at low
sugar levels
C-peptide – not present
if exogenous insulin
used
Condition
Key points
‘Red flags’
Key examinations,
investigations and
treatment
Common errors
Drug toxicity
(ototoxic)
Aminoglycoside (gentamicin)
Furosemide (reversible)
Cisplatin
Elderly
Renal failure
Us
+ Es (raised creatinine
and low glomerular
filtration rate)
Stop the offending drug
Elderly people require
lower doses
Check Us
+ Es prior to
starting these drugs
Ramsay Hunt
syndrome
Latent varicella zoster virus
reactivated in geniculate
ganglion
Pain
Possible deafness, tinnitus
and vertigo
Palsy of cranial nerve VII
Painful vesicles in the
external auditory
meatus

Histories:
39 Dizziness 175
Condition
Key Points
‘Red flags’
Key examinations,
investigations and
treatment
Common errors
Anaemia
Low haemoglobin level
Tiredness
Elderly
Heavy periods
Haemorrhage (any reason)
Vegetarian diet
Full blood count and
mean corpuscular
volume
Blood pressure
(Postural)
hypotension
Low blood pressure
Causes:
• Medications
(antihypertensives,
alpha-blockers,
anti-parkinsonian agents)
• Addison’s disease/
pan-hypopituitarism
• Autonomic dysfunction
• Parkinson’s disease
• Dehydration
Elderly
Antihypertensives
• New medication
• Overuse
Worse on standing
Standing and sitting
blood pressure:
•
>20 mmHg fall in
systolic blood pressure
•
>10 mmHg fall in
diastolic blood
pressure
Tilt-table testing
Causes:
• Addison’s disease
• Elderly
• Medication (tricyclic
antidepressants,
alpha-blockers,
anti-parkinsonian
medication)
• Hypopituitarism
Stokes–Adams
attacks
Falls to ground
Palpitations
Pale
Trauma due to fall
Several attacks a day
Recovery in seconds
ECG, 24-hour ECG
Pacemaker
Anxiety
Hyperventilation
Sweating
Palpitations
Paraesthesia
Perioral tingling
Young female
Thyroid function tests,
calcium
ECG
Reassurance
Counselling
Lateral instability
Condition
Key points
‘Red flags’
Key examinations,
investigations and
treatment
Common errors
Acoustic
neuroma
Arises from cranial nerve VIII and
is actually a schwannoma
May involve cranial nerves V, VI,
IX and X
Ipsilateral cerebellar signs
(DANISH – dysdiadochokinesis,
ataxia, nystagmus, intention
tremor, scanning dysarthria,
heel–shin test positive)
Early loss of hearing on
ipsilateral side and
later vertigo
Neurofibromatosis type
2 (chromosome 22,
autosomal dominant,
café-au-lait spots,
bilateral acoustic
neuromas)
MRI
Surgical removal
Risk of damage to cranial
nerve VII during surgery
as both are in close
proximity as they enter
the internal auditory canal
Cranial nerve VII is
very rarely affected
by tumour
Cerebellar
disease
Multiple sclerosis
Stroke, transient ischaemic attack
Posterior fossa tumour (gradual
onset)
Alcohol
Phenytoin toxicity
Ipsilateral signs
DANISH
See Chapter 7 on cerebellar
examination
MRI
(
Continued )

176
Histories:
39 Dizziness
sive as you will be highlighting the holistic approach to
managing the case.
Offer to conduct a full neurological and cardio
vascular examinations in your presentation to the
examiner.
Questions you could be asked
Q. What symptoms should you consider when a
patient complains of dizziness?
A. • Vertigo
• Faintness
• Instability
Q. What commonly used medications are ototoxic?
A. • Gentamicin
• Furosemide (reversible)
Q. What is the definition of postural hypotension?
A. Postural hypotension is a drop in blood pressure on
standing that is sufficient to cause reduced per
fusion of the brain. It is usually said to occur if there
is a drop greater than 20 mmHg systolic or 10 mmHg
diastolic. Patients’ blood pressure should be meas
ured after lying down.
Hints and tips for the exam
As you can see from the tables above, the differential
diagnosis of ‘dizzy’ is extensive. Therefore your first goal
should be to clarify exactly what the patient means by
use of word ‘dizzy.’ If they cannot clearly describe the
sensation, provide possible examples such as:
• Do you feel the room is spinning around you?
• Do you feel unsteady on your feet?
• Do you feel faint?
Do not assume you know what the patient means by
feeling ‘dizzy
′ – each meaning will lead you down a
different diagnostic path.
Addressing the social issues in this history and your
management is important. If an elderly patient or
someone living alone is complaining of dizziness and/
or falls, are they safe in their current environment? In
a hospital setting, admitting this patient might be the
best and safest next step. Mentioning a multidiscipli
nary team review is likely to score a mark. This will
involve an occupational therapist (who will check safety
and provide aids), a physiotherapist (to help improve
mobility) and a carer. Mentioning this will look impres
Condition
Key points
‘Red flags’
Key examinations,
investigations and
treatment
Common errors
Peripheral
nerve
Loss of peripheral sensation
Pins and needles in the feet
Walking on cotton wool
Pain (worse at night)
Long history of diabetes mellitus
Chemotherapeutic medication
(platinum-based)
Worse in the dark or
with eyes shut
See Chapter 4 on peripheral
nervous examination
Absent ankle reflex
Nerve conduction studies
Dorsal
column
Trauma
Vitamin B12 deficiency
Friedreich’s ataxia
Worse in the dark or
with eyes shut
Serum vitamin B12 level
MRI
Genetic testing

177
40 Joint pain
Checklist
P
MP
F
Appropriate introduction
Confirms patient’s name and age
Explains reason for consultation
Obtains consent
Open question to elicit presenting complaint
Allows patient to open up, listens carefully,
remains silent and does not interrupt the patient
Signposts: e.g. ‘Mr Gregory, thank you for telling
me about this problem. I would like to ask a few
more detailed questions. Is that all right?’
History of presenting complaint:
• Site:
• Which joints specifically
• Small/large joints
• Symmetrical
• Proximal/distal
• Onset:
• Trauma
• Injection
• Chronic/gradual
• Acute, severely painful (septic, gout,
fracture)
• Radiation
• Time:
• Duration of joint pain
• Intermittent, continuous, progressive (raised
intracranial pressure)
• Alleviating factors:
• Movement (inflammatory)
• Exacerbating factors:
• Movement (mechanical/degenerative)
• Worse in morning (inflammatory)
• Severity (excruciating pain with complete
immobility: ? septic arthritis)
• Limitation of movement/activity
• Morning stiffness: duration of morning
stiffness – an easily forgotten point
• Redness, swelling (gout, septic arthritis)
• Locking (cartilage injury), giving way (ligament
injury)
• Fevers
• Asks if patient is suffering from any other
symptoms
• Asks about any recent illnesses
• Previous history of joint pains
Checklist
P
MP
F
Associated symptoms/review of symptoms:
• Skin:
• Erythematous patches with silver scaly
patches (psoriasis)
• Butterfly rash (SLE)
• Nodules, calcinosis (CREST)
• Raynaud’s syndrome (CREST)
• Skin tightness (CREST)
• Dry mouth (Sjögren’s syndrome)
• Nails: pitting, onycholysis (psoriasis)
• Eyes: pain (anterior uveitis in ankylosing
spondylitis), dry eyes ( Sjögren’s syndrome )
• Heart: pain (pericarditis)
• Lungs: cough (sarcoid, fibrosis), shortness of
breath (pulmonary fibrosis), pleuritic pain
(pleurisy)
• Gastrointestinal: diarrhoea (Reiter’s syndrome),
bloody diarrhoea (inflammatory bowel disease)
• Renal: haematuria, ankle swelling (nephritis)
• Peripheral nervous system:
• Sensory disturbances, motor weakness
(mononeuritis multiplex)
• Pain, tingling, numbness in the first 3.5
fingers (carpal tunnel syndrome)
• Central nervous system: nerve palsies
• Genitourinary: urethritis, ulcers, discharge,
dysuria (Reiter’s syndrome)
• Generalised: fever, weight loss, tiredness,
myalgia
‘Red flags’:
• Weight loss, night sweats
Past medical history:
• Traumatic injury, fractures
• Recent joint injection (septic arthritis)
• Joint surgery
• Cancer
• Osteoporosis
• Autoimmune conditions: inflammatory bowel
disease, glomerulonephritis, psoriasis, Sjögren’s
syndrome
• Osteoarthritis
• Diabetes (pseudogout, septic arthritis)

178
Histories:
40 Joint pain
Checklist
P
MP
F
Family history:
• Rheumatoid arthritis, ankylosing spondylitis,
inflammatory arthropathy
• Osteoporosis
• Osteoarthritis
• Cancer
Drug history:
• Long-term steroids (osteoporosis)
• Thiazide diuretics (gout)
• NSAIDs (gout)
• Over-the-counter medication
Allergies
Social history:
• Occupation
• Manual labour, lifting (osteoarthritis)
• Sports, exercise, strenuous activity
(osteoarthritis)
• Effect on activities of daily living, loss of
function (dressing, writing, eating, stairs)
• Alcohol (gout)
• Smoking
• Illicit drug use
Checklist
P
MP
F
Use of non-verbal cues, e.g. good eye contact,
nodding head and good body posture
Systematic approach
Explores and responds to ICE:
• Ideas
• Concerns
• Expectations
Shows empathy
Non-verbal skills
Avoids technical jargon
Devises holistic management plan and addresses
psychosocial issues as well as medical problems
Summarises
Offers to answer any questions
Thanks patient
Condition
Key points
Investigations and management
Osteoarthritis
Primary or secondary to earlier joint disease (trauma, obesity)
Pain on movement
Worse at the end of the day
Stiffness after rest
Heberden’s nodes (distal interphalangeal)
Bouchard’s nodes (proximal interphalangeal)
Joints: distal interphalangeal, thumb metacarpophalangeal,
knees
X-ray:
• Osteophytes
• Subchondral sclerosis
• Bone cysts
• Joint space narrowing
Exercise
Physiotherapy
Analgesia (paracetamol/NSAIDs)
Intra-articular steroid injection
Joint replacement
Rheumatoid arthritis
(Aletaha
et al.
2010)
Symmetrical
Swollen
Morning stiffness
Hands and feet
Metacarpophalangeal, proximal interphalangeal, wrist,
metatarsophalangeal
Carpal tunnel syndrome
Ulnar deviation
Dorsal subluxation
Rheumatoid factor positive (70%)
Anti-CCP (98%)
Anaemia of chronic disease
C-reactive protein, ESR, platelets (all raised)
X-ray:
• Soft tissue swelling
• Osteopenia
• Loss of joint space
Refer to rheumatologist
Summary of common conditions seen in OSCEs

Histories:
40 Joint pain 179
Condition
Key points
Investigations and management
Boutonnière deformity
Swan neck deformity
Z thumb
Elbow nodules
Felty syndrome: rheumatoid arthritis
+ neutropenia +
splenomegaly
Increased cardiovascular risk – ask about risk factors
(e.g. smoking)
28 Joint Disease Activity Score (DAS28)
DMARDs : ask about history of tuberculosis
(personal and in family; reactivation on
biological treatments)
Steroids (oral or intra-articular)
NSAIDs
Exercise
Joint replacement
Gout
Monoarthropathy
Metatarsophalangeal joints
Pain
Inflammation
Diuretics
Alcohol
Tumour lysis syndrome
Renal disease
Polarised light microscopy of joint fluid:
negatively birefringent
Raised urate
X-ray:
• Periarticular erosions
• Soft tissue swelling
Acute:
• NSAIDs
• Colchicine
Chronic:
• Allopurinol
Avoid alcohol and purine-rich foods (meat,
seafood)
Pseudogout (CPPD)
Similar to gout
Knee, hip, wrist
Diabetes mellitus
Hypothyroidism
Hyperparathyroidism
Wilson’s disease
Polarised light microscopy of joint fluid:
positively birefringent
X-ray: chondrocalcinosis
Analgesia
NSAIDs
Ankylosing spondylitis
Spine
Sacroiliac joints
HLA B27
Gradual onset of low back pain
Worse at night
Morning stiffness
Improves during day
Question mark posture
Enthesitis (inflammation at tendon insertion into bone):
Achilles tendon
Iritis
Aortic regurgitation
Apical lung fibrosis
X-ray: bamboo spine (syndesmophytes)
Normocytic anaemia
C-reactive protein, ESR (raised)
Exercise
Physiotherapy
NSAIDs
Anti-tumour necrosis factor alpha
(etanercept, adalimumab)
Systemic sclerosis
Limited: CREST (calcinosis, Raynaud’s syndrome,
oesophageal dysmotility, sclerodactyly, telangiectasias):
• Face, hands, feet, pulmonary hypertension
• Anti-centromere 70–80%
Diffuse: skin and organs (lungs, kidneys, heart)
• Anti-topoisomerase-1 (anti-Scl70) 40%
• Anti-RNA polymerase 20%
Diffuse: echocardiogram, spirometry
Intravenous cyclophosphamide
Angiotensin-converting enzyme inhibitor
Gloves, hat
Prostacyclin
(
Continued )

180
Histories:
40 Joint pain
Condition
Key points
Investigations and management
Relapsing
polychondritis (rare
but somehow finds
its way into OSCEs)
Floppy ears
Stridor (nasal septum, larynx)
Aortic valve disease
Polyarthritis
Vasculitis
Steroids
Immunosuppression
Polymyositis,
dermatomyositis
(same as
polymyositis
+ skin)
Symmetrical
Proximal muscle weakness
May be paraneoplastic phenomenon (lung)
Fever
Raynaud’s disease
Lung fibrosis
Myocarditis
Skin:
• Macular rash
• Heliotrope rash (eyelids)
• Dilated nailbed capillary loops
• Gottron’s papules
• Subcutaneous calcification
• ‘Mechanic’s hands’
Creatine kinase (raised)
EMG (fibrillation potentials)
Muscle biopsy
Anti-Mi-2
Anti-Jo-1 (acute onset)
Chest X-ray (? malignancy)
CT (chest, abdomen, pelvis)
Prednisolone
Immunosuppression
SLE
Women of child-bearing age
Afro-Caribbean
Relapsing and remitting
Fever, malaise, myalgia
Malar rash
Discoid rash
Photosensitivity
Mouth ulcers
Serositis (pleura, pericardia)
Renal
Central nervous system (seizures, psychiatric)
Drugs: isoniazid, hydralazine, phenytoin
Anti-dsDNA (60%)
C3, C4 (low)
ESR (raised)
C-reactive protein (normal)
ANA (95%)
ENA (20%):
• Anti-Ro
• Anti-La
• Anti-Sm
• Anti-RNP
Rheumatoid factor (40%)
Anti-histone antibodies (drug-induced SLE)
False-positive VDRL
Blood:
• Haemolytic anaemia
• Lymphopenia
• Leukopenia
• Thrombocytopenia
Maintenance:
• NSAIDs
• Hydroxychloroquine
• Steroid-sparing agents (methotrexate,
mycophenalate, azathioprine)

Histories:
40 Joint pain 181
Condition
Key points
Investigations and management
Reactive arthritis
Lower limbs
After infection: sexually transmitted disease:
Chlamydia,
Ureaplasma; gastroenteritis: Campylobacter, Salmonella,
Shigella, Yersinia
Reiter’s syndrome:
• Urethritis
• Arthritis
• Conjunctivitis
Iritis
Keratoderma blenorrhagica (palms and soles)
Circinate balanitis
Mouth ulcers
Enthesitis
ESR
C-reactive protein
Stool culture
Referral to genitourinary medicine clinic
X-ray
Psoriatic arthritis
Presentations:
• Like rheumatoid arthritis
• Distal interphalangeal joints
• Asymmetrical oligoarthritis
• Like ankylosing spondylitis
• Arthritis mutilans
Dactylitis (sausage fingers)
X-ray: pencil-in-cup deformity
NSAIDs
Sulfasalazine
Methotrexate
Ciclosporin
Anti-tumour necrosis factor alpha
Septic arthritis
Fever
Pain – cannot move joint
Swelling
Acute onset
Intravenous drug user
Joint fluid aspiration and culture
Intravenous antibiotics
Joint washout under general anaesthetic
Behçet’s disease
Mediterranean
Oral ulcers
Genital ulcers
Uveitis
Erythema nodosum
Central nervous system
Pathergy test: papule forms after needle prick
Immunosuppression, steroids
Charcot’s joint
Peripheral neuropathy (diabetes mellitus)
Deformed joint
X-ray
Analgesia
Surgery
Wegener’s
granulomatosis
Medium-vessel vasculitis
Upper airways (epistaxis, saddle-nose, sinusitis)
Lungs (cough, haemoptysis)
Kidneys (rapidly progressive glomerulonephritis)
Eyes
cANCA
PR3
Urinalysis (proteinuria, haematuria)
Chest X-ray
Steroids
Cyclophosphamide
Plasma exchange
Azathioprine, methotrexate
Trauma
Important to know mode of injury (high- or low-energy)
Bones, ligaments torn, dislocations – knee/hip trauma is
common in the history
‘RICE’ (rest, ice, compression, elevation)
Analgesia
Physiotherapy
Steroid injection
Surgery

182
Histories:
40 Joint pain
(depending on the level of dysfunction), occupational
therapist, surgeons (if replacement of the joint is con-
sidered), rheumatologist and GP. If there is chronic
illness such as rheumatoid arthritis, mention that there
are support groups and charities that the patient can
contact.
Questions you could be asked
Q. What are the features of seronegative arthritides?
A. Absence of rheumatoid factor, HLA B27-positive,
involvement of the axial skeleton, enthesitis, dactylitis,
extra-articular features such as oral ulcers, aortic
regurgitation and anterior uveitis, and asymmetrical
oligoarthritis/large joint monoarthritis (e.g. in the
knee).
Q. What are the differential diagnoses of seronegative
arthritides?
A. Psoriatic arthritis, reactive arthritis, enteropathic
arthritis, osteoarthritis, rheumatoid arthritis, haemo-
chromatosis, SLE and septic arthritis.
Q. What are the diagnostic criteria for rheumatoid
arthritis?
A. New criteria were released in 2010 from the
American College of Rheumatology:
• Presence of synovitis in at least one joint
• Absence of an alternative diagnosis better explain-
ing the synovitis
• Score greater than 6/10 on:
• Number and site of involved joints (range 0–5)
• Serological abnormality (range 0–3)
• Elevated acute-phase response (range 0–1)
• Symptom duration (two levels; range 0–1)
Q. How can you monitor disease activity in rheuma-
toid arthritis?
A. Frequent follow-up, 28 Joint Disease Activity Score
(DAS28) – repeat monthly, C-reactive protein and joint
X-ray.
Q. How do you manage rheumatoid arthritis?
A. The answers can be found in the summary table
above.
Reference
Aletaha D, Neogi T, Silman AJ et al. (2010) Rheumatoid
arthritis classification criteria: an American College
of Rheumatology/European League Against Rheu-
matism collaborative initiative. Ann Rheum Dis 69:
1580–8.
‘Surgical sieve’
Vitamin C D E
Vascular
Haemophilia
Infective/inflammatory
Staphylococcus, Streptococcus,
Neisseria gonorrhoeae, tuberculosis
Trauma
Fracture, secondary osteoarthritis
Autoimmune
Rheumatoid arthritis, SLE, rheumatic
fever
Metabolic
Gout, pseudogout
Iatrogenic
High-dose steroids (avascular necrosis)
Neoplastic
Osteosarcoma
Congenital
Congenital dislocation of the hip
Degenerative
Osteoarthritis
Endocrine
Diabetes (pseudogout),
postmenopausal osteoporosis
Hints and tips for the exam
Taking a history for joint pain is quite straightforward.
As with any pain, you will gain marks by running
through SOCRATES (site, onset, character, radiation,
alleviating factors/associated symptoms, timing, exac-
erbating factors, severity/signs/symptoms) and then
following up with a standard history proforma. The
marks to separate you from other candidates will come
from asking about extra-articular manifestations of
disease (assess this in the body systems) and the effect
of the condition on the patient’s life and work. If faced
with an elderly patient presenting with worsening pain
in the hip due to osteoarthritis, you should aim to
address their social and safety issues. Are they at risk of
falls? Do they need help around the house? How has
their mood been affected?
Remember to ask about the joint above and the one
below in all cases. For example, pain in the knee can be
referred pain from the hip and vice versa.
Do not forget occupation – more often than not, the
patient’s job will involve use of their affected joint.
Opening the station for questioning on how they are
coping and what their employer feels about the situa-
tion can bring out the patient’s concerns early and build
a stronger rapport. Hobbies and sports activities should
also be addressed.
Management will require an multidisciplinary
approach with involvement of a physiotherapist

183
41 Back pain
Checklist
P
MP
F
• Asks if patient is suffering from any other
symptoms
• Asks about any recent illnesses
• Previous history of back pain
Associated symptoms:
• Mechanical back pain: worse on movement/
flexion/extension
Spinal cord compression (intrinsic/extrinsic –
secondary):
• Rigidity of legs
• Motor weakness and sensory disturbance in
the legs
Myeloma: night sweats, weight loss
Spinal stenosis:
• Pain radiating down to thighs/buttocks, worse
on extension, better with flexion
• Motor weakness and sensory disturbance in
legs
Herniated spinal and nerve root compression:
• Pain radiating down leg and thigh
• Tingling down leg (rarely motor weakness)
Spondylolisthesis: similar to nerve root
compression, onset more acute
Discitis, myelitis, abscess:
• Immunosuppression (HIV, chemotherapy)
• Fevers
• Gradual onset of pain and motor weakness
and sensory disturbance in the legs
Vertebral fracture, ligament tears: trauma
Ankylosing spondylitis:
• Early morning stiffness, pain improves with
activity as the day progresses
• Disease of the As: anterior uveitis (eye pain),
Achilles tendinitis (Achilles pain), aortic
stenosis (heart symptoms), apical pulmonary
fibrosis (lung symptoms)
Spinal cord infarct:
• Sudden motor weakness
+ sensory disturbance
(pain/temperature affected first and more
severely, light touch/vibration sensation
relatively spared or unaffected)
Kyphosis/scoliosis: prolonged strain on posture
(e.g. lifting a heavy rucksack for many years)
Referred pain: renal stones (back/loin to groin),
rupture of abdominal aortic aneurysm (abdomen
to back)
Checklist
P
MP
F
Appropriate introduction
Confirms patient’s name and age
Explain reason for consultation
Obtains consent
Open question to elicit presenting complaint
Allows patient to open up, listens carefully,
remains silent and does not interrupt the patient
Signposts: e.g. ‘Mr Gregory, thank you for telling
me about this problem. I would like to ask a few
more detailed questions. Is that all right?’
History of presenting complaint:
• Site: which part of back (cervical/thoracic/
lumbar/sacral)
• Onset (how it started):
• Sudden
• Gradual
• After trauma/sudden movement
• Character: sharp shooting
• Radiation:
• To legs:
• Which side? Bilateral?
• To buttocks
• To feet
• To groin (loin to groin pain – the classical
kidney/ureteric stone pain that radiates
from the back to the groin)
• Around chest
• Time:
• Duration
• Intermittent, continuous, progressive (raised
intracranial pressure)
• Alleviating factors
• Exacerbating factors:
• Flexion/extension
• Walking
• Coughing
• Morning, with inactivity
• Night
• Heavy lifting
• Severity
• Limitation of movement, problems walking
• Any motor weakness/sensory symptoms in the
legs

184
Histories:
41 Back pain
Checklist
P
MP
F
‘Red flags’:
• Cauda equina symptoms:
• Perianal/’saddle’ numbness (numb when
wiping one’s bottom)
• New incontinence of faeces/urine
• Sudden motor weakness
• Weight loss
• Fevers, night sweats
• Night pain
• Recent trauma
• Past medical history of cancer
• Age
<20 or >55 years
Review of systems
Past medical history:
• Cancer
• Spinal surgery
• Ankylosing spondylitis
• Osteoporosis
• Osteoarthritis
Family history:
• Cancer
Drug history:
• Over-the-counter medication
Allergies
Checklist
P
MP
F
Social history:
• Alcohol (peptic ulcer disease, gastritis)
• Smoking
• Illicit drug use
• Occupation:
• Posture at work
• Manual labour
• Time off work
• Effect on activities of daily living
• Sports, exercise, strenuous activity
Use of non-verbal cues, e.g. good eye contact,
nodding head and good body posture
Systematic approach
Explores and responds to ICE:
• Ideas
• Concerns
• Expectations
Shows empathy
Non-verbal skills
Avoids technical jargon
Devises holistic management plan and addresses
psychosocial issues as well as medical problems
Summarises
Offers to answer any questions
Thanks patient

Histories:
41 Back pain 185
Condition
History
and
examination
Pathology
Investigations
Management
Disc
protrusion
and
nerve
root
compression
Lumbar
or
neck
pain,
limb
pain,
weakness
, w
asting,
sensory
disturbance
Very
rare
at
thor
acic
levels
as
less
mobility
there
Myelopathic
clinical
picture
.
This
may
not
cause
back
pain
but
only
lower
limb
neur
ology
Degener
ative
disease
causing
intervertebr
al
disc
herniation
and
impingement
on
nerve
roots
MRI
scan
Nerve
conduction
studies
Conserv
ative:
physiother
apy
, analgesia
–
smaller
disc
protrusions
without
major
root
compression
may
resolve
with
conserv
ative
treatment
Surgery:
when
clear
compression
is
seen
on
MRI
–
laminectomy
and
remov
al
of
disc
with
adequate
decompression
of
nerve
roots
Cauda
equina
syndrome
This
may
not
cause
back
pain
but
only
lower
limb
neur
ology
Bilater
al
leg
pain/weakness
, bladder
or
bowel
disturbance
, saddle
anaesthesia
Look
specifically
for
perianal
sensation,
anal
tone
and
lower
limb
neurology
Compression
of
thecal
sac
below
conus
medullaris
, usually
by
disc
herniation
Urgent
MRI
scan
Bladder
scan
to
assess
residual
volume
Emergency
lumbar
decompression
and
discectomy
Spinal
stenosis
Lower
back
pain,
neurogenic
claudication
(fixed
distance
,
relieved
by
bending
forw
ard)
Congenital
or
degener
ative
osteoligamentous
hypertrophy
Can
be
associated
with
slipping
of
one
vertebr
a
over
the
next
(spondylolisthesis)
Dynamic
X-r
ays/CT
to
ev
aluate
bony
structures
MRI
to
ev
aluate
neur
al
structures
Failing
conserv
ative
management,
surgical
options
include
laminectomy
to
remove
bony
compression
and
occasionally
spinal
instrumentation
to
correct
slipped
vertebr
ae
Spinal
infection
Progressive
localised
back
pain,
worse
on
movement,
fever
,
systemically
unwell
Can
affect
disc
space
and
adjacent
vertebr
ae
(spondylodiscitis)
Usually
caused
by
staphylococci
and
streptococci,
and
occasionally
by
Mycobacterium
tuberculosis
MRI
to
ev
aluate
neur
al
structures
and
any
epidur
al/par
aspinal/psoas
pus
collections
CT
to
assess
bony
integrity
Blood
cultures
, tests
for
tuberculosis
Open
or
CT
-guided
biopsy
to
identify
organism
Intr
avenous
antibiotics
for
at
least
6
weeks
–
more
if
tuberculosis
is
present
Dr
ainage
(usually
radiologically
guided)
of
any
psoas
abscess
May
require
surgical
w
ashout
and
stabilisation
if
extensive
Summary
of
serious
causes
of
back
pain
(Continued
)

186
Histories:
41 Back pain
Condition
History
and
examination
Pathology
Investigations
Management
Tr
auma
Mechanism
of
injury
–
flexion/
compression;
hyperextension/
distr
action;
axial
loading
Pain
at
site
on
injury
, limited
range
of
motion,
neurological
compromise
,
associated
injuries
Pre-existing
conditions
where
pathological
fr
acture
may
occur
if
trauma
is
minor
Injury
can
be
affect
bones
, ligaments
and
neur
al
structures
Spinal
fr
actures
defined
by
how
many
of
these
are
affected
according
to
three-column
theory
of
Denis
Cervical
spine:
anteroposterior/later
al
and
peg
view
X-r
ays
or
CT
–
must
go
to
C7/T1
junction;
MRI
if
neurological
symptoms
Rest
of
spine:
CT
and,
if
neur
al
compromise
, MRI
Cardiov
ascular
monitoring
for
neurogenic
shock
Immobilise
with
collar
, blocks
, tape
and
spinal
board
until
spine
is
cleared
clinically
, or
radiologically
if
patient
is
unconscious
Spinal
board
associated
with
high
risk
of
pressure
sores
so
patient
should
not
remain
on
a
board
for
more
than
2
hours
For
stable
fr
actures
, treatment
can
include
analgesia,
mobilisation
and
interv
al
X-r
ays
to
assess
fusion
For
unstable
fr
actures
, stabilisation
and
reduction
can
be
performed
externally
though
halo
stabilisation
and
tr
action
or
open
surgery
Metastatic
disease
Localised,
unremitting
pain,
nocturnal
pain,
progressive
, neurological
symptoms
May
have
known
history
of
malignancy
Metastatic
disease
affecting
spine
may
be
sclerotic
or
lytic
May
also
infiltr
ate
extr
adur
al
and
intr
adur
al
spaces
Common
cancers
that
metastasise
to
spine
are
prostate
(Batson’
s
valveless
venous
plexus)
and
breast
Whole-spine
CT/MRI
to
ev
aluate
spinal
cord,
multiplicity
of
lesions
, spinal
stability
and
integrity
of
bone
at
adjacent
levels
CT
chest/abdomen/pelvis
to
stage
cancer
Oncology
review
to
assess
prognosis
Tissue
diagnosis
confirmed
Blood
tests
such
as
prostate-specific
antigen
and
myeloma
screen
Palliative
radiother
apy
or
surgery
(surgery
cannot
be
performed
after
radiother
apy)
Surgery
if
limited
disease
and
reasonable
prognosis
Steroids

Histories:
41 Back pain 187
Checklist
P
MP
F
Introduce yourself to the patient with your full
name and designation
Explain that you are going to examine their back
and limbs. Obtain their consent
Offer to provide analgesia if the patient is in
obvious distress
General inspection – pain, posture, mobility,
deformity, scars, orthoses, medical aids
Palpate spinous processes for tenderness. In the
presence of trauma and spinal tenderness, the
patient must remain immobilised in a hard collar
and blocks until the spine has been radiologically
cleared with an X-ray/CT that shows the area
from the skull base to the T1 vertebra
Movements: neck flexion, extension, lateral
movements and rotation. Trunk flexion, extension
and rotation. Lumbar flexion and extension
(Schober’s test at this stage if limited flexion is
suspected)
Full neurological examination of the upper and
lower limbs
Straight leg raise
Femoral stretch test
Kernig’s and Brudzinski’s tests if infection/
meningism suspected
Rectal examination – a CHAPERONE is needed.
Check buttock and perianal sensation to pinprick
and light touch on the left and right. Check anal
tone and comment on whether the rectum is full
or empty. Test the abdominal, anal, cremasteric
and bulbocavernosus reflexes
Bladder: palpate for a full bladder. Check if a
catheter tug is felt. Offer a hand-held bladder
ultrasound scan to record residual volume.
Gait
Functional assessment – getting to the toilet,
able to dress self
Thank patient and help them dress
Offer differential diagnoses
MRI scan if there are neurological findings
Examination of a patient with back pain
Although this is a station related to history of back pain,
it is quite common to be asked to examine a patient
with back pain, either briefly after taking a history or
as part of an extended musculoskeletal station. Below
is a brief checklist to guide in examination of a patient
with back pain within this station.
Hints and tips for the exam
These signify a serious underlying pathology that needs
further investigation. If any of these are present, you
should really consider imaging (ideally an MRI, but at
least a plain X-ray) and bloods including a full blood
count, ESR and calcium level.
‘Red flags’ for lower back pain
• Age
<20 or >50 years
• Weight loss
• Night pain
• Night sweats
• Pain in the thoracic spine
• History of cancer or steroid use
• Symptoms of cauda equina syndrome (faecal incontinence/
saddle anaesthesia)
• Focal neurological signs or symptoms
Assessing possible cauda equina syndrome:
what information to have at hand when
referring the patient to neurosurgery
Making referrals to other specialities and colleagues is
increasingly being assessed in OSCEs, and a serious
neurosurgical emergency such as cauda equina syn-
drome would be a perfect case to test this with. Here
are the details that you should be ready with when
making a referral:
• Age
• Co-morbidities
• Pre-existing back pain
• History of trauma/spinal surgery
• Detailed time course of symptoms
• Results of full lower limb neurological examination
• Can the patient walk?
• Anal tone
• Bilateral perianal sensation to light touch and
pinprick
• Is the patient catheterised or passing urine?
• If catheterised, can the patient feel a strong tug of the
catheter?
• Post-void/catheter residual bladder volume
• Use of antiplatelet agents/anticoagulants
• Time last ate and drank
• MRI results if available.
Clearing the cervical spine
Patients with suspected neck injury will be immobilised
at the scene. Before they can be mobilised, their cervical
spine has to be cleared. In unconscious patients, more
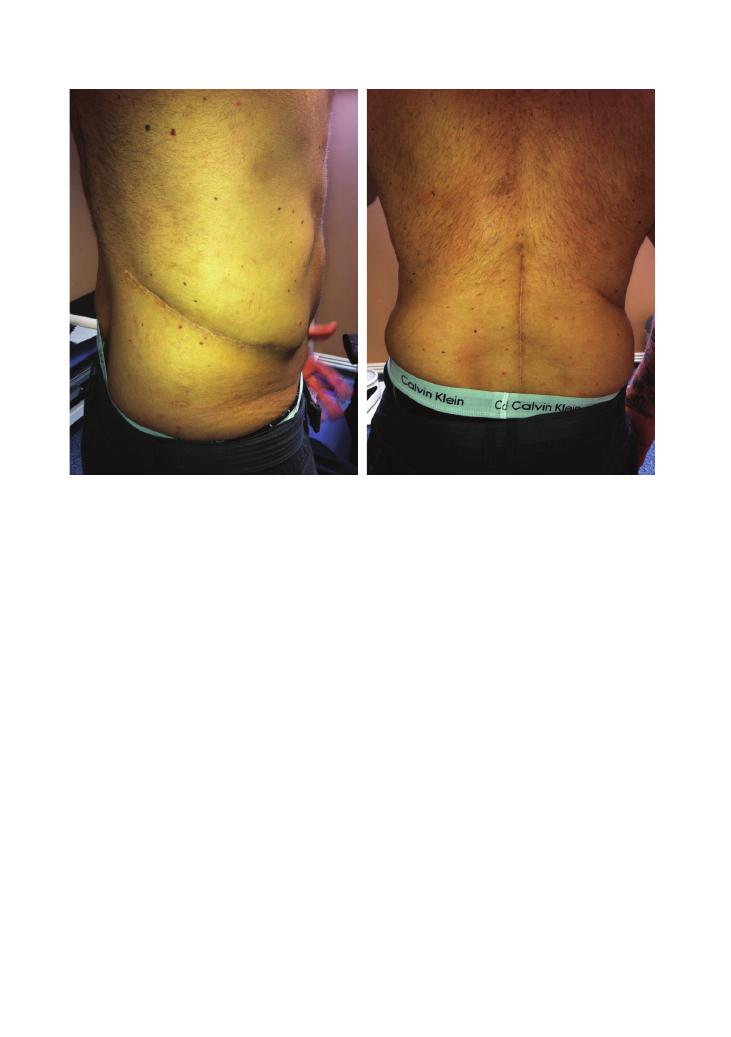
188
Histories:
41 Back pain
bilisation is then performed with a halo vest or opera-
tive intervention.
Neurogenic shock versus spinal shock
Neurogenic shock is a cardiovascular consequence of
spinal injury and can occur in spinal cord injuries
above T6. It refers to disruption of the sympathetic
outflow. This leads to bradycardia and hypotension as
there is unopposed parasympathetic activity. It can be
distinguished from hypovolaemic shock by warm
vasodilated peripheries in neurogenic causes, whereas a
patient who is bleeding will be peripherally shut down.
Neurogenic shock should be managed in a setting
where cardiovascular monitoring is available, and
pressor drugs and fluids may be required. Note that
ATLS guidelines require cardiovascular compromise to
be treated as hypovolaemic shock until this is excluded,
so never assume that a known spinal injury patient is
compromised due to neurogenic shock until bleeding
has been absolutely excluded.
Spinal shock is not related to the cardiovascular
system. It refers to a flaccid paralysis and areflexia that
occurs after spinal injury and can be reversible.
reliance is placed on the radiological investigations. To
clinically clear a spine, the patient must have a Glasgow
Coma Scale score of 15, not be intoxicated and have no
distracting injuries. Patients must have no neurological
deficit and no midline bony tenderness. They should be
able to rotate their neck. Radiologically, the films must
show the C7/T1 junction to be valid. Interpretation of
cervical spine films in the trauma patient is covered in
the ATLS guidelines and involves checking for correct
alignment and soft tissue spaces within normal limits.
In unconscious patients, in whom clinical assessment is
lost, MRI may be needed to assess the ligaments.
Immobilising the spinal patient
To be correctly immobilised, the patient must be placed
on a hard spinal board at the scene, with a properly
fitting hard collar, blocks and tape. Without all these
components, the patient cannot be said to be immobi-
lised. To move these patients for secondary survey and
imaging, they must be log-rolled. If there is an unstable
spinal injury and immobilisation must continue, the
patient should be placed in a Miami J or Philadelphia
collar and complete bed rest ensured. Definitive immo-
Figure 41.1 Scars from L2 vertebrectomy to treat a giant cell tumour
(a)
(b)

Histories:
41 Back pain 189
Common causes of ‘simple’ musculoskeletal
back pain
Back pain could underlie a very serious pathology, but
the vast majority of patients suffering from back pain
have ‘simple/musculoskeletal’ back pain. Some of the
common causes of this are described in the table.
Ankylosing spondylitis
This is a seronegative multisystem disease. It usually
starts as sacroiliac joint stiffness in young men that
progresses to involve the whole back. It is usually worse
in the morning. The pathological process includes ossi-
fication of ligaments leading to a rigid brittle spine that
is vulnerable to trauma. Radiologically, an ossified
‘bamboo spine’ is seen, as well as characteristic Anders-
son lesions of the endplates on MRI where the liga-
ments insert. Spinal deformity such as kyphoscoliosis
can occur. Systemic features of ankylosing spondylitis
include aortic disease, apical lung fibrosis, uveitis, pso-
riasis and gastrointestinal inflammation.
Key investigations: when in doubt about
the integrity of neural structures, go for
an MRI
The examiner may ask you what investigations you
would like to request. Unless there is a specific indica-
tion, do not request X-rays as most of the time they will
come back as appearing normal or with mild osteoar-
thritic changes – and they also expose the patient to
large volumes of radiation. The investigation of choice
to investigate any structural or inflammatory pathology
in the back is an MRI scan.
You could justify routine blood tests, for example full
blood count, Us
+Es, ESR, C-reactive protein and bone
profile, as these could indicate a primary or secondary
malignancy and inflammatory causes of back pain.
‘Yellow flags’
‘Yellow flags’ are psychosocial risk factors for devel-
oping chronic back pain. These may include the
following:
• Problems at work, for example the patient is bullied
at work and therefore uses back pain as an excuse to be
not working
• Social withdrawal or lack of social integration
• A past or current medical history of depression, stress
or anxiety, or mental health problems
• Low self-motivation and failure to actively partici-
pate in activities that may help them, for example
physiotherapy
Cauda equina syndrome
This a neurosurgical emergency due to compression of
the nerve roots in the thecal sac below the level of the
conus medullaris – untreated, it can lead to paralysis
and loss of bladder and bowel control; this has been
covered in detail in Chapter 11 on rectal examination.
It is one of the most common causes of medicolegal
action by patients.
Type
Comments
Mechanical
The most common cause of lower back pain. It is
commonly due to age-related disc degeneration
or musculoskeletal injury after minor trauma.
You may want to suggest a trial of analgesia
and physiotherapy
Posture
Bending forwards to lift a heavy box or standing
all day, for example with a job as a security
guard, can lead to back pain. Suggest that the
patient reports this problem to the occupational
health department where they work
Sciatica
Caused by irritation of the sciatic nerve. Patients
will describe pain that shoots down their legs
and can be severe. Physiotherapy assessment
will be helpful, and if the pain does not resolve,
MRI can be used to assess nerve root
impingement.
Questions you could be asked
Q. What would you advise a patient with mechanical
lower back pain in a GP appointment?
A. It is important that patients do not take to their
beds in the belief that movement will damage their
back. Encourage them to go about their normal activi-
ties at work and at home. A referral for physiotherapy
is also useful.
Q. Why is degenerative disc disease less common in the
thoracic spine?
A. Degenerative disease and trauma occur at the most
mobile segments of the spine, i.e. the cervical spine and
thoracolumbar junction. The thoracic spine is relatively
immobile and is well supported by the ribs, making it
less vulnerable to degeneration and injury.
Q. What is an ASIA chart?
A. This is a standardised method developed by the
American Spinal Injury Association to assess motor
function, sensory function and anal tone. It classifies
spinal cord injury as complete or incomplete, which has
prognostic value. Clinically, it is useful to assess neurol-
ogy serially and detect improvements or deteriorations,
even when the tests are carried out by different
examiners.

190
Histories:
41 Back pain
Q. Which scan is useful in osteoporosis?
A. A DEXA scan.
Q. Which scan is useful for distinguishing between
infection and malignancy?
A. Positron-emission tomography.
Q. What are some differential diagnoses for back pain?
A. Serious and common pathologies can masquerade
as back pain. These include abdominal aortic aneu-
rysm, urinary tract infections and upper tract renal
disease, aortic dissection, myocardial infarction, ectopic
pregnancy, pancreatitis and other retroperitoneal
pathology, and duodenal ulcers.

191
42 Pyrexia of unknown origin
Checklist
P
MP
F
Appropriate introduction
Confirms the patient’s name and age
Explains reason for consultation
Obtains consent
Open question to elicit presenting complaint
Allows patient to open up, listens carefully,
remains silent and does not interrupt the patient
Signposts: e.g. ‘Mr Smith, thank you for telling
me about this problem. I would like to ask a few
more detailed questions. Is that all right?’
History of presenting complaint:
• How do the patient know they had pyrexia?
• What was the temperature (if measured)?
• Onset (how it started)
• Pattern:
• Day/night/intermittent/continuous/
progressive
• Peaks and troughs
• Frequency
• Exacerbating factors
• Alleviating factors (paracetamol)
• Rigors/shivers
• Lethargy
• Night sweats
• Weight loss
• Reduced urine output (septic shock)
Associated symptoms that may indicate a focus:
• Respiratory:
• Cough, sputum (pneumonia)
• Haemoptysis (cancer, tuberculosis)
• Shortness of breath
• Gastrointestinal:
• Diarrhoea (gastroenteritis)
• Bloody stools (inflammatory bowel disease)
• What/when did the patient last eat?
• Liver/gallbladder:
• Right upper quadrant pain
• Jaundice
Checklist
P
MP
F
• Neurological:
• Headache (abscess, meningism)
• Neck stiffness, rash (meningism)
• Focal neurological symptoms (abscess,
encephalitis)
• Cardiovascular: chest pain, shortness of breath,
haematuria (infective endocarditis)
• Urological:
• Haematuria
• Dysuria (urinary tract infection)
• Loin pain (pyelonephritis)
• Rheumatological, musculoskeletal:
• Severely painful single joint (septic arthritis)
• Pain in small joints (rheumatoid arthritis,
systemic lupus erythematosus)
• Muscle pain (myositis)
• ENT: throat pain (upper respiratory tract
infection, tonsillitis)
• Dental: tooth pain (tooth abscess)
• Skin: rash, inflammation, redness (cellulitis)
• Calf pain/swelling (deep vein thrombosis)
• Lumps (lymphadenopathy)
• Gynaecological symptoms:
• Vaginal bleeding/discharge (pelvic
inflammatory disease)
• Use of tampons
• Risk factors for HIV:
• Multiple/new sexual partners, contact with
sex workers (must signpost)
• Contraception
• Intravenous drug abuse
• Recent recurrent boils/other infections
• Asks if the patient is suffering from any other
symptoms
• Asks about recent illnesses
• Previous episodes of pyrexia of unknown origin
(PUO)
Past medical history:
• HIV
• Tuberculosis
• Cancer

192
Histories:
42 Pyrexia of unknown origin
Checklist
P
MP
F
• Valvular heart disease/replacement (infective
endocarditis)
• Organ transplants
• Rheumatic fever
• Blood transfusions
• Diabetes
• Immunisations
• Recent hospital admissions
• Recent surgery: any healing wounds?
Family history:
• Tuberculosis
• Cancer
• Immunosuppressive illnesses
• Familal Mediterranean fever
Drug history:
• Immunosuppressants: cytotoxic agents,
chemotherapy, steroids
• Malaria prophylaxis
• Over-the-counter medications
• Herbal remedies
Allergies
Social history:
• Recent travel history:
• Where/when/what country?
• Accommodation
• Food, water, restaurants
• Did others on holiday have same symptoms?
• Swimming in rivers, at coasts or in possible
contaminated waters
Checklist
P
MP
F
• Fever on holiday
• Insect/tick bites
• Recent diet:
• Unpasteurised dairy products
• Barbecues
• Drinking water abroad
• Recent contact with farm animals
• Foreign contacts
• Alcohol, smoking, illicit drug use
• Sexual history (if appropriate and only after
signposting clearly)
• Occupation
• Accommodation: any recent changes
Review of systems
Use of non-verbal cues, e.g. good eye contact,
nodding head and good body posture
Systematic approach
Explores and responds to ICE:
• Ideas
• Concerns
• Expectations
Shows empathy
Non-verbal skills
Avoids technical jargon
Devises holistic management plan and addresses
psychosocial issues as well as medical problems
Summarises
Offers to answer any questions
Thanks patient
Summary of common conditions seen
in OSCEs
Causes of PUO can be divided into:
• Infection
• Malignancy
• Inflammatory/rheumatological diseases
• Miscellaneous
• Unknown

Histories:
42 Pyrexia of unknown origin 193
Condition
Key points
Tuberculosis
Cough
Night sweats (drenched)
Haemoptysis
Weight loss
Tuberculosis contact
South Asian
Abscess
Spiking fever
Temperature chart looks like a zig-zag line
Endocarditis
New murmur and fever
Weight loss
Anaemia
Embolic phenomena (stroke)
Janeway lesions
Osler’s nodes
Splenomegaly
Prosthetic valve
Intravenous drug use
Requires blood cultures and
transoesophageal echocardiogram
Osteomyelitis
Pain, tenderness
Swelling
Heat
Pneumonia
Elderly
Alcohol
Previous tuberculosis
Smoking
Immunosuppression
Urinary tract
infection
Frequency
Dysuria
Haematuria
Intracerebral
– meningitis,
encephalitis,
abscess
Delirium
Cognitive
± neurological features
Lumbar puncture
CT brain
HIV
Non-specific symptoms
Opportunistic infections
Endemic area
Risk factors
Hepatitis
Abdominal pain
Jaundice
Alcohol
Obesity
Intravenous drug user
Tropical
infections
Foreign travel
Malaria prophylaxis (compliance)
Immunisation history
Consider the wider public health aspect also
(contacting the CCDC, notifiable diseases)
Infections (25%)
Condition
Key points
Lymphoma
Tiredness
Lymphadenopathy
Night sweats
Pruritus
Weight loss
Leukaemia
Bruising
Infections
Anaemia
Neoplasms (20%)
Condition
Key points
Rheumatoid
arthritis
Symmetrical
Swollen
Painful
Small joints of hands (metacarpophalangeal,
proximal interphalangeal)
Systemic lupus
erythematosus
Non-specific symptoms (malaise, tiredness)
Weight loss
Alopecia
Malar rash
Photosensitivity
Mouth ulcers
Arthralgia
Young women
Giant cell arteritis
Elderly
Associated with polymyalgia rheumatica
Headache
Temporal tenderness
Jaw claudication
Amaurosis fugax
Polymyalgia
rheumatica
Morning stiffness in the proximal limb
muscles
Tiredness
Anorexia
Weight loss
Still’s disease
Joint pain and swelling
Salmon pink skin rash
Fever peaks in afternoon
Connective tissue disease (20%)

194
Histories:
42 Pyrexia of unknown origin
Structure your questioning according to different
body systems. This will ensure you do not miss any-
thing obvious.
Asking for the patient’s personal thoughts on the
cause is imperative and more often than not gives the
diagnosis away in this station. This should also be used
as an opportunity to allay the patient’s fears if the diag-
nosis is clear.
In cases of PUO, the history and examination should
be repeated at intervals to see if further information can
be gleaned to achieve a diagnosis. This should be men-
tioned to the examiner when you present the case.
Examining patients with PUO
Examining a patient with a PUO involves a thorough
examination focusing on possible causes that were
highlighted within the history. Pay particular attention
to the patient’s skin, mucous membranes and lym-
phatic system, and the presence of abdominal masses.
Key investigations for patients with PUO
Be prepared with a number of investigations at the
PUO station. Be able to justify each test based on your
history, examination findings and likely differential
diagnosis:
• Bedside tests: measure the temperature!
• Full blood count, white cell count and differential,
Us
+Es, C-reactive protein, liver function tests, ESR,
blood film, amylase
• Blood cultures (
×3, taken at different times from dif-
ferent sites using an aseptic technique.)
• Urine microscopy, culture and sensitivity
• Swabs (throat, ear, penile, high vaginal/endocervical)
• Autoantibody screen – antinuclear antibody, ANCA,
rheumatoid factor
• HIV test, PPD, interferon-gamma release assay for TB
• Chest X-ray
• Abdominal ultrasound scan
• CT/MRI – the site will be dictated by what you find
from your history and examination
In your management plan, first decide whether the
patient needs to be admitted. A multidisciplinary
approach is key in PUO (as with every OSCE).
Questions you could be asked
Q. What are the common symptoms of tuberculosis?
Q. What initial investigations would you consider in a
patient presenting with a PUO?
A. The answers can be found in the chapter text.
Miscellaneous (15%)
Condition
Key points
Drug fever (3%)
Beta-lactam antibiotics (penicillin)
Isoniazid
Sulphonamide (sulphasalazine)
Pulmonary embolism
Shortness of breath
Chest pain
Haemoptysis
Recent surgery, immobility
Inflammatory bowel
disease
Abdominal pain
Weight loss
Diarrhoea (ulcerative colitis – bloody)
Occupation
Condition
Sewage worker
Leptospirosis
Farm worker
Zoonosis
Healthcare worker
Hepatitis, HIV
Forestry worker
Lyme disease
Abattoir workers
Q fever (
Coxiella burnetii )
Occupation-associated illness
Remember that 25% of patients with a PUO never
receive a diagnosis for why it has occurred.
Hints and tips for the exam
Definition of PUO
The definition of PUO is a temperature over 38.3°C
for longer than 3 weeks with no obvious source
despite investigation.
Devising a list of differential diagnoses
PUO has a vast differential diagnosis so approaching
this station can be tricky. Cast your net wide. Only
home in on a possible diagnosis after you have asked
all the key questions (i.e. even if it is clear that a con-
nective tissue disorder is the cause, do not forget the
travel and sexual histories). There is a lot to cover so be
succinct, but give the patient enough time to respond
so that you can gain the most marks.
In this station, one of your goals is to differentiate
between whether the patient should be admitted for
further investigation or can be monitored and treated
in the community.

195
43 Ankle swelling
Checklist
P
MP
F
Appropriate introduction
Confirms patient’s name and age
Explains reason for consultation
Obtains consent
Open question to elicit presenting complaint
Allows patient to open up, listens carefully,
remains silent and does not interrupt the patient
Signposts: e.g. ‘Mr Gregory, thank you for telling
me about this problem. I would like to ask a few
more detailed questions. Is that all right?’
History of presenting complaint:
• Details about swelling:
• Duration, extent (e.g. mid-shins, knees),
changes since onset, presence of erythema/
pain/itching, previous episodes of swelling
• Change in relation to time of day
• Associated symptoms:
• Related to heart failure: shortness of
breath, paroxysmal nocturnal dyspnoea,
orthopnoea, past medical history of
ischaemic heart disease or chronic lung
disease
• Related to chronic liver disease:
abdominal distension, jaundice, changes
to sleep–wake cycle
• Related to kidney disease: swelling of
face, haematuria, frothy urine, oliguria
• Related to venous insufficiency:
eczema, ulceration, pigmentation, risk
factors, e.g. prolonged standing, high
heels
• Related to hypothyroidism: decreased
tolerance of cold, weight gain, mood
changes
• Related to a pelvic mass: abdominal
distension, constipation
• Related to a deep vein thrombosis:
severe pain
• Asks in a sensitive manner about the
possibility of being pregnant
Checklist
P
MP
F
• Asks about risk factors for deep vein
thrombosis: recent surgery, past deep vein
thrombosis, immobility, thrombophilia, cancer
Asks about constitutional symptoms: fever, weight
change
• Asks if patient is suffering from any other
symptoms
• Asks about any recent illnesses
• Previous episodes of ankle swelling
• Family members/contacts with similar
symptoms
‘Red flags’:
• Weight loss, loss of appetite, night sweats
(malignancy)
Review of systems
Past medical history:
• Ischaemic heart disease and heart failure
• Liver disease
• Diabetes
• Hypertension
• Cancer
• Pelvic surgery
Family history:
• Ischaemic heart disease
Drug history:
• Current medication
• Recent changes to dose
• Over-the-counter drugs
• Intravenous drug use
Allergies
Social history:
• Smoking
• Alcohol
• Illicit drug use (especially intravenous drug
abuse – hepatitis B/C)
• Occupation
• Activities of daily living
• Effect of ankle swelling on patient’s mobility
Use of non-verbal cues, e.g. good eye contact,
nodding head and good body posture
Systematic approach

196
Histories:
43 Ankle swelling
Checklist
P
MP
F
Explores and responds to ICE:
• Ideas
• Concerns
• Expectations
Shows empathy
Non-verbal skills
Avoids technical jargon
Checklist
P
MP
F
Devises holistic management plan and addresses
psychosocial issues as well as medical problems
Summarises
Offers to answer any questions
Thanks patient
Condition
Clues from the history
Investigations
Renal failure
Risk factors, e.g. diabetes mellitus, hypertension, use
of nephrotoxic drugs,
Associated symptoms, e.g. tiredness, metallic taste,
yellow tinge to the skin, brown discoloration of the
nails
Full blood count, Us
+Es, bone profile,
1,25-hydroxy vitamin D levels
Renal ultrasound scan
Albumin:creatinine ratio
Nephrotic syndrome
Periorbital swelling
Frothy urine
Diabetes, hypertension, features of connective disease
(e.g. arthralgia, Raynaud’s phenomenon,
photosensitive rash)
Haematuria
Urine dipstick
Us
+Es
Albumin:creatinine ratio (or 24-hour urine
collection)
Clotting screen
Lipid profile
Autoantibody screen
ASO titre
Oral glucose tolerance test
Hepatitis serology
Renal biopsy
Right-sided/
congestive cardiac
failure
Shortness of breath on exertion
Chronic long-standing lung disease (e.g. COPD,
severe asthma, fibrotic lung disease)
Plasma brain natriuretic protein
Echocardiogram
Chest X-ray
Lung function tests
High-resolution CT chest
Pulmonary
hypertension
Shortness of breath
Chest pain
Cardiac catheter studies
ECG
Echocardiogram
Chronic liver disease
Presence of associated symptoms, e.g. jaundice,
ascites, confusion
Past medical history of excess alcohol intake
Risk factors for chronic liver disease, e.g. past medical
history or family history of haemochromatosis/
Wilson’s disease, intravenous drug use
Liver function tests
Clotting screen
Liver screen (see Chapter 3 on abdominal
examination)
Ultrasound abdomen
Hypothyroidism
Past history of thyroid surgery
Past medical history of other autoimmune conditions
Symptoms related to hypothyroidism
Thyroid function tests
Thyroid ultrasound scan
Venous insufficiency
Prolonged standing
Previous deep vein thromboses
Presence of brown pigmentation, eczema, dilated
tortuous veins
Doppler ultrasound scan
Ankle–brachial pressure index
Abdomen
+ pelvic examination + ultrasound
scan to screen for venous compression from
an abdominal/pelvic mass
Summary of common conditions seen in OSCEs

Histories:
43 Ankle swelling 197
Condition
Clues from the history
Investigations
Pelvic mass causing
venous
compression
Abdominal distension
Constipation
Vaginal bleeding
Menstrual disturbance
Full blood count, Us
+Es, liver function tests, ESR
Ultrasound abdomen
+ pelvis
CT abdomen
+ pelvis
Cellulitis
Erythema, history of penetrating injury
Fever
History of immunosuppression
Spreading of erythema
Clinical diagnosis
Raised inflammatory markers/C-reactive protein
Pregnancy
Child-bearing age
Sexually active and not using contraception
Vomiting
Urinary beta-hCG
Pelvic ultrasound scan
Pre-eclampsia
Pregnancy
>20 weeks’ gestation
Features due to hypertension: headache, frothy urine
(proteinuria), vomiting
Urine dipstick (proteinuria)
Blood pressure (
>140/90 mmHg or significant
rise from booking blood pressure)
Deep vein thrombosis
Presence of risk factors (outlined above)
Lower limb Doppler ultrasound studies
Hereditary
lymphoedema
Family history
No symptoms to suggest a secondary cause
Investigations to screen for secondary causes
Secondary
lymphoedema
Radiotherapy
Symptoms of intra-abdominal/pelvic malignancy
Ultrasound abdomen
+ pelvis
Tumour markers
Iatrogenic
Amlodipine
Investigations to rule out other possible causes
apart from the drug in question that may be
contributing
Hints and tips for the exams
Ask about the duration of ankle swelling
Ankle swelling of rapid onset is more likely to be caused
by an acute process (e.g. deep vein thrombosis), whereas
swelling that has developed over the course of weeks or
months is more likely to be caused by one of the failures
(renal, liver, cardiac or thyroid).
Remember to take a thorough drug history
Ankle swelling is, for example, a common side effect of
amlodipine.
Work through the history systematically
As you can see from the summary table, ankle swelling
can be caused by pathology affecting various organ
systems. Hence, it is important to ‘throw the net wide’
early on in your history to screen for pathology related
to each of these systems.
Do NOT forget pregnancy and
pre-eclampsia
Obstetrics is examined in the fourth year at most UK
medical schools, so the majority of students do not
revise this topic for finals. However, contrary to popular
belief, obstetric emergencies can be examined in finals.
It is thus important to remember that worsening or
new-onset ankle swelling in a pregnant female beyond
20 weeks’ gestation should be treated as pre-eclampsia
until proven otherwise.
Potential variations at this station
• History of unilateral ankle swelling
+ examination of
venous system of the lower limbs
• History of ankle swelling
+ focused examination. The
‘focused examination’ should include the following:
• Hands: signs of chronic liver disease, clubbing
(liver cirrhosis, fibrotic lung disease)
• Eyes: conjunctival pallor (NB. anaemia can be
related to chronic kidney disease or cardiac failure)
• Chest: observation for deformities (e.g. Harrison’s
sulcus, barrel chest), auscultation of lung fields for
crepitations associated with fibrosis or wheeze associ-
ated with COPD, auscultation of heart sounds
(various murmurs can be associated with congestive
heart failure)
• Abdomen: hepatomegaly, palpable pelvic masses,
distension (e.g. ascites, pregnancy)
• Legs: other signs associated with chronic venous
insufficiency (outlined above)

198
Histories:
43 Ankle swelling
Q. What features would support a diagnosis of chronic
rather than acute renal failure?
A. • Anaemia
• Secondary hypoparathyroidism (low calcium, low
1,25-hydroxy-vitamin D, elevated phosphate, ele-
vated parathyroid hormone)
• Renal osteodystrophy (osteomalacia, osteoporo-
sis, osteosclerosis causing a ‘rugger-jersey’ spine on
X-ray)
• Small kidneys on ultrasound scan
• Lack of symptoms despite severe uraemia
• Bedside tests: urine dipstick, peak expiratory flow
rate
Questions you could be asked
Q. What else might you find on examination of the
ankles in a patient with ankle swelling secondary to
hypothyroidism?
A. • Pretibial myxoedema (see Chapter 9 on thyroid
examination for an illustration)
• Erythema ab igne (arising from large periods of
time spent near a fire or heater as a result of cold
intolerance)
• Slow-relaxing reflexes

199
44 Needlestick injury
Checklist
P
MP
F
Appropriate introduction and establishes identity
of colleague
Instructs colleague about dealing with injury
appropriately:
• Induce bleeding
• Do not suck blood
• Wash thoroughly under running water without
use of soap or bleach
Obtains details of injury:
• Location and time
• Approximate depth of needlestick penetration
• Presence of visible blood/other fluid on needle
• Splashes to eye or mouth
Assesses risk and communicates this
appropriately to the patient in a clear empathetic
manner
Informs colleague about risk of contracting
blood-borne viral illness without post-exposure
prophylaxis (PEP):
• HIV
<1%, hepatitis B up to 30%, hepatitis C
3%
• Explains clearly that these risks are an average
and depend upon risk of exposure
Provides appropriate details about PEP:
• PEP is offered if donor has one or more
significant risk factor(s) for HIV or is known to
have HIV, or if it is not possible to exclude that
the donor has HIV
• Most effective if started within the hour (but
can will still have benefit if started within 72
hours of exposure)
• Minimum course is 28 days
• Explains side effects (myalgia, rash,
pancreatitis, deranged liver function tests,
neutropenia)
• Recipient needs to avoid drinking alcohol
Explains blood tests that need to be done:
Checklist
P
MP
F
• Liver function tests immediately, at 3 months
and at 6 months
• HIV testing immediately and at 3 months
• Hepatitis B testing immediately, at 3 months
and at 6 months
Enquires about previous immunisation against
hepatitis B, offers immunisation/booster if
appropriate, offers hepatitis B immunoglobulin if
the donor is a known hepatitis B sufferer with
high infectivity
Advises colleague to refrain from obtaining
consent for blood-borne virus testing from the
donor themselves and explains this has to be
done by a colleague
Advises colleague to avoid unprotected
intercourse and donation of blood until HIV
testing has been completed or PEP has been
completed
Provides safety netting for regarding acute
seroconversion illness, telling colleague to look
out for:
• Swollen glands
• New rashes
• Throat/mouth infections
• Shingles
Provides safety netting for hepatitis B, advising
colleague to look out for:
• Jaundice
• Right upper quadrant pain
Instructs colleague to inform supervisor and
complete an incident form
Maintains sympathetic tone throughout
consultation
Provides information clearly
Checks colleague’s understanding of information
regularly and invites questions at the end
Arranges follow-up by the occupational health
department
Task (5 minutes): You are an SHO working in occupa-
tional health. You have received a phone call from an
FY1 working with the infectious disease team about a
needlestick injury. Advise the FY1 on what steps need
to be taken.

200
Histories:
44 Needlestick injury
• Pancreatitis
• Neutropenia
• Stevens–Johnson syndrome
Interactions with drugs metabolised by the P450
liver enzyme system are common so the patient must
be given information about which drugs are safe to use.
• What happens if the recipient is pregnant?
• If pregnancy has not already been confirmed, carry
out a pregnancy test prior to initiating PEP.
• Pregnancy does not contraindicate the use of PEP.
• There is limited evidence regarding any adverse
effects of drugs used in PEP on the developing fetus.
• The risk of vertical transmission of HIV should be
balanced against the risk of adverse effects on the
fetus by PEP.
• Drugs used in PEP are contraindicated while
breast-feeding.
• Does the recipient of the injury have to stay away
from work until tests are complete at 6 months?
• As long as seroconversion illness does not develop,
healthcare workers are not required to stay off work
or avoid exposure-prone procedures.
• This is why it is so important at this station to
construct a safety net for the signs and symptoms of
seroconversion illness.
Potential variations at this station
You may encounter the following, all of which are
5-minute stations:
• A telephone conversation with an actor behind a
curtain
• Face-to-face role-play with an actor
• A viva with an examiner asking questions regarding
sharps incidents
Hints and tips for the exam
This is a relatively difficult OSCE station because it tests
candidates in three separate domains and you are
unlikely to encounter many opportunities to practise it
during your clinical attachments:
• Knowledge: You need to know what steps need to be
taken following a sharps accident and what constitutes
a high-risk exposure for blood-borne viral illness. Also,
you should be able to construct an appropriate safety
net with regard to signs of HIV seroconversion illness.
• Communicating with a worried colleague: You
need to be empathetic and calm while trying to impart
a large volume of information in a manner that is easily
understood by your colleague.
• Ethics and law: You need to know that fully informed
consent must be taken by a health professional other
than the recipient of the needlestick injury before the
patient’s blood can be tested.
You are unlikely to get exposure to this type of scenario
during clinical attachments, so the most effective way
of preparing for this station is to practise it several
times with colleagues before the OSCE.
There are a number of key points that will help to
ensure that you cover all the necessary points at this
station:
• What constitutes a high-risk exposure?:
• Patient is known to be a carrier of a blood-borne
viral infection
• Patient has a history of sexual intercourse with a
carrier of a blood-borne viral infection
• Patient is a male with a history of sex with men
• Patient has lived in Africa or was born there
• Patient is/has been an intravenous drug user
• Patient received a blood transfusion before 1991
• What are the common side effects of PEP?:
• Gastrointestinal disturbance (nausea, vomiting,
diarrhea, anorexia)

201
45 Preoperative assessment
Checklist
P
MP
F
Appropriate introduction
Confirms patient’s name and age
Explains reason for consultation
Obtains consent
Confirms operation to be performed
Open question to find out if patient understands
the purpose of the history
Allows patient to open up, listens carefully,
remains silent and does not interrupt the patient
Enquires about cardiovascular health, asking
specifically about symptoms of:
• Ischaemic heart disease
• Hypertension
• Arrhythmias
• Syncope
• Peripheral vascular disease
Enquires about respiratory health, asking
specifically about:
• Asthma
• COPD
• Sleep apnoea
• Pneumonia
Establishes exercise tolerance
Enquires about other medical problems, in
particular:
• Cerebrovascular accidents
• Epilepsy
• Diabetes mellitus
• Rheumatoid arthritis (and which joints are
affected)
• Renal disease (and if there is renal failure,
details of dialysis)
• Liver disease
• Sickle cell disease
Enquires about previous facial/head and neck
surgery
Asks about any history of hiatus hernia or
gastro-oesophageal reflux
Checklist
P
MP
F
Asks about any previous operations, general
anaesthesia and associated problems
Enquires about any family history of any problems
associated with general anaesthesia
Establishes what regular medication the patient is
taking, and whether it has been taken that day
Establishes any allergies/adverse reactions
Asks specifically about adverse reactions to
penicillin, NSAIDs, latex
Establishes smoking history
Establishes alcohol intake
Establishes any history of illicit drug use
Asks about dentition, i.e. loose teeth, caps,
crowns, fillings, dentures, plates
Asks the time when patient last had anything to
eat or drink
If the patient is young and female, establishes
the possibility of the patient being pregnant
Use of non-verbal cues, e.g. good eye contact,
nodding head and good body posture
Systematic approach
Mentions would examine the patient, including
cardiorespiratory and airway assessment
Intention to order relevant preoperative tests as
per local or national guidelines: ECG, bloods,
echocardiogram, chest X-ray
Explores and responds to ICE:
• Ideas
• Concerns
• Expectations
Shows empathy
Non-verbal skills
Avoids technical jargon
Summarises
Offers to answer any questions
Thanks patient

202
Histories:
45 Preoperative assessment
There are, however, several drawbacks to this system.
It is unclear how to classify a patient with several co-
morbidities: one individual’s definition of a ‘mild’
disease may be ‘severe’ in someone else’s eyes – it is
largely open to interpretation. Anyone over the age of
80 cannot be classified any better than ASA2.
Preoperative investigations
Remember to tell the examiner of your intention to
request relevant preoperative investigations. In most
cases, those in the list below will suffice, although
patients with specific co-morbidities may need other
specific investigations – for example, patients with
rheumatoid arthritis will usually need cervical spine
X-rays to assess atlantoaxial instability.
• Blood tests:
• Full blood count, Us
+Es, liver function tests
• Clotting screen
• Group and save
• Haemoglobinopathy screen (especially important
with certain ethnicities, such as Afro-Caribbean,
Mediterranean and Asian patients)
• ECG
• Chest X-ray
• Echocardiogram
If you encounter problems
You must be prepared to highlight any potential prob-
lems you detect in your patient assessment to the anaes-
thetist allocated to do the list, as well as the surgeon or
their team, since this is the whole point of the preopera-
tive assessment. If in doubt, ask! That way, a plan can
be made to optimise the patient in time for the opera-
tion, whether this means referral to a specialist or a visit
back to the GP. It also allows time, if required, to admit
the patient a day before the planned surgery to sort out
their medical conditions. You should make it clear to
the examiner, if your patient presents problems, that
this is what you intend to do.
Premedication
You will often be asked to prescribe the patient the
medications for their drug chart in advance. This will
usually consist of simple prescriptions such as preop-
erative drinks, enoxaparin, bowel preparation and
diabetic medications. Again, there are usually local pro-
tocols for this.
Postoperative review
As a surgical FY1, it may be your responsibility to see
patients postoperatively either in the recovery area or
Summary of key points for OSCEs
Having an anaesthetic and undergoing surgery repre-
sents a major physiological challenge for the human
body. The preoperative assessment is designed to antic-
ipate any problems that might be encountered in the
perioperative period and to take steps to minimise their
impact as much as possible. In the emergency setting,
this is not always achievable, but in designated pre-
assessment clinics, patients who are scheduled for
elective procedures can be ‘optimised’ to a large extent
before the operation.
Pre-assessment clinics are increasingly nurse-led, but
in many NHS trusts the surgical FY1 carries out the
pre-assessment for their consultant’s lists a few weeks
in advance. If you get a preoperative assessment in the
OSCE, it is almost certain that you will see a patient for
an elective procedure.
The ASA classification
The American Society of Anaesthesiologists has devel-
oped ‘grades’ to classify patients in terms of their
general fitness for anaesthesia (see the table).
ASA grade
Description
1
Normal, fit, healthy patient
2
Patient with mild systemic disease
3
Patient with severe systemic disease
4
Patient with severe systemic disease that is a
constant threat to life
5
Moribund, not expected to survive more than
24 hours
6
Brainstem death, organ donation
E
Suffixed to any grade, E indicates an emergency
operation, e.g. 1E, 2E, etc.
This grading system is the one that is most widely
used; it essentially classifies a patient according to his
or her functional limitation. If a patient is classified as
ASA1, they are completely fit and well. The presence of
mild systemic disease implies that patients are not sig-
nificantly limited in their day-to-day activity; for
example, patients with diabetes mellitus, mild asthma
or even stable angina would all be ASA2 patients.
However, those patients who are limited, for example
by shortness of breath, angina, etc., such that they are
unable to continue their daily activity without distur-
bance are classed as ASA3. This classification is thought
to give some indication of how such a patient’s physiol-
ogy would cope with the great stress of general anaes-
thesia and surgery.

Histories:
45 Preoperative assessment 203
• It is essentially a detailed systems review, but with far
more attention to detail in terms of cardiorespiratory
functional status.
• Establishing exercise tolerance is important. If some-
body can walk only 10 m and then needs to stop as they
are short of breath, their outcome after being subjected
to major surgery is unlikely to be good, and more pre-
cautions certainly need to be in place for them.
• Asking about previous facial and neck surgery has
implications for a potentially difficult airway.
• Quantify smoking and alcohol consumption.
• In certain patients, further questioning may be indi-
cated, for example relating to pregnancy in young
women of child-bearing age, or sickle cell disease in
those of Afro-Caribbean descent.
• It is important to ask about previous episodes of
general anaesthesia as patients may tell you that they
woke up very sick last time, or that the anaesthetist
could not get a tube down their throat and told them
to tell all future anaesthetists. They may have also had
previous problems such as malignant hyperpyrexia.
Previous anaesthetic problems are valuable warnings
for future anaesthetic encounters.
• It is also important to ask about a family history of
problems with general anaesthesia. If anyone in the
family has needed postoperative ventilation for no
apparent reason, they may have conditions like ‘suxa-
methonium apnoea’ or malignant hyperpyrexia, and it
is then important to check that the patient has been
investigated for this.
• All preoperative assessments should include a good
airway assessment, but this is probably beyond what
can be achieved in 5 minutes. You should, however,
mention that you would do this.
when they get back to the ward. You should assess the
following.
Type of anaesthetic used
If, for example, they have had an epidural or spinal, they
will not be able to move their legs and should have been
catheterised. Their urine output and blood pressure
need to be watched, and they may need fluid boluses to
maintain these.
Type of operation
• It is important to know exactly what procedure has
been carried out. For example, if the patient has had a
wide local excision involving a guidewire and dye, they
may have a distinctly grey appearance, which can lead
to a sense of panic in the doctor if the patient is asleep!
• Familiarise yourself with the patient’s medical
background.
• Check the vital signs, such as heart rate, blood pres-
sure, oxygen saturations, respiratory rate, BM values
and temperature. These will all have been checked in
the recovery area and any problems sorted out before
the patient returns to the ward, but there may be spe-
cific instructions in terms of what is to be done if any
further problems are encountered.
• Check the operative site and any drains/catheter
output.
• Check the drug chart: ensure pain medications,
fluids, antibiotics, diabetic medications, enoxaparin,
etc. have all been adequately prescribed.
• Check whether or not the patient is in pain. Ensure
there is a suitable analgesic plan.
• Check whether the patient is allowed to eat and drink,
and encourage early enteral intake if allowed.
Hints and tips for the exam
• This is a station that can provide really easy marks,
so you should score highly here.


OSCEs for Medical Finals, First Edition. Hamed Khan, Iqbal Khan, Akhil Gupta, Nazmul Hussain, and Sathiji Nageshwaran.
© 2013 John Wiley & Sons, Ltd. Published 2013 by John Wiley & Sons, Ltd.
205
Part 3: Communication skills
Top tips
Do:
• Start with two open questions and a minute of
silence: In 10-minute OSCE stations, it can be easy to
become fixated on covering all the points as soon as
possible. But by giving the patient ample time and space
to speak, especially at the beginning of the consultation,
you will not only get plenty of marks for open ques-
tioning, but will also be able to establish the patient’s
tone, underlying concerns, and hopefully expectations
and agenda.
• Apply ‘ICE’: this is the one of the most important
mantras of communication in medicine. Apply it, and
make sure it is obvious to the examiner that you are
doing so:
• Ideas: This refers to the patient’s ideas, views and
feelings about the issue being discussed. This is fun-
damental as these ideas may be realistic or unrealistic
and you will have to pitch your information at an
appropriate level:
‘What do you understand about XYZ?’
‘Have you heard of XYZ before?’
‘Did you have any ideas of why you might be having
this cough?’
• Concerns: Uncovering the patient’s concerns will
allow you to address their underlying anxieties. It is
quite common for patients to present with something
relatively non-serious, such as a chest infection, and
actually be worried about something much more sig-
nificant, such as lung cancer. They will usually have
had an experience that justifies those concerns – such
as a relative who recently died of lung cancer. You
could use these statements to probe any underlying
concerns:
‘Was there anything you were particularly worried
about?’
‘Was there anything at the back of your mind that
was worrying you?’
‘What concerns you most about XYZ?’
• Expectations: Establishing the patient’s expecta-
tions is the key to identifying their agenda and
establishing what they want out of the consultation.
This will subsequently help to ensure that consulta-
tion remains ‘patient-centred’ rather than ‘doctor-
centred’, and make the patient feel satisfied that they
have got what they wanted from the consultation.
Establishing the patient’s expectations will also help
you prepare them for any unexpected surprises – if a
patient diagnosed with lung cancer was actually
expecting just to get some antibiotics for a perceived
chest infection, you will need to utilise all your ‘break-
ing bad news’ communication skills to recalibrate the
consultation.
• Acknowledge ‘cues’ and emotions: Cues are small
snippets of information underlying more major issues
that patients give without elaborating much further.
The onus is on the candidate to identify cues and then
tease out the more important underlying issues. An
excellent candidate will go on to devise a management
plan to help solve the problems – or at the very least
organise a follow-up appointment to explore the issues
in more detail. Cues could be verbal as well as non-
verbal. For example, a patient looking very anxious
when you talk about cancer may have an underlying
anxiety due to a recent similar diagnosis in a close rela-
tive. The following are some examples of cues you may
encounter:
• ‘It’s definitely not the heart/cancer is it?’ (a patient
who is worried about a heart attack/cancer).
• ‘I won’t have to go to hospital, will I?’ (a patient who
is worried about being admitted).
• ‘Will I be able to work?’ (a patient who has financial
difficulties and is worried that they will not receive
sick pay when off work).
• ‘It’s not serious is it?’ (a patient worried about any
serious condition – a good candidate will tease out
exactly what condition the patient is worried about).
• ‘So I don’t have rheumatoid arthritis then, do I
doctor?’ (a patient who is worried about rheumatoid

206
Communication skills
arthritis, who may have an underlying anxiety
about their hands becoming deformed and subse-
quently impairing their ability to carry out essential
tasks, such as caring for an elderly, debilitated
relative).
• Say some clear unambiguous ‘empathy’ sentences:
There is often one mark for ‘empathy’ or ‘empathetic
approach’. Your manner and tone are obviously decisive
in this, but you can make the examiner’s job easier by
using some statements that clearly and obviously
empathise with the patient. Sentences like ‘I can see
how difficult this is for you’ or ‘I can’t even begin to
understand what you must be going through right now’
will help convince an ambivalent examiner of your
communication skills.
• Use non-verbal communication: This is a vital part
of any communication skills station:
• Make facial expressions that reflect those of the
patient and the mood of the station.
• Nod when appropriate.
• Maintain good eye contact.
• Adopt a posture that makes you look interested,
leaning slightly forwards.
• Identify any hidden agenda: This could be a
‘concern’, as discussed under ‘ICE’ above, or it could be
something else. A patient may actually be after a sick
note, or may need respite from caring for an elderly
debilitated relative, or may be worried about the effect
their illness might have on their work. Make sure you
ask probing questions and pick up all the cues.
• Employ signposting: This refers to the process of
telling the patient what you are going to talk about,
before talking about it. In certain stations such as
‘breaking bad news’ (see Chapter 46), this may consti-
tute a ‘warning shot’ with which you warn the patient
that you will be giving them some distressing news, or
it may be merely be an explanation of what you intend
to cover during the consultation.
• Remember psychosocial aspects: This is the key to
providing holistic care. Find out about your patient’s
life – what they do, where they work, where they live,
who they live with, and what they do socially. Most
importantly, explore how their condition affects all
these aspects of their life – and what you can do to help
them.
• Be ‘patient-centred’: Don’t be too rigid when devis-
ing a management plan. Find out about your patient’s
needs and preferences, and orientate your plan around
the patient. Remember that the communication skills
station is not primarily testing your clinical skills – it is
highly important to ensure that the patient is at ease
and feels happy with your plan.
• Summarise: There is often a specific mark for this,
and it is also an excellent way for you to organise your
own thoughts and identify anything you may have
missed.
• Involve the multidisciplinary team: Utilise everyone
in your team – social workers, dietitians, physiothera-
pists, occupational therapists, pharmacists, specialists,
GPs and so on.
• Use patient information leaflets: This is easy and
consumes very little time – and it also makes your
patient’s life easier. There are leaflets for everything, so
use them!
• Follow the patient up: It is unlikely that your station
will mark the end of the patient’s story, so always
arrange a follow-up appointment.
Don’t:
• Don’t miss the point: Avoid overindulging in
empathy and being nice to the extent that you miss the
aim of the station. Read the scenario carefully and make
sure that, by the end, you have done what the instruc-
tions asked you to do.
• Don’t be pedantic about the clinical minutiae: As
mentioned before, the primary aim of communication
skills stations is not to test your clinical knowledge, so
don’t get too hung up on the minute details.
• Don’t get impatient: This can be difficult when you
are pushed for time, but rushing the patient may upset
them and lose you marks. For example, your empathy
and listening skills will be unconvincing if you keep one
eye on the clock. Take your time, and don’t worry if you
do not quite finish – most examiners will forgive this if
you have been empathetic and you have demonstrated
all the other relevant communication skills.
• Don’t sound paternalistic: As your communication
skills are being tested, don’t be surprised if you have
patients who are difficult to communicate with – such
as those who are vague, unreasonable, overdemanding
or just plain rude! Patiently persist, continue to be
nice, and always negotiate and compromise where you
need to.
Ethics and law
There is at least one ethics and law station in the final-
year OSCE at the vast majority of medical schools. The
main themes that you should have a thorough knowl-
edge of are:
• Confidentiality
• Mental capacity
• Best interests
• DNAR orders
• Euthanasia

Communication skills
207
The way to go about ethical scenarios is to always go
through the four key principles of ethics:
• Beneficence: doing good
• Non-malevolence: not doing harm
• Autonomy: the right to self-determination
• Justice/law: consideration of the law, with respect to
the underlying legal frameworks and legal implications
The vast majority of candidates have a sound knowl-
edge of ethical principles and medical law, and score
well on MCQs on these topics. However, a large propor-
tion of medical students find the ethics and law station
one of the most difficult to score well on in the OSCE.
Frequent reasons for encountering difficulty are:
• Failure to recognise that the station is testing ethics
and law
• Failure to establish a plan of action at the end
• Failure to demonstrate empathy while communicat-
ing
• Failure to apply knowledge of ethical principles and
medical law to the context of the OSCE station
Practising with colleagues is most likely to be the main-
stay of your practice in preparation for this station
because you are unlikely to get many opportunities to
discuss ethical issues with patients during your clinical
attachments.
Generic points for all communication skills
stations
Appropriate introduction
Confirms patient’s name
Explains reason for consultation
Obtains consent
Systematic approach
Establishes rapport
Starts with two open questions and 1 minute of silence
to allow patient to open up
Acknowledges and responds to patient’s ‘cues’
Explores and responds to ICE
Explores psychosocial factors
Uses a ‘patient-centred’ approach and works in partner-
ship with patient
Identifies any ‘hidden agenda’ and addresses it
appropriately
Involves the multidisciplinary team where appropriate
Remains non-judgemental and encourages a positive
approach
Shows empathy
Uses simple and appropriate language, avoiding use of
jargon
Listens carefully and uses non-verbal communication
skills effectively, maintaining appropriate tone and
eye contact
Checks patient’s understanding at regular intervals
Non-verbal skills
Avoids technical jargon
Uses signposting appropriately
Devises a holistic management plan and addresses psy-
chosocial issues as well as medical problems
Acknowledges any gaps in own knowledge and offers to
discuss these areas with seniors
Gives patient a patient information leaflet
Offers contact details of support groups/patient asso-
ciations if appropriate
Summarises
Invites questions
Organises follow-up

208
46 Breaking bad news
Checklist
P
MP
F
Introduces self and explains reason for
consultation
Identifies patient correctly
Gains consent
Ensures setting is private and dignified (bleep off,
door closed)
Establishes rapport
(E – expectations) Establishes what patient is
expecting to find out
Establishes patient’s understanding of the
sequence of events leading to this
consultation
(I – ideas) Establishes patient’s ideas of what
the underlying cause of the symptoms might be
Clarifies or confirms patient’s understanding of
the sequence of events
(C – concerns) Establishes and acknowledges
any concerns the patient has
Signposts that bad news is going to be broken,
using an appropriate ‘warning shot’
Breaks bad news in a gentle and empathetic
manner
Ensures that information given is accurate and
unambiguous
Uses a period of silence to allow patient to
absorb the information
Allows patient to express their emotions
Acknowledges patient’s emotions and the
significance of the news
Explains management strategy
Acknowledges any gaps in own knowledge, and
offers to seek advice from seniors/colleagues
Encourages a positive outlook, highlighting
any positive aspects of test/investigation results
Checklist
P
MP
F
Manages uncertainty appropriately and
empathetically
Explores psychosocial context (who is at
home, whether there is anyone to talk to,
activities of daily living, work situation, etc.)
Explores psychosocial situation and offer
support:
• Offer meeting with family/partner
• Counselling
• Social worker if the patient is elderly and has
care needs
Arranges follow-up appointment with specialist
doctor/nurse/other member of the
multidisciplinary team
Safety net: asks patient to contact doctor if letter/
notification of appointment does not arrive
Offers to help patient get home (call a taxi)
Provides contact details
Listens to patient and allows them to express
their views without interruption
Shows empathy
Uses simple and appropriate language, avoids
using jargon
Listens carefully and uses non-verbal
communication skills effectively, maintaining
appropriate tone and eye contact
Checks patient’s understanding at regular
intervals
Invites questions
Systematic approach
Summarises
Offers written information/patient information
leaflets
Offers contact details of support groups/patient
associations if appropriate

Communication skills:
46 Breaking bad news 209
• I – invitation: refers to the invitation given to patients
to find out whether or not they want more
information.
• K – knowledge: refers to the process of signposting
and actually giving the patient the news.
• E – empathy.
• S – strategy and summary: refers to the closure,
including a summary of what has happened and what
the plan is.
Acknowledge lack of knowledge
You may not be familiar with the condition you are
talking about – which is not a problem. But don’t be
tempted to confabulate and ‘guesstimate’. Patients under
such emotional duress will seek reassurance, sometimes
even unrealistically – and naturally you may feel inclined
to acquiesce with them. However, it is important that
you give accurate information while still remaining
positive and as optimistic as the situation allows.
How long do I have?
This is a common question, especially from patients
who have been diagnosed with cancer. The honest
answer is that we rarely know – so do not try to
guess a time frame. Be honest and unambiguous, and
explain gently and empathetically that although you
cannot answer that question at the moment, further
Hints and tips for the exam
This is one of the most common stations in all com-
munication skills OSCEs at every level in medical
school – and beyond in postgraduate exams. This is
probably because it is a very common real-life scenario
that almost all doctors will face, regardless of what spe-
ciality they work in.
SPIKES – an easy-to-remember generic
structure
The tables above cover everything you need for a finals
OSCE exam. In the early stages of revision, a quick and
easy way of remembering the basics is to go through
the SPIKES six-point framework. This was devised by
Robert Buckman, a Canadian oncologist, who pub-
lished his idea in the journal Community Oncology’,
since when it has been adapted, used and taught widely
across the world. The mnemonic expands as follows:
• S – setting the scene: refers to the process of ensuring
that the setting is appropriate, for example ensuring
that the room is private, dignified and comfortable, that
there will be no disturbances, etc.
• P – perception: refers to the patient’s perception, i.e.
elucidating the patient’s understanding of what has
happened so far, and why the investigation has been
done.
Condition
Key issues to consider and discuss
Cancer
Stage and grade
Any metastasis
Chemotherapy, radiotherapy, surgery
Macmillan team input
Diabetes
Insulin or not insulin
Follow-up in primary or secondary care
Detecting and preventing complications
Can lead a completely normal life – there are many successful sportsmen with diabetes
Multiple sclerosis
Variability of prognosis
Different types – relapsing/remitting, progressive
Leukaemia
Recent improvements in therapy and prognosis
HIV
See Chapter 51 on HIV
There have been recent huge advances in treatment
If adhere to HAART, could potentially have a normal lifestyle and life expectancy
Rheumatoid arthritis
Early treatment can prevent deformity and reduce or minimise debilitation
Emergency hysterectomy
Reasons for doing this as emergency – immediate threat to life
Summary of common conditions seen in OSCEs

210
Communication skills:
46 Breaking bad news
investigations (such as scans looking for metastases)
will help to give a more accurate idea, and that, most
importantly, the whole multidisciplinary team (includ-
ing yourself) will try their absolute best to ensure the
best possible outcome and to keep the patient comfort-
able and pain-free.
Don’t bombard the patient with too much
information
This station tests your ability to break bad news in a
way that is structured, clear and empathetic. There will
usually be relatively few marks for your technical
medical knowledge of the illness – so do not spend too
much time and effort trying to discuss minutiae. Keep
the conversation simple, focused and clear.
Don’t be too optimistic
The art of breaking bad news is to remain positive and
empathetic, while also being realistic. Patients may be
in denial, and it can be tempting to play along and agree
that ‘everything will be OK’. However, it is important
to be truthful and ensure that you give the patient a
realistic and honest account of what you know and
understand.
To maintain a positive tone, first explain that there
are specialist multidisciplinary teams with access to a
vast array of investigations and therapeutics that can be
utilised to their full potential, and second emphasise
that everyone in the team will try their best and do
absolutely everything within their means to help the
patient in every way possible.

211
47 Explaining medication
Checklist
P
MP
F
Introduces self and explains reasons for
consultation
Identifies patient correctly
Gains consent
Establishes rapport
Explains purpose of consultation
(E – expectations) Establishes what patient is
expecting to gain from the consultation
(I – ideas) Establishes patient’s understanding of
situation and need for consultation, e.g. ‘Can you
fill me in on what has been happening so far?’
Establishes sequence of events leading to this
consultation.
(C – concerns) Establishes and acknowledges
any concerns the patient has
Checks if the patient is currently taking any drugs
or has any drug allergies
Checks if there any contraindications to the drug
Explains why the new drug is being started
Explains in lay terms how the drug works
Explains how the drug should be taken
Explains how long the patient can expect to be
on the drug
Explains pre-treatment blood tests/other
investigations required (if applicable)
Explains common side effects of drugs
Explains uncommon but serious or potentially
life-threatening side effects of the drug
Explains simple methods to avoid or counteract
the side effects (if applicable – e.g. co-
prescription of alendronate to prevent
steroid-induced osteoporosis)
Explains potential hazards of taking the drug
(e.g. adrenal crisis if steroids are stopped
suddenly)
Gives specific important information (e.g.
requirement to wear warfarin bracelet or hold
steroid card)
Checklist
P
MP
F
Explains how clinical condition and side effects
will be monitored
Provides effective safety net (e.g. for warfarin –
need to seek attention if suffer a head injury; for
steroids – need to seek attention if there is
intercurrent illness)
Acknowledges any gaps in knowledge, and offers
to seek advice from seniors/colleagues
Explores potential issues relating to drug
compliance
Devises practical feasible solutions with an
agreed time frame to solve compliance/other
issues (e.g. dosette box)
Works in partnership with patient, exploring their
ideas and preferences with respect to possible
solutions, negotiating and compromising where
necessary
Asks if the patient has any specific concerns/
questions about the new drug (e.g. ‘Will I put on
weight if I start steroids?’)
Responds positively and offers simple solutions
for concerns (e.g. weight gain is a recognised
side effect but can be countered by improving
diet and taking more exercise)
Advises patient to store medications out of reach
of young children
Explores psychosocial aspects:
• Explores home situation (who patient lives
with, activities of daily living, work)
• Disruption to lifestyle as a result of
medications
Identifies and addresses any ‘hidden agenda’
Invites questions and checks patient’s
understanding regularly
Communicates at an appropriate pace and shows
empathy
Offers leaflet/web-based information about the
drug
Arranges a follow-up appointment
Actor’s impression of overall consultation

Drug
How
does
it
work
(in
lay
terms)?
Dosing
regimen
Side
effects
Hazar
ds
related
to
drug
use
Safety
netting
, important
advice
Monitoring
Other
important
information
Steroid
(e
.g.
prednisolone)
Prevents
immune
system
from
attacking
itself
Reduces
inflammation
Not
a
pain-killer
Once
daily
tablet
for
1–2
years
for
giant
cell
arteritis
7–10-day
course
after
exacerbations
of
COPD
5-day
course
after
asthma
attacks
Peptic
ulcer
disease
,
heartburn
Osteoporosis
W
eight
gain
and
Cushingoid
appear
ance
Diabetes
mellitus
Hypertension
Increased
risk
of
infections
Catar
acts
Risk
of
adrenal
crisis
if
stopped
suddenly
Increased
risk
of
low-tr
auma
fractures
Report
new-onset
heartburn,
abdominal
pain,
impaired
vision,
polydipsia
+
polyuria
Do
not
stop
taking
steroids
suddenly;
seek
advice
if
there
is
intercurrent
illness
Alendronate
is
prescribed
to
counter
bone
thinning
Increase
exercise
and
reduce
calorie
intak
e
to
counter
weight
gain
Consult
GP
before
starting
any
new
medication,
especially
aspirin
Or
al
glucose
toler
ance
test
Blood
pressure
DEXA
scan
Activity
of
underlying
disease
(e
.g.
ESR
for
giant
cell
arteritis)
Must
carry
steroid
card
at
all
times
Avoid
over
-the-counter
drugs
, e
.g.
ibuprofen
If
smok
er
, advise
cessation
to
decrease
risk
of
osteoporosis
W
arfarin
‘T
hins’
blood
and
therefore
prevents
formation
of
clots
that
can
block
blood
vessels
Dose
titr
ated
by
International
Normalised
Ratio
Heparin
must
be
co-prescribed
on
the
first
5
days
because
w
arfarin
initially
has
a
par
ado
xical
pro-coagulant
effect
Easy
bruising
Haemorrhage
Rash
Ter
atogenic
Alopecia
Gastrointestinal
upset
Increased
risk
of
intr
acr
anial
haemorrhage
with
falls
Inter
actions
with
alcohol,
antibiotics
and
antiepileptic
drugs
Report
new-onset
bleeding
(e
.g.
haematuria,
haematemesis
, melaena)
Report
any
head
injury
(even
if
minor)
Consult
medical
pr
actitioner
before
starting
any
new
drug
Do
not
tak
e
over
-the-counter
drugs
, e
.g.
ibuprofen,
without
getting
medical
advice
Seek
immediate
advice
if
you
may
be
pregnant
International
Normalised
Ratio
Need
to
wear
w
arfarin
br
acelet
at
all
times
Need
to
keep
International
Normalised
Ratio
booklet
Need
to
attend
appointments
at
local
anticoagulation
clinic
Seek
advice
before
planning
pregnancy
or
breast-feeding
while
on
w
arfarin
Summary
of
common
medications
seen
in
OSCEs

Drug
How
does
it
work
(in
lay
terms)?
Dosing
regimen
Side
effects
Hazar
ds
related
to
drug
use
Safety
netting
, important
advice
Monitoring
Other
important
information
Methotrexate
Reduces
activity
of
immune
system
and
therefore
reduces
damage
to
body
tissues
Reduces
inflammation
Not
a
painkiller
Once
weekly
Never
once
daily
Important
to
check
dose
carefully
and
seek
prompt
advice
if
there
are
any
concerns
about
dose
Gastrointestinal
upset
Mouth
ulcers
Infections
Rashes
Hair
thinning
Bone
marrow
suppression
leading
to
easy
bruising
Ter
atogenic
Long
term:
increased
risk
of
cirrhosis
and
pulmonary
fibrosis
Men
taking
methotrexate
should
ensure
their
partners
do
not
become
pregnant
while
they
are
on
treatment
W
omen
should
seek
immediate
advice
if
they
think
they
may
be
pregnant
if
they
are
taking
methotrexate
themselves
or
their
partner
is
taking
it
Check
the
dose
is
correct
before
taking
it
Report
the
following
immediately:
shortness
of
breath/decreased
exercise
toler
ance
, jaundice
, fever
or
sore
throat,
bruising,
continued
gastrointestinal
upset,
shingles
Inform
medical
pr
actitioner
you
are
taking
methotrexate
prior
to
surgery
Befor
e
starting
tr
eatment:
full
blood
count,
Us
+Es
, liver
function
tests
,
chest
X-r
ay
,
Urine
dipstick
During
tr
eatment:
Full
blood
count,
Us
+Es
, liver
function
tests
continued
Seek
urgent
medical
help
if
you
accidentally
tak
e
an
overdose
or
miss
a
dose
Do
not
tak
e
if
pregnant
or
breast-feeding
Seek
medical
advice
before
taking
any
vaccinations
.
Live
vaccines
(yellow
fever
, MMR,
rubella)
are
contr
aindicated
Avoid
alcohol
as
this
precipitates
liver
damage
Avoid
unpasteurised
milk
Carry
a
monitoring
booklet
Metformin
Increases
sensitivity
of
tissues
to
insulin
Tak
en
three
times
daily
(a
few
minutes
after
meals)
Gastrointestinal
upset
Lactic
acidosis
Renal
failure
NB
. Not
hypoglycaemia
Precipitates
renal
failure
if
pre-existing
kidney
injury
Precipitates
lactic
acidosis
if
tissue
ischaemia
(e
.g.
myocardial
infarction)
Inform
radiologist
before
any
scan
involving
contr
ast
Inform
anaesthetist
before
surgery
Seek
medical
attention
if
there
are
continued
symptoms
such
as
polydipsia/polyuria
Us
+Es
, HbA
1c
Continue
to
implement
lifestyle
modifications
including
increased
exercise
, reduced
calorie
intak
e,
reduced
salt
intak
e,
smoking/alcohol
cessation
Statins
Reduce
blood
cholesterol
and
therefore
reduce
risk
of
myocardial
infarction,
strok
e
and
peripher
al
vascular
disease
Tablet
tak
en
last
thing
before
going
to
bed
Jaundice
Muscle
damage
Seek
immediate
attention
if
jaundiced
or
with
abdominal
pain
or
muscle
aches/weakness
Call
999
if
chest
pain
develops
or
notices
any
‘F
AST’
signs
Liver
function
tests
Lipid
profile

214
Communication skills:
47 Explaining medication
and respond positively by offering simple solutions
where appropriate.
Potential variations at this station
• Completing a ‘To take away’ (TTA) form and explain-
ing the medications to a patient.
• Explaining medications and conservative lifestyle
measures to a patient.
Scenarios you may encounter at this
station
• Mrs Smith was recently diagnosed with giant cell
arteritis. She is now ready to be discharged from hos-
pital. Your registrar has asked you to explain her new
medication to her before she goes home. The medicine
she has been started on is prednisolone 40 mg once
daily.
• Mr Jones has been recovering on the ward from an
acute exacerbation of COPD. He is being discharged
home on a breakthrough course of oral prednisolone
to be taken for 14 days. He has some questions about
this.
• While recently recovering on the ward from an unre-
lated infection, Mrs Winters was found to be suffering
from atrial fibrillation. A decision has been made to
start her on warfarin. Your registrar has asked you to
explain her new medication to her before she goes
home.
• Mr. Arthur’s blood cholesterol was recently found to
be 7.5 mmol/L during routine screening at your GP
practice. Secondary causes have been ruled out, and the
senior GP feels he will benefit from taking simvastatin.
He has invited Mr Arthur to the clinic today and has
instructed you to explain simvastatin therapy to Mr
Arthur.
• Mr Shaun has recently been diagnosed with rheuma-
toid arthritis and is now being started on methotrexate.
Explain methotrexate therapy to him.
NB. Asthma and post-myocardial infarction medica-
tion are covered in Chapters 49 and 54, respectively.
Hints and tips for the exam
This is a relatively difficult OSCE station because it tests
the candidate in a number of domains:
• Knowledge about commonly prescribed drugs: You
need a fairly detailed knowledge of the side effects,
dosing regimens and potential hazards of the drugs
outlined in the table above to be able to perform well
in this station.
• Communication skills: You will be imparting a large
volume of information in a small amount of time to a
lay person. It is important to try to keep the station as
interactive as possible – this is the best way to ensure
you are only giving information that is relevant to the
patient’s needs. In some cases, however, actors will not
guide you through the station by asking questions. In
this case, it is important to stick to the generic structure
whereby you explain the reason for the drug and its
dosing regimen, and its side effects/hazards, and
provide appropriate safety netting and monitoring.
• Safety netting: Make the patient aware of situations
that may require emergency care. Stress the importance
of having a low threshold for seeking medical help if
they are concerned about their symptoms or any side
effects of the drug.
• Safe prescribing: Although you are not required to
write up a drug chart, this station tests several other
aspects of safe prescribing. You should ask about drug
allergies and check for contraindications.
• Orchestrating an effective consultation: No consul-
tation is ever complete without exploring the patient’s
specific concerns. In the OSCE, you are almost guaran-
teed to be faced with an actor who does have a specific
concern. You should ask about any specific concerns

215
48 Explaining a procedure
Checklist
P
MP
F
Introduces self and explains reasons for
consultation
Identifies patient correctly
Gains consent
Ensures setting is private and dignified (bleep off,
door closed)
Establishes rapport
Explains purpose for consultation, obtains
consent
(E – expectations) Establishes what patient is
expecting to gain from the consultation
(I – ideas) Establishes patient’s current
understanding of procedure/operation
Establishes sequence of events leading to this
consultation
(C – concerns) Establishes and acknowledges
any underlying concerns patient has about the
procedure
Establishes if the patient is currently on any
medication that may need to be stopped/altered
beforehand
Explains why the procedure/operation is being
proposed, without using jargon
Explains what the procedure/surgery involves:
• Duration
• Location (e.g. designated procedure suite,
outpatients clinic, theatre)
• Pain/discomfort likely to be experienced
• Use of sedation, anaesthesia or analgesia
Explains common and serious risks and
complications associated with procedure/surgery:
• Immediate risks (e.g. pain, damage to local
organs)
• Short-term risks (e.g. risk of deep vein
thrombosis/pulmonary embolism, wound
infection)
• Long-term risks (e.g. recurrence of disease)
Explains consequences of not proceeding with
proposed procedure/surgery:
Checklist
P
MP
F
• Less invasive alternatives
• Diagnostic delay
• Complications of underlying disease associated
with delay in diagnosis/treatment
Outlines reasonable alternatives to the proposed
procedure
Explains what needs to be done before the
procedure:
• Recommended time of arrival at hospital
• Instructions on eating/drinking the night before
and/or on day of the procedure/surgery
• Instructions regarding any special diet or
medicines that need to be taken beforehand
Explains what will happen after the procedure:
• Length of hospital stay
• Driving
• Returning to work
• Activities of daily living
Explores psychosocial aspects and effects on
patient’s life that symptoms have had
Identifies and addresses any ‘hidden agenda’
Works in partnership with patient, exploring their
ideas and preferences with respect to possible
solutions, negotiating and compromising where
necessary
Acknowledges any gaps in own knowledge and
offers to seek advice from seniors/colleagues
Provides appropriate safety netting giving clear
advice about adverse symptoms to look out for
Explains how the results will be disclosed
Explores any specific concerns (e.g. risk of
colonoscopy showing bowel cancer)
Addresses concerns appropriately (does not give
false reassurance)
Invites further questions
Closes consultation appropriately:
• Ensures understanding
• Invites questions
• Offers written information

Pr
ocedur
e
Details
Risks
Benefits
Consequences
of
not
going
ahead
Alternatives
Pr
e-pr
ocedur
e
Post-
pr
ocedur
e
Safety
netting
Centr
al
line
Local
anaesthetic
over
insertion
site
Lie
flat
with
head
tilted
downw
ards
looking
aw
ay
from
side
of
insertion
Needle
inserted
to
guide
a
narrow
tube
Needle
removed
and
tube
taped
to
neck
Sterile
field
Discomfort
Bleeding
Infection
Scarring
Artery
puncture
Pneumothor
ax
Nerve
injury
Arrhythmia
Monitoring
Frequent
replacement
not
required
Potentially
fatal,
depending
on
indication
Sometimes
femor
al
line
may
be
acceptable
Often
there
is
no
alternative
Check
International
Normalised
Ratio
if
on
w
arfarin
Chest
X-r
ay
to
check
for
correct
placement
Breathing
difficulty
Palpitations/chest
discomfort
Fever
Pain
Red,
hot,
itchy
skin
over
insertion
site
Oesophago-
gastro-
duodenoscopy
Sedation
Local
anaesthetic
spr
ay
on
pharynx
Suction
of
pharyngeal
secretions
Will
be
ask
ed
to
sw
allow
Sore
throat
Amnesia
for
period
of
sedation
Tube
passed
in
to
trachea
(causing
chest
infection)
Discomfort
Extremely
rarely:
•
Perfor
ation
•
Cardiac
arrest
Gold
standard
to
diagnose
upper
gastrointestinal
tract
pathology
Diagnostic
delay
and
uncertainty
Barium
meal
CT
scan
Nil
by
mouth
for
4
hours
Stop
antacid
2
weeks
beforehand
Few
hours
of
monitoring
in
recovery
area
until
sedation
has
worn
off
Arr
ange
to
be
pick
ed
up
Chest
pain
Haematemesis
Vomiting
Abdominal
pain
Difficulty
sw
allowing
Fever
Colonoscopy
Rectal
examination
beforehand
Sedation
Lie
on
one
side
but
may
be
ask
ed
to
turn
Perfor
ation
risk
(very
rare
–
would
require
emergency
surgery)
Infection
Incomplete
examination
Allergic
reaction
to
sedative
drugs
Discomfort
Bloatedness
Gold
standard
for
investigating
colonic
pathology
Polyps
can
be
removed
Diagnostic
delay
CT
scan
of
abdomen
–
does
not
necessarily
give
definitive
diagnosis
Barium
enema
Surgical
explor
ation
Must
tak
e
bowel
prepar
ation
medication
the
day
before
the
procedure
Only
clear
fluids
for
12
hours
before
procedure
Few
hours
of
monitoring
in
recovery
area
until
sedative
wears
off
Arr
ange
to
be
pick
ed
up
Abdominal
pain
Rectal
bleeding
Fever
Bronchoscopy
Sedation
Local
anaesthetic
spr
ay
on
pharynx
Lying
down
Scope
enters
through
nostril
Breathing
monitored
and
oxygenation
provided
Pneumothor
ax
Chest/throat
infection
Perfor
ation
Bleeding
Allergic
reaction
to
sedatives
Gold
standard
for
diagnosing
lung
pathology
Possible
diagnostic
delay
Possible
diagnostic
uncertainty
despite
other
investigations
Imaging
Aspir
ation
guided
by
imaging
May
need
alter
ation
to
anticoagulant
medication
Nil
by
mouth
for
around
8
hours
Lung
function
tests
,
blood
tests
Chest
X-r
ay
Few
hours
of
monitoring
in
recovery
area
until
sedative
wears
off
Arr
ange
to
be
pick
ed
up
Breathing
difficulty
Fever
Haemoptysis
Haematemesis
Summary
of
common
pr
ocedur
es/oper
ations
seen
in
OSCEs
Pr
ocedur
es

Pr
ocedur
e
Details
Risks
Benefits
Consequences
of
not
going
ahead
Alternatives
Pr
e-pr
ocedur
e
Post-
pr
ocedur
e
Safety
netting
ERCP
for
gallstone
remov
al
Sedation
Local
anaesthetic
spr
ay
on
pharynx
Tube
passed
through
mouth
(patient
ask
ed
to
sw
allow)
into
duodenum
and
then
turned
into
biliary
tree
Dye
injected
to
enable
X-r
ay
images
Cutting
of
sphincter
, stenting
of
any
blockage
Pancreatitis
Cholangitis
Perfor
ation
Chest
infection
Mortality
<0.3%
Relief
of
gallstone-
induced
obstruction
Need
for
open
surgery
Surgery
under
gener
al
anaesthesia
Nil
by
mouth
for
12
hours
Blood
test
(liver
function
tests
,
platelets)
Come
to
hospital
the
night
before
for
prophylactic
antibiotics
(or
al
ciproflo
xacin;
NB
.
Ask
about
allergies)
Short
hospital
stay
to
monitor
for
potential
complications
Abdominal
pain
Vomiting
Fever
Rigors
Cough,
breathing
difficulty
Cardiac
catheterisation
for
angiogr
aphy
May
be
a
day
case
or
may
have
to
stay
in
hospital
overnight
Local
anaesthetic
applied
over
inner
thigh
Femor
al
artery
punctured
and
probe
passed
upw
ards
to
heart
vessels
Dye
injected
to
enable
images
of
vessels
to
show
up
on
X-r
ay
Stenting/balloon
dilation
may
be
performed
Bleeding,
pain,
infection
at
insertion
site
Cardiac
tamponade
Myocardial
infarction
Anginal
chest
pain
Allergic
reaction
to
contr
ast
Hot
flushes
due
to
contr
ast
Gold
standard
to
image
coronary
arteries
Ther
apeutic
–
avoids
open
heart
surgery
Medical
management
Need
for
open
heart
surgery
later
on
Higher
risk
of
acute
coronary
syndrome
Open
heart
surgery
(in
some
cases)
Continuing
medical
management
Establish
allergies
to
iodine
and
seafood
(contained
in
dye)
Blood
tests
, ECG
, chest
X-r
ay
Nil
by
mouth
for
6
hours
beforehand
Changes
to
blood-thinning
and
diabetic
medication
Blood
tests
ECG
Monitoring
in
recovery
area
and
on
w
ard
thereafter
Chest
pain
Palpitations
Breathing
difficulty
Light-headedness
Bleeding,
pain,
red,
hot
skin
over
inner
thigh
Fever
CT
head
Contr
ast
injected
into
vein
Wheeled
into
a
doughnut-
shaped
scanner
Dur
ation
about
20
minutes
Reaction
to
contr
ast
ranging
from
nausea/flushing
to
anaphylaxis
Claustrophobia
High
dose
of
radiation
Quick
er
than
other
scans
Accur
acy
May
be
able
to
undergo
a
different
mode
of
imaging
MRI
scan
Alter
ations
to
drugs
(e
.g.
metformin)
Intr
avenous
fluids
to
prevent
contr
ast-
induced
nephropathy
Facial
swelling
Breathing
difficulty
Symptoms
of
hypoglycaemia
(if
diabetes
mellitus)
Lumbar
puncture
Performed
to
obtain
a
sample
of
the
fluid
around
the
br
ain
and
spinal
cord
Patient
on
left
later
al
side
with
knees
tuck
ed
in
to
chest
Local
anaesthetic
injected
at
site
of
lumbar
puncture
Needle
inserted
between
two
vertebr
ae
into
fluid-filled
space
outside
spinal
cord
Dur
ation
20–30
minutes
Discomfort
when
lumbar
puncture
needle
manipulated
to
obtain
sample
Pain
and
abnormal
sensations
down
the
legs
(NB
. T
ell
patient
to
w
arn
doctor
if
this
occurs)
Infection
Bleeding
Headache
afterw
ards
(risk
about
one-third
in
the
first
24
hours).
High
diagnostic
accur
acy
Diagnostic
uncertainty
Delay
in
commencing
treatment
Imaging
Blood
tests
CT
head
(?
raised
intr
acr
anial
pressure)
Blood
tests
(?
clotting
disorders)
Lie
on
back
for
a
few
hours
Pain-killers
to
prevent
headache
W
eakness/abnormal
sensations
of
legs
Persistent
headache
Fever
Photophobia
Drowsiness
Neck
stiffness
Discomfort
at
lumbar
puncture
site

Oper
ation
Details
Risks
Benefits
Consequences
of
not
going
ahead
Alternatives
Pr
e-pr
ocedur
e
Post-pr
ocedur
e
Safety
netting
Elective
inguinal
hernia
repair
Surgery
performed
under
gener
al
anaesthesia
Incision
made
in
lower
abdomen
Hernia
pushed
back
into
abdomen
and
mesh
used
to
secure
it
in
place
If
laparoscopic
method
used,
three
small
incisions
are
made
Damage
to
spermatic
cord
and
nerves
supplying
male
genitals
Avoid
need
for
emergency
surgery
Hernia
can
str
angulate
,
necessitating
emergency
surgery
Conserv
ative
management,
e.g.
wearing
special
items
of
clothing
to
help
push
it
back
Nil
by
mouth
12
hours
preoper
atively
Alter
ations
to
medication
for
diabetes
mellitus
Monitored
overnight/over
a
few
days
on
the
w
ard
for
complications
and
recovery
Painful
leg
Breathing
difficulty
W
ound
site
discharge
after
leaving
hospital
Fever
Appendicectomy
Surgery
performed
under
gener
al
anaesthetic
Keyhole
surgery
(with
three
incisions)
or
incision
in
lower
abdomen
Damage
to
nearby
nerves
causing
slightly
increased
chance
of
inguinal
hernia
Damage
to
reproductive
organs
in
females
Long
term:
adhesions
causing
bowel
obstruction
Avoid
need
for
emergency
surgery
,
which
carries
higher
risk
Symptoms
unlik
ely
to
resolve
with
medical
treatment
alone
Medical
treatment
Nil
by
mouth
from
time
of
diagnosis
Monitoring
overnight
or
for
a
few
days
on
w
ard
Antibiotic
prophylaxis
Painful
leg
Breathing
difficulty
W
ound
site
discharge
after
leaving
hospital
Fever
Long
term:
subfertility
,
symptoms
of
bowel
obstruction
Laparoscopic
cholecystectomy
Four
incisions
for
laparoscopic
remov
al
of
gallbladder
Contr
ast
injected
into
biliary
tree
and
X-r
ay
tak
en
to
ensure
there
are
no
remaining
stones
Conversion
to
open
oper
ation
(about
10%)
Damage
to
liver
and
bowel
Damage
to
local
blood
vessels
, causing
substantial
bleed
Cures/prevents
gallstones
and
biliary
colic
Further
episodes
of
cholecystitis
,
cholangitis
,
increased
risk
of
gallbladder
carcinoma
in
long
term
Open
surgery
Medical
ther
apy
unlik
ely
to
be
effective
Nil
by
mouth
12
hours
preoper
atively
Monitoring
overnight
or
for
a
few
days
on
w
ard
Possible
antibiotic
prophylaxis
Possible
outpatient
follow-up
Painful
leg
Breathing
difficulty
W
ound
site
discharge
after
leaving
hospital
Fever
TURP
Spinal
anaesthesia
so
no
sensation
below
w
aist
Tube
inserted
into
urethr
a
Hypertrophic
prostate
tissue
cut
aw
ay
Irrigation
Total
spinal
anaesthesia
leading
to
respir
atory
arrest
Need
for
repeat
TURP
(appro
ximately
10%
in
next
10
years)
Haematuria
(about
2
weeks)
Prostatitis
Post-TURP
syndrome
–
potential
for
confusion,
fitting,
loss
of
consciousness
Erectile
dysfunction
(about
10%)
Impotence
(<
10%)
Urethr
al
stricture
Blood-stained
ejaculate
Urinary
incontinence
(about
10%)
Increased
frequency
for
around
6
weeks
postoper
atively
Gold
standard
treatment
for
benign
prostatic
hypertrophy
Need
for
radical
prostatectomy
later
on
Side
effects
from
medication
Medical
treatment
Radical
prostatectomy
Nil
by
mouth
12
hours
preoper
atively
Catheter
in
situ
Tr
ansfer
to
recovery
area
and
then
w
ard
for
monitoring
(up
to
1
week)
Avoid
driving
and
sexual
intercourse
for
2
weeks
Haematuria
beyond
2
weeks
Dysuria,
fever
, rigors
Erectile
dysfunction
Oper
ations

Communication skills:
48 Explaining a procedure 219
Hints and tips for the exam
Clinical medical students are expected to have observed
common procedures and operations in sufficient detail
to be able to gain formal consent from patients, so you
are more or less guaranteed to get at least one of these
OSCE stations. Candidates are often worried about not
knowing the minor details of all the common proce-
dures – although this may be useful, there are seldom
marks for stating every single benefit or complication
of a procedure/operation. Hence, it is more productive
to apply a generic framework to this type of station.
Pass/fail points
• Explaining serious complications: for example, the
risk of oesophageal rupture following an oesophago-
gastro-duodenoscopy
• Safety netting: warning the patient to call 999 if chest
pain develops following oesophago-gastro-duodenos-
copy (because this could signal oesophageal rupture)
• Fulfilling the criteria to gain valid informed consent
(according to the Mental Capacity Act 2005):
• Details of procedure
• Reason for proposing procedure
• Consequences of not going ahead with it
• Risks and benefits
• Alternatives
• Careful communication is the key:
• Chunk and check.
• Do not coerce the patient.
• Objective language to describe frequency of com-
plications. For example, ‘Out of every thousand
people having the procedure, on average one person
will suffer . . . ’ is better than saying ‘The risk of . . . is
extremely low.’
• Do not give false reassurance. For example, do not
tell the patient that a deep vein thrombosis is a
‘minor’ postoperative complication.
Other important points
• It is important to establish what the patient wants to
know early on, so ASK. Allow the patient to ask ques-
tions freely so that they can guide you through the
station. This way you will be scoring marks left, right
and centre. If you simply regurgitate memorised infor-
mation that the patient is not interested in knowing,
you will not earn many marks.
• Have a logical structure. Complications can always be
divided into those which are immediate, short term and
long term, and those related to the procedure/surgery
itself as opposed to the sedation/anaesthetic. Most of
the procedures outlined here are carried out under
sedation so you should remember the following items
of information for the patient with regard to this:
• Arrange to be picked up.
• Have someone looking after you for 24 hours after
the procedure.
• Do not drive for 24 hours after the procedure.
• Do not operate machinery or perform other
potentially dangerous tasks for 24 hours after the
procedure.
• Complications of general anaesthesia are as follows:
• Damage to teeth/oropharynx during intubation
• Allergic reactions to anaesthetic drugs
• Weakness of limbs and difficulty weight-bearing
postoperatively
• Chest infection
• Urinary retention leading to an increased chance of
urinary tract infection
• Catheterisation for a few hours or days postopera-
tively
• General postoperatively complications include:
• Pain
• Bleeding, poor healing and infection of the wound
• Chest and urinary tract infections
• Deep vein thrombosis and pulmonary embolism
• Failure of surgery or a need for further surgery
later
• Patients must be advised that they are unlikely to be
able to return to work for at least 2 weeks following the
operations described in this chapter.
• Remember the specific serious and life-threatening
complications of common procedures and operations
outlined in the table above.

220
49 Inhaler technique and asthma medication
Task (5 minutes): This is 18-year-old John, who has
been diagnosed with asthma following an attack last
week. He is being started on salbutamol and beclom-
etasone inhalers. Advise him how to use these
inhalers.
Checklist
P
MP
F
Introduces self and explains reasons for
consultation
Identifies patient correctly
Gains consent
Ensures setting is private and dignified (bleep off,
door closed)
Establishes rapport
Explains purpose for consultation/obtains consent
(E – expectations) Establishes what patient is
expecting to gain from the consultation
(I – Ideas) Establishes patient’s understanding
of situation and need for consultation, e.g. ‘Can
you fill me in on what has been happening so
far?’
Establishes sequence of events leading to this
consultation
(C – concerns) Establishes and acknowledges
any concerns that patient has about their inhalers
and/or asthma
Establishes symptoms that led to the diagnosis of
asthma
Assesses prior knowledge and offers brief
explanation of asthma without using jargon:
• Relatively common disease affecting 5–8% of
the population
• Triggered by various stimuli including cold air,
exercise, pollution, pollen and house dust mite
droppings
• Caused by narrowing of airways
• Treated by medicine that reverses narrowing of
airways
Enquires about known drug allergies
Explains inhaler technique without using jargon:
• Shake inhaler
• Remove cap
• Exhale maximally
• Form tight seal around mouth piece
• Press canister and inhale simultaneously
Checklist
P
MP
F
• Hold breath for 10–15 seconds (or as long as is
comfortably possible)
• Repeat this again
• Demonstrate to the patient
• Ask the patient to demonstrate before the end
of the consultation
• Offer written advice
Explains salbutamol is a reliever:
• Two puffs when symptoms of cough, shortness
of breath or wheeze develop
• Seek urgent medical help if no relief after four
puffs
• Side effects include tremor, headache and
palpitations
Explains beclometasone is a preventer:
• Used regularly irrespective of symptoms, e.g.
two puffs twice a day
• Decreases likelihood of developing recurrent
symptoms over the longer term
• Side effects:
• Sore throat due to fungal infection:
preventable by gargling with water after use
• Rare to get side effects associated with oral
steroid use
• Advises patient that they may need to carry
a ‘steroid card’ if the dose has to be
increased
Explains when emergency help should be sought:
• Symptoms do not improve, or worsen, despite
four puffs of the blue inhaler
• Symptoms are severe, e.g. cannot talk in full
sentences, lips become blue, becomes drowsy
Explores specific concerns (e.g. perceived stigma
caused by taking inhalers at school or in
workplace)
Shows empathy and offers simple solutions (e.g.
school nurse can hold inhalers)
Checks understanding and arranges follow-up
Maintains rapport throughout consultation and
closes appropriately

Communication skills:
49 Inhaler technique and asthma medication 221
time. In addition to explaining inhaler technique, this
scenario also tests your ability to prescribe on a drug
chart, complete a discharge summary and explain post-
discharge asthma care.
• Explain use of inhalers with a spacer device. You
must communicate the following information to the
patient:
• The inhaler is plugged in at one end. A tight seal is
formed around the mouth piece at the other end. One
puff should be delivered into the spacer at a time, and
the patient should breath in and out deeply several
times.
• Once a week, the spacer should be washed by
immersion in water (or soap solution) followed
by drip-drying. It should not be scrubbed or dried by
rubbing. It should be replaced every 6–12 months.
• Spacer devices increase ease of inhaler use by
removing the need for precise coordination between
pressing the canister and inhaling.
• Spacer devices increase the amount of drug deliv-
ered into the airway and decrease the amount depos-
ited on the back of the throat. They are therefore
more effective, and patients are less likely to suffer
from local side effects such as a sore throat.
• Explain how to use a peak flow meter and a salbuta-
mol inhaler to this patient recently diagnosed with
asthma by his GP. In addition to inhaler technique,
you must communicate the following concepts to the
patient without using jargon:
• Instructions:
• Stand up.
• Ensure the pointer is at zero, and hold the meter
horizontally at the sides without occluding the
pointer.
• Inhale maximally and form a tight seal around
the mouth piece.
• Exhale as quickly as possible.
• Record the number the pointer is pointing to.
• Replace the pointer to zero and repeat the proce-
dure three times, taking the highest reading.
• Don’t forget to demonstrate the procedure to the
patient and check their technique.
• Peak flow meters assist in diagnosing asthma and
monitoring response to treatment.
• Peak flow should be recorded in the morning, at
night and when symptoms are experienced. The
values should be entered in a peak flow diary.
• A diurnal variation of greater than 20% on three or
more days of the week supports a diagnosis of asthma.
• The existence of significant diurnal variation
despite treatment may be an indication for stepping
up treatment.
Hints and tips for the exam
This is a relatively straightforward station. The vast
majority of candidates will be able to explain asthma
and inhaler technique to a patient, and most will be able
to give basic information about dosing regimens and
the side effects of medication. However, you will be
expected to explore and address any specific concerns
the patient has in order to secure a good score in this
station. The key concepts that you should demonstrate
in this station relate to the following:
• Good communication skills:
• Do not overlook the importance of using phrases
to demonstrate empathy at the start of the consulta-
tion because asthma is potentially a lifelong condi-
tion and can be particularly frustrating if it limits
participation in sports or employment.
• Remember to ‘chunk and check’. Check the
patient’s prior knowledge, provide information at an
appropriate pace and check the patient’s understand-
ing afterwards. Ensure that you demonstrate inhaler
use and check the patient’s technique during the
consultation.
• In addition to the basics, the actor-patient is likely
to have a specific agenda. Concerns about the side
effects of steroids are quite common in OSCEs. This
will only be revealed if the candidate specifically
enquires about the patient’s concerns. Candidates
who explore the actor-patient’s agenda are likely to
be considered for a merit/distinction.
• Safety netting: Make the patient aware of situations
that may require emergency care. Stress the importance
of having a low threshold for seeking medical help if
the patient is concerned about their symptoms. Failing
to give advice about what to do if symptoms continue
despite using salbutamol will be regarded as unsafe
practice.
• Safe prescribing: Although you are not required to
write up a drug chart, this station tests several other
aspects of safe prescribing. You should ask about drug
allergies and take a brief past medical history to ensure
that it is safe for the patient to take the inhalers and that
there are no contraindications to this. Ensure you have
a sound knowledge of the side effects of asthma medi-
cation and can clearly explain the roles of salbutamol
and beclometasone in symptom relief and prevention,
respectively.
Potential variations at this station
• Fill out a TTA form and explain inhaler technique
to a patient who is ready for discharge after being
admitted with a severe asthma attack for the first

222
50 Exploring reasons for non-compliance
Checklist
P
MP
F
Introduces self and explains reason for
consultation
Identifies patient correctly
Gains consent
Establishes rapport
(E – expectations) Establishes reason for
patient’s attendance
Establishes patient’s ideas of what the underlying
cause of the symptoms might be
Clarifies or confirms patient’s understanding of
the sequence of events
(C – concerns) Establishes and acknowledges
any concerns the patient has
(I – ideas)
Explores patient’s understanding of the condition
and their health beliefs
Explores patient’s understanding of medication
and the following aspects:
• Purpose of medication
• How it works
• Benefits of compliance
• Consequences of non-compliance
• Fears of medication, adverse effects and/or the
condition itself (C – concerns)
Explores all aspects of the pathway of the
patient’s usage chronologically, and identifies
problems:
• Obtaining medication (travel to chemist)
• Paying for prescription
• Understanding regimen (dose, frequency,
duration)
• Administering medication (swallowing, etc.)
• Adverse effects
• Monitoring
Psychosocial aspects
• Explores home situation (who patient lives
with, activities of daily living, work)
• Disruption to lifestyle as a result of the
medication
• Stigma/fears about being stigmatised
Checklist
P
MP
F
Identifies and addresses any ‘hidden agenda’
Explores and addresses each problem identified
in a logical and non-judgemental manner
Works in partnership with the patient, exploring
their ideas and preferences with respect to
possible solutions, negotiating and compromising
where necessary
Devises practical feasible solutions with an
agreed time frame
Acknowledges any gaps in own knowledge and
offers to seek advice from seniors/colleagues
Encourages positive outlook, highlighting
advantages of compliance
Arranges follow-up appointment to monitor
patient’s progress
Safety net: asks patient to contact doctor if there
are any problems
Listens to patient and allows them to express
their views without interruption
Shows empathy
Uses simple and appropriate language, avoids
using jargon
Uses non-verbal communication skills effectively
and maintains appropriate tone and eye contact
Checks patient understanding at regular intervals
Invites questions
Systematic approach
Summarises
Offers written information/patient information
leaflets
Offers contact details of support groups/patient
associations if appropriate

Communication skills:
50 Exploring reasons for non-compliance 223
be useful and have significant experience of helping
elderly patients in such situations.
If you are thinking of broader, more long-term solu-
tions (and have time remaining at your station!), you
could even consider discussing ways to improve the
patient’s mobility in general – for example, through
physiotherapy or occupational therapy. This would not
only help the patient obtain their medication, but also
improve their life in general.
Pharmacists could also help by organizing deliveries
to patients’ homes. Some pharmacies are even involved
batch prescribing, in which GPs write prescriptions for
6 months and pharmacies then dispense to patients on
a monthly basis.
Paying for prescriptions
The cost of a single prescription item at the time
of publishing is about £7.40. This is significant for
patients on a low income and may well prove to be a
deterrent.
There are, however, various ways of minimising this,
for example Prescription Payment Certificates, which
allow patients to pay for a ‘bulk’ of prescriptions for
a year at a cheaper cost than the sum of individual
prescriptions. Various patient groups are also exempt
from prescription charges, such as those with certain
Hints and tips for the exam
This is a common scenario in OSCEs as it assesses a
broad understanding of psychosocial issues and the
ability of candidates to think laterally and devise practi-
cal solutions that can be implemented in real life.
Solutions
The checklist above should help you establish the
underlying cause of the patient’s non-compliance. The
key to getting into the upper echelons of the pass mark
and into the merit range is to devise a practical and
realistic solution that both the patient and examiner
find convincing. Here are some possible solutions that
could be applied to any scenario.
Obtaining the prescription
Elderly patients may have mobility problems that make
it difficult for them to physically travel to their local
pharmacist – possible issues could range from going up
and down flights of stairs, to arranging transportation.
Practical solutions may involve simple measures, like
utilising help from friends and family to help out.
Social services may be able to organise carers to do this,
who could liaise with pharmacists. Third-sector organ-
isations, for example charities such as Age UK, may also
Condition
Key issues to consider and discuss
Statins
Antihypertensive agents
Lack of obvious physical improvement
Side effects (such as muscular pains with statins, ankle swelling with amlodipine)
Insulin
Phobia to needles
Stigma – use of needles may look similar to illicit drug abuse to general public
Inconvenience of using needle and apparatus if busy at work and during social activities
(e.g. at cinema)
Lack of obvious physical improvement
Inhalers
Lack of understanding about mechanism of action and the different roles of preventers versus relievers
Warfarin
Monitoring (with regular International Normalised Ratio) may be perceived to be arduous
Lack of understanding about need for prevention
Steroids
Misperception of steroid (confusion with anabolic steroids used by sportsmen)
Side effects (e.g. weight gain, bruising)
Antiepileptic agents
Lack of understanding about the need for prevention
Lack of obvious physical improvement
Immunosuppressive medication
Side effects (e.g. gum hypertrophy with ciclosporin)
Tuberculosis medications
Duration of course
Lack of understanding of public health issues and seriousness of disease
Summary of common conditions in OSCEs

224
Communication skills:
50 Exploring reasons for non-compliance
liquid suspension forms, and several are available in
modified-release form, involving taking fewer tablets
that then slowly release the medication over a longer
duration of time (e.g. 12 or 24 hours).
Needles
The injection of medications such as insulin is often
associated with more specific problems, such as the
stigma associated with using needles (similar to illicit
drug users) and needle phobias. The answer may lie in
simple educational measures – such as offering to
speak to a patient’s employer to help educate the staff
about the patient’s condition, or to find a separate room
for the patient where they can administer their injec-
tions. Needle phobias may need specific treatment such
as cognitive-behavioural therapy or counselling. More
basic issues include the availability of sharps disposal
bins. Changing the regimen could often be useful – for
example, consider long-acting, slow-release insulin
preparations rather than those which are short-acting.
Above all, remember to show empathy and provide
reassurance – needle phobia and the stigma associated
with injection can be very demoralising.
Work through and devise solutions
for each problem individually
To ensure that your answer at this station is well struc-
tured, make a list of all the problems and find solutions
for each one separately. Without this, you may well find
that you lose track of the problems and merely have a
helpful ‘chat’ rather than devise workable practical
solutions.
Directly observed therapy
In this approach, the patient’s medication is supervised
by either a pharmacist or sometimes a community
nurse. It is used rarely when compliance is absolutely
essential – such as with tuberculosis.
Be ‘patient-centred’
This is a perfect station to show your ‘patient-
centredness’. If your patient is difficult, use the oppor-
tunity to negotiate and compromise, and devise a
solution that both you and the patient agree with.
conditions (e.g. thyroid problems), certain age groups
(e.g. the under 16s and over 60s). A detailed list of
exempted groups can be found on this official NHS
website (www.nhsbsa.nhs.uk/792.aspx).
You could also consider ways to help patients with
their general financial situation, such as asking social
workers to help those with chaotic routines and diffi-
cult lifestyles. Benefit advisors often see patients in GP
surgeries and could help patients obtain benefits they
do not know they are entitled to.
Medication regimens (dose, frequency,
times, duration)
Some medication regimens are easy to understand and
remember – such as taking one aspirin a day. Other
more complex regimens may, however, be quite difficult
to fathom, especially for elderly patients and those with
cognitive impairment, who are ironically usually taking
multiple medications with more complex regimens.
Patients may simply not know about the correct
regimen, or may have difficulty remembering to take all
their medications at the right time – patient education
is always a good place to start.
As with the other problems, try simpler solutions
first. Basic measures such as posters on walls and doors
may be all that is needed – the more technologically
astute could utilise reminders on their mobile phones.
Again, friends and family may be able to help, and
social services could organise carers. Pharmacists could
provide dosette boxes or blister packs, which divide
the medications into little slots or boxes according to
the day and time they are to be taken.
Again, thinking more laterally, you may find that you
have uncovered a larger underlying problem. This may
be an early presenting sign of dementia or an underly-
ing social or psychiatric problem – investigating and
managing this could help the patient’s life and health
in a much bigger way.
Administering medication
Some tablets may be difficult to swallow, or may be of
a size or taste that deters patients from taking them.
Most medications can be prescribed in soluble or

225
51 Counselling for an HIV test
Checklist
P
MP
F
Introduces self and explains reasons for
consultation
Identifies patient correctly (uses at least two
identifiers)
Gains consent
Ensures that setting is private and dignified
(bleep off, door closed)
Establishes rapport
Explains purpose for consultation, obtains
consent
(E – expectations) Establishes patient’s reason
for attending
(I – ideas) Establishes patient’s understanding of
situation and need for pre HIV test discussion,
and if patient has ever had an HIV test before
(I – ideas) Establishes patient’s understanding of
HIV and what it is:
• Destroys immune system
• Makes sufferers susceptible to bacteria/viruses
• If not treated, can lead to AIDS
Establishes sequence of events leading to this
consultation
(C – concerns) Establishes and acknowledges
any underlying concerns that patient may have
about the HIV test and explores possible
sociocultural impact of being stigmatised
Mentions confidentiality (separate notes from
medical notes if is a genitourinary medicine clinic,
insurance company, GP)
• Has the patient ever been tested before
(when? result?)
Explains why patient needs HIV test
Risk assessment – mentions risk factors:
• Other sexually transmitted infections (increases
risk of HIV-positive status and HIV
transmission)
• Partner known to be HIV-positive
• Men who has sex with men (MSM), especially
high-risk sex acts such as unprotected anal
intercourse
Checklist
P
MP
F
• Bisexual partner (if female)
• Partner from high-risk country (e.g.
sub-Saharan Africa and Caribbean)
• Intravenous drug user
• Blood transfusion abroad or before 1985 in UK
• Is patient a sex worker or has patient had
contact with a sex worker?
Assess patient’s knowledge of HIV, AIDS and
transmission (sex, vertical transmission, blood,
needles)
• Most HIV-positive patients are asymptomatic
• One-third of those HIV-positive in the UK are
unaware of their status
Patient’s perception of own risk and expectation
of result (responds appropriately)
Benefits of testing
• If positive:
• Treatment available
• Normal life expectancy with proper
antiretroviral treatment
• Able to have children (HAART and
sperm-washing) but not able to breast-feed
• Explains difference between HIV and AIDS
• Reduction of further transmission
• Counselling available if needed
• If negative:
• Can end a period of not knowing
Basics of testing:
• Point of care test (POCT): low risk. Not used
for West African contacts due to insensitivity to
HIV-2
• Antigen/antibody blood test: high risk and also
used to confirm reactive POCT
• Explains window period clearly (3 months) and
checks patient’s understanding
• Emphasises need for follow-up testing in 3
months

226
Communication skills:
51 Counselling for an HIV test
Checklist
P
MP
F
• Asks when last exposure was (
<72 hours +
high risk – may give post-exposure prophylaxis.
May be mentioned earlier)
• Arrangements for how result will be given
(usually given in person)
Asks whether patient has support if they are
found to be HIV-positive and who they would
they disclose to
Explores how patient may feel or react if HIV test
is positive
Remains empathetic and non-judgemental
throughout the consultation
Mentions documentation of discussion
Gives patient information leaflets
Discusses importance of avoiding spreading HIV
• Condoms/safe sex
Discusses need to test for other sexually
transmitted disease
Explores psychosocial aspects
• Explores home situation (who patient lives
with, activities of daily living, work)
• Disruption to lifestyle as a result of the
situation
Checklist
P
MP
F
Identifies and addresses any ‘hidden agenda’
Works in partnership with patient, exploring their
ideas and preferences with respect to possible
solutions to any issues/problems, negotiating and
compromising where necessary
Obtains informed consent for test (written
consent is usually unnecessary)
If patient is unsure after discussion, gives them
time to consider and return
If patient refuses, tries to carefully explore the
reasons why. May be misinformed (e.g. criminal
prosecution, insurance). The reasons for refusing
a test should be documented
Summarises and checks understanding
Offers to answer any questions the patient has
Acknowledges any gaps in own knowledge, and
offers to seek advice from seniors/colleagues
Hints and tips for the exam
This is a sensitive station. A patient waiting to have a
HIV test will be understandably apprehensive and
anxious. Part of this anxiety will relate to who will have
access to the result of the test and or even know that
the patient is having the test. Build a strong rapport
early by stating the confidential nature of your discus-
sion with the patient, as well as the fact that you will
need their permission before any disclosure (something
that is implicit in other OSCE stations). Do not start
detailing the finer points of confidentiality with regard
to positive results and serious harm unless asked spe-
cifically. It is, however, important to mention safe
sexual practices while a patient’s status is unknown.
Clarity is key in this station. You will be explaining
the testing while also taking a brief history to ascertain
the patient’s risk. Asking the patient at regular (and
natural) intervals whether they have understood you is
important.
Try to use generalised statements and questions to
assess the risk of HIV as well as the patient’s level of
knowledge. This will make the history more conversa-
tional and sound less accusatory. For example:
• ‘Certain risk factors increase a person’s chance of
contracting HIV. Are you aware of any?’
• ‘That’s right. Also . . . can increase the likelihood.’
• ‘How do you feel about your risk? Would any of these
factors apply to you?’
Also ask about the patient’s own perceptions of the
disease and be prepared to politely correct any incorrect
preconceived notions such as HIV being a disease solely
of the homosexual population.
In some medical schools, one hurdle students are
expected to navigate relates to the use of terms such as
‘homosexual’. Refrain from using this, and ask directly
about whether the patient has ever had sex with a man
or whether their partner has (i.e. a man who has sex
with another man).
A difficult area of the station is explaining the prac-
ticalities of the test, especially the window period. Prac-
tise this and have a memorised statement that is short
and clear, such as: ‘All HIV tests have a “window period”
of 3 months. This means that if a person was exposed
to HIV in the previous 3 months, the test may not pick
this up, and they should come again for re-testing.’ Note
that this means the individual should have two tests
separated in time.
Marks will be awarded for assessing the patient’s
expectations of the result and how they will cope. Who
will they disclose to? Do they have adequate support at
home? Would they benefit from seeing a counsellor?
You may also mention the Terrence Higgins Trust,
which provides support and information regarding
HIV and AIDs.

Communication skills:
51 Counselling for an HIV test 227
• The patient would be notified prior to
disclosure.
• Only as much information as is needed will be
disclosed.
• It is worth mentioning that a doctor dealing with
such a case should seek advice from their medical
defence union on how to deal with it.
• Remember to ask at regular intervals if the patient
understands.
• Allow them to make a decision in their own time.
But remember to advise them to practise safe sex to
prevent transmission in the interim.
• If the situation arises where both parties are HIV-
positive, this still does not remove the need for pro-
tection as they may have different serotypes (HIV-1
and HIV-2). This also increases the risk of resistance
to HAART (if partners have different resistant strains)
and subsequently makes it more likely that treatment
will fail.
• You may have to counsel a pregnant woman about
an HIV antenatal test.
• Use the phrase ‘routine test’ as this will ease
conversation.
• Knowing the mother is HIV-positive will mean:
• Caesarean section
• Prompt antiretroviral treatment for the baby
after delivery
• Advice regarding breast-feeding
Questions you could be asked
You may be asked questions related to the following
topics:
• Confidentiality: when can it be broken?
• Insurance policies and HIV:
• Taking a test does not have to be declared.
• A negative test does not have to be declared to an
insurance company.
• A positive test should be declared, but the original
policy is usually continued or ‘honoured’ by the
insurance company.
• Antiretroviral therapy and side effects.
• What other illnesses would prompt you to offer a
HIV test?
A common difficulty among students is explaining
the difference between HIV and AIDS. Make sure you
have memorised a clear statement such as:
• ‘HIV is an virus infection that damages the protective
cells in the body, weakening the immune system.’ (Note
the lack of the word ‘your’)
• ‘AIDS is a result of untreated long-standing HIV
infection. When the immune system is very weak, the
body cannot defend itself against other infections.’
• ‘The test detects the HIV virus and not AIDS.’
Results can usually be available with a few minutes for
the POCT or up to 2 weeks for the blood test. Results
are usually given in person if the patient is deemed high
risk. Low-risk patients can be phoned, texted or sent a
letter.
The patient can, of course, decline the test (after all
your hard work!). Although this is unlikely in the
OSCE, be prepared for this and aim to explore their
reasons for this and gently persuade of the benefits –
but do not try to force them.
The point of the OSCE is to determine first and
foremost whether you will be a safe junior doctor. Akin
to this is good documentation. Remember to mention
to the patient (and the examiner) that you would docu-
ment everything discussed today.
Potential variations at this station
• You may have to talk to a HIV-positive patient who
is having unprotected sex and does not wish to dis-
close to their partner.
• This variation requires you to assess the risk to the
partner of contracting HIV as a result of unsafe
sexual practices.
• You will also need to explore the patient’s reasons
for not telling their partner, as well as their awareness
of the risk of transmission.
• You may be asked what will happen if they refuse
to disclose their status to their partner. Here you will
have to clearly explain the boundaries of doctor–
patient confidentiality.
• Say particularly that you would have to disclose
in the interests of the partner to prevent
transmission.

228
52 Post mortem consent
Checklist
P
MP
F
• Photographs may be taken if necessary and
appropriate (at the discretion of the pathologist
• The procedure takes approximately 3–4 hours
• Once the procedure is complete, the body will
be closed up and ready for burial or cremation
Emphasises that organs will only be retained if
and after the relative consents in writing
Explores possibility of limited post mortem if
relative not happy with full post mortem
Allows relative to gather their thoughts and
invites questions
Enquires about preference of body, i.e. burial or
cremation
Emphasises that funeral will not be delayed
Summarises back to relative
Offers to answer any questions relative may have
Acknowledges any gaps in own knowledge, and
offers to seek advice from seniors/colleagues
Identifies and addresses any ‘hidden agenda’
Asks for approval of the post mortem and gains
written consent if appropriate
Is empathetic throughout the consultation
Explores psychosocial situation and offers
support:
• Offers meeting with family/partner
• Who is at home?
• Counselling
Arranges follow-up appointment with specialist
doctor, nurse or other member of the
multidisciplinary team if any further discussion/
clarification is required
Offers patient information leaflets
Offers details of bereavement officer and
counselling services
Offers details of chaplaincy/religious services
Offers to help relative get home (call taxi)
Provides contact details
Listens to relative and allows them to express
their views without interruption
Shows empathy
Checklist
P
MP
F
Introduces self
Identifies relative correctly
Identifies patient correctly
Confirms patient’s relationship to relative and
checks that relative is the next of kin
Establishes rapport
Ensures that setting is private and dignified
(bleep off, door closed)
Offers condolences and shows empathy
Establishes what the relatives already know
Explains reason for consultation
Explains reasons for post mortem:
• If mandatory – to establish cause of death if
unknown
• Educational and research purposes
Establishes relative’s understanding of what a
post mortem is and how it is done
Explores relatives’ ‘ICE’ regarding cause of death
and post mortem:
• Ideas: What were the relatives expecting to
happen to the body?
• Concerns: What concerns do the relatives have
about the post mortem and/or the patient’s
cause of death
• Expectations: What are the relatives’
expectations from a post mortem?
Allows relatives some time for reflection and asks
if they would like to ask any questions at this
point
Explains post mortem procedure
• Usually done as soon as possible, depending
on availability of pathologist
• Procedure will be performed by pathologist
• Will be carried out in the hospital mortuary
• A midline cut will be made for examination of
internal organs and also the back of the head
• Internal organs will be removed and returned
once the procedure has been completed
• Specimens may be taken for further
investigation if deemed necessary
• Emphasises that body will not be disfigured
and will be treated with the utmost respect
and dignity

Communication skills:
52 Post mortem consent 229
involved in must abide by. You could also stress the
reasons for it being done (e.g. if the cause of death is
suspicious), and the advantages of obtaining the infor-
mation from it, especially with respect to helping
the grieving family have some sort of psychological
closure.
Referring a death to a coroner
The coroner will decide whether a post mortem is nec-
essary. Although any deaths can be discussed or referred
to a coroner for their opinion, in some circumstances
it is legally mandatory to do so:
• If the cause of death has not been identified
• If the patient was not seen by a doctor in the 2 weeks
preceding death
• If the death occurred within 24 hours of the patient
being admitted to hospital
• If the death occurred after a termination of preg-
nancy or after delivery
• If the death was violent, suspicious, accidental or pos-
sibly resulting from poisoning
• If the death was due to a medical/surgical
complication
• If the death was from a condition resulting from/
associated with the patient’s occupation (e.g. mesothe-
lioma in patients who have worked with asbestos)
• If the death was the result of an accident
• If the death took place in prison or police custody
Questions you could be asked
Q. When might you have to report a death to a coroner?
Q. What is the procedure for a post mortem?
A. The answers to these questions can be found in the
text.
Hints and tips for the exam
This is a difficult station – the topic of discussion is a
very sensitive one that is potentially difficult to under-
stand. Discussing a post mortem with someone who is
already shocked and distressed having lost a loved one
just makes it more difficult.
Keep your explanation clear and simple
Don’t dig yourself into a hole trying to explain every
single nook and cranny of an aspect of the post mortem
that the patient is having difficulty in understanding.
You can always offer to arrange a meeting between the
relative and a pathologist, or give them written infor-
mation – or even revisit the issue later when the relative
may be more settled.
Empathy is essential (again)!
This may be the last station you undertake, and you
may be exhausted and totally fed up with the OSCE – if
this shows during a cardiovascular examination or can-
nulation station, the examiner will probably show some
understanding. However, a post mortem is a very sensi-
tive and potentially emotive issue, and you must ensure,
regardless of other factors, that you are as empathetic
and polite as possible.
What if the relative refuses a mandatory
post mortem?
Mandatory post mortems have to be carried out by law,
with or without the relative’s consent. This may be dif-
ficult to explain, especially in a way that comes across
empathetically. It may help if you explain that it is not
your decision, but a legal requirement that everyone

230
53 Explaining a DNAR (Do Not Attempt
Resuscitation) decision
Checklist
P
MP
F
Introduces self and explains reasons for
consultation
Identifies patient correctly
Gains consent
Ensures that setting is private and dignified
(bleep off, door closed)
Establishes rapport
(E – expectations) Establishes what patient is
expecting to find out
(I – ideas) Establishes patient’s ideas of the
sequence of events leading to this
consultation.
Clarifies or confirms patient’s understanding of
the sequence of events
(C – concerns) Establishes and acknowledges
any concerns that the patient has
Signposts that would like to discuss a direction
and strategy for the patient’s future management
Explains what treatment is being given now
Explains that patient’s condition is critical and
may deteriorate, possibly resulting in a cardiac
arrest
Explains that a decision is to be made on
whether or not the patient is suitable for
resuscitation
Ascertains patient’s views
Offers to include family/relatives or next of kin in
discussion
Explains that resuscitation may not be
appropriate in someone with their medical
condition
Checklist
P
MP
F
Suitable explanation for inappropriateness of
resuscitation
Explains that patient is still for full treatment
except resuscitation and that you will continue to
try your best for them
Explains that the resuscitation order will be
reviewed if the patient’s condition improves
Intention to inform other multidisciplinary staff
involved in the patient’s care
Intention to complete a DNAR form, but
awareness that it must be signed by a consultant
Provides contact details
Listens to patient and allows them to express
their views without interruption
Shows empathy
Uses simple and appropriate language, avoids
using jargon
Listens carefully and uses non-verbal
communication skills effectively, maintaining
appropriate tone and eye contact
Checks patient’s understanding at regular
intervals
Invites questions
Systematic approach
Summarises
Offers written information/patient information
leaflets
Offers contact details of support groups/patient
associations if appropriate

Communication skills:
53 Explaining a DNAR (Do Not Attempt Resuscitation) decision 231
Reviewing a resuscitation status
Once a decision is made, it is not carved in stone.
Patients sometimes improve, and the prognosis then
changes. In such circumstances, the resuscitation order
should be reconsidered, although often, even after an
improvement, the original DNAR order is still deemed
most appropriate.
Many hospitals use a brightly coloured DNAR
form that, once completed, is attached to the front of
the patient’s notes, so that it can easily be found and
will stand out in what are often large, thick bundles of
notes.
Summary of key points
• You must practise this station many times before the
OSCE. It is easy marks, a large proportion of which are
related to communication skills, but these can be
affected by the general anxiety associated with the
OSCE exam. It may be wise to have a few rehearsed
phrases up your sleeve that can be used to good effect
without having to think about them in the heat of the
moment.
• Many such stations will give you a scenario involving
a patient who has a chronic illness in its latter stages.
You may be asked to explain a resuscitation status to
the patient or their relative, or discuss their views with
them.
• Do not resuscitate does not mean stop treating. It
does have some associated implications, for example
that such a patient would be unsuitable for invasive
ventilation or haemofiltration, but current medical
management should continue. This must be commu-
nicated to the patient at some point in the discussion,
so that they are reassured you are not just giving up on
them.
• Ensure the patient knows about their condition and
how they are being treated at present, for example that
their pneumonia is severe but they are receiving anti-
biotics, fluids, etc.
• Go on to explain that they may deteriorate and if, in
this deterioration, the heart were to stop, the medical
team would need to decide whether or not cardiopul-
monary resuscitation would be in the patient’s best
interest.
• Sometimes the actor-patient will ask further ques-
tions about whether or not they can refute this decision,
whether the decision can be altered, etc. This may be
set up to assess your knowledge of the ethics surround-
ing this issue, or it may be to test your communication
skills in terms of how you would answer such questions.
In addition, such questions may also serve as prompts
Hints and tips for the exam
This is a challenging station, but if you keep it simple,
you will get most of the marks. It is highly unlikely that
you will face this task alone in your early postgraduate
years, as the decision-making and discussion with
patient and family should be handled by the most
senior doctor available on the team, and this is almost
always the consultant.
When to discuss resuscitation status with
patients
If cardiorespiratory arrest is not expected to occur, it is
not necessary to have this discussion with the patient
unless they wish to do so.
If a decision is taken on clinical grounds that the
patient is inappropriate for resuscitation, discussion
with the patient is not always required. In some circum-
stances, it may cause more distress than benefit, for
example with end-stage terminal disease in which death
is imminently expected. Such decisions should be made
on an individual basis.
Some patients will not want to have this discussion,
while others may request a second opinion. In either
case, the patient’s choices must be respected.
Patients who lack capacity may have made a living
will, or have appointed an attorney, deputy or guardian
in order to make their wishes known. The family may
also know what the patient is likely to have wanted.
While the patient’s wishes should be respected, they
can only refuse resuscitation. They cannot demand
treatment that, on clinical grounds, is deemed inap-
propriate (i.e. if they are made ‘not for resuscitation’
for sound clinical reasons, they cannot demand to be
resuscitated).
When is resuscitation inappropriate?
It is difficult to give a generalised answer to this ques-
tion. In general, patients should be resuscitated unless:
• The outcome is unlikely to be successful, or it is very
unlikely that the heart could be restarted and breathing
sustained for any period of time
• A patient with full mental capacity refuses
• Successful resuscitation may result in a very poor
quality of life for the patient that may prolong their
distress or suffering
If in doubt about a patient’s resuscitation status when
arriving at a cardiac arrest, you must commence cardi-
opulmonary resuscitation, as this can always be stopped
later if the patient is not for resuscitation.

232
Communication skills:
53 Explaining a DNAR (Do Not Attempt Resuscitation) decision
to get the required information out of you, so do not
get put off or fooled by questions, reactions or com-
ments from the actor.
• A significant number of marks are given for com-
munication skills – eye contact, empathy, etc. – as
dealing with such complex situations can be a signifi-
cant communication (as well as clinical) challenge.
• You must tell the examiner that you would afterwards
document the discussion in the notes, ensure a DNAR
form had been filled, and communicate the decision to
all the team members involved in patient care.
• Demonstrate your awareness that a consultant/senior
doctor must make the final decision, if your scenario
has not already told you so.

233
54 Explaining post-myocardial infarction
medication
Checklist
P
MP
F
Introduces self and explains reasons for
consultation
Identifies patient correctly
Gains consent
Ensures that setting is private and dignified
(bleep off, door closed)
Establishes rapport
Explains purpose of consultation
(E – expectations) Establishes what patient is
expecting to gain from the consultation
(I – ideas) Establishes patient’s understanding of
situation and need for consultation, e.g. ‘Can you
fill me in on what has been happening so far?’
Establishes sequence of events leading to this
consultation
(C – concerns) Establishes and acknowledges
any concerns that patient has about medications
Asks patient about preadmission medication
Checks if patient has existing knowledge about
discharge medications
Explains each drug separately
Explains each drug systematically, including
reason for use, dosing regimen, side effects,
safety netting and length of time the patient can
expect to be taking it
• Aspirin:
• Must be taken daily
• Works by ‘thinning’ the blood, thus reducing
clot formation
• Inform doctor if experiencing heartburn,
vomiting or black stools
• Metoprolol:
• Must be taken daily
Checklist
P
MP
F
• Works by reducing chances of
subsequent MI
• Inform doctor if have cold peripheries,
erectile dysfunction or sleep disturbance
• Enalapril:
• Must be taken daily
• Works by reducing blood pressure and
assisting recovery of heart muscle, therefore
reducing risk of subsequent MI
• Inform doctor if develop dry cough,
shortness of breath or facial swelling
• Advises patient that blood tests will be
performed to monitor kidney function
• Simvastatin:
• Must be taken every night before going to
bed
• Works by reducing blood cholesterol, thus
reducing chance of subsequent MI
• Inform doctor if develop muscle pains or
jaundice
• Advises patient that blood test will be
performed to check liver function
• GTN spray:
• To be taken only if angina develops
• Must stop all activity and rest if pain arises;
call 999 if pain not relieved within 5
minutes or pain is of a different nature from
usual angina chest pain
• Inform doctor if frequency of use or time
taken for pain relief is increasing
• Side effects involve headache, facial flushing
and postural dizziness
Explains that all drugs are likely to be required
lifelong
Task: Mr Jones recently suffered a myocardial infarc-
tion (MI). He has recovered well on CCU and is now
ready to be discharged home. Your registrar has told
you to explain the medications on his TTA before he
leaves. The medications are as follows:
• Aspirin (75 mg once daily)
• Bisoprolol (5 mg)
• Enalapril (5 mg)
• Simvastatin (40 mg)
• GTN spray (as required)

234
Communication skills:
54 Explaining post-myocardial infarction medication
Checklist
P
MP
F
Demonstrates knowledge of common drug
interactions and contraindications if appropriate
to the scenario
Explores potential difficulties with compliance
and offers simple solutions (such as use of a
dossette box)
Acknowledges any gaps in own knowledge, and
offers to seek advice from seniors/colleagues
Explores specific concerns (e.g. difficulty spraying
GTN under the tongue)
Explores and addresses any problems identified in
a logical and non-judgemental manner
Demonstrates effective safety netting for each
drug
Works in partnership with patient, exploring their
ideas and preferences with respect to possible
solutions, negotiating and compromising where
necessary
Checklist
P
MP
F
Suggests simple solutions (e.g. meeting with a
specialist nurse to check technique) with agreed
time frame
Explores psychosocial aspects:
• Explores home situation (who patient lives
with, activities of daily living, work)
• Potential disruption to lifestyle as a result of
medications and MI
Identifies and addresses any ‘hidden agenda’
Offers follow-up appointment to monitor for side
effects
Invites questions and checks patient’s
understanding regularly
Maintains rapport and communicates
empathetically
Appropriate close with plan for follow-up
appointment
Hints and tips for the exam
This is a relatively difficult OSCE stations because it
tests a number of different skills:
• Knowledge: A basic working knowledge (at the very
least) of the drugs used in secondary prevention of MI
is required.
• Communication skills: The station is designed to
test the candidate’s ability to impart a relatively
large
volume of potentially complicated information over
a short period of time
in lay terms. You must provide
information in a way that is understandable and regu-
larly invite questions from the patient. This will only
come by practising this station with colleagues and
taking opportunities to explain medications to patients
on the ward who are about to be discharged.
• Safety/prescribing skills: All medications are poten-
tially dangerous so you must:
• Check that it is safe for the patient to be taking the
drugs prescribed on the TTA (i.e. there are no adverse
interactions or contraindications)
• Provide appropriate safety netting (i.e. clearly
explain what the major side effects are and how these
may be manifest)
• Orchestrating a successful consultation: No con-
sultation is ever complete without addressing the
patient’s specific concerns. In the OSCE, you are guar-
anteed to be faced with an actor-patient who has a
specific agenda. You must ask about any
specific con-
cerns and address these in a positive manner by offer-
ing simple and appropriate solutions.
Special points to remember for this station
Do:
• Check the patient’s prior knowledge. This will ensure
that you do not waste time giving the patient informa-
tion they already have.
• Ask the patient if they feel ready to go home. This is
important not only to demonstrate empathy, but also
to ensure safety – if patients do not feel safe to go home,
their concerns must be addressed before discharge.
• Explain each drug separately. If you explain ‘the
drugs’ as a whole, there is more potential for confusion
over why the drugs have been prescribed and how they
should be taken.
• Ensure there are no contraindications to any of the
drugs.
• Provide effective safety netting. Without this, your
explanation is likely to be deemed unsafe.
• Ask if there are any particular concerns.
• Respond positively to concerns raised by the patient.
• Offer a follow-up appointment.
• Invite questions throughout the consultation and at
the end.
Don’t:
• Don’t assume the patient already has information
without checking with them.
• Don’t lecture to the patient without pauses to check
for concerns or questions.
• Don’t hurriedly offload as much information as pos-
sible if you find yourself pushed for time. A better
approach is to acknowledge the time constraints and

Communication skills:
54 Explaining post-myocardial infarction medication 235
v. Assess
stress
levels
and
offer
stress
management.
vi. Advice resumption of sexual activity a
minimum of 4 weeks following uncomplicated
recovery from MI.
vii. Include patients in a cardiac rehabilitation
programme.
viii. Advise the patient to take at least 2 months
away from work and to review and reassess their
occupation to consider workplace modifications to
minimise their risk of MI.
• The patient should avoid air travel for 2–3 weeks
(if there are no complications), in line with NICE
(2007) guidelines.
• Review:
i. 6 weeks post-MI for a review of symptom
recurrence
ii. 3 months post-MI for a review of blood lipid
levels
• Complete a TTA for a patient being discharged after
an MI and explain the medications to the patient. NB.
This is also likely to be tested in two linked 5-minute
stations.
Reference
National Institute for Health and Clinical Excellence
(2007) MI: secondary prevention. Available from:
www.nice.org.uk/nicemedia/live/11008/30497/
30497.pdf (accessed June 2012).
respond to this by offering to arrange a follow-up
appointment.
• Don’t spend a lot of time providing information
regarding general lifestyle changes and other aspects of
secondary prevention of MI unless this is specifically
stated in the instructions.
• Don’t ignore cues provided by the patient. Act posi-
tively on these to help guide the consultation.
• Don’t ignore specific concerns raised by the patient.
Scenarios you may encounter at this
station
• Provide general advice in addition to explaining
medication for the secondary prevention for MI. You
are likely to be given more time (e.g. a
10-minute
station) if this variation of the station is used in the
exam. ‘General advice’ includes information regarding
several aspects of lifestyle and post-MI review.
• Lifestyle:
i. Discuss current dietary habits, and encourage a
Mediterranean diet with low saturated fat intake
and increased intake of fruit and vegetables.
ii. Encourage alcohol intake within limits and to
avoid binge drinking.
iii. Encourage/provide support for smoking
cessation.
iv. Encourage 20–30 minutes of physical activity
per day to the point of slight breathlessness/
sweating and advise a step-by-step increase in
activity.

236
55 Dealing with an angry patient
Checklist
P
MP
F
Introduces self and explains reason for
consultation
Identifies patient correctly
Gains consent
Attempts to establish rapport and to converse
calmly with the patient
(E – expectations) Establishes reason for
patient’s attendance and what they are expecting
from the consultation
Establishes chronological sequence of events
leading to the complaint
Gives patient opportunity to express and release
their anger
(I – ideas) Identifies and explores reasons for
patient’s anger
Acknowledges patient’s anger in a non-
judgemental and empathetic manner, negotiating
and compromising where necessary
Apologises to patient and accepts their grievance
if appropriate
Tries to diffuse situation, explaining that the
intention is to help the patient
Does not react personally to any negative
personal remarks
Avoids apportioning blame to any individual or
department
If appropriate, explains their own version of
events to help the patient’s understanding of the
situation
Devises a practical solution to the patient’s
problems, working in partnership with the patient
Reassures the patient that concrete steps will be
taken to prevent such occurrences in future,
including a significant event analysis if
appropriate
Emphasises that the process will be transparent
and efficient
Offers to organise a meeting for the patient with
members of the team involved in the situation in
question
Checklist
P
MP
F
Explains complaints procedure and offers to help
patient if they wish to make a complaint, giving a
time frame for the response:
• Hospital: patient advice and liaison centre
service
• GP: practice manager
Psychosocial aspects:
• Assesses impact of situation on patient’s home
and social and work life
• Offers to help reduce this impact if possible
Identifies underlying (C) concerns/fears
Acknowledges and addresses patient’s fears/
concerns empathetically and offers help and
reassurance
Acknowledges any gaps in own knowledge and
offers to seek advice from seniors/colleagues
Arranges follow-up appointment/phone call to
inform patient of progress made on solving the
problem
Safety net: asks patient to contact doctor if they
have any problems
Ensures that own safety is not compromised, and
takes necessary measures, calling for help or
pressing panic alarm if necessary
Shows empathy and adopts a calm conciliatory
tone
Uses simple and appropriate language, avoids
using jargon
Listens carefully and uses non-verbal
communication skills effectively, maintaining eye
contact
Checks patient’s understanding at regular
intervals
Invites questions
Systematic approach
Summarises
Offers written information/patient information
leaflets
Offers contact details of support groups/patient
associations if appropriate

Communication skills:
55 Dealing with an angry patient 237
Cause of anger
Key issues to consider and discuss
Missed diagnosis
Misdiagnosis
Incorrect treatment
Patient safety is paramount – ensure there is a swift and definitive follow-up plan in place to establish
the diagnosis and start treatment of the condition
Ensure you set specific time frames for follow-up
Long waiting times for
elective procedure/surgery
Try to explain the reason for waiting lists and waiting times, and the basic issues surrounding resource
allocation and rationing
Emphasise that emergencies, ‘urgent’ and serious cases are dealt with promptly
Lack of information/
communication
Offer to be the main point/source of communication yourself
Ensure you set specific time frames for follow-up
Rudeness on the part of
staff members
Emphasise that rudeness (in general) is never acceptable
Plan to speak to the member of staff in question to explore their views or version of events
Unrealistic/unreasonable
expectations
Empathise unreservedly with the patient
Try to avoid colluding with the patient
Explain your perspective and try to give patient some insight
Hidden agenda
This could be anything – such as a devious agenda to have time off work, or underlying financial or
relationship problems, or even just normal anxiety because of their diagnosis
Once you identify the ‘hidden agenda’, try to help the patient and devise a plan of action to manage it
Psychiatric problems
Remain calm and collected
Summary of common conditions seen in OSCEs
Hints and tips for the exam
This a difficult station, both in real life and even more
so in the OSCE setting. Unfortunately, it is also very
common.
Control yourself
This is the most important tip. Don’t let the situation
overwhelm you, don’t become defensive, and above all
don’t get angry. Remaining calm will show the exam-
iner that you are can cope with difficult situations
under pressure – and it will also help the patient to calm
down. Don’t feel pressurised to respond to everything
the patient says – don’t hesitate to remain silent and
give the patient time and space to express his
emotions.
Be aware of your own emotions
Most of us would find it difficult not to get annoyed or
angry when faced with a patient who is aggressive or
rude, and this may inadvertently start to show in your
expression and behaviour. If you feel angry or fed up,
try to actively work against it and suppress your annoy-
ance – at least until the end of the station!
Apologise
This is often all the patient wants, and may be enough
to pacify them. Saying sorry does not mean that you are
taking liability or accepting blame for the issue – rather,
it is an expression of regret for the situation that the
patient finds themself in.
Don’t blame your colleagues
It could be tempting to collude with an angry patient
and join them in their condemnation of a colleague or
another department. Resist this at all costs. Be empa-
thetic towards the patient, and if appropriate reassure
the patient that their anger is understandable and that
you would also feel angry in the same position. But
rather than blame colleagues, convince the patient that
you will do everything to find out where the fault (if
one exists) lies, and that you will investigate and address
it with the person in question. Always put the emphasis
on helping the patient, and ensuring that any error or
untoward incident does not recur.
Know the complaints procedures
As a finalist, it is unlikely that you will be expected to
know complaints procedures in any great detail.
However, a basic understanding will not only make you
sound convincing to the patient, but will also highlight
how well informed you are for the examiner.
Hospital: patient advice and liaison service
Every hospital has a patient advice and liaison service
department, and this should generally be the patient’s

238
Communication skills:
55 Dealing with an angry patient
both hospitals and GP surgeries is to mark the event as
a ‘significant event’ – this could be any incident where
a patient has been harmed or had potential to be
harmed. Every GP surgery and hospital holds signifi-
cant event analysis meetings as part of clinical govern-
ance on a regular basis (usually once every 1–2 months)
to review these cases. The whole multidisciplinary team
is involved, and the aim is to learn from mistakes and
to institute measures to prevent them in future – usually
in the form of policy and protocol changes.
Stay safe
There will of course never be a true risk to your safety
in the OSCE setting, although your examiners may
create a simulated scenario where there is a risk.
Observing the following precautions will demonstrate
to your examiners that you are prepared for such an
emergency:
• Sit as close to the door as possible.
• Keep the door open if possible.
• Ensure you know where the ‘panic’ button or alarm
is – and use it if necessary.
• Put any objects that could pose a risk to your safety
out of the patient’s reach.
• Shout for help if things get out of hand!
first port of call for any complaints. They will be able
to help with the patient’s complaint and escalate it to
the most appropriate agency or member of staff. Other
than this, they can also provide information on how
different departments within the NHS work and who
the patient can approach for independent intervention,
as well as providing details of support groups.
GP: practice manager
If the scenario lies within the GP setting, the first port
of call should be the practice manager, who should
always respond to the patient within 48 hours of receiv-
ing the complaint.
If the patient wanted to complain at a higher level
independently of the GP practice or hospital, they
could contact either the primary care trust or the NHS
Ombudsman – although this is usually reserved for
intractable or very serious complaints.
Significant event analysis
A common motive for patient complaints is to prevent
other patients suffering the same fate as them. Hence,
it is important to be able to reassure the patient that
you are taking concrete steps and reviewing relevant
guidelines and policies. The first step towards this in

239
56 Carrying out a handover
Checklist
P
MP
F
Introduces self, including name and grade
Requests to speak to the appropriate team (e.g.
respiratory team if handing over a patient with
an acute exacerbation of COPD)
Asks name of colleague
Explains reason for call (e.g. ‘Can I hand over a
patient to you?’)
Explains Situation:
• States name and age of patient
• States date and reason for patient being
brought to medical attention
• Makes a subjective comment on condition of
patient (e.g. ‘Mrs Winters was admitted with a
fall and currently seems very unwell’)
• States urgency of referral correctly and is able
to give a reason for this
Explains Background:
• States relevant points in patient’s history
• States relevant examination findings
•Provides baseline observations and other
objective indicators of patient’s condition, e.g.
pulse rate, blood pressure, respiratory rate,
oxygen saturation, Glasgow Coma Scale score (if
appropriate)
• States results of preliminary bedside and blood
tests that are relevant
Checklist
P
MP
F
Explains Assessment of patient’s current
situation:
• Comments on haemodynamic stability (if
appropriate)
•States working diagnosis
•Explains other current problems that need to be
addressed
Makes a Recommendation with regard to further
patient care:
• Explains treatment required and further
investigations that need to be requested
•Outlines any anticipated complications
•States conditions/deterioration that will warrant
a senior review
• Checks colleague understands plan and asks if
any alterations or additions are advised
Invites questions from colleague and answers
appropriately
At end of conversation, confirms handover can be
made and recommended management plan
implemented
Provides colleague with appropriate contact
details and encourages contact to be made if the
need arises
Communicates politely and maintains rapport
throughout conversation

240
Communication skills:
56 Carrying out a handover
Suspected
cancer
Age of
patient
Criteria for urgent referral
Criteria for
immediate
referral
Team to
refer to
Lower
gastrointestinal
tract
Any age
Right lower abdominal mass
Colorectal
surgeons
Palpable mass on rectal examination
Unexplained iron deficiency anaemia
Haemoglobin
<11 g/100 mL
Non-menstruating women with iron deficiency anaemia
and haemoglobin
<10 g/100 mL
40–59
Rectal bleeding
+ change in bowel habit towards looser
stools for more than 6 weeks
60
+
Rectal bleeding for over 6 weeks
Change in bowel habit towards looser stools for more than
6 weeks
Upper
gastrointestinal
tract
Any age
Dysphagia, chronic gastrointestinal bleeding, weight loss,
persistent vomiting, iron deficiency anaemia, epigastric
mass, suspicious barium meal result
Upper
gastrointestinal
surgeons
55
+
Unexplained and persistent recent-onset dyspepsia
Lung
Any age
Suspicious chest X-ray (including pleural effusion and
slowly resolving consolidation)
Superior vena cava
obstruction
Chest physicians
Asbestos exposure
+ recent-onset chest pain/shortness of
breath/unexplained systemic upset/suspicious chest X-ray
Stridor
Haemoptysis
>3 weeks of: chest pain, shoulder pain, weight loss, chest
signs, hoarseness, clubbing, cervical/supraclavicular
lymphadenopathy, cough, suspected metastases, change
in symptoms of chronic underlying respiratory disease
Radiologist for
urgent chest
X-ray
40
+
Persistent haemoptysis in smoker/ex-smoker
Chest physicians
Urological
Any age
Painless macroscopic haematuria
Urologist
Abdominal mass identified clinically or radiologically that is
thought to arise from urological tract
Swelling/mass in body of testis
Signs of penile cancer
Elevated age-specific prostate-specific antigen
Hard, irregular prostate
40
+
Recurrent/persistent urinary tract infection
+ haematuria
50
+
Unexplained microscopic haematuria
Summary of common conditions seen in
OSCEs
Make sure you know common/important referral cri-
teria outlined by NICE (2005).

Communication skills:
56 Carrying out a handover 241
how closely your recommendation matches the man-
agement plan implemented by the team.
• Look out for opportunities during GP attach-
ments: Patients are commonly referred to secondary
care by GPs, and you can benefit from observing your
tutors do this. Some tutors may also allow you to prac-
tise referring patients by telephone yourself under
supervision, so take such opportunities when they
present.
• Arrange to shadow the acute team on-call radiolo-
gist at your teaching hospital: You will be able to
observe several patients being referred to the radiology
department for urgent imaging. Focus particularly on
how the referring doctors justify why their patients
urgently require imaging.
• Practise with your colleagues in your study
groups: You can formulate scenarios among your-
selves, or use the ones you have observed during your
attachments, to test each other.
Questions you could be asked
Q. Write a referral letter based on clinical information
provided in the OSCE scenario (5 minutes).
Q. Take a history and then hand the patient over to the
appropriate team by telephone.
Q. Double station: Take a history and then hand the
patient over to the appropriate team by writing a refer-
ral letter.
Hints and tips for the exam
Performing a handover using the widely accepted and
universally recognised ‘SBAR’ – situation, background,
assessment, recommendation – framework is an
OSCE station that is increasingly being tested in finals.
This station requires a systematic approach and tests
your abilities in several different areas:
• Knowledge: You will usually be given a significant
amount of background information about the patient
you are handing over in the station. However, you will
usually be instructed to formulate your own manage-
ment plan based on your interpretation of the clinical
information you are given. This requires skill in data
interpretation as well as factual knowledge of how
common conditions are managed.
• Communication: Your ability to communicate
effectively with a colleague is being tested. Remember
that this is different from communicating with a patient
because you will be required to use medical ‘jargon’. If
you follow the SBAR framework, you will find it easier
to impart meaningful information in a precise manner.
Like all communication skill stations, do NOT forget to
check whether your colleague has any questions. In
addition, it is also important to remember to discuss
whether your colleague agrees with the management
plan and has any additions to make.
• Safety: Your ability to gauge the urgency of a clinical
situation is being tested. Beware that the actor to whom
you are handing over may have been instructed to
deliberately avoid taking an urgent handover. If this is
the case, do not panic or backtrack – this situation is
deliberately being simulated to test your ability to
justify why you think a situation is urgent.
You will get several opportunities on all your clinical
attachments to observer handovers being performed:
• Attend the morning handover meeting before the
ward round: Listen carefully to how the night on-call
team communicate information about new admissions
to your team members. Attending the evening hando-
ver will serve the same purpose. Close to your exams,
it may be worthwhile noting down some of the patients’
clinical details and practising handing these over to
each other with your colleagues. You can then check
The marking schedule for a referral letter is likely to
be very similar to that of a referral. You should remem-
ber to write legibly. Remember to give information
about allergies to contrast, metallic prostheses (e.g.
metallic heart valves) and drugs such as metformin
when referring a patient for imaging.zxz
Reference
National Institute for Health and Clinical Excellence
(2005) Referral guidelines for suspected cancer.
Available from: www.nice.org.uk/nicemedia/live/
10968/29813/29813.pdf (accessed June 2012).


OSCEs for Medical Finals, First Edition. Hamed Khan, Iqbal Khan, Akhil Gupta, Nazmul Hussain, and Sathiji Nageshwaran.
© 2013 John Wiley & Sons, Ltd. Published 2013 by John Wiley & Sons, Ltd.
243
Part 4: Procedures
Top tips
Do:
• Prepare well (see below).
• Know the steps of the procedure well: You will have
only a few minutes (usually 5) to a perform the proce-
dure and answer questions on it.
• Practise! Visit your medical school’s clinical skills
centre or teaching room and use the manikins or equip-
ment there to practise and rehearse how you would do
the procedure if it came up in the exam. Use the mark
schemes provided and have a friend watch and time
you.
• Ask for help with your learning if you are
unsure: Many people will be able to show you a pro-
cedure if you are unfamiliar with it. Do not be shy or
too proud to seek help before the exam if you do not
know it, as it is better to make mistakes before the exam
than in it.
• Be as comprehensive and as thorough as possible in
the short time you have: Say as many points as you can
when asked a question, and cover as many details of the
procedure as you can. It is often a good idea to talk
while you are doing the procedure, and sometimes
the specific instructions of the station may ask you to
do this.
Don’t:
• Don’t panic!: The majority of the procedures will be
carried out on manikins, so you do not need to worry
about hurting a patient. However, you must treat the
manikin as you would a real patient.
• Don’t worry!: In the exam, the manikin may not be
perfect, so even though your intravenous cannula may
go into the manikin’s vein, you may not get any blood
back. This may be the manikin rather than your tech-
nique, and the examiner is likely to know this. Even if
you are penalised for it, it would be only a mark, and it
must not play on your mind.
• Don’t think about the station you have just done: It
is rare to pass every single station! If you feel that one
station may not have gone well, do not let it play on
your mind. You get marks for lots of things, and you
may have got more than you think. Also, this will hinder
your chance of doing well on the next station. You must
put it behind you and move on.
• Don’t overcomplicate simple procedures . . . keep
simple things simple!
Preparation
With any procedure in general, preparation is the key.
Preparation should be of:
• The patient
• The environment
• The equipment
The patient
• Confirm the patient’s identity.
• Explain the procedure, including why it is being done
and the risk of any complications.
• Ensure there are no contraindications to the proce-
dure or to any drug being given, including allergies.
• Appropriately position and expose the patient in
order to access the relevant site for your procedure.
The environment
• Ensure adequate privacy and lighting.
• Ensure there is a sharps bin with you.
• Ensure you have an assistant who can help you, or
who you can call on for help when things go wrong.
• Ensure you are doing the procedure in an appropriate
setting.
The equipment
• Ensure you have all the equipment you are going to
need.
• Lay it out in an easily accessible manner – it is often
helpful to place it in the order you are going to use it.
• Where drugs are involved, check the prescription,
dose and timing, and check the ampoule with a col-
league, including the drug name, dose and expiry date.

244
Procedures
• Ensure you have a drawing up needle and a separate
injection needle if required.
Generic points for most procedures
stations
Understands the task from the scenario that is given
Introduces self to the patient/actor
Obtains consent
Washes hands and wears gloves as appropriate
Is methodical in approach
Makes it very clear to the examiner what is doing, so
that each step gets noticed
Cleans up after the procedure and disposes of any
sharps
Thanks patient
Appears confident

245
57 Urinary catheterisation
Checklist
P
MP
F
Appropriate introduction to patient and informed
consent obtained
Ensures privacy and good lighting
Prepares the following sterile equipment with
aseptic technique:
• Sterile catheter pack
• Kidney dish/collecting dish
• Sterile towel and cotton swabs/gauze
• Sterile gloves
• Antiseptic solution, poured into a pot from
sterile pack
• Foley catheter (10–16 F) of appropriate size
• Lubricant gel
• Catheter bag
• 10 mL 1% lidocaine lubricant gel (usually in
pre-filled sterile syringe)
• 10 mL 0.9% saline (usually in pre-filled sterile
syringe)
Adequate exposure: ideally umbilicus to knees
Positions the patient, lying supine:
• Males: legs extended, flat
• Females: hips and knees flexed, legs apart
Washes hands and dons sterile gloves
Establishes sterile field by placing sterile towel/
sheet:
• Males: around the penis
• Females: around the labia
Checklist
P
MP
F
Uses one hand used to hold the penis or labia,
other hand being kept clean
Retracts foreskin/parts labia and cleans
appropriately
Inserts 1% lidocaine gel into urethra
Occludes urethral meatus for 3–5 minutes
Lubricates tip of catheter and places kidney dish/
collecting dish between patient’s legs
Gently inserts catheter into urethra, to the hilt
Does not use force, handles resistance
appropriately and watches for urine
Fills balloon with sterile water
Gently retracts catheter until resistance is felt
Attaches appropriate catheter drainage system
Replaces foreskin
Covers patient, ensuring patient’s comfort and
dignity
Records residual volume
Sends residual urine sample for report on
catheter specimen of urine and urine Dipstix
testing
Ensures good communication with patient
throughout
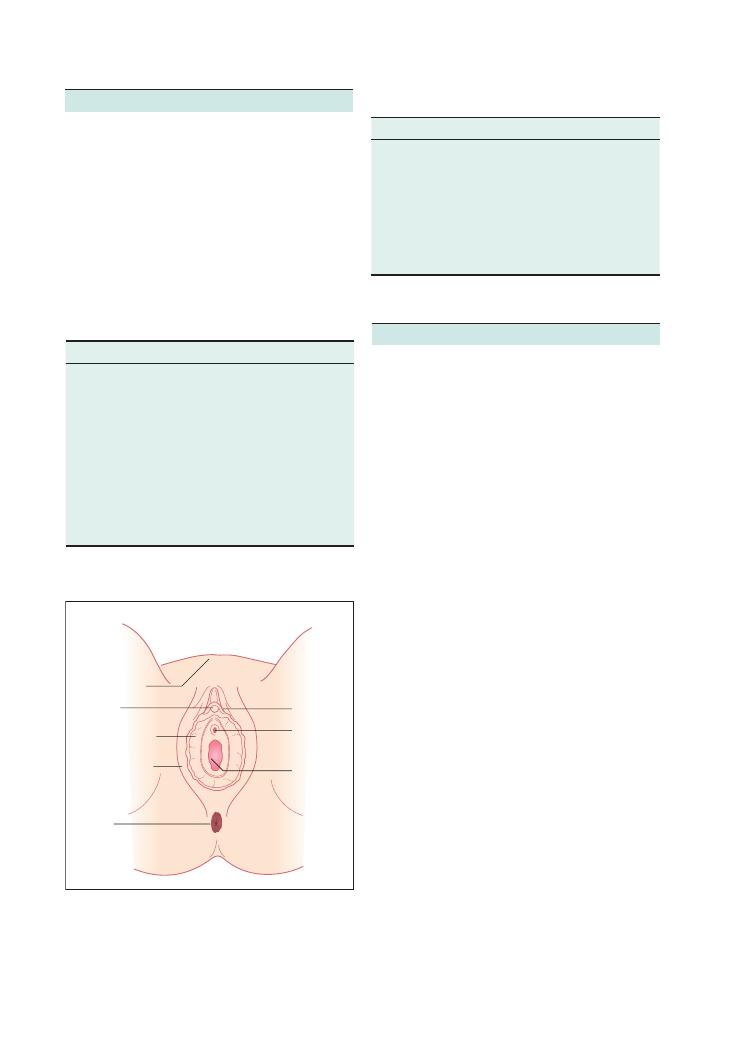
246
Procedures:
57 Urinary catheterisation
Potential complications
Figure 57.1 Anatomy of the female genitalia – many students and
junior doctors have been embarrassed by catheterising the incorrect
meatus.
Labia majora
Clitoris
Labia minora
Anus
Mons pubis
Prepuce
Vagina
Urethral
orifice
Indications
Contraindications
Monitoring urine output, e.g. fluid
resuscitation, fluid balance
measurements, sepsis, etc.
Patient refusal
Relieving urinary retention
Urethral trauma
Urinary incontinence
Active urinary tract infection
Immobility, e.g. low Glasgow
Coma Scale score, coma, lower
limb fractures, cerebrovascular
accidents, postoperatively, etc.
Cystograms and other urology
investigations
Early complications
Late complications
Pain or discomfort on insertion
Paraphimosis if foreskin is
not replaced
Local tissue trauma, e.g. premature
inflation of the balloon, causing
prostatic or urethral trauma
Urethral stricture formation
Bleeding
Creation of false passage
Urinary tract infection
Blockage of catheter
Summary of key points for OSCEs
Know the relevant anatomy
It is vital that you understand the anatomy very well,
or else you may find yourself in the embarrassing situ-
ation of catheterising the wrong meatus, both in the
exam as well as in real life! It is obvious where the
urethra is in males, but to the unfamiliar candidate it
is sometimes unclear on a female manikin where the
catheter should go. Figure 57.1 illustrates the anatomy
of the female genitalia.
Indications and contraindications
Hints and tips for the exam
Equipment
• A sterile catheter pack is often available, containing a
kidney dish, cotton gauze, a pot for saline or cleaning
solution, and sometimes sterile gloves. It is advisable to
know what your clinical skills centre uses as this is likely
to be the same set you will get in the exam.
• If the pack does not contain cleaning solution, you
may need an assistant to pour some cleaning solution
into your pot as you will be sterile.
• The lidocaine local anaesthetic comes as a gel, often
in a prepacked 10 mL syringe that is not normally
included in the catheter pack.
• The catheter itself should come with saline to fill the
balloon in a prepacked syringe. Note that you will need
to use sterile saline and a sterile syringe.
• The balloon capacity will be indicated on the infla-
tion port.
• As the OSCE station may last only 5 minutes, the set
you need will have sometimes already have been opened
and prepared for you. In such circumstances, tell the
examiner that you would like to make sure that this is
a completely sterile set.
Technique
• The procedure will be carried out on a manikin, so
you may be expected to say, for example, that you
would introduce yourself to the patient and obtain
informed consent, etc. Alternatively, there may be an
actor with whom you may have to interact.
• If you are asked to catheterise a member of the oppo-
site gender, always offer a CHAPERONE.
• It is vital that you know the anatomy.
• Take full aseptic precautions – one of the most
common causes of acquiring a urinary tract infection
is urinary tract instrumentation. Some hospitals suggest
you give a dose of prophylactic antibiotic after insertion

Procedures:
57 Urinary catheterisation 247
• Send a urine sample for analysis, including microbi-
ology as this should be a sterile sample.
• It is important to say that you would provide instruc-
tions to the nursing staff, such as to take an hourly urine
record or complete a fluid input–output chart, etc.
according to the scenario you are given.
• In a catheterised patient who is not hypovolaemic,
low urine output may be the result of a blocked cath-
eter. Hence, the catheter should always be flushed to
check.
• It is important, at the end of the procedure, to
mention the importance of patient comfort.
• Express your intention to document the procedure in
the notes.
Types of catheter
This station assumes the use of indwelling Foley cath-
eters, distinguished by the presence of a balloon at the
tip that keeps them in place. There are many other
catheter types (e.g. the Robinson catheter, which does
not have a balloon) but these are beyond the scope of
this book.
Foley catheters are usually made of silicone rubber
or natural rubber, and are sized in French units (F). The
larger the number, the larger the catheter size so, for
example, 16 F is larger than 10 F. You should use the
smallest suitable size for your patient. Catheters used
for males are longer than those for females as the male
urethra (typically 20 cm long) is longer than the female
urethra (typically 6–7 cm long).
Generally, there are two-way or three-way catheters,
depending on the number of ports that are present.
There is always a passage open at both ends for drainage
of urine. The two-way catheters also have a port with a
one-way valve that allows balloon inflation. Three-way
catheters have an additional port for bladder irrigation,
which is separate from the port for drainage.
of the catheter. Ensure you know your medical school’s
policy.
• Cleaning technique is important and must be clearly
demonstrated to the examiner. In males retract the
foreskin, and in females part the labia. Cotton gauze
must be soaked in your cleaning solution and applied
generously in such a way that you start at the urethra
and clean away from it. Ensure you clean the area well
at least three or four times.
• In males, after insertion of the local anaesthetic lido-
caine gel, hold the shaft of the penis vertically and
occlude the meatus in order to prevent the local anaes-
thetic coming out.
• Don two pairs of sterile gloves at the start, and
remove the outer pair once the initial cleaning and
handling has been completed.
• Generously apply lubricant gel to the catheter tip.
• Do not force the catheter! If resistance is met, try and
gently manoeuvre past it. In males, hold the penis verti-
cally and then try to advance the catheter further.
• Try not to touch the actual catheter itself. It usually
comes in a plastic wrapper so try to open the wrapper
and shuffle the tip of the catheter into the urethra.
• Try not to handle any lubricant gel with the same
hand as the catheter as this can make it slippery and
difficult to handle.
• Never force the balloon full – the process should not
be difficult. If it is, and the patient complains of pain,
the balloon is probably in the urethra and should be
advanced further. It is to avoid this situation that it is
advisable to advance the catheter to its hilt.
• Ensure urine flows back. If not, check that the cath-
eter is far enough in and flush it with saline to ensure
it is not blocked, for example by lubricant gel.
After catheterisation
• Attach the catheter bag.
• Record the residual volume

248
58 Insertion of nasogastric tube
Checklist
P
MP
F
Appropriate introduction to the patient and
informed consent obtained
Adequate positioning, patient sitting upright,
head supported by a pillow
Checks the indication for nasogastric (NG) tube
and excludes contraindications
Prepares equipment:
• NG tube to be inserted
• Lubricating gel
• Spigot or bag for NG tube
• Bowl for collecting secretions, gastric content
or vomit
• Glass of water with straw
• Adhesive tape
Washes hands
Dons non-sterile gloves and apron
Measures length of insertion of NG tube: distance
from tip of nose, to tragus of ear, to a point
immediately inferior to xiphisternum
Lubricates distal part of NG tube with gel
Checklist
P
MP
F
Stands facing the patient, on the same side as
the nostril to be used
Gives patient a glass of water
Gently inserts NG tube into nostril, a few
centimetres at a time, aiming towards the occiput
(i.e. backwards)
There are no marks for aiming cranially (upwards)
Asks patient to swallow sip of water when they
feel the tip of the NG in the oropharynx
Continues to insert tube, coordinating with
patient’s swallowing
Inserts tube to previously measured length
Attaches drainage bag/spigot
Uses adhesive tape to fix NG tube securely to
nose
Appropriate disposal of waste
Cleans hands appropriately
Asks for a chest X-ray before the tube is used
Ensures patient’s comfort

Procedures:
58 Insertion of nasogastric tube 249
Summary of key points for OSCEs
Indications and contraindications for NG
tube insertion
Indications
Contraindications
Gastric emptying, e.g. bowel
obstruction, ileus
Patient refusal
Enteral nutrition
Basal skull fracture or other
facial trauma
Gastric lavage or aspiration after
poisoning or drug overdose
Recent nasal surgery
Administration of medication
Oesophageal strictures
Administration of contrast for
radiological investigation
Known oesophageal varices
Upper gastrointestinal bleed:
• Evaluation (e.g. presence,
volume, etc.)
• Sengstaken–Blakemore tubes
help in controlling variceal
bleeds
Caution in unconscious
patients, and in patients
with coagulopathy
Identifying oesophagus and/or
stomach on chest X-ray
Alkaline ingestion
Figure 58.1 How to measure the required length of insertion of an
NG tube. The tube is measured by placing the tip at the tip of the
patient’s nose, and measuring the length from the tip of the nose, to
the ear lobe/tragus and then to the sternum
Earlobe
Nose
Xiphoid
Figure 58.2 (a) An adequately placed nasogastric (NG) tube. The key finding is that the tip of the NG tube is visible below the diaphragm.
Although this X-ray clearly demonstrates the entire NG tube, often only the tip is radio-opaque. (b) A NG tube that has gone into the patient’s
lung so must be withdrawn and reinserted. Reproduced courtesy of Pennsylvania Patient Safety Authority
The tube follows a straight
course down the midline
of the chest to a point
below the diaphram
The tube does not follow
the path of a bronchus
The tube is not coded
anywhere in the chest
The tip of the tube is
below the diaphram
(a)
(b)

250
Procedures:
58 Insertion of nasogastric tube
• Lubricate the NG tube very, very generously! This is
vital to ensure easy passage.
• If resistance is met, the tube should not be forced but
should be withdrawn and redirected.
• If you are unable to pass the tube through one nostril,
try the other.
• When the tip of the tube reaches the oropharynx, it
is helpful to ask the patient to swallow. By coordinating
insertion of the tube with the patient’s swallowing, you
maximise your chance of correct placement, as the
swallowing action should help to steer the tube to the
oesophagus.
• Some patients can swallow without anything in
their mouth.
• Many patients prefer to swallow with a sip of
water as this then becomes similar to swallowing
a pill.
• If the patient gags (they then cannot swallow) or
coughs, stop the insertion, withdraw the tube and start
again.
• Insert the tube to the length you measured
before insertion. If you forget to measure this length,
insert to 30–40 cm, and confirm placement on a chest
X-ray.
• To measure the required length, ask patient to hold
their head straight. Hold the tip of the NG tube at the
tip of the nose, run it past the tragus of the ear and
down to just below the xiphisternum, and read off
the length on the calibration markings on the NG
tube itself.
• Fix the tube securely with adhesive tape. To minimise
pressure necrosis around the tube insertion point, it is
advisable to apply a skin ointment/aqueous cream
before fixing the tube with tape.
• The use of lidocaine gel for the nose, and benzocaine
or lidocaine spray for the throat, can help to minimise
discomfort, but their use for this purpose is
uncommon.
• In some situations, for example gastric decompres-
sion, it is advisable to attach suction (with a Yankauer
suction catheter) or aspirate with a 50 mL syringe after
insertion.
• Attachment to a drainage bag or spigot minimises the
spreading of gastric secretions.
Methods of confirming placement
There are several, but only a chest X-ray is considered
confirmatory:
• Chest X-ray: Essentially, you must ensure that the
tip of the NG tube is lying below the diaphragm and
not in the bronchial tree.
Potential complications of NG tube
insertion
These include:
• Bleeding (e.g. oesophageal, major epistaxis)
• Pain or discomfort during insertion
• Gag reflex:
• Caused by the presence of the tube in the
oropharynx
• This may cause vomiting
• Aspiration of vomitus
• Misplacement, for example:
• Coiling in the nose or oropharynx
• Passing into the trachea (if the patient coughs)
• Passing too far into the duodenum
• Entering the cranial cavity
• Local tissue necrosis
• Oesophageal/gastric perforation
• Failure
Hints and tips for the exam
• You will be performing the procedure on a manikin,
so it is prudent to tell the examiner that you would
introduce yourself to the patient, obtain informed
consent, etc.
• If there is an actor present, speak to them as you
would a patient.
• Prior to inserting the tube, it is often helpful to briefly
examine the nose to check for a deviated septum in
order to determine which nostril is more suitable to
use.
• It is vital to give the patient good clear instructions.
Technique
• Be very gentle in your approach to the patient.
• Aim to pass the tube along the floor of the nasal
cavity, in a posterior direction. Do not aim superiorly
as you will meet obstruction at the cribriform plate.
With facial trauma, it is not difficult to push the NG
tube through into the cranium.
• There are different types of NG tube of different sizes.
Typically, 16–18 F is appropriate for an adult, whereas
in children the necessary size varies with age.
• Use a cold NG tube. Colder tubes are less pliable and
are therefore more likely to keep their curvature for
longer. This makes them easier to direct, and reduces
the chance of their curling in the wrong place.
• Ask for a cold NG tube, fresh from the fridge.
• If cold tubes are not available, placing the distal
part in ice for a few minutes or spraying it with cold
spray/cryogesic will help.

Procedures:
58 Insertion of nasogastric tube 251
• NG aspiration: Aspirate a few millilitres of fluid
from the NG tube and test its pH with litmus paper. A
pH
<5 is highly suggestive of gastric contents, but this
may be inaccurate if the patient is on medication such
as omeprazole, ranitidine or other antacids.
• Air injection: Injection of 20–30 mL of air into the
NG tube while auscultating over the stomach with your
stethoscope is also suggestive of correct placement, but
this method is unreliable.

252
59 Venepuncture/phlebotomy
Checklist
P
MP
F
Appropriate introduction to the patient and
informed consent obtained
Confirms the indication for venepuncture
Prepares equipment:
• Needle of appropriate size (21 G green or 23 G
blue)
• Syringe or Vacutainer
• Alcohol swab
• Tourniquet
• Blood collection bottles
• Sharps bin
• Cotton wool
Positions the patient
Adequately exposes the limb, removing any tight
clothing
Applies a tourniquet proximal to the elbow
Palpates for a suitable vein at an appropriate site
Cleans the area with alcohol swab and does not
touch this area again
Checklist
P
MP
F
Washes hands and dons a clean pair of gloves
Attaches the needle to the syringe and unsheaths
it
Pulls the skin taut from 1–2 mm distal to the
puncture site
Warns patient there will be a sharp scratch
Inserts the needle into the vein at an adequate
angle (until flashback is seen if applicable)
Applies good technique for obtaining blood from
the vein with a Vacutainer or syringe
Loosens the tourniquet before withdrawing the
needle
Applies pressure to the puncture site with cotton
wool as the needle is withdrawn
Applies a plaster over the puncture site
Safe disposal of sharps
Washes hands after procedure
Correct labelling of blood samples

Procedures:
59 Venepuncture/phlebotomy 253
• A sharps bin should always accompany you to the
bedside, to enable the immediate and safe disposal of
sharps.
• When positioning the patient, it is best to ensure their
comfort by, for example, placing a pillow under their
arm.
• In is important to ensure good stability of the needle
and to keep it steady and still while actually taking the
blood sample.
• The collected blood should be promptly placed in the
appropriate bottles and immediately labelled in order
to reduce the risk of errors.
• Good hand hygiene should be demonstrated clearly
before and after the procedure.
• Needles should never be resheathed.
• A Vacutainer reduces the risk of needlestick injury. If
using a needle and syringe, discard the needle, and
remove the tops from the blood sample bottles, allow
ing you to place blood in the blood bottle without the
need for sharps. Blood should be first placed in a coagu
lation and full blood count sample bottle, as these tests
cannot be done on a clotted sample.
• Prolonged tourniquet application should be avoided
due to discomfort, but specifically in patients with, for
example, peripheral vascular disease, Raynaud’s phe
nomenon, hypocalcaemia, etc.
Hints and tips for the exam
This is a simple procedure, and it is important to keep
it simple in the OSCE. It is one that you will probably
have done many times before on real patients, and if
this station is given to you in the exam, it is no less than
a gift.
Venepuncture in general
• Common sites for venepuncture include the ante
cubital fossa, forearm and dorsum of the hand. It is
likely that you will get a manikin model of an upper
limb, with a very prominent vein.
• If blood is taken downstream of an intravenous
cannula through which fluid is running, it is very
likely that the results obtained will be of doubtful
significance.
Technique
• As the manikin may have been used several times
before, you will be able to see where it has previously
been punctured, but it may not necessarily give you a
blood sample. This may well be due to some fault in the
manikin rather than in your technique, so a demonstra
tion of your safe technique is more important than
actually obtaining a blood sample.
• If you are presented with an actor from whom you
are asked to obtain consent or explain what you are
doing, it is vital to be polite and courteous.

254
60 Intramuscular injection
Checklist
P
MP
F
Appropriate introduction to the patient and
informed consent obtained
Confirms the indication for injection
Checks the prescription on the drug chart
Ensures there are no allergies or contraindications
Washes hands and wears clean gloves
Prepares equipment:
• Alcohol wipe or other skin preparation
• Syringe (2 mL or 5 mL)
• 21 G needle (usually green) to draw up
medication
• 23 G needle (usually blue) to inject medication
• Cotton wool/gauze with tape
• Sharps bin
Checks the drug, dose and expiry date with a
colleague or nurse
Draws up the drug with the 21 G green needle
and expels any air bubbles
Replaces the 21 G green needle with a 23 G blue
needle on the syringe
Checklist
P
MP
F
Positions the patient appropriately to access the
chosen site
Cleans the site with the alcohol swab and leaves
to dry for 30 seconds
Tenses the skin to make it taut
Introduces the needle into the muscle layer,
perpendicular to the skin and muscle
Aspirates first to ensure that a blood vessel has
not been punctured
Injects the medication slowly
Withdraws the needle, applying mild pressure
with cotton wool/gauze
Disposes of sharps immediately and washes
hands
Observes patient and vital signs for a few
minutes
Records signature and time on the drug chart
Thanks patient, ensures comfort and offers to
answer any questions
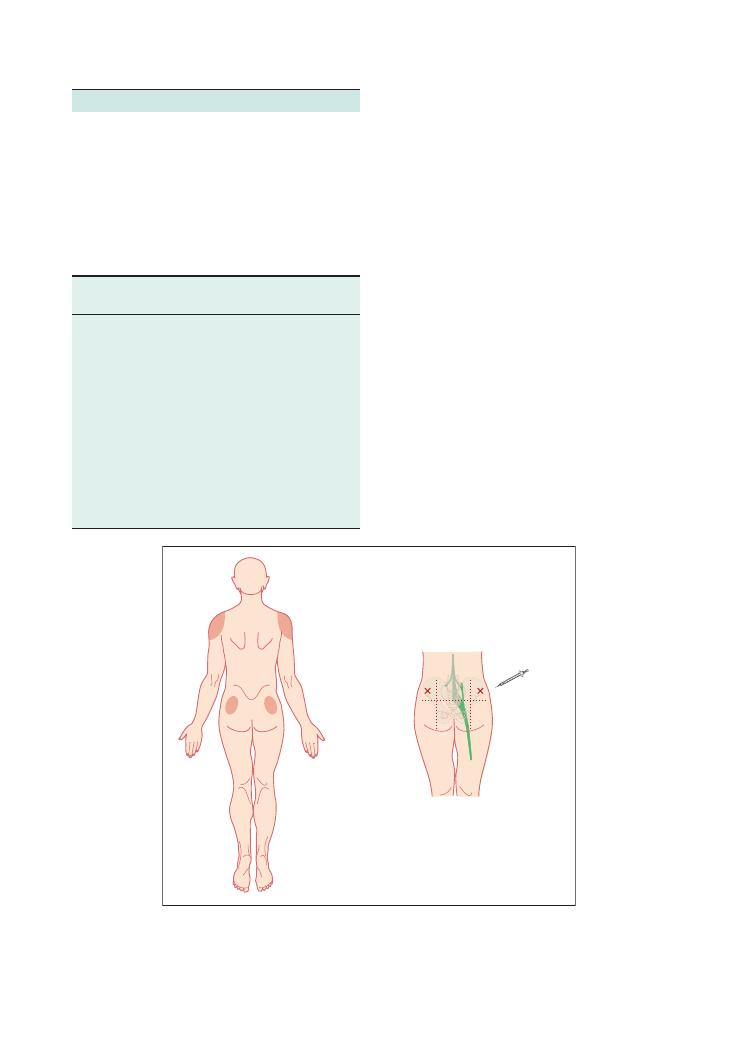
Procedures:
60 Intramuscular injection 255
Hints and tips for the exam
• Always aspirate before injecting. The importance of
this cannot be overemphasised as inadvertent intravas-
cular injection may be fatal.
• In the event of aspirating blood, abandon the proce-
dure, apply pressure and try again at a different site
with a fresh set of equipment.
• Never resheath a needle. As you change your needle,
immediately dispose of it in the sharps bin, ensuring
the examiner sees you do this.
• Always have a sharps bin with you to minimise any
risk of injury.
• It is very likely that you will receive a manikin or a
slab of modified sponge on which to perform the pro-
cedure. There may, however, be an actor-patient present
from whom you may be asked to obtain consent. If not,
it is wise to tell the examiner that these are the steps
you would take prior to performing your injection.
• If you do get an actor-patient, being polite and cour-
teous and using a suitable introduction will get you
some marks before you even start the procedure.
• Ensure the examiner sees that you would wash your
hands before and after the procedure.
Summary of key points for OSCEs
Sites that can be used are the:
• Deltoid muscle
• Lateral thigh muscle (vastus lateralis)
• Gluteus muscle and the upper outer quadrant of the
buttock, in order to avoid the sciatic nerve
Table of drugs that can be administered
via the intramuscular route
Figure 60.1 Suitable sites for intramuscular injection: the deltoids and the upper outer quadrant of the buttock (as this position avoids the
path of the sciatic nerve)
Sciatic nerve
Conditions
Indication for
injection
Example of drug
Pain
Analgesia
Morphine, tramadol,
pethidine, diclofenac,
ketoprofen
Nausea and
vomiting
Antiemetic
Ondansetron, cyclizine,
metoclopramide
Psychosis
Antipsychotic
Haloperidol, olanzapine
Infection
Antibiotic
Co-amoxiclav
Cardiac arrest
Adrenaline (epinephrine),
atropine
Anaphylaxis
Rapid drug
administration if
intravenous access
difficult
Adrenaline,
chlorpheniramine

256
Procedures:
60 Intramuscular injection
Questions you could be asked
Q. What are the indications for intramuscular
injection?
A. The intramuscular route may be the only tolerated,
available or possible way of administering a particular
medication. See the text above for examples.
Q. List some contraindications to intramuscular
injection.
A. These may include patient refusal, allergy to the
medication you are going to inject, thrombocytopenia,
coagulopathy or the patient taking anticoagulant
medication.
Q. What complications may arise from an intramus-
cular injection?
A. These can be classified broadly into local and
general complications. Local complications include
pain at the injection site, localised swelling, haematoma
formation from local bleeding, damage to surrounding
structures, for example adjacent nerves, introduction of
air and bruising. General complications include intro-
duction of infection, intravascular injection, anaphy-
laxis or reaction to the drug injected, and injection of
the wrong dose or volume of the drug.
Q. What if your patient has anatomy that is difficult to
discern, for example if they are obese?
A. If the patient is obese, longer needles can be used.
If you feel you are unhappy performing a procedure on
a patient, ask for senior help before attempting it. Intra-
muscular injections are relatively safe to perform, even
if the anatomy is difficult.

257
61 Intravenous cannulation
Checklist
P
MP
F
Suitable introduction to the patient and informed
consent obtained
Confirms the indication for the intravenous
cannula
Prepares equipment:
• Intravenous cannula of appropriate size
• Alcohol swab
• Tourniquet
• 0.9% saline to flush with a 5 mL or 10 mL
syringe
• Sharps bin
• Cannula dressing
• Cotton wool/gauze with tape
Positions the patient
Adequately exposes the limb, removing any tight
clothing
Applies a tourniquet proximal to the elbow
Palpates for a suitable vein at an appropriate site,
noting its depth, length and course
Cleans the area with alcohol swab and does not
touch this area again
Washes hands and wears a pair of clean gloves
Checklist
P
MP
F
Selects a cannula of suitable size
Inspects to ensure the cannula is not defective or
broken, and loosens the needle from the plastic
covering
Pulls the skin taut from 1–2 mm distal to the
puncture site
Warns the patient just before insertion that there
will be a sharp scratch
Inserts the cannula at an angle of approximately
20 degrees until flashback is seen in the
flashback chamber
Advances the needle and cannula a further
2–3 mm to ensure the tip is in the vein
Withdraws the needle at the same time as
advancing the cannula
Appropriately disposes of the sharp and puts the
cap on the cannula
Flushes the cannula with 0.9% saline
Applies the cannula dressing as appropriate
Washes hands, reassures patient and answers
any questions

258
Procedures:
61 Intravenous cannulation
Potential complications of intravenous
cannulation
Possible complications may include:
• Bleeding and haematoma formation
• Pain, both on insertion and afterwards
• Failure to cannulate
• Subcutaneous administration of fluids and drugs (i.e.
‘tissuing’)
• Infection, cellulitis, bruising
• Air embolism
Hints and tips for the exam
Technique
• You will be performing this procedure on a manikin.
This may be mechanically more difficult than cannulat-
ing a real patient as the manikin’s rubbery skin is
usually thicker and more tough than real skin, and the
vein is often harder. As it may have been used several
times before, do not be disheartened if you do not get
a flashback in the flashback chamber. In real life, it will
frequently require more than one attempt to site a suit-
able cannula. It is far more important to show the
examiner your technique. If it is likely that the manikin
is the problem, the examiner may say to just pretend
you did get a flashback and move on.
• Don’t forget to mention at the end of the station that
you would inform the nurse looking after the patient
that there is a new cannula in place they can use.
• Check the cannula before you use it and loosen the
needle from the plastic cover before starting.
• When advancing the cannula over the needle, it is
important that this is done slowly and carefully.
• Flush the cannula with normal saline soon after
insertion or else the blood will clot in it.
• Mention how you would position the patient, for
example placing a pillow under the arm to stabilise the
arm.
• There may be an actor-patient present from whom
you may be asked to obtain consent. If not, it is wise to
tell the examiner that these are the steps you would take
prior to performing your injection.
• If you do get an actor-patient, being polite and cour-
teous with a suitable introduction will get you some
marks before you even start the procedure.
Safety
• Never resheath a needle. Immediately dispose of it in
a sharps bin, and ensure the examiner sees you do this.
• Always have a sharps bin with you.
• It is important that you know what to do should
you get a needlestick injury, according to your local
Summary of key points for OSCEs
Sites for intravenous cannulation
In practice, intravenous cannulation can be performed
wherever a suitable vein can be found. This may mean
using a vein in the lower limb or foot. In infants, some-
times even the scalp is cannulated.
In general, one should start by looking as distally as
possible and working proximally. The antecubital fossa
is a very tempting place to go but really should be a last
resort because in situations where a good intravenous
access may be needed, such as unexpected emergencies,
this acts as a site of easy intravenous cannulation.
Where you SHOULD site
a cannula
Where you should NOT site
a cannula
Non-dominant hand or
forearm
Joints, e.g. antecubital fossa, as
this is more likely to be
painful, especially when the
patient bends their arm
Consider the dominant hand
if the non-dominant one
has no suitable vein
Arms that have an
arteriovenous fistula
Can consider lower limb if
upper limbs are difficult
Arms on the side from which
axillary lymph nodes have
been removed, e.g. patients
who have had a mastectomy
with lymph node clearance
Largest, longest, straightest
vein palpable
Veins that are thrombosed or
sore from multiple previous
unsuccessful attempts
Indications
Contraindications
Administration of drugs
and intravenous fluids
Patient refusal
Administration of blood
and blood products
Arteriovenous fistula (look
elsewhere)
Emergencies, acute
illness, resuscitation
Caution with the length of time
the tourniquet is applied in
patients with vascular
insufficiency or hypocalcaemia
Preparation for theatre
or anaesthesia, e.g.
nil by mouth
Indications for and contraindications to
cannulation

Procedures:
61 Intravenous cannulation 259
the cannula is not kinked, as is often the case. In patients
who are confused or likely to pull the cannula out, it is
wise to additionally dress the cannula with a bandage.
Cannula flow rates
This is something it is wise to know about in case you
get asked at the end of the station, as it is can gain you
easy marks.
As you know, cannulas come in different colours and
sizes. The rate of fluid flow through a cannula is calcu-
lated in laboratory conditions, using a fluid bag of dis-
tilled water at 22°C, pressurised at 10 kPa, through
tubing of internal diameter 4 mm and length 110 cm.
Intravenous cannulas are sized by standard wire
gauge. In this system, the larger the gauge size, the
smaller the cannula. Which colour represents a particu-
lar size varies by manufacturer, and there is no interna-
tionally accepted colour scheme. In the UK, one
common colour scheme is shown in the table.
hospital protocol (and also because the examiner may
ask you!):
• Stop the procedure you are doing.
• Wash the injured part under a running tap with
warm water, encouraging bleeding.
• Inform the occupational health department and
arrange an urgent visit for post-exposure
prophylaxis.
• Discuss what has happened with the patient and
obtain their consent to test for transmissible viruses
such as hepatitis C, hepatitis B and HIV.
• A colleague should take the patient’s blood and
yours for the appropriate blood tests.
• If an injury happens at 3 am with a high-risk
patient, there are still local protocols you can follow,
usually receiving post-exposure prophylaxis from
A&E. Arrange a visit to the occupational health
department the following day.
• Ensure the examiner sees that you would wash your
hands before and after the procedure.
Cannula care
The site of cannula insertion should be inspected every
day, and the cannula should ideally be removed after 72
hours. Before replacing it, consider whether or not a
cannula is still needed. If a new cannula is required,
secure it first before removing the old one.
If there is evidence of occlusion, ‘tissuing’ or sur-
rounding pain, redness or inflammation, the cannula
should be removed before 72 hours have elapsed. If it
seems to be blocked, try to flush it gently with normal
saline. Remove the dressing gently and check to see that
Colour
Gauge
Estimated flow rate (mL/min)
Blue
22
20–40
Pink
20
40–80
Green
18
75–120
White
17
100–140
Grey
16
130–220
Orange
14
250–360
So, if there is a well-running 14 G cannula, you can
give a 1 L bag of fluid in under 4 minutes, which is
actually quicker than can be given via a central access.

260
62 Intravenous drug administration
Checklist
P
MP
F
Appropriate introduction to the patient and
informed consent obtained
Confirms indication for administration of the drug
Checks prescription on the drug chart, including:
• Patient identity, with wrist band
• Dose
• Time to be given
• Route of administration
• Appropriate prescription
If is in doubt regarding dose or frequency, consults
the
BNF
Ensures there are no allergies or contraindications
to the drug
Ascertains whether patient has appropriate
intravenous access
Washes hands and wears clean gloves
Checks the drug, dose and expiry date with a
colleague or nurse
Checks the administration fluid into which drug is
to be mixed with a nurse or colleague
Checks the manufacturer’s instructions regarding
the preparation and administration of the drug(s)
Checklist
P
MP
F
Draws up into a syringe/fluid bag the appropriate
amount of drug in a suitable volume of fluid, as per
the manufacturer’s instructions
Appropriately labels the drug
Draws up a saline flush
Positions the patient comfortably
Cleans the injection port of the cannula site with
an alcohol-based or chlorhexidine-based wipe
Gently injects 5–10 mL saline flush to ensure the
cannula is patent
Ensures air is expelled from the drug preparation:
• If a syringe, tap it to remove air bubbles
• If a giving set, ensure the line is run through
Gives drug by injection or fluid giving set as per
instructions over the appropriate amount of time
Observes patient and vital signs for a few minutes
Records signature and time on the drug chart
Thanks patient, ensures comfort and offers to
answer any questions

Procedures:
62 Intravenous drug administration 261
• Priority is given to safety.
• Ensure that you flush the intravenous cannula with
normal saline before and after drug administration.
• Always say you would monitor the patient for a few
minutes after administration of the drug.
• Ensure that you document the event on the drug
chart.
• Note that two appropriate healthcare staff (i.e.
doctors and/or nurses) are required to check the drug.
• You must ensure adequacy of the intravenous access.
There are certain drugs that should be given only via a
large central vein and not peripherally. Examples
include inotropes, concentrated KCl solutions and total
parenteral nutrition.
Risks of intravenous drug administration
There are a few risks of intravenous drug administra-
tion, including the following:
• Phlebitis, for example from irritant drugs
• Extravasation into the surrounding tissues
• Intra-arterial injection
• Pain on injection
• Introduction of infection
• Emboli, for example air embolism
• Anaphylaxis, a reaction or hypersensitivity to the
drug
• Dosing errors
• Errors in the rate of administration. For example, if
gentamicin is given too quickly, its plasma concentra-
tion may rise above its therapeutic window and give rise
to ototoxicity.
Summary of key points for OSCEs
Types of drug administration
You will sometimes be asked to give a drug intrave-
nously to a patient who does not have an intravenous
cannula. In such situations, you may say that you would
either insert one first or give the drug by injection
directly into the vein.
In addition, drugs come in different preparations.
Some will come as liquids that can be given as they are.
These are usually drawn up into a syringe and injected
slowly. Other drugs (whether powders or liquids) will
need to be reconstituted into a certain volume of fluid
before injection.
Some drugs will be given as a bolus injection. Others
(e.g. insulin for sliding-scale infusion) may be given via
syringe driver. Some are placed in a given volume of
intravenous fluid and infused over a particular time
interval. A volumetric pump is often used for precision
and accuracy.
Remember that the essential principles do not
change whatever the manner of drug administration.
Essentially, safety is the key to this station. Checking
you have the correct patient and their drug chart, and
ensuring that there are no allergies/contraindications to
the drug, will provide the majority of the marks.
Hints and tips for the exam
• This is a simple procedure, so keep it simple.
• Emphasise that you would check the drug, etc., and
that you would check the prescription with the BNF.

262
63 Arterial blood gas analysis
Checklist
P
MP
F
Appropriate introduction and verbal consent
obtained
Checks identity of the patient using wristband/
medical notes
Collects appropriate equipment
• Needle
• Arterial blood gas (ABG) syringe
• Soft swab and tape
• Sterile wipes
• Sharps bin
Sterilises skin
Enquires about patient preference regarding
which hand to use
Repositions patient appropriately
Performs Allen’s test
Warns patient there will be a sharp scratch
Inserts needle at an appropriate angle
Gets flashback on first attempt
Waits for syringe to fill syringe or fills syringe
manually
Removes needle and disposes of it in sharps bin
Puts cap on syringe
Applies firm pressure over artery and tapes swab
down to stop bleeding
Mentions need to get the sample tested promptly
Thanks patient
Interpretation of ABG shown by examiner:
pH 7.44,
Po
2
7.9 kPa,
Pco
2
3.5 kPa, lactate
3.5 mmol/L, HCO
3
25 mmol/L, BE
−1.8 mmol/L
Checklist
P
MP
F
When asked: Is able to name two or three
hospital locations where ABG processing
machines are available (e.g. ITU, HDU, A&E,
obstetrics/labour ward)
Mentions the need to accurately enter the
patient’s details into the interpretation machine
Asks how many litres of oxygen the patient is
receiving (examiner replies ‘15 L per minute’
if
the candidate asks)
Correctly interprets
Po
2
Correctly interprets
Pco
2
and acid–base status
Correctly interprets base excess and bicarbonate
Calculates and comments on anion gap (if
interpreting metabolic acidosis)
Correctly interprets lactate
Makes appropriate comments regarding any other
abnormalities (e.g. haemoglobin, sodium,
potassium, glucose, calcium)
Correctly interprets overall picture (e.g. refractory
type 1 respiratory failure)
Requests results from previous ABGs
Comments on possible causes of the observed
ABG abnormalities (type 1 respiratory failure
secondary to severe pneumonia)
Correctly identifies further steps in management:
• Sits patient up
• Informs ITU with a view to start CPAP
• Considers complications and alternative
diagnoses, e.g. adult respiratory distress
syndrome or pulmonary embolism in addition
to pneumonia
• Considers changing antibiotics
Identifies importance of further ABGs to monitor
progress
Task: You are the medical ward cover FY1 on call. The
nurses have bleeped you to see a 23-year-old man com-
plaining of difficulty breathing who has saturations of
91% on 15 L/min oxygen. They inform you that his
other observations are stable and that he is alert. He was
admitted from A&E this morning with severe lobar
pneumonia. Please perform an ABG on the manikin pro-
vided. You will then be shown the result by the examiner.
Please interpret this and answer the examiner’s questions
regarding further management.

Procedures:
63 Arterial blood gas analysis 263
Performing an ABG and being able to interpret the
results is a hugely important skill, especially for the FY1
on call who has been bleeped to review a sick patient
on the ward. However, unlike venepuncture and can-
nulation, it is massively underpractised by the vast
majority of medical students approaching finals.
Hints and tips for the exam
Practise on actual patients
Although you will be provided with a manikin arm in
the OSCE, it is wise to practise the ABG on real patients
because it is a vital skill for an FY1 to have. The best
way to do this is to meet the FY1 on the respiratory or
acute medicine firm after the ward round and ask them
which patients will be requiring an ABG. Other oppor-
tunities may arise if you take time to shadow the on-call
medical FY1.
Do not forget to perform Allen’s test
You risk failing the entire station if you do not perform
this simple test, so make sure you always perform it
when you practise so that it becomes second nature.
Allen’s test is used to check that both the ulnar and
radial arteries are intact. This is important because an
ABG can theoretically damage the radial artery and
cause haematoma formation that compresses the artery
and compromises blood flow. If this were to happen,
the ulnar artery would have to be intact to supply blood
to the hand and prevent ischaemic tissue damage. Carry
out the test as follows:
1. Elevate the hand.
2. Occlude the ulnar and radial artery by applying firm
pressure until the hand becomes pale.
3. Release pressure from the ulnar artery.
4. Check whether the hand goes red.
5. If it does, the ulnar artery is intact and it is safe to
perform an ABG on the radial artery.
Know how to calculate the anion gap if
presented with metabolic acidosis
• This is calculated using the formula (values in
mmol/L): K
+ Na – HCO
3
– Cl.
• The normal anion gap is 10–18 mmol/L.
• The anion gap is important because the causes of
metabolic acidosis with an increased and a normal
anion gap differ significantly (see the table).
Always ask about results from previous
ABGs and mention you would like to
perform further ABGs after starting
management
Interpreting ABG results is much easier if you have a
series of results from different stages of a patient’s
illness. Furthermore, it is necessary to monitor the
response to treatment.

264
Procedures:
63 Arterial blood gas analysis
Abnormalities
on
ABG
Causes
Important
investigations
Management
Type
1
respir
atory
failure
Po
2
<
8
kP
a
Pco
2
(normal
or
low)
Obstructive
airw
ay
disease
(asthma,
COPD)
Pulmonary
oedema
Pulmonary
embolism
Lower
respir
atory
tract
infection
Peak
expir
atory
flow
rate
Chest
X-r
ay
CT
pulmonary
angiogr
am
or
V/Q
scan
High-flow
oxygen
CP
AP
if
resistant
to
oxygen
ther
apy
Treat
underlying
cause
, e
.g.
antibiotics
,
anticoagulation,
bronchodilators
Type
2
respir
atory
failure
Po
2
<
8
kP
a
Pco
2
>
6.5
kP
a
pH
is
normal
if
compensated,
<
7.35
if
uncompensated
COPD
Respir
atory
muscle
weakness
(e
.g.
Guillain–Barré
syndrome)
Head
injury
Opiate
or
benzodiazepine
overdose
Chest
X-r
ay
CT
of
the
head
Urine
to
xicology
screen
Nerve
conduction
studies
BIP
AP
(if
conscious)
Inv
asive
ventilation
(if
Glasgow
Coma
Scale
score
<
8)
Treat
underlying
cause
, e
.g.
with
nalo
xone
or
plasma
exchange
Respir
atory
acidosis
Pco
2
>
6
kP
a
pH
<7.35
kP
a
HCO
3
may
be
>30
mmol/L
(and
BE
>+
2
mmol/L)
if
compensated
Life-threatening
asthma
Excessive
oxygen
ther
apy
in
a
‘blue
bloater’
Head
injury
Opiate
or
benzodiazepine
overdose
Peak
expir
atory
flow
rate
Chest
X-r
ay
Urine
to
xicology
BIPIAP
(or
inv
asive
ventilation
if
lack
of
response
to
BIP
AP)
Bronchodilators
Respir
atory
alkalosis
Pco
2
<
4.7
kP
a
pH
>7.45
HCO
3
may
be
<24
mmol/L
(and
BE
<–2
mmol/L)
if
compensated
Hyperventilation
Early
stages
of
salicylate
to
xicity
Blood
salicylate
levels
Ask
about
other
symptoms
of
anxiety
Simple
hyperventilation:
rebreathe
into
a
brown
paper
bag
Salicylate
overdose:
activ
ated
charcoal,
correction
of
metabolic
der
angement,
intr
avenous
rehydr
ation,
dialysis
Summary
of
common
conditions
seen
in
OSCEs

Procedures:
63 Arterial blood gas analysis 265
Abnormalities
on
ABG
Causes
Important
investigations
Management
Metabolic
acidosis
pH
<7.35
HCO
3
<
24
mmol/L,
BE
<–2
mmol/L
Normal
anion
gap
Diarrhoea
Road
traffic
accident
Abdominal
X-r
ay
Fluid
and
electrolyte
support
Antimicrobial
agents
Raised
anion
gap
Ketoacidosis
Lactic
acidosis
Late
stages
of
salicylate
to
xicity
Par
acetamol
overdose
Renal
failure
Capillary
blood
glucose
To
xicology
screen
Fluid
resuscitation
Insulin
sliding
scale
N-Acetylcysteine
Dialysis
Metabolic
alkalosis
pH
>7.45,
HCO
3
>
30
mmol/L,
BE
>+
2
mmol/L
Vomiting
Nasogastric
intubation
Pyloric
stenosis
Primary
or
secondary
hyper
aldosteronism
Diuretics
Hypercalcaemia
Abdominal
X-r
ay
Bloods:
Us
+Es
, bone
profile
, liver
function
tests
, plasma
br
ain
natriuretic
peptide
, renin–
aldosterone
ratio
Echocardiogr
am
(NB
. cardiac
failure
can
cause
secondary
hyper
aldosteronism)
Treat
underlying
cause
High
lactate
Lactate
>2
mmol/L
Systemic
inflammatory
response
syndrome
Severe
sepsis
Bowel
perfor
ation
Ischaemic
bowel
Disseminated
intr
av
ascular
coagulation
Chronic
hypo
xia
(e
.g.
‘blue
bloater’
COPD)
Liver
failure
Dehydr
ation
Bloods:
full
blood
count,
C-reactive
protein
level,
liver
function
tests
, clotting
screen
Blood
cultures
Amylase
Erect
chest
X-r
ay
and
abdominal
X-r
ay
CT
abdomen

266
Procedures:
63 Arterial blood gas analysis
Potential variations at this station
• Interpretation of an ABG, followed by ‘SBAR’ (situa-
tion, background, assessment, recommendation) refer-
ral to ITU for ventilatory support.
• Interpretation of an ABG, followed by examiner
questions on further management.
Questions you may be asked
Q. What are the indications for CPAP and BIPAP?
A. Indications for CPAP include type 1 respiratory
failure refractory to high-flow supplementary oxygen.
Indications for BIPAP are:
• Type 2 respiratory failure secondary to obstruc-
tive sleep apnoea, neuromuscular disease for chest
deformities
• Decompensated COPD with CO
2
retention
causing acidosis (pH 7.25–7.35)
• Weaning off endotracheal intubation
Q. Briefly explain how CPAP and BIPAP work.
A. CPAP works by:
• Positive airway pressure throughout the respira-
tory cycle
• Splinting the alveoli open during expiration, thus
preventing premature closure/collapse of the alveoli
• Increasing the time and surface area available for
ventilation, therefore increasing gas exchange and
oxygenation of the blood
BIPAP works by:
• Providing positive pressure throughout the respi-
ratory cycle
• Pressure being more positive during inspiration
than expiration
• High positive pressures during inspiration
splinting the alveoli open and thus increasing
oxygenation
• Lower positive pressures during expiration
increasing minute ventilation so that more air (and
hence CO
2
) is exhaled per unit time
Q. How do you calculate the oxygen delivery to
tissues?
A. Oxygen delivery (mL O
2
/min)
= Cardiac output (L/
min) x [Hb] (g/L) x 1.31 (mL O
2
/g Hb)
× Sao
2
Q. What are the potential complications of an ABG?
A. • Haematoma formation (can cause compression
of the artery and compromise blood flow)
• Damage to local structures
• False aneurysm formation
• Failure to get blood despite multiple attempts
Q. How can lactic acidosis be classified?
A. Type A lactic acidosis is caused by tissue hypoper-
fusion (e.g. systemic inflammatory response syndrome,
hypoxia, severe anaemia)
Type B lactic acidosis has three subtypes:
• Drugs (e.g. metformin, paracetamol overdose)
• Tumours (e.g. lymphoma)
• Inborn errors of metabolism (e.g. glucose
6-phosphate deficiency)

267
64 Measuring peak expiratory flow rate
Checklist
P
MP
F
Appropriate introduction to patient
Explains procedure and obtains informed consent
Washes hands
Prepares equipment:
• Peak flow meter
• Clean disposable mouth piece
Checks the peak flow meter, ensuring the dial is
not stuck
Explains the technique and checks the patient’s
understanding
Demonstration by performing the technique first
Positions the patient – standing upright
Sets the dial to zero
Ensures the peak flow meter is held horizontally
and the dial is not obstructed, e.g. by fingers
Checklist
P
MP
F
Patient takes a deep breath in to vital capacity
Patient forms airtight seal around mouth piece
Patient exhales as fast and as hard as possible
Records result
Resets dial to 0 and then repeats procedure
twice
Records the best of three readings in the notes
and/or patient’s peak flow diary
Thanks patient, reassures them and answers any
questions
Discards mouth piece and washes hands
Consultation conducted in a professional manner
with appropriate use of language and avoidance
of medical jargon
Satisfactory interpretation of result

268
Procedures:
64 Measuring peak expiratory flow rate
Limitations of peak flow measurement
Although peak flow measurement is a simple, inexpen-
sive and easily performed technique, there are several
drawbacks to its use, which must be considered:
• It depends significantly on the patient’s technique,
cooperation and effort, so clear instructions, demon-
stration and encouragement are required. If patients do
not put in their best possible effort, the results may not
give a true reflection of their current respiratory state.
• The technique measures the PEFR but gives no indi-
cation of other markers of lung function, for example
volume measurements.
• It does not assess the calibre of the smaller airways.
• It is unsuitable for use in children below 5 years
of age as the airway resistance encountered in using
a peak flow meter is too high, and it may be difficult
to explain the technique to a small child and get their
cooperation.
Spirometry
You will probably not be asked to demonstrate this in
the exam, but you may be asked to interpret spirometry
graphs as part of the station on PEFR.
Spirometry is performed in the laboratory by spe-
cially trained technical staff. Essentially, the patient
exhales with maximum possible force through a mouth
piece as rapidly as possible for as long as possible, after
a maximum inspiration. This can be difficult and
exhausting for patients, especially those with obstruc-
tive airway diseases since they have prolonged expira-
tory phases. The spirometer then produces a graph as
shown in Figure 64.3.
Two key measurements are made with this
technique:
Summary of key points for OSCEs
Peak flow rate is measured using a simple peak flow
meter that consists of a long cylindrical tube and a
disposable mouth piece (Figure 64.1). As the patient
exhales into the mouth piece, a piston is forced along
the long axis of the peak flow meter. This is connected
to a pointer that moves along the upper surface to give
a reading on a calibrated scale.
Uses of peak flow measurement
Peak flow measurement is useful in the diagnosis and
monitoring of obstructive airway disease.
Diagnosis
Peak flow can be used to diagnose asthma by demon-
strating ‘reversibility’. Following administration of a
bronchodilator, for example via a salbutamol nebuliser
or inhaler, an improvement of over 15% in peak flow
rate indicates that the airway obstruction has a revers-
ible component, in keeping with asthma.
If there is no convincing reversibility, the diagnosis
is unlikely to be asthma but may well be chronic
obstructive pulmonary disease (COPD). However,
there are also patients with COPD or emphysema who
demonstrate a degree of reversibility, so the differentia-
tion in diagnosis between COPD or asthma is not
always clear.
Monitoring
The trend in peak flow rate is more important than the
actual value. Recording serial peak flow readings pro-
vides objective evidence of progress or response to
treatment of the airway obstruction. In addition,
diurnal variation is often seen in asthma, with early
morning dips in the peak flow values. Patients will often
keep a peak flow diary, which can be used to demon-
strate this. If measurements are taken daily for moni-
toring purposes, they should be taken at the same time
each day.
Interpretation of the result
The best reading of three is taken so that the patient’s
best effort is what is documented. This will often be the
second reading. The greatest reading is compared either
with the patient’s own best known reading or with a
standardised chart that predicts what it should be
according to height and gender (Figure 64.2). ‘Normal’
is considered to be a reading that is at least 80% of the
predicted or best known value.
The peak expiratory flow rate (PEFR), expressed as
a percentage of the best or predicted value, is a useful
tool in establishing the severity of an asthma attack.
Figure 64.1 A typical bedside peak flow meter, similar to ones you
are likely to be given in the exam
800
750
700
650
600
550
500
450
400
350
300
250
200
150
100
Mouthpiece
PEFR readings
PEFR expressed as % of
best or predicted value
Severity of asthma attack
80
+
Normal
50–75
+
Moderate
33–50
Severe
<33
Life-threatening

Procedures:
64 Measuring peak expiratory flow rate 269
Figure 64.2 Peak expiratory flow rates for males and females – normal values. The graphs demonstrate predicted peak flow values for
healthy males and females of different ages and weights. You only need to learn a few typical values for the exam, as well as how to interpret
the graph. Adapted by Clement Clarke for use with EN13826/EU scale peak flow meters from Nunn AJ, Gregg I,
Br Med J 1898;298:1068–70
Height
Men
190 cm (75 in)
183 cm (72 in)
175 cm (69 in)
167 cm (66 in)
160 cm (63 in)
Height
Women
183 cm (72 in)
175 cm (69 in)
167 cm (66 in)
160 cm (63 in)
152 cm (60 in)
15
300
320
340
360
380
400
420
440
460
480
500
520
540
560
580
600
620
660
640
680
20 25 30 35 40 45 50
Age (years)
PEAK FLOW METER
PEF (mm) EU scale
55 60 65 70 75 80 85
• Forced vital capacity (FVC): the maximum volume
of air that can be forcefully exhaled after a maximum
inspiration
• Forced expiratory volume in 1 second (FEV
1
): the
volume of air that is exhaled in the first second of the
FVC measurement
Together, these values help to decide whether the
patient has a restrictive or an obstructive lung pathol-
Obstructive lung disease
Restrictive lung disease
Examples
Asthma, chronic obstructive
pulmonary disease
Intrinsic: pulmonary fibrosis, sarcoidosis, interstitial lung disease
Extrinsic:
• Non-muscular chest disorders, e.g. kyphosis, rheumatoid arthritis, obesity
• Neuromuscular disorders, e.g. myasthenia gravis, Guillain–Barré syndrome
FVC
Reduced
Reduced
FEV
1
Reduced significantly more than FVC
Reduced almost in proportion to FVC
FEV
1
/FVC ratio
<75%
>75%
ogy. There are, once again, charts that give predicted
values for FVC and FEV
1
. However, the ratio of FEV
1
to
FVC is important:
• In normal lungs, the FEV
1
/FVC ratio is about 75%.
• If the FEV
1
/FVC ratio is
<75%, the disease is likely to
be obstructive.
• If the FEV
1
/FVC ratio is
>75%, the disorder is likely
to be restrictive, or the lungs are normal.
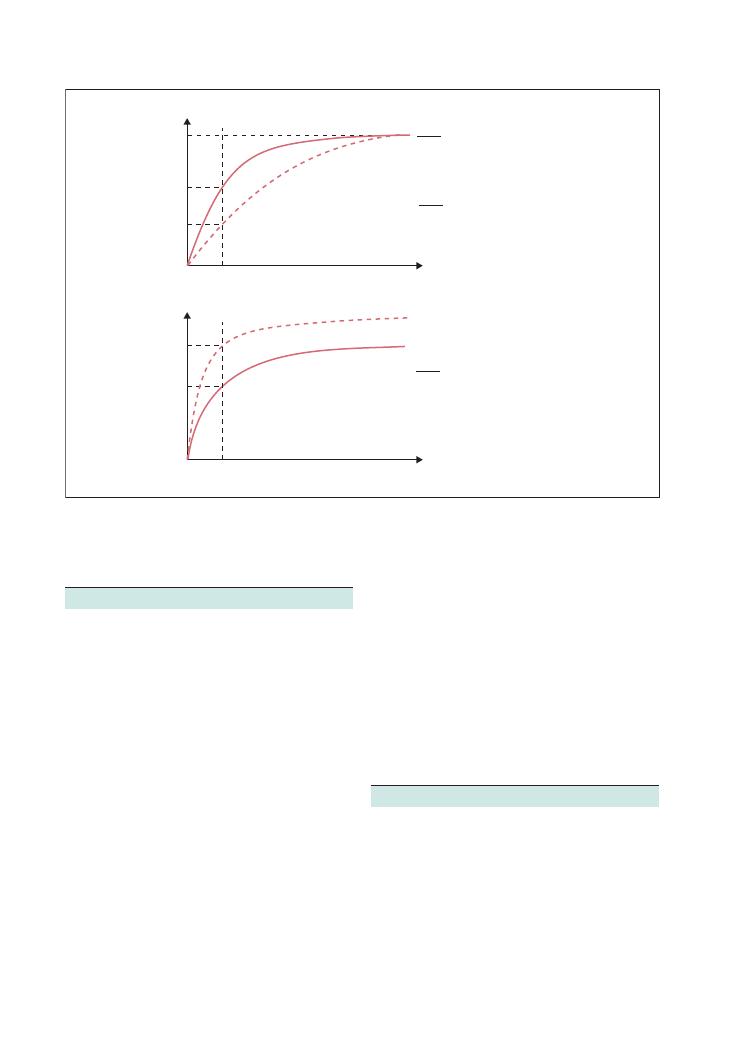
270
Procedures:
64 Measuring peak expiratory flow rate
Figure 64.3 Spirometry graphs for obstructive and restrictive lung disease. The graphs demonstrate the spirometry graphs you can expect to
see for patients with obstructive and restrictive lung diseases, and show how the FEV
1
/FVC ratio changes
FVC
≈ 75%
ratio maintained
In restrictive lung disease,
FVC also decreases in
proportion with FEV
1
∴
FEV
1
FVC
≈ 75%
In obstructive FEV
1
↓ ∴
Obstructive lung disease
i.e. long time to reach FVC
Normal lung
Time
Volume
FVC
FEV
1
Obstructive
FEV
1
FEV
1
FVC
< 75%
FEV
1
Time
Volume
1s
1s
Restrictive
FVC
Restrictive
FEV
1
Hints and tips
Technique
• Practise! It is important that you practise how you are
going to explain the technique to the patient so that you
do not waste vital minutes in the exam in trying to do
so. It may be something along the lines of:
Please stand up. Hold this tube horizontally. Take a deep
breath in, as deep as you possibly can. Then form a good
seal around this mouth piece and blow into it as hard and
as fast as you possibly can. I will then take a reading from
the dial on top, so it is important that you hold the tube
from the sides and not above and below. Let me show
you . . . .
• You must make sure that you check the peak flow
meter, making sure that it is patent, and that the dial is
set to zero between readings and is able to move freely.
• Demonstrate to the examiner that you clean your
hands between attempts.
• It is important to be professional and courteous to
the patient-actor throughout, and this alone will get
you a few marks.
Interpretation
• You should familiarise yourself with the charts that
compare predicted values with actual values, as well as
learn a few typical values. The patient or actor in the exam
is going to be reasonably well in order to carry out up to
three peak flows for the entire OSCE cohort in your sitting.
However, they may be told not to give their full effort, and
hence give lower peak flow readings than are true.
• The examiner may give you the graph shown in
Figure 64.3 and ask you to interpret your results and
say how they compare with the predicted value.
Questions you could be asked
These are likely to be based on the following topics:
• Interpretation of the result based on predicted value
charts
• Problems and shortcomings of peak flow
measurement
• Reversibility
• Interpretation of spirometry graphs and FEV
1
/FVC
ratios

271
65 Performing and interpreting ECGs
Checklist
P
MP
F
Appropriate introduction and confirms identity of
patient using wrist band
Briefly explains the procedure
Requests patient to remain as still and silent as
possible during recording
Correctly attaches the limb leads
Correctly attaches the chest leads:
• V1 – 4th intercostal space, right sternal border
• V2 – 4th intercostal space, left sternal border
• V3 – Half way between V2 and V4
• V4 – 5th intercostal space, midclavicular line
• V5 – 5th intercostal space, left anterior axillary
line
• V6 – 6th intercostal space, left anterior axillary
line
Explains that stickers will be left on the chest in
case a further trace is needed in the near future
and thanks patient
Checks for correct calibration of the ECG (25 mm/s,
1 cm/mV)
Checklist
P
MP
F
States intention to write indication for ECG on the
recording
Reports on following aspects of the trace:
• Heart rate
• Rhythm
• Axis
• P wave, QRS wave, T wave
• PR interval
• ST segment
• Other abnormal waveforms, e.g. J waves, U
waves, pathological Q waves
Offers appropriate differential/ correct diagnosis
Offers appropriate management plan:
• Recognises the need for resuscitation with
respect to airway, breathing and circulation (if
appropriate)
• Discusses further management (if appropriate)
Task (5 minutes): Demonstrate how you would record
a 12-lead ECG on this manikin and interpret the ECG
traces presented by the examiner.

272
Procedures:
65 Performing and interpreting ECGs
Disease/abnormality
Char
acteristic
ECG
featur
es
Specific
points
in
management
ST
segment
elev
ation
MI
ST
elev
ation:
(leads
2,
3,
aVF
–
inferior;
V1–V4
–
anteroseptal;
V4–V6,
1,
aVL
–
anterolater
al)
Tall
T
w
aves
in
acute
setting
Pathological
Q
w
aves
(>
0.04
s
wide
and
>2
mm
deep)
LBBB
(of
new
onset)
Percutaneous
coronary
intervention
is
treatment
of
choice
Thrombolysis
if
•
ST
elev
ation
>1
mm
in
two
or
more
limb
leads
, or
>2
mm
in
two
or
more
chest
leads
•
New
LBBB
Streptokinase
for
non-anterior
MI
Tenecteplase
if
anterior
MI,
systolic
blood
pressure
<100
mmHg,
new
LBBB
, previous
use
of
streptokinase
Alteplase
if
previous
adverse
reaction
to
streptokinase
Non-ST
segment
elev
ation
MI
ST
depression
Inverted
T
w
aves
Aspirin
(300
mg)
+
clopidogrel
(300
mg)
+
low
molecular
weight
heparin
Nitr
ates
, beta-block
ers
, A
CE
inhibitors
, lipid
management
Consider
glycoprotein
2b/3a
inhibitors
Posterior
infarct
Tall
R
w
aves
and
ST
depression
in
leads
V1–V2
See
ST
segment
elev
ation
MI
Ventricular
fibrillation
Char
acteristic
broad
complex
tachycardia
that
should
be
instantly
recognised
No
clear
QRS
complexes
Rate
>120/min
See
Chapter
69
on
ALS
Ventricular
tachycardia
Positive
QRS
concordance
in
chest
leads
Left
axis
deviation
Rate
>100/min
Fusion
and
capture
beats
Atrioventricular
dissociation
Polymorphic
QRS
complexes
with
constantly
changing
axis
in
torsade
de
pointes
If
no
pulse
, follow
ALS
protocol
If
patient
has
a
pulse
, check
for
adverse
signs
(systolic
blood
pressure
<90
mmHg,
chest
pain,
heart
failure
, heart
rate
>150/min)
If
pulse
is
present,
sedate
and
administer
DC
shock
If
pulse
is
absent,
correct
underlying
causes
, try
chemical
cardioversion
(amiodarone/
lidocaine)
and
then
give
DC
shock
Supr
aventricular
tachycardia
Rate
>100/min
QRS
<120
ms
Rhythm
regular
Vagal
manoeuvres
Adenosine
6
mg
followed
by
12
mg
and
12
mg
(into
a
centr
al
vein)
Rate
control
if
no
adverse
signs
(esmolol,
digo
xin,
ver
apamil,
amiodarone)
Sedation
and
synchronised
shock
if
adverse
signs
Atrial
fibrillation
Irregular
baseline
Irregularly
irregular
rhythm
Rate
may
be
>100/min
(or
<100/min
if
on
rate-controlling
drugs)
No
P
w
aves
Refer
to
NICE
(2006)
guidelines
Summary
of
common
ECGs
seen
in
OSCEs

Procedures:
65 Performing and interpreting ECGs 273
Disease/abnormality
Char
acteristic
ECG
featur
es
Specific
points
in
management
Heart
block
First
degree:
prolonged
PR
interv
al
Correct
underlying
causes
(e
.g.
hypothyroidism),
stop
precipitating
drugs
(e
.g.
beta-block
ers
, digo
xin,
calcium
channel
block
ers)
No
treatment
if
rate
>40/min
and
asymptomatic
If
rate
<40/min
or
symptomatic,
give
atropine
, or
pace
if
this
is
not
effective
Second
degree
(Mobitz
type
I/W
enck
ebach):
PR
gets
progressively
longer
over
a
few
beats
and
then
a
QRS
w
ave
is
dropped.
T
he
PR
interv
al
following
the
dropped
QRS
beat
is
shorter
Second
degree
(Mobitz
type
II):
PR
interv
al
is
uniform
but
some
P
w
aves
are
not
followed
by
a
QRS
. Is
2:1
if
QRS
is
dropped
after
every
third
P
w
ave
, and
3:1
if
QRS
is
dropped
after
every
fourth
P
w
ave
Mobitz
type
II
has
a
higher
rate
of
progression
to
third-degree
heart
block
and
therefore
usually
requires
pacing
Mobitz
type
I requires
treatment
only
if
symptomatic
Third
degree
(complete):
dissociation
between
P
w
ave
rate
and
QRS
rate
All
patients
require
pacing
Trifascicular
block
RBBB
+
left
axis
deviation
Pacing
W
olff–P
arkinson–White
syndrome
Short
PR
interv
al
Wide
QRS
with
slurred
upstrok
e
See
supr
aventricular
tachycardia
Ablation
Hyperkalaemia
Tall
tented
T
w
aves
, wide
QRS
complexes
, small
P
w
aves
Ventricular
fibrillation
Arrest
protocol
if
ventricular
fibrillation
10
mL
10%
calcium
gluconate
intr
avenously
over
2
minutes
(prefer
ably
into
a
large
vein)
50
mL
50%
glucose
with
10
U
of
rapid-acting
insulin
over
30
minutes
. Monitor
BM
readings
5
mg
salbutamol
via
nebuliser
Calcium
resonium
Dialysis
if
potassium
remains
persistently
high
Hypokalaemia
ST
elev
ation,
T
w
ave
inversion
Prolonged
QT
interv
al
Flattened
T
w
ave
, may
be
followed
by
U
w
ave
Long
PR
interv
al
ALS
protocol
if
patient
is
in
cardiac
arrest
Correct
underlying
cause
(vomiting,
diuretics
, Cushing’
s
syndrome
, Conn’
s
syndrome)
Or
al
potassium
if
K
>
2.5
mmol/L
and
asymptomatic
Intr
avenous
potassium
if
K
<
2.5
mmol/L
or
symptomatic
Hypothermia
Osborne
J
w
aves
(positive
deflection
at
junction
of
QRS
w
ave
and
ST
segment)
May
be
confused
with
bundle
br
anch
block
or
ST
elev
ation
but
identification
enabled
by:
•
Shorter
dur
ation
of
positive
deflection
•
Present
in
all
(or
most)
chest
and
limb
leads
•
Coexisting
br
adycardia
Slow
rew
arming
aiming
for
increase
in
temper
ature
of
appro
ximately
0.5°C
per
hour
.
Hot
drinks
, w
arm
intr
avenous
infusion
Antibiotic
prophylaxis
against
pneumonia
in
patients
aged
over
65
Monitor
rectal
temper
ature
, urine
output,
blood
pressure
, pulse
and
respir
atory
rate
at
least
half-hourly
NB
. F
alling
blood
pressure
is
the
first
sign
of
overr
apid
rew
arming,
which
can
cause
ventricular
and
atrial
fibrillation
Review
patient’
s
social
situation
before
discharge
(Continued
)

274
Procedures:
65 Performing and interpreting ECGs
Disease/abnormality
Char
acteristic
ECG
featur
es
Specific
points
in
management
Acute
pericarditis
Widespread
concave
ST
segment
elev
ation
Analgesia
(e
.g.
ibuprofen)
Colchicine
, steroids
Treat
underlying
cause
(e
.g.
dialysis
if
ur
aemia,
antineoplastic
agents
if
malignancy
, etc.)
Possible
pulmonary
embolism
Sinus
tachycardia
RBBB
Deep
S
w
ave
in
lead
1
+
Q
w
ave
in
lead
3
+
inverted
T
w
ave
in
lead
3
(although
this
picture
is
uncommon
in
pr
actice)
Thrombolysis
if
massive
pulmonary
embolism
or
patient
haemodynamically
unstable
Intr
avenous
low
molecular
weight
heparin
Start
w
arfarin
once
systolic
blood
pressure
>90
mmHg
Heparin
+
w
arfarin
for
5
days
. Stop
heparin
once
INR
>2
6
weeks’
w
arfarin
if
cause
is
remediable;
if
no
remedial
cause
, 3–6
months’
w
arfarin
Search
for
underlying
causes
Pacemak
er
Spik
es
before
P
and
QRS
w
aves
If
there
are
spik
es
without
QRS
complexes
, pacemak
er
is
lik
ely
to
be
dislodged
Dextrocardia
Poor
R
w
ave
progression
in
leads
V1–V6
Inverted
P,
QRS
and
T
w
aves
in
lead
1
Cardiac
tamponade
Low-voltage
QRS
complexes
Tachycardia
Electrical
alternans
See
Chapter
69
on
ALS
ALS
, adv
anced
life
support;
INR,
International
Normalised
Ratio;
LBBB
, left
bundle
br
anch
block;
MI,
myocardial
infarction;
RBBB
, right
bundle
br
anch
block

Procedures:
65 Performing and interpreting ECGs 275
Hints and tips for the exam
The mark sheet for this station appears brief, but do
not be deceived because it is testing several key areas of
your knowledge. This station effectively has three parts:
• Setting up the ECG: You either know how to do this
or you don’t! Make sure you practise this a few times
so that you can get it out of the way quickly in the exam
before you take on the harder task of interpreting the
traces.
• Interpreting findings from a 12-lead ECG:
• You may be provided with brief history and/or
examination findings related to the ECG. If so, it
would be wise to quickly formulate a list of differen-
tial diagnoses in your head before starting to report
the ECG. Regardless of this, make sure you clearly
point out any glaring abnormality (if present) at the
beginning. For example, if there is obvious ST eleva-
tion in leads 2, 3 and aVF, you can start by saying, ‘On
initial analysis, there is ST elevation in 2, 3 and aVF.
Upon review . . . ’ – and then go through the whole
trace systematically.
• Traces of ventricular tachycardia and ventricular
fibrillation require spot diagnosis so make sure you
are able to identify them instantaneously. You will not
be expected to adopt a systematic approach to recog-
nise these traces.
• You will probably be asked to interpret more than
one trace, in which case one of them may be of a less
common condition, such as dextrocardia. Although
you are unlikely to fail if you are unable to diagnose
something as rare as dextrocardia from the ECG
trace, it would be wise to use the systematic approach
of interpreting an ECG and offering a reasonable
differential diagnosis and further investigations at
the end.
• Management of common medical emergencies: The
traces you will be shown in the exam are likely to relate
to commonly encountered medical emergencies such as
acute coronary syndrome, arrhythmias and serious
electrolyte disturbances. You must remember the need
to resuscitate an acutely ill patient with respect to ABC
(covered in detail in other stations) before proceeding
to further specific steps in management outlined in the
table above.
Potential variations at this station
• An ECG spot diagnosis of a ‘shockable’ rhythm fol-
lowed by the advanced life support management
protocol.
• Interpreting results from an arterial blood gas (ABG)
analysis followed by an ECG from the same patient. For
example, you might be shown an ABG of type 1 respira-
tory failure, which may be followed by an ECG showing
sinus tachycardia. You might then be asked for the most
important differential diagnosis (which in this case is
pulmonary embolism).
• Interpreting a chest X-ray followed by an ECG from
the same patient. For example, you may be shown a
chest X-ray with diffuse reticulonodular shadowing fol-
lowed by an ECG with right-heart strain pattern and
then be asked the most important differential diagnosis
(in this case cor pulmonale secondary to fibrotic lung
disease).
• An ECG followed by viva questions, for example the
causes of hypokalaemia or hyperkalaemia.
Questions you could be asked
Q. Where is the isoelectric point?
A. The point at which the P wave begins to rise on the
ECG.
Q. What are the posterior chest leads?
A. Leads V7–V9 (useful if a posterior infarct is
suspected).
You may also be given the following ECGs or ECG-
related scenarios to interpret:
• Chest X-ray, for example cardiomegaly,
+ related
ECG
• ABG, for example of type 1 respiratory failure,
+
ECG reflecting pulmonary embolism; type 2 respi-
ratory failure
+ right heart strain ECG showing cor
pulmonale; lactic acidosis/ increased troponin
+ ST
segment elevation
• ECG
+ advanced life support
• ECG
+ viva (e.g. causes of hyperkalaemia)
• ECG
+ focused history (e.g. to rule out contrain-
dications to thrombolysis)
Reference
National Institute for Health and Clinical Excellence
(2006) Atrial fibrillation: the management of
atrial fibrillation. Available from: www.nice.org.uk/
nicemedia/live/10982/30054/30054.pdf
(accessed
June 2012).

276
66 Scrubbing up in theatre
Checklist
P
MP
F
Wears surgical scrubs, shoes and theatre cap
Applies a mask over the nose and mouth
With sterile technique, opens an appropriately
sized surgical gown
With sterile technique, opens sterile gloves
Is bare below the elbows, removing watches,
rings, etc.
Opens a sterile sponge/brush and leaves to one
side
Turns on tap, adjusting water temperature
Wets hands and forearms, but only allows water
to flow proximally from hands down to elbows
Uses only one scrub solution (not more), and
operates dispenser using elbows and not hands
Initial pre-scrub wash: lather formed from hands
to above elbows and then rinsed off
Checklist
P
MP
F
Uses brush and/or nail file to scrub below each of
the nails for 30 seconds per hand
Scrubs between each of the fingers, and between
forefinger and thumb
Scrubs both dorsal and palmar surfaces of fingers
Scrubs palms, dorsum of hands and wrists
Washes from hands to elbows, always keeping
hands elevated above elbows
Does not shake water off after washing
Dries hands with sterile towels, starting with
hands and then working back to elbows
Gown applied appropriately
Sterile gloves applied satisfactorily
Asks for an assistant to tie gown from behind

Procedures:
66 Scrubbing up in theatre 277
never the other way, in order to make sure your hands
remain sterile.
• There will be often be a choice of a chlorhexidine-
based or an iodine-based solution. You must only ever
use one scrub solution at a time – never more than one.
• Scrubbing solution is applied using one elbow to
depress the dispenser. Never use your hands or they will
cease to be sterile.
• If at any time you have become unsterile, everything
must be discarded and the whole procedure com-
menced from the beginning.
• The initial phase is a pre-scrub wash in which the
scrub solution is lathered up as high as a point just
proximal to the elbow and then rinsed off.
• Do not dry your hands by shaking the water off. Just
let it drip off, and then wipe your hands with sterile
towels.
Equipment
• It is important that all the surgical apparel is opened
using a sterile technique.
• The brush and sponge are used to clean under the
nails. Nowadays, they often come as a single piece. Read
the package as some makes are impregnated with a
scrubbing solution, whereas others are not. The brush
should not be used on the skin as it may cause breaks
in the skin as well as disrupting the normal skin flora.
• The gown must be handled with care. Once the hands
are dry after scrubbing, the gown must be picked up by
what will be its inside and allowed to unfold itself down
without touching the floor or any unsterile surface. The
ends of the sleeves cover as far as the palms of your
hands.
• You may be asked to demonstrate how you would
open and wear the gown and the gloves using a sterile
technique.
• The gloves are worn without touching their outsides.
They significantly overlap the ends of the gown’s
sleeves. It is worth practising with sterile gloves so that
you become efficient at wearing them before the exam.
Summary of key points for OSCEs
Scrubbing up effectively in theatre is vital in preventing
the transmission of infection both to the patient and
from the patient to the staff. In order to pass this station
successfully, practice is important. The best people to
show you how to scrub up are probably friendly and
enthusiastic operating department practitioners – but
remember to ask them nicely! Many hospitals and oper-
ating departments have their own scrub policies, and
becoming familiar with them will make you more effi-
cient in the exam.
Hints and tips for the exam
About scrubbing up in general
The examiners may ask you some basic facts about
scrubbing up, which are worth knowing:
• Scrubbing for the first case of the day should take you
4–5 minutes, and you must clean your nails with the
brush or nail file.
• Once you have scrubbed, this is thought to be effec-
tive for approximately 2 hours.
• If the patient is a high-risk case (in terms of transmis-
sible infections), for example is an intravenous drug
user or is known to be HIV-positive, one should
double-glove, and the eyes should be protected either
with goggles or a mask with a visor.
Technique
• Even before scrubbing, you must say that you would
don appropriate surgical scrubs, shoes and a theatre or
operating hat.
• Your nose and mouth should be covered by a mask
that fits snugly over the contour of your face. Most
standard disposable surgical masks can be adjusted to
achieve a good fit.
• Being bare below the elbows is vital, and, accordingly,
all apparel below the elbows must be removed.
• At all times, you must ensure that water and scrub
solution run back from your hand to your elbow and

278
67 Suturing
Checklist
P
MP
F
Appropriate introduction to the patient and
informed consent obtained
Asks patient whether they have any allergies, e.g.
to local anaesthetic
Checks that suturing the wound would be
appropriate, including:
• Presence of infection or contamination
• Presence of foreign body
• Neurovascular state of skin
• Location of wound
• Wound not more than 24 hours old
Adequate exposure and good lighting
Prepares equipment:
• Sterile drape
• Sterile suture pack (forceps, needle holder,
gauze, pot for cleaning solution, scissors)
• Wound cleaning solution, poured into the pot
• Appropriate local anaesthetic
• 10 mL syringe with 21 G (green) needle and
25 G (orange) needle
• Suitable size and type of suture
• Sterile gloves
Washes hands and dons sterile gloves
Cleans the area with cleaning solution, and
applies sterile drape to create a sterile field
Draws up local anaesthetic with 21 G needle
Checklist
P
MP
F
Infiltrates wound area appropriately with local
anaesthetic using 25 G needle
Places suture needle in needle holder two-thirds
of its length away from its tip
Raises skin edge on one side of wound with
forceps
Inserts needle perpendicular to skin 5 mm from
the wound edge, and gently pulls through with
needle holder
Raises opposite skin edge with forceps, and
passes needle through directly opposite to
insertion point, from dermis upwards, emerging
5 mm from wound edge
Ties three knots, clockwise–anticlockwise–
clockwise, and cuts to leave approximately 1 cm
of thread on wound
Pulls knot to sit to one side of wound, not
directly above it
Ensures skin edges appose but do not overlie
each other, and are not under tension
Continues in a similar fashion to close wound
Applies appropriate dressing
Enquires about tetanus status
Thanks patient and disposes safely of sharps

Procedures:
67 Suturing 279
Sutures also come in different sizes: the larger the
number, the smaller the suture. Hence, a 5/0 suture is
larger than a 6/0 suture. The following table provides
some guidance, but there may be local protocols in your
hospital or medical school.
Summary of key points for OSCEs
Indications and contraindications
Indications
Contraindications
Wound closure
Patient refusal
Fixing drains in place, e.g.
chest drains, drains
sited intraoperatively
Foreign matter in the wound,
including glass, dirt, etc.
Repair of deep structures,
e.g. tendons
Infected wound
Large wound whose ends
cannot be suitably apposed
without significant tension
Type of material
Absorbable
Non-absorbable
Properties
Dissolve
Remain
in situ
until removed
Examples
Monocryl
Vicryl
Polydiaxonone (PDS)
Nylon
Silk
Prolene
Removal required?
No
Yes, timing
depends on site
Suitable sites
Lips, mouth, tongue,
viscera
Limbs, face, neck,
abdominal/
chest wall
Site
Suture and size
Time to removal
Scalp
Non-absorbable
3/0
7 days
Face
Non-absorbable
5/0–6/0
4–5 days
Chest wall
Non-absorbable
3/0
10 days
Limbs and hands
Non-absorbable
4/0–5/0
10 days
Lips/tongue/mouth
Absorbable
6/0
n/a
There are some situations where alternative wound
closure methods would be more appropriate. For
example, glue may be used on facial wounds or for
children; Steri-Strips may provide a useful and less
painful alternative.
Certain wounds may need specialist referral (e.g. to
a plastics centre), and simple closure methods are
inappropriate.
Types of suture
Choosing the appropriate suture material is important.
Suture material can be broadly classified as absorbable
or non-absorbable.
Suture needles come in a variety of shapes, including
circular, semi-circular, three-eighths of a circle, five-
eighths of a circle, straight, compound curved, half
curved, etc. You do not need a detailed knowledge of
these differences for the exam, but it is likely that you
will get a curved needle to use and be asked to demon-
strate that you can close a wound without actually
touching the needle with your hands, i.e. using only
forceps and a needle holder.
Choice of local anaesthetic
Lidocaine is the first choice of local anaesthetic agent
as it has a reasonably quick onset and relatively short
duration of action. The alternative is bupivacaine (Mar-
caine), which has a longer onset of action but is more
dangerous in terms of toxicity.
Some local anaesthetic preparations contain adrena-
line (epinephrine). The aim of this is to cause local
vasoconstriction, hence limiting blood flow to the area
and resulting in a reduced absorption of the local
anaesthetic. This prolongs the action of the local anaes-
thetic agent. However, when applying the solution to
the extremities or to areas that do not have a notable
collateral circulation, you must not use a solution con-
taining adrenaline as vasoconstriction may cause
necrosis of distal tissues.
The maximum safe dose of local anaesthetic depends
on a patient’s body weight. For lidocaine it is 3 mg/kg,
and with adrenaline it is 5 mg/kg as its absorption is
less. For bupivacaine it is 2 mg/kg. One may give as
much local anaesthetic as required as long as it does not
exceed these maximum doses.
If a larger volume is required to cover a wider area,
a greater volume of a more dilute concentration is suf-
ficient to achieve the same effect. If no dilute prepara-
tions are available, dilute your local anaesthetic with
saline to the desired volume.
Local anaesthetic does not work as effectively in
infected tissue.
Suturing technique
The following should be considered:
• Local anaesthetic infiltration, from around the perim-
eter of the wound inwards, including corners and angles
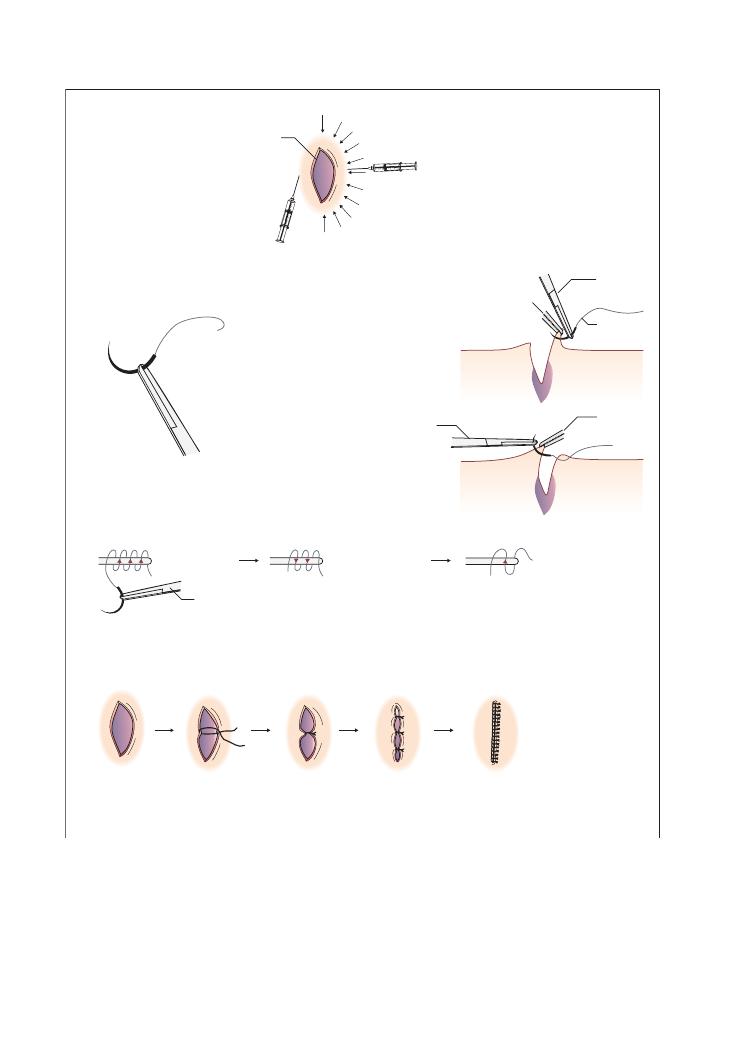
280
Procedures:
67 Suturing
Figure 67.1 One technique to suture a simple skin wound
(a) Local anaesthetic infiltration
(b) Holding the needle
Wound
Put the curved needle in the
needle holder 2/3 away from
the tip
(d) Tying suture knot: 3–2–1 technique
(e) Half and half technique: knots to one side of the wound
Pull the knot tight, so that wound ends appose but not overlap, and are not under tension
i.e. keep suturing by making the wound in half, then half again, then half again until finished
Wound
1/2 wound
1/2 wound
again
2/3
1/3
(c) Inserting the needle into the skin/wound
Inserting needle into
raised wound edge
Inserting needle into
one wound edge at
a time
Needle
holder
Needle holder
3 clockwise
2 anticlockwise
1 clockwise again
Suture
string
Needle
holder
Toothed forceps
raising wound
edge
Toothed
forceps
Method 1:
Insert needle into the
skin subcutaneously;
inject as you withdraw
to raise a bleb.
Method 2:
Infiltrate around wound
edge, approximately 0.5 cm
away from wound edge
Arrows indicate areas in which
local anaesthetic is to be infiltrated

Procedures:
67 Suturing 281
Hints and tips for the exam
• You will be asked to suture a slab of sponge or fake
skin. A piece of chicken is sometimes used. In either
case, the principle is the same.
• The wound is typically straight and just 1–2 cm long.
• In a 5-minute station, it is unlikely that you will be
asked to close the entire wound but instead to perhaps
produce one or two sutures.
• You must say you would position the patient com-
fortably. This is often supine or semi-reclined, with the
part to be sutured well supported.
• Show the examiner your aseptic technique.
• You may need an assistant in preparing your equip-
ment, for example to pour the cleaning solution into
your pot, but it is likely that, in 5-minute stations, this
will already be set up for you, and you will just need to
check that everything is there.
• Clean and wash the wound thoroughly before closure.
If there is dirt or foreign matter, say that you would
thoroughly irrigate the wound.
• The wound should be cleaned with sterile solution
before local anaesthetic is given.
• Be generous with the amount of local anaesthetic
because if the patient feels pain, they will tense their
muscles and this can interfere with wound closure.
However, take care that your local anaesthetic does not
distort the wound edges.
• Infiltration of local anaesthetic should be from the
outside inwards; do not forget the very edges and angles
of the wound.
• Leave 1 cm of thread so that suture removal is easier.
• Do not leave the knot in the middle of the wound.
• Ensure there is no tension in opposing edges, and that
the knot is not so tight as to cause pressure on the skin
that it is holding.
• Document the number of sutures you have inserted
so that, on removal, it can be ensured that all the
stitches are out.
• Practise in your clinical skills centre as suturing
without handling the suture needle is a difficult task
until you have done it many times.
• Always mention tetanus.
• Position of the suture needle in the needle holder
• Half and half suture technique
• Tying the suture knot
This station is written to demonstrate one method of
suturing. There are, however, other techniques that, for
example, do not start in the middle of the wound and
that advocate tying the knot differently. There are still
other methods that allow you to use your hands to
handle the suture needle. It is important that you check
with your own medical school syllabus or clinical skills
centre what techniques they suggest and follow them,
as this will be what you face in your exam.
Tetanus
In the UK, tetanus prophylaxis is given monthly for 3
months from 2 months of age, with boosters at 4 years
and 14 years of age. The need for prophylaxis depends
on the nature of the injury and the patient’s immunisa-
tion status. After these five doses, one is considered to
have lifelong immunity.
Human anti-tetanus immunoglobulin (HATI)
should be given instead if the patient has a history of
severe reactions to tetanus vaccine.
Examples of tetanus-prone wounds include:
• Those contaminated with soil or manure
• Those harbouring infection or with a wound more
than 6 hours old
• Puncture wounds, for example from nails or bites
Immunisation status
Prophylaxis required
Full course of five
injections, or booster
within the last 10 years
Clean wounds need no prophylaxis
HATI can be given for tetanus-
prone wounds contaminated
with manure
Partial course, or booster
more than 10 years ago
Tetanus booster should be given
to all wounds
HATI should additionally be given
for tetanus-prone wounds
Unknown status, or
non-immunised
Start tetanus course for all wounds
If tetanus prone, additionally give
HATI

282
68 Basic life support
Checklist
P
MP
F
Ensures safety of self
Ensures safety of patient
Adequate positioning of patient
Checks for response
Shouts for help
Opens airway with manoeuvres
Immobilises cervical spine if appropriate
Adequate inspection and clearance of the airway
Looks, listens and feels for breathing for 10
seconds
Calls 999 or puts out cardiac arrest call
appropriately
Communicates location and situation well to the
receiver
Checklist
P
MP
F
Commences chest compressions at a rate of
approximately 100/min
Chest compression technique is adequate
Stops after 30 chest compressions and gives two
rescue breaths
Adequate ventilation
Continues cycle in a 30:2 ratio
Knows to continue until return of spontaneous
circulation, appropriate help arrives or becomes
exhausted
Puts patient in recovery position when return of
spontaneous circulation occurs
Frequently reassesses the patient
Basic life support performed in confident manner
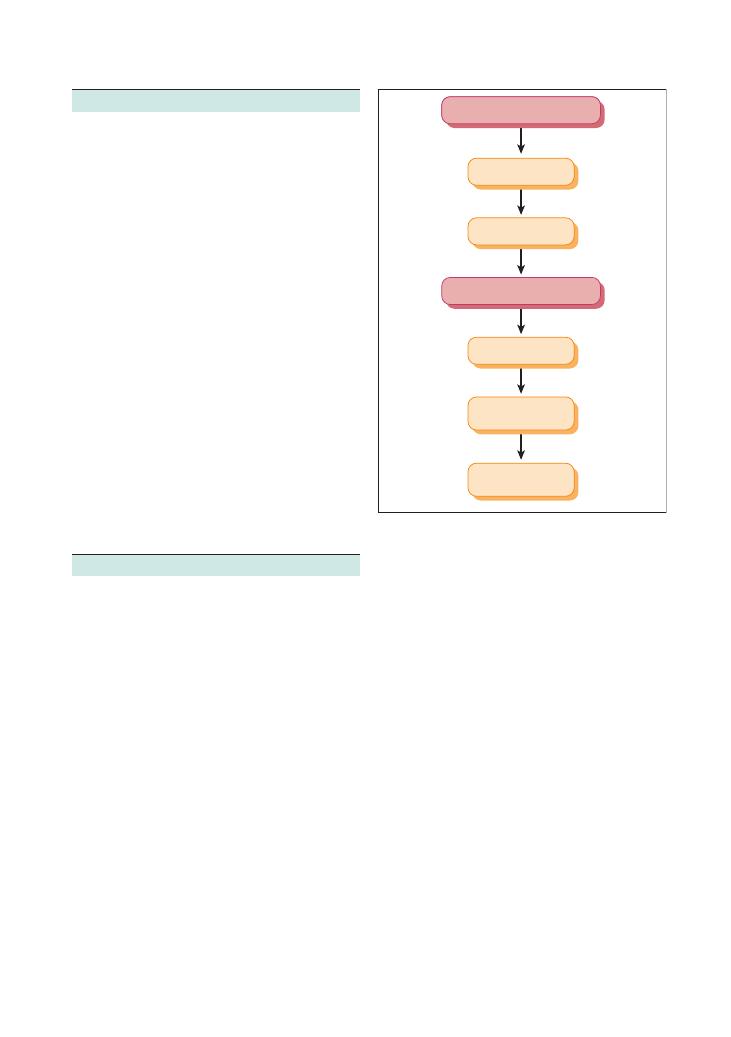
Procedures:
68 Basic life support 283
• In any such station, your very first step is to confirm
cardiac arrest:
• Check for a response by gently shaking/stimulating
the patient, and shouting ‘Are you all right?’
• Look, listen and feel for breathing for 10 seconds:
• Open the airway with head tilt, chin lift, jaw
thrust, as illustrated in Figure 68.2.
• Place your face near the mouth, looking at the
chest, and listen for sounds of breathing while
feeling for warm breath on your cheek and observ-
ing the chest wall (Figure 68.3).
• You should then shout for help.
• If help arrives, they should be instructed to contact
999 or the cardiac arrest team:
• The communication here must be clear.
• It must be emphasised that the patient is not
breathing, is unresponsive or has arrested, and your
location must be clearly described.
• If no help is available, you must call for help your-
self prior to commencing BLS.
• As always, take an ABC approach.
Summary of key points for OSCEs
This situation may arise in the OSCE as either an out-
of-hospital or an in-hospital situation, but in any case,
until help arrives, the basic life support (BLS) technique
is the same. The ‘help’ awaited will either be the emer-
gency medical services outside the hospital or the
cardiac arrest team in hospital.
There will be a manikin on whom you will be asked
to perform the technique. This may be a simulation
station, in which the dummy will be able to talk, or you
may be demonstrating on a lifeless (sometimes limb-
less) manikin. It is important to know what equipment
your clinical skills centre has and to familiarise yourself
with it, as it is highly likely that this will be what appears
in the exam.
BLS sometimes occurs as part of another scenario in
which you have been called to see a sick patient and
they suddenly become unresponsive. This is why fre-
quent reassessment of the patient in any such scenario
is important. The moment there is any doubt, start
checking for the patient’s response and begin BLS if
necessary.
Note that, in the same station, BLS may then progress
to advanced life support (ALS) when the necessary help
arrives. ALS follows on from BLS, and is covered in the
next station.
Hints and tips for the exam
• You must learn the Resuscitation Council (UK)
guidelines and follow them to the letter. This should
easily secure you a pass in this station.
• Always ensure your own safety first. Do not start BLS
in the middle of a busy road for example, and ensure
you have easy access to the patient without risking your
own comfort.
• The patient’s safety is paramount. Move the patient
to a place of safety before you begin BLS.
• The ideal patient position for BLS is supine. If the
patient arrests in a chair, they should be gently laid
down with help, and space cleared around them in
order for the resuscitation team to be able to reach the
patient.
• Some situations require cervical spine immobilisa-
tion, which means that you must not carry out a head
tilt in your airway manoeuvres. Cervical spine immo-
bilisation is required in the following situations:
• Known or suspected neck trauma
• Drowning situations
• Unknown or uncertain mechanism in cases of
injury
Figure 68.1 The Adult Basic Life Support Algorithm. Reproduced
with kind permission of the Resuscitation Council (UK)
Unresponsive?
Shout for help
Open airway
Not breathing normally?
Call 999
30 chest
compressions
2 rescue breaths
30 compressions
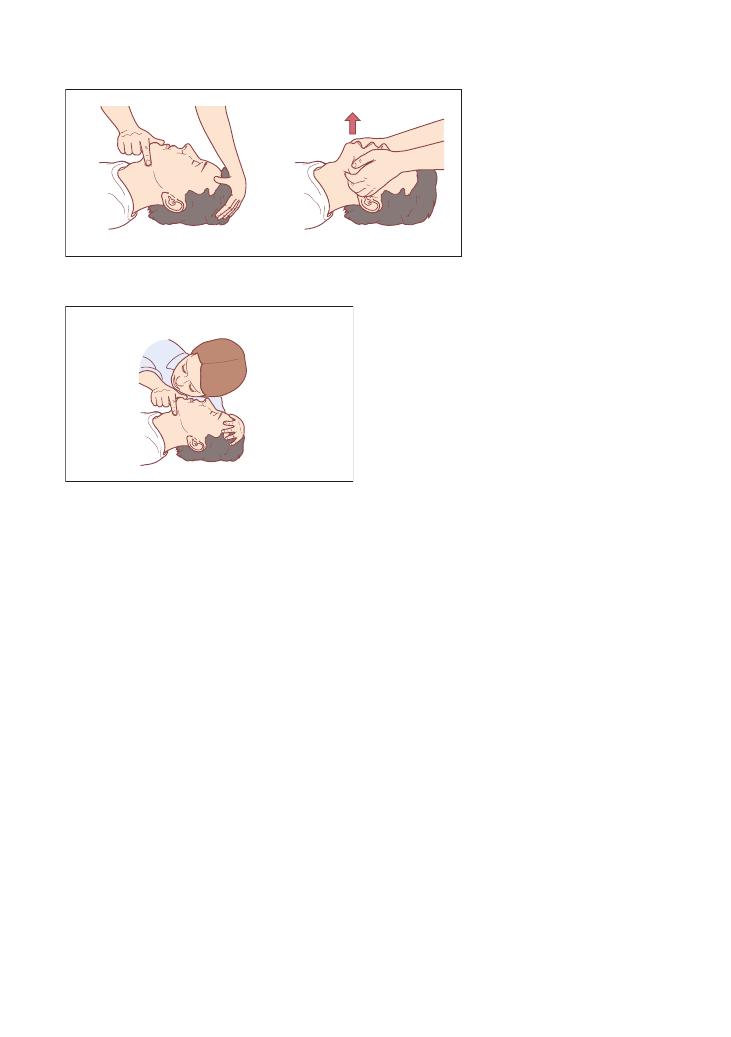
284
Procedures:
68 Basic life support
• The chest should be depressed to a depth that
is approximately one-third of its anteroposterior
dimension, or about 4–5 cm.
• The rate should be at approximately 100/min.
• Count out loud while you do this, so that the exam-
iner knows you know how many to do.
• After 30 chest compressions, give 2 ventilations:
• Open the airway adequately and remove any
obstructions.
• Form a good seal around the patient’s mouth.
• Inflate their chest for approximately 1 second.
• Between breaths, maintain an open airway.
• Watch for chest movement; if the chest wall does
not move, your ventilation has been ineffective.
• In hospital, you should use a self-inflating bag-
valve-mask (e.g. Ambu-bag) rather than your mouth
for ventilation (Figure 68.5). This should always be a
two-person technique as you obtain a better seal
between the mask and the patient’s mouth.
• Do not waste time if you have been unsuccessful in
giving two good ventilations. There should be two
attempts at effective ventilation, but no more. Instead,
immediately recommence chest compressions. The
Resuscitation Council (UK) suggests that continuous
chest compressions with minimal interruption are
associated with a better outcome.
• Continue in a 30:2 fashion until:
• There is a return of spontaneous circulation
• You are exhausted
• Help arrives – in which case, continue CPR until
the help takes over
• Following return of spontaneous circulation, put the
patient in the recovery position, as pictured in Figure
68.6.
• BLS is a simple but essential skill.
• If you are unpractised, it will show in the exam.
• You must go your clinical skills centre, familiarise
yourself with the exam manikins if possible, and
practise.
Figure 68.3 How to look, listen and feel for breathing. While
listening for breath sounds, you should simultaneously observe for
chest movement and feel for breath on your cheek. Ensure the
patient’s airway is open while you do this!
Figure 68.2 Manoeuvres to open the
patient’s airway. Head tilt and chin lift are
usually sufficient. Jaw thrust is performed
by placing your fingers behind the angle of
the patient’s mandible and applying firm
upward pressure
(a)
(b)
• When you open the airway, check for things that may
obstruct the airway, for example blood, vomit, loose
teeth or poor-fitting dentures. Turn the head to one side
and scoop any obstructions out with your finger:
• Do not do this with the head in neutral position or
the debris may be pushed back into the pharynx.
• Leave well-fitting dentures in place as they will help
to maintain airway contour and make ventilation
easier.
• Do good chest compressions at a rate of approxi-
mately 100/min:
• The emphasis now is on good quality chest com-
pressions, and in a BLS station you will get marks for
this!
• Place the palm of one hand on the lower third of
the sternum (Figure 68.4).
• Place your other hand on top of the first, and inter-
lock the fingers. The pressure needs to be on the
sternum and not the ribs, so your fingers should be
away from the chest wall.
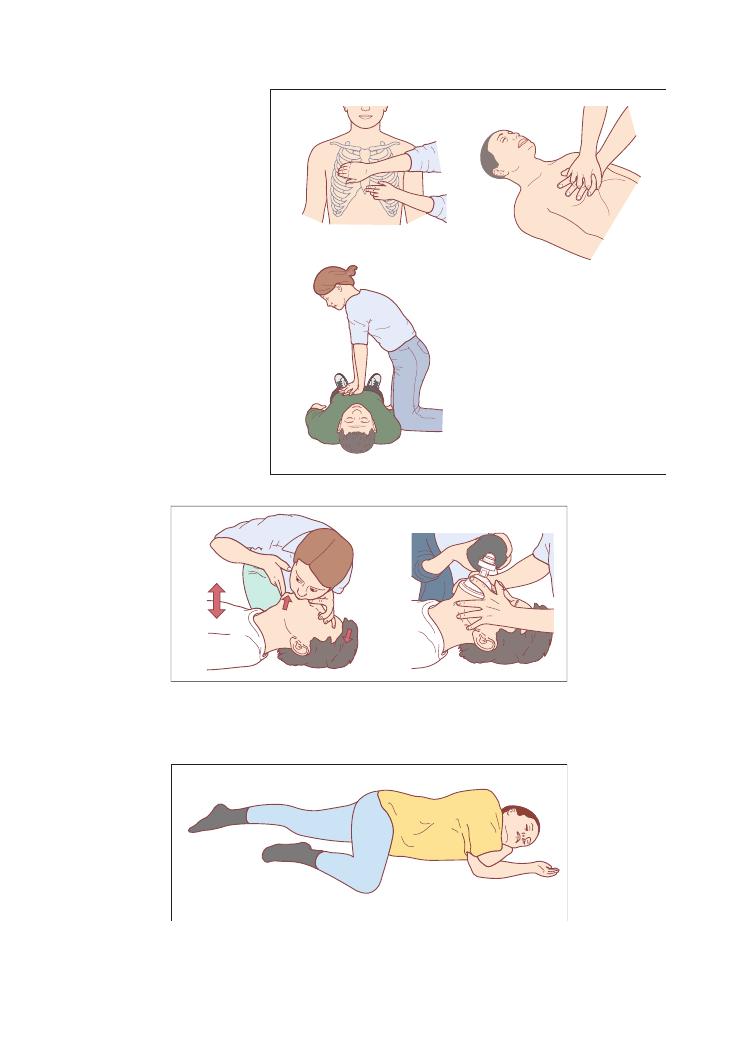
Procedures:
68 Basic life support 285
Figure 68.4 The correct method for chest
compression. Your palm should be placed
on the lower third of the patient’s sternum,
one hand over the other with the fingers
interlocked. You should be positioned such
that your arms are completely vertical
above the patient’s chest. The movement
should be generated by your upper body,
not your arms; aim to depress the patient’s
thorax by a depth of approximately
one-third of its thickness
(a)
(c)
(b)
Figure 68.5 Mouth to mouth resuscitation is no longer necessary for bystander CPR. However, if it is to be performed, form a good seal with
the patient’s mouth and pinch their nose while delivering a breath. In hospital, use a two-person technique to ventilate the patient with a bag
and mask; it takes two hands to form a good seal between the mask and the patient’s face, so another person is required to squeeze the bag
(a)
(b)
Figure 68.6 The recovery position

286
69 Advanced life support
Checklist
P
MP
F
Takes a safe approach
Calls for help
Checks for signs of life for 10 seconds
Calls cardiac arrest team
Gives 30 chest compressions at rate of 100/min
Commences assisted ventilation with bag and
mask
Good two-person bag mask ventilation technique
Continues uninterrupted CPR when the arrest
team arrive
Appropriately applies defibrillator pads
Stops CPR only to assess rhythm
Correctly diagnoses rhythm
Safely administers shock of appropriate energy if
indicated
Immediately continues CPR for 2 minutes
Checklist
P
MP
F
During 2 minutes of CPR, must express intention
to:
• Obtain a definitive airway, allowing
uninterrupted chest compressions
• Secure intravenous access and send off basic
bloods, including a gas (venous/arterial)
Uses adrenaline (epinephrine) appropriately
Uses atropine appropriately
Reassesses situation after 2 minutes and
continues down the appropriate algorithm
Looks for and considers all reversible causes of
the arrest, arriving at the most likely
Takes steps to correct the cause, while continuing
CPR
Good, effective, communication to team members
throughout
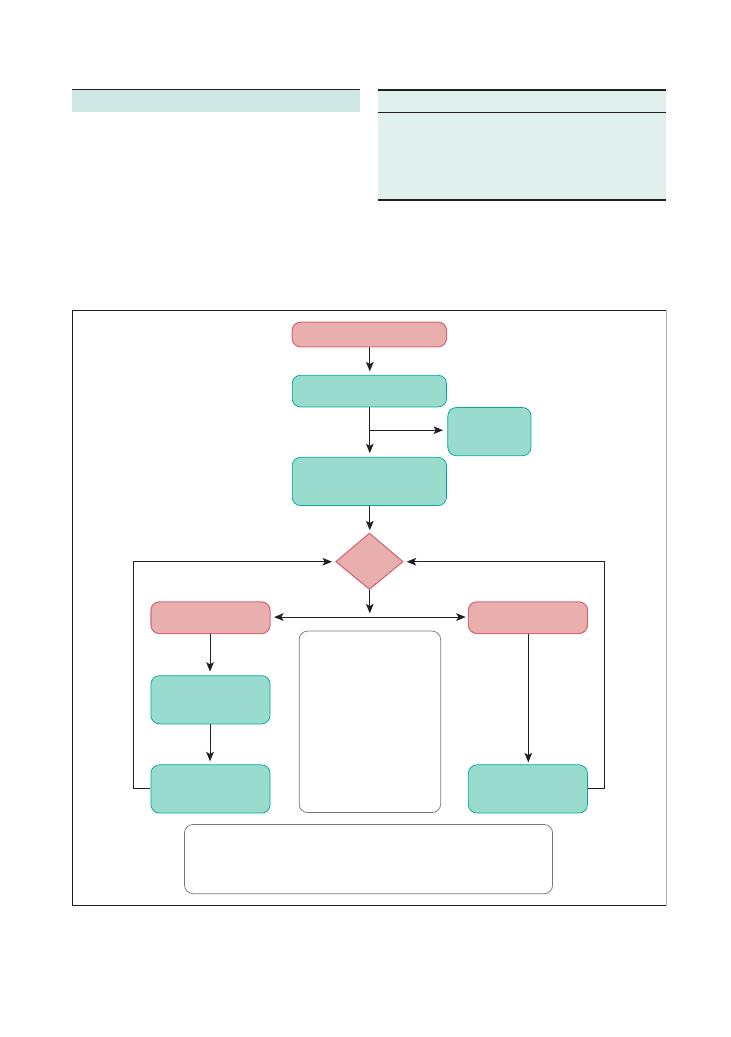
Procedures:
69 Advanced life support 287
Summary of key points for OSCEs
The algorithm
The key to doing well in this station is following the
Resuscitation Council (UK) algorithms to the letter.
For advanced life support (ALS), this is included in
Figure 69.1.
Reversible causes
Any resuscitation effort should not stop until and
unless all reversible causes have been excluded. These
can be broadly classified into ‘the 4Hs and the 4 Ts’.
Figure 69.1 The adult Advanced Life Support Algorithm. PEA, pulseless electrical activity; VF, ventricular fibrillation; VT, ventricular tachycardia.
Reproduced with kind permission of the Resuscitation Council (UK)
Unresponsive?
Open airway
Look for signs of life
CPR 30:2
Until defibrillator/monitor
attached
Assess
rhythm
Shockable
(VF/pulseless VT)
1 Shock
150–360 J biphasic
or 360 J monophasic
Non-shockable
(PEA/asystole)
Immediately resume
CPR 30:2
for 2 min
Immediately resume
CPR 30:2
for 2 min
Call
Resuscitation
Team
During CPR:
•
Correct reversible causes*
•
Check electrode position
and contact
•
Attempt/verify:
IV access
airway and oxygen
•
Give uninterrupted
compressions when
airway secure
•
Give adrenaline
every 3–5 min
•
Consider amiodarone,
atropine, magnesium
* Reversible causes :
Hypoxia
Hypovolaemia
Hypo/hyperkalaemia/metabolic
Hypothermia
Tension pneumothorax
Tamponade, cardiac
Toxins
Thrombosis (coronary or pulmonary)
H
T
Hypoxia
Tamponade
Hypovolaemia
Tension pneumothorax
Hypo/hyperkalaemia or other metabolic
cause
Thromboembolism
Hypothermia
Toxins
You are likely to be given a scenario, and that should
allow you to establish the most likely cause. For
example, if you are told that your patient has been
rescued from submersion in a river, the most likely
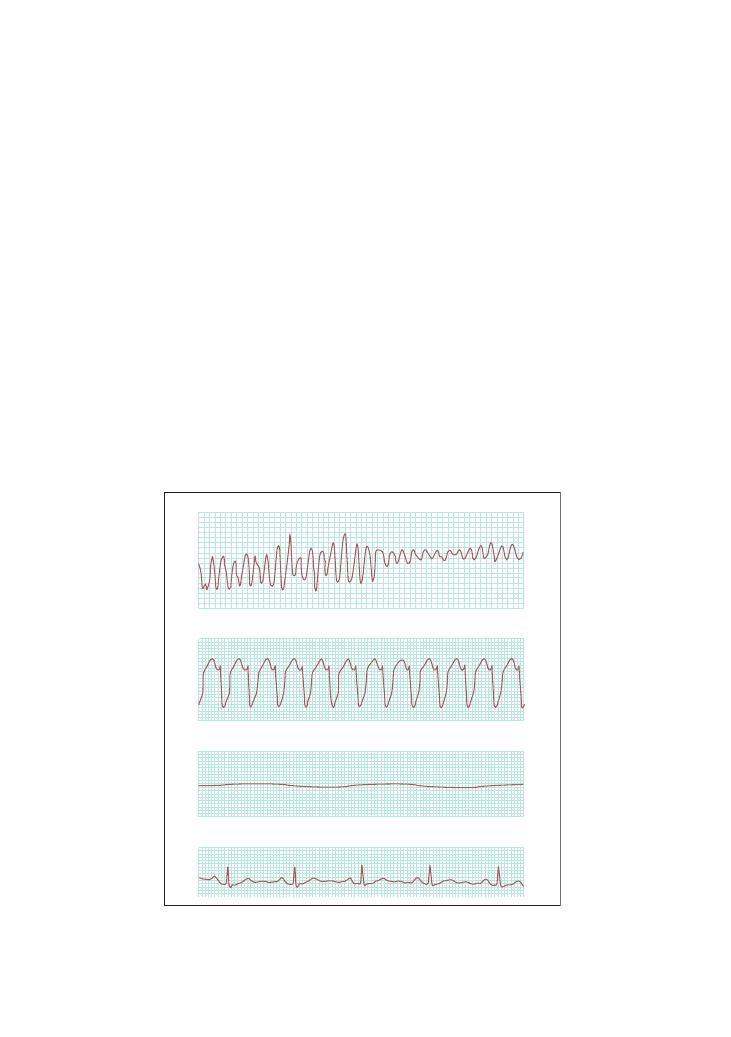
288
Procedures:
69 Advanced life support
able’ and associated with a better outcome (although a
good outcome post-cardiac arrest is rare).
Good defibrillation needs good technique. Applying
the defibrillation pads in such a manner that the
maximum possible voltage reaches the myocardium
through thoracic wall tissues is vital. This means apply-
ing pads in a position of maximum contact, and using
gel-based pads to reduce the impedance of the chest
wall to the voltage delivered. In older machines, paddles
and gel pads came as separate pieces. More modern
machines use disposable self-adhesive paddles, with gel
included.
Getting good access to the chest wall may mean
cutting off the patient’s shirt/blouse, jacket, etc. All
medication patches should be removed as these will
explode when shock is delivered. Oxygen must be taken
away at the time of the shock. It is prudent to check
that no member of the resuscitation team is touching
the patient or the bed before delivering the current. A
‘visual sweep’ (i.e. looking around the bed to ensure
nobody is touching any part of it) must be exaggerated
in the exam to show the examiner that you know how
to defibrillate safely.
causes are hypothermia or hypoxia. If you then get
further details, such as that the patient had consumed
unknown pills before jumping in the river, ‘toxins’
becomes a possible cause. Suppose your patient had
been thrown into the river by means of a road traffic
accident as the cyclist hit by a car. This would lead to
suspicion of tamponade, tension pneumothorax and
hypovolaemia (as for any other trauma scenario) in
addition to all the above.
In each case, the key is to begin good quality CPR
and work through each of these possible causes. It
should be reiterated that resuscitation should not stop
until each of them has been addressed.
Cardiac arrest rhythms
Figure 69.2 illustrates the cardiac arrest rhythms you
will encounter. Learn what they look like. It is highly
likely that you will be asked to recognise them in the
exam.
Defibrillation
The ventricular fibrillation/ventricular tachycardia
(VF/VT) side of the algorithm is the side that is ‘shock-
Figure 69.2 The following ECG rhythm strips demonstrate the shockable and non-shockable rhythms of a cardiac arrest: ventricular
fibrillation (VF), ventricular tachycardia (VT), asystole and pulseless electrical activity (PEA)
VF
VT
Asystole
PEA
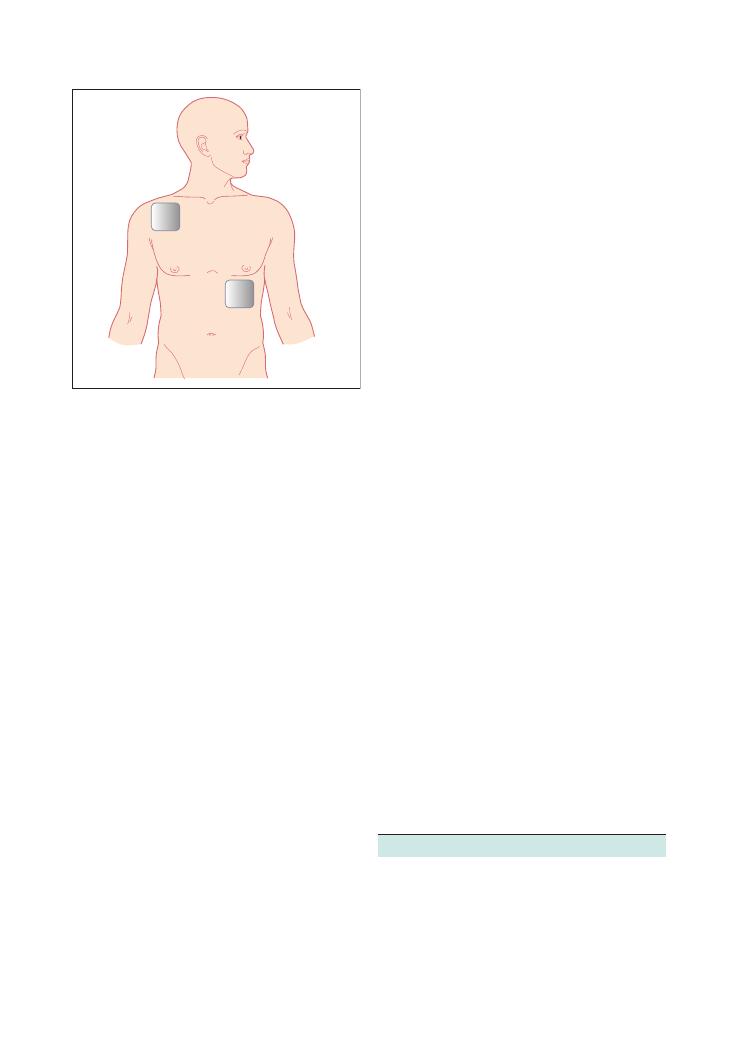
Procedures:
69 Advanced life support 289
Following defibrillation, you must immediately
recommence CPR, the emphasis being on good quality
chest compressions. There is often a delay in getting an
ECG trace, and the initial cardiac cycles after defibril-
lation may not be associated with a pulse. Reassess only
after 2 minutes of CPR.
CPR
The strong emphasis is on good quality CPR. Early
attainment of a definitive airway and continuous unin-
terrupted chest compressions are vital. The latest
Resuscitation Council (UK) guidelines (2010) suggest
that chest compression should continue even during
charging of the defibrillation paddles, and halt for as
little a time as possible to deliver assess the rhythm and
deliver the shock.
The non-shockable side of the algorithm
If the initial rhythm is pulseless electrical activity
(PEA), also termed electromechanical dissociation, or
asystole, no shock is required. Uninterrupted CPR
should continue, and the patient should be reassessed
every 2 minutes.
In many cardiac arrest situations, you will switch
cycles between algorithms, some cycles being shocka-
ble, others being non-shockable.
Key drugs
Adrenaline 1 mg intravenously should be given every
3–5 minutes, i.e. every other cycle after two cycles have
been completed. It usually comes in a prepacked 10 mL
syringe, with a strength of 1:10,000; 1 mg adrenaline is
equivalent to all 10 mL of this preparation.
Atropine 3 mg intravenously should be given once
only, if there is PEA with a heart rate of
<60/min or
asystole.
If patient has hyperkalaemia, hypocalcaemia or
hypermagnesaemia, 10 mL 10% calcium chloride over
10 minutes may be helpful.
Amiodarone could be considered for VF or pulseless
VT.
In torsade des pointes, magnesium sulphate is
important.
Hints and tips for the exam
These have been largely covered above.
• Know the algorithms. Following them precisely will
secure a pass.
• Keep it simple and organised.
• If in doubt, think back to the beginning.
Correct placement of the paddles is illustrated in
Figure 69.3. One paddle is placed to the right of the
sternum, below the clavicle, the other in the left mid-
axillary line in the V6 position. If the patient has a
permanent pacemaker, the paddles must be placed at
least 15 cm away from any part of it or it may malfunc-
tion, or burn and cause tissue damage.
Most defibrillators are self-explanatory. If you look
closely enough, most modern machines indicate what
buttons to push in order by numbering them 1, 2, 3.
Hence, do not panic if you find an unfamiliar machine
confronting you in the exam. Some of the newer
machines automatically analyse the rhythm for you,
and these are found in public places to allow even the
lay public to deliver defibrillation. In the exam, you may
or may not get such machines, and you should take the
time to familiarise yourself with the machines in your
local place of work, or where the exam is to be held.
Selecting the correct energy value is important for
good effective resuscitation. Most defibrillators are
biphasic as this is less damaging to the tissues. A smaller
amount of energy is required because the current
travels in two directions, thereby traversing the myocar-
dium twice. The initial setting for biphasic defibrillators
is usually 150–200 J for the initial shock, and then 150–
360 J for all subsequent shocks. Older monophasic defi-
brillators may be present as well, and these are usually
set at 360 J for all shocks.
Figure 69.3 The diagram illustrates where on the thorax the
defibrillation paddles should be placed. One should be placed to the
right of the sternum under the clavicle, the other should be placed in
the left mid-axillary line

290
Procedures:
69 Advanced life support
• In such scenarios, the exam will often position you as
the team leader and ask you to allocate tasks rather than
expect you to do everything yourself.
• Chest compressions should not be interrupted for
anything except rhythm analysis and delivery of the
shock. Chest compressions must continue even during
charging of the defibrillator.
• During the 2 minutes of chest compressions, it is
important to address the following:
• Secure a definitive airway
• This would normally be the job of the anaesthet-
ist, who would intubate the patient with an
endotracheal tube.
• However, one does not need specialist skills to
insert a laryngeal mask airway (LMA), which liter-
ally slides along the palate to the throat. Although
an LMA does not protect the airway from aspira-
tion, it provides a more secure airway that allows
continuous, uninterrupted chest compressions.
• Obtain intravenous access.
• Send off basic bloods and a blood gas:
• Blood gas analysis (even a venous sample) allows
a quick analysis of key facts, for example potassium
level, haemoglobin, etc.
• Check the good placement and adherence of the
defibrillation paddles to the chest wall.
• Check adequacy of the chest compressions:
• One should be able to palpate a central pulse if a
chest compression is adequate.
• It is important to rotate this role frequently
between team members. Fatigue is a key cause of
inadequate chest compression.
• Think of each of the reversible causes of the arrest:
• Take measures to address them if they may have
contributed; for example, start insulin/dextrose if
hyperkalaemia is suspected, give fluids for hypovol-
aemia, warm the patient if they are hypothermic,
etc.
• Practice makes perfect!
• It is often helpful to ask your resuscitation officers
about any doubts or queries, and possibly help you
work through some simulation sessions. Most resusci-
tation officers are friendly, approachable and very keen
to teach.

291
70 Completing a death certificate
Checklist
CP MP
F
Fills out ‘name of the deceased’
Fills out ‘date of death as stated to me’ in words
and correctly fills out ‘age’ in numbers
Correctly fills out ‘last seen alive’ line in words
Correctly fills in line 1A
Correctly fills in line 1B
Correctly fills in line 1C
Correctly fills in line 2
Correctly fills in time interval between onset of
illness written on lines 1A, 1B, 1C and 2 and
death
Writes in full without using abbreviations
Does not use modes of death or ‘failure’
Identifies whether the death may have been
contributed to by the deceased patient’s
occupation
Ensures handwriting is legible
Signs and dates certificate
Correctly answers whether this death needs to be
reported to the coroner
Checklist
CP MP
F
On questioning, is able to identify cases that
would need to be referred to the coroner:
• Death within 24 hours of admission to hospital
• Unknown cause of death
• No doctor has seen the patient within 14 days
of death
• Death in prison
• Death that is suspicious or related to violent
causes
• Sudden/unexpected death
• Death during surgery or before recovery from
anaesthetic
• Accidental death
• Death related to occupation
• Death that may be the result from neglect
On questioning, is able to state the criteria that
must be fulfilled to be able to complete a valid
death certificate:
• Must be a registered medical practitioner
• Must have seen the patient within the last 14
days
Task (5 minutes): Read the two clinical cases given to
you by the examiner and then use these to fill out death
certificates for the corresponding patients.

292
Procedures:
70 Completing a death certificate
• 1A: Aspiration pneumonia caused by E. coli
• 1B: Complete anterior circulation territory cere-
brovascular accident (not stroke)
• 1C: [BLANK]
• 2: Diabetes mellitus, Alzheimer’s disease
2. Mrs Jones is 68-year-old lady with a history of mul-
tiple myeloma. She was admitted under the haematol-
ogy team for an exchange transfusion. Five days into
her hospital stay, she died from a pulmonary embolism.
She is also known to have suffered from three miscar-
riages in the past, which were found to be secondary to
antiphospholipid syndrome.
• 1A: Pulmonary embolism (not PE)
• 1B: [BLANK]
• 1C: [BLANK]
• 2: Antiphospholipid syndrome and multiple
myeloma. (NB. Antiphospholipid syndrome and all
malignancies contribute towards a procoagulant
state)
3. Mr Smith is a 65-year-old man who was admitted
10 days ago with an anteroseptal STEMI. He was recov-
ering on the ward but developed sudden shortness of
breath and passed away from pulmonary oedema sec-
ondary to acute heart failure. He had a past medical
history of angina, diabetes and hypercholesterolaemia.
• 1A: Acute pulmonary oedema (NB. not acute
heart failure)
• 1B: Anteroseptal ST elevation myocardial infarc-
tion (not MI)
• 1C: Ischaemic heart disease
• 2: Hypercholesterolaemia, diabetes mellitus
Hints and tips for the exam
This is a very commonly tested finals OSCE station.
Note that you will probably be required to fill out death
certificates for at least two separate clinical scenarios in
a 5-minute OSCE station, so you should practise pacing
yourself accordingly in your study groups.
You are unlikely to get much practice at this task
during any of your clinical attachments, so the best way
to practise is by photocopying blank death certificates
and setting each other example scenarios to complete
within 5 minutes. Another option is to find out whether
it would be possible for you to visit the bereavement
office at your teaching hospital and spend a couple of
hours going through some clinical histories and cor-
responding death certificates. In addition, you should
memorise the criteria for referral to the coroner and the
conditions that must be fulfilled before you can com-
plete a death certificate.
Listed below are three example OSCE scenarios to
get you started:
1. Mrs Winters is a 95-year-old lady who was admitted
7 days ago with a complete anterior circulation infarct.
She deteriorated after admission and developed an
aspiration pneumonia 2 days ago. Escherichia coli
was isolated from a sputum sample. She was treated
with antibiotics but subsequently went into cardiac
arrest and was not resuscitated as she had a DNAR
order. She had not been in good health for the previous
2 years and had a history of diabetes and Alzheimer’s
disease.

293
Page numbers in italics denote figures,
those in bold denote tables.
abdominal aortic aneurysm 145
abdominal distension 143–7, 145
abdominal examination 10–19
abdominal masses 17–18, 17
abdominal pain 137–42
acute 138
chronic 139
investigations 139–40
origin of 140–1, 141
abducens nerve 34
abscess 193
breast 54
perianal 57
acidosis
metabolic 263, 265
respiratory 264
acoustic neuroma 34, 175
acquired immunodeficiency syndrome
see HIV/AIDS
acromioclavicular joint
arthritis 81
Scarf test 84, 84
activities of daily living (ADLs) 77, 107
acute abdomen 140
acute coronary syndrome 116
adhesive capsulitis 81
adrenaline
advanced life support 289
intramuscular injection 255
in local anaesthetics 279
advanced life support 286–90
age-related macular degeneration 38
alcohol abuse, and diarrhoea 134
alcoholic liver disease 13
alkalosis
metabolic 265
respiratory 264
Allen’s test 263
amiodarone 289
amputation 69
anaemia 175
anaesthesia 203
anal fissure 57, 154
analgesia overuse headache 163
angry patients 236–8
Index
anion gap 263
ankle swelling 195–8
ankle-brachial pressure index 70–1
ankylosing spondylitis 179, 189
antalgic gait 25, 42, 94
anti-tuberculosis drugs 223
antiepileptics 223
antihypertensives 223
anxiety
faintness 175
palpitations 120
tremor 169
aortic dissection 116
aortic regurgitation 3
aortic stenosis 3
aorto-enteric fistula 149
apex beat 4
Apley’s test 102
apologising 237
appendicectomy 218
apraxic gait 25
arterial blood gas analysis 262–6, 264–5
arterial examination 68–72
arterial ulcer 70
arthritis
osteoarthritis see osteoarthritis
psoriatic 89, 181
reactive 181
rheumatoid see rheumatoid arthritis
septic see septic arthritis
seronegative 100
arthroscopy, shoulder 82
ascites 145, 146, 146
asthma 8
medication 220–1
ataxic gait 42
atrial fibrillation 119
ECG 272
atropine
advanced life support 289
intramuscular injection 255
autoimmune hepatitis 13
avascular necrosis of hip 94
back pain 183–90
red flags 187
yellow flags 189
see also specific conditions
Baker’s cyst 100, 104
bamboo spine 189
basal cell carcinoma 77
basic life support 282–5
Behçet’s disease 181
benign paroxysmal positional vertigo
173
benign prostatic hypertrophy 57
berry aneurysm 33
biceps tendonitis 81
bleeding diathesis 149
blood gas analysis see arterial blood gas
analysis
Boerhaave’s syndrome 149
Bouchard’s nodes 90
bowel cancer see colorectal cancer
bowel obstruction 144, 146
brachial plexus 85
brain natriuretic peptide 6
breaking bad news 208–10
SPIKES framework 209
breast abscess 54
breast examination 53–5
description of lumps 55, 55
patient welfare and dignity 54
techniques 54–5, 55
breast malignancy 54
breast screening 55
breathlessness 125–7
Broca’s expressive dysphasia 45
bronchiectasis 8, 129
bronchoscopy 216
Brudzinski’s sign 36
Buerger’s test 70
bulbar palsy 30, 45
bulge test 102
bupivacaine 279
bursitis
hip 94
knee 101, 104
caffeine-induced palpitations 119
calcific tendonitis 81
calcium chloride 289
cancer 240
breaking bad news 209
breast 55, 55
colorectal 134, 147, 153
OSCEs for Medical Finals, First Edition. Hamed Khan, Iqbal Khan, Akhil Gupta, Nazmul Hussain, and Sathiji Nageshwaran.
© 2013 John Wiley & Sons, Ltd. Published 2013 by John Wiley & Sons, Ltd.

294 Index
gastrointestinal 149, 153, 240
lung 129, 240
oesophageal 149
prostate 57
testicular 65
cannula
care of 259
flow rates 259
intravenous 257–9
carcinoid 135
cardiac arrest rhythms 288, 288
cardiac catheterisation 217
cardiac tamponade 274
cardiopulmonary resuscitation 282–5,
289
cardiovascular examination 2–6
carotid sinus hypersensitivity 174
carpal tunnel syndrome 88
cataract 38
catheters
cardiac 217
urinary 245–7
cauda equina syndrome 57, 58, 185,
187, 189
cavernous sinus 30
cellulitis 197
central lines 216
central nervous system examination
28–36
central retinal artery occlusion 38
central retinal vein occlusion 38
cerebellar ataxia 94
cerebellar disease 45, 169, 175
cerebellar examination 40–3
cerebellopontine angle tumour 30
chaperones
breast examination 54
hernia 61
rectal examination 58
testicular examination 65
Charcot’s joint 181
chest compression 285
chest pain 115–17
Child-Pugh grading system 150, 151
chlorpheniramine 255
chronic liver disease 11, 13, 13, 196
with end-stage renal failure 16
chronic obstructive pulmonary disease
(COPD) 8
chronic venous insufficiency 74, 75
Clostridium difficile 134
cluster headaches 163
co-amoxiclav 255
coeliac disease 134
colonoscopy 216
colorectal cancer 134, 153
Dukes staging 147
colostomy 19
communication skills 205–7
angry patients 236–8
breaking bad news 208–10
counselling for HIV test 225–7
cues and emotions 205–6
do not resuscitate orders 230–2
ethics and law 206–7
explaining medication 211–14
explaining procedures 215–19
handovers 239–41
ICE mnemonic 205
inhalers and asthma medication
220–1
non-compliance 222–4
non-verbal communication 206
post mortem consent 228–9
post-myocardial infarction
medications 233–5
signposting 206
complaints 237–8
computed tomography
abdomen 136
bowel obstruction 144
chest 159, 196
gastrointestinal cancer 153
head 163, 217
pulmonary angiogram 126, 166
conduction aphasia 45
confusion 47, 47
congestive cardiac failure 196
consolidation 8
corneal arcus 5
coronary artery bypass graft 5
Corrigan’s pulsation 3
corticobasal syndrome 170
corticosteroids see steroids
costochondritis 116
cough 122–4
cranial nerves 31, 31, 32–3, 35
crepitations 9
Crohn’s disease see inflammatory bowel
disease
cruciate ligament tear 101
CT see computed tomography
cyclizine 255
cysts
Baker’s 100, 104
epididymal 65
thyroglossal 49
De Musset’s sign 3
De Quervain’s tenosynovitis 89
death, confirmation of 105–6
death certificates 291–2
deep vein thrombosis 197
defibrillation 288–9, 289
dextrocardia 274
diabetes mellitus 110, 111, 209
hypoglycaemia 120, 174
diabetic foot 69
diabetic neuropathy 135
diabetic retinopathy 38
diabetic ulcer 77
dialysis 14, 16
diarrhoea 132–6
overflow 135
diastolic murmurs 3–4
diclofenac 255
Dieulafoy lesion 149
diplopia 34
directly observed therapy 224
disc protrusion 185
dizziness 172–6
do not resuscitate orders 230–2
dorsal column 26
drug fever 194
Dukes staging 147
Dupuytren’s contracture 89
dysarthria 45
dysphagia 158–60
dysphasia 45
dysphonia 46
Eaton-Lambert syndrome 25
ECG see electrocardiogram
ectopic pregnancy 140
electrocardiogram (ECG) 271–5,
272–4
cardiac arrest 288, 288
encephalitis 193
end-stage renal failure 11, 14, 16
with chronic liver disease 16
endocarditis 193
endoscopic retrograde
choleopancreatography (ERCP)
217
epididymal cyst 65
epigastric hernia 62
epilepsy 174
ethics and law 206–7
examinations 1
abdominal 10–19
breast 53–5
cardiovascular 2–6
central nervous system 28–36
cerebellar 40–3
hand 87–92
hernia 60–3
hip 93–7
knee 98–104
ophthalmoscopy 37–9
peripheral nervous system 20–7
rectal 56–9
respiratory 7–9
shoulder 80–6
speech 44–7
testicular 64–7
thyroid 48–52
cancer (cont’d)

Index 295
ulcer 76–9
vascular
arterial 68–72
venous 73–5
external (superficial) ring 61
FABER test 95
facial nerve 35
palsy 30, 33
faintness 174–5
FAIR test 95–6
fat necrosis of breast 54
fatty liver 13
femoral aneurysm 61
femoral canal 61
femoral fractures 101
femoral hernia 61, 62
festinant gait 25, 42
fever
palpitations 120
pyrexia of unknown origin 191–4
fibroadenoma 54
fibroadenosis 54
finger clubbing 9, 16, 90
Finkelstein’s test 91
foot drop 94
forced expiratory volume 269
forced vital capacity 269
fractures
femoral neck 101
hip 96–7
Friedreich’s ataxia 24
Froment’s sign 90–1
frozen shoulder 81
gait 25–6, 41–2, 94, 102
see also specific types
Gallavardin’s phenomenon 3
gastric cancer 149
gastritis 116, 149
gastroenteritis 134
gastrointestinal cancer 149, 153,
240
generalised anxiety disorder 120
giant cell arteritis 193
global aphasia 45
globus hystericus 159
goitre 52
multinodular 50
Goodpasture’s syndrome 129
gout 179
Graves’ disease 52, 169
groin lumps 61
Guillain-Barré syndrome 25, 46
haematemesis 148–51
haemochromatosis 13
haemoptysis 128–31
diagnosis 130
haemorrhoids 57, 153
haloperidol 255
hand 87–92
handovers 239–41
Hawkins-Kennedy test 83, 83
head CT 217
headache 161–4
hearing 32, 32
heart block 273
heart failure 6, 13
heart murmurs 3–4, 3
Heberden’s nodes 90
HELP mnemonic 1
hemiplegic gait 25
hepatitis 13, 193
autoimmune 13
hepatomegaly 13–14, 15, 145
hereditary neuropathies 24
hernia 60–3, 144
types of 61, 62
high-stepping gait 25, 42
hip
anatomy 95
examination 93–7
fractures 96–7
hip replacement 97
histories 107–8
abdominal distension 143–7
abdominal pain 137–42
ankle swelling 195–8
back pain 183–90
breathlessness 125–7
chest pain 115–17
cough 122–4
diarrhoea 132–6
dizziness 172–6
dysphagia 158–60
haematemesis 148–51
haemoptysis 128–31
headache 161–4
jaundice 155–7
joint pain 177–82
lethargy and tiredness 109–11
loss of consciousness 165–7
needlestick injury 199–200
palpitations 118–21
pyrexia of unknown origin 191–4
rectal bleeding 152–4
tremor 168–71
weight loss 112–14
HIV/AIDS 193
antenatal testing 227
breaking bad news 209
non-disclosure to partner 227
pretest counselling 225–7
Holmes-Adie syndrome 31
Horner’s syndrome 30, 31, 31
human immunodeficiency virus see
HIV/AIDS
hydrocele 65
hyperkalaemia 273
hypertensive retinopathy 38
hyperthyroidism 49, 169
and diarrhoea 135
treatment 50
hypertrophic obstructive
cardiomyopathy 119
hypoglossal nerve palsy 30
hypoglycaemia 120, 174
hypokalaemia 273
hypothermia 273
hypothyroidism 46, 49, 51, 196
post-thyroidectomy 49
hysterectomy 209
ICE mnemonic 205
ileostomy 19
immobilisation of spinal patients 188
immunosuppressives 223
impingement tests 83–4, 84
inflammatory bowel disease 11, 134,
154, 194
infraspinatus test 83, 83
inguinal canal 61
inguinal hernia 61, 62, 65
repair 218
inguinal ligament 61
inhalers 220–1
insulin 223
intention tremor 43
intermittent claudication 69
internal (deep) ring 61
internuclear ophthalmoplegia 34
intracerebral haemorrhage 163
intracranial pressure, raised 163
intramuscular injection 254–6
sites for 255
intravenous cannulation 257–9
indications and contraindications
258
sites for 258
intravenous drug administration
260–1
irritable bowel syndrome 135, 145
ischaemia, critical 69
jaundice 155–7
joint pain 177–82
see also specific conditions
jugular foramen 30
keratoacanthoma 77
Kernig’s sign 36
ketoprofen 255
kidney 16–17, 17
ballotable/enlarged 16
Kings College Hospital criteria for liver
transplantation 151

296 Index
knee
examination 98–104
ligament lesions 101, 103
meniscal lesions 100, 103
replacement 100, 102
swollen 103
labyrinthitis 173
lactate 265
laparoscopic cholecystectomy 218
lateral instability 175–6
laxative abuse 134
lethargy 109–11
leukaemia 193, 209
levothyroxine 51
Lewy body dementia 170
lidocaine 279
life support
advanced 286–90
basic 282–5
limb length 95
lipoma 61
lithium toxicity 171
liver disease
alcoholic 13
chronic see chronic liver disease
see also specific conditions
liver transplantation, Kings College
Hospital criteria 151
load shift sign 84
lobectomy 8–9, 8, 9
local anaesthetics 279
long thoracic nerve injury 85
loss of consciousness 165–7
lower limb
arterial examination 68–72
arterial tree 71
venous examination 73–5
lower motor neurone disease 24, 25–6,
31
lumbar puncture 217
lung cancer 129, 240
lymph nodes 61
lymphoedema
hereditary 197
secondary 197
lymphoma 66, 193
McMurray’s test 102
magnesium sulphate 289
Mallory-Weiss tear 149
malnutrition 160
mammary duct ectasia 54
marche à petits pas 94
median nerve 90
medication 211–14
post-myocardial infarction 233–5
melaena 57, 154
Ménière’s disease 173
meningitis 162, 193
metabolic acidosis 263, 265
metabolic alkalosis 265
metformin 213
methotrexate 213
metoclopramide 255
migraine 162
and oral contraceptive pill 163
mitral regurgitation 3
mitral stenosis 3
mononeuritis multiplex 24, 25, 26
morphine 255
motor neurone disease 24
mouth to mouth resuscitation 285
multi-infarct dementia 170
multiple sclerosis 24, 209
multisystem atrophy 27, 170
muscle power, grading of 26, 26
musculocutaneous nerve injury 85
myasthenia gravis 30, 46
mydriasis 33
myocardial infarction
non-ST segment elevation 272
posterior infarct 272
ST segment elevation 272
myxoedema 51
nasogastric tube insertion 248–51, 249
complications 250
confirmation of placement 250–1
technique 250
needle phobias 224
needles 224
needlestick injury 199–200
Neer’s impingement test 84, 84
nephrostomy 19
nephrotic syndrome 196
nerve root compression 185
nerve root lesions 24, 25
neurogenic shock 188
neuropathy
diabetic 135
hereditary 24
nodal osteoarthritis 89
nominal dysphasia 45
non-alcoholic steatohepatitis 13
non-compliance 222–4
non-verbal communication 206
obturator hernia 62
occupation-associated illness 194
oculomotor nerve palsy 30
oesophageal cancer 149
oesophageal rupture 116
oesophageal varices 149
oesophagitis 149
oesophago-gastro-duodenoscopy 216
olanzapine 255
ondansetron 255
ophthalmoplegia 34
ophthalmoscopy 37–9
optic atrophy 38
Osgood-Schlatter syndrome 101, 103–4
Osler-Weber-Rendu disease 149
osteoarthritis 178
hip 94
knee 100
osteomyelitis 193
ototoxicity 174, 176
overflow diarrhoea 135
pacemakers 5
ECG 274
failure of 120
Paget’s disease 100, 104
pain
abdominal 137–42
chest 115–17
movement limitation 26
palpitations 118–21
pancreatitis, chronic 134
papilloedema 38
paresis 26, 27
Parkinson-plus syndromes 27, 170–1
parkinsonian gait 94
Parkinson’s disease 169
patellar dislocation 101, 103
patellar tap test 102
peak expiratory flow rate 267–70, 269,
270
interpretation 268, 268
uses of 268
pelvic mass 145, 197
penile ulcer 65
peptic ulcer 116, 149
perianal abscess 57
perianal haematoma 57
pericarditis 116
ECG 274
peripheral nervous system examination
20–7
peripheral neuropathy 24, 26
peripheral pulses 70
peritoneal pain 141, 141
pethidine 255
Peutz-Jegher syndrome 149
phaeochromocytoma 119
Phalen’s test 88, 90
phlebotomy 252–3
piriformis syndrome 94
plegia 26, 27
pleural effusion 8
pneumonectomy 8–9, 8
pneumonia 116, 129, 193
pneumothorax 8, 9, 116
polymyalgia rheumatica 193
polymyositis/dermatomyositis 180
post mortem consent 228–9
postoperative review 202–3
postural hypotension 175
pre-eclampsia 197

Index 297
prednisolone 212
pregnancy 145
ankle swelling 197
ectopic 140
pregnancy test 140
premedication 202
preoperative assessment 201–2
ASA classification 202, 202
investigations 202
Prescription Payment Certificates 223
pressure ulcer 77
primary biliary cirrhosis 13
primary sclerosing cholangitis 13
procedures 243–4
advanced life support 286–90
arterial blood gas analysis 262–6,
264–5
basic life support 282–5
death certificates 291–2
ECG 271–5, 272–4
explaining 215–19
intramuscular injection 254–6
intravenous cannulation 257–9
intravenous drug administration
260–1
nasogastric tube insertion 248–51
peak expiratory flow rate 267–70
scrubbing up 276–7
suturing 278–81, 280
urinary catheterisation 245–6
venepuncture/phlebotomy 252–3
progressive supranuclear palsy 27, 170
pronator drift 26
prostate
benign prostatic hypertrophy 57
carcinoma 57
transurethral resection (TURP) 218
proximal myopathy 24
pseudobulbar palsy 30, 45
pseudoclubbing 16
pseudogout 179
psoriatic arthritis 89, 181
ptosis 33
pulmonary embolism 116, 129, 194
ECG 274
pulmonary fibrosis 8
pulmonary hypertension 196
pulmonary oedema 129
pupillary defects 31, 31
pyrexia of unknown origin 191–4
Quincke’s sign 3
radial nerve 90
palsy 88
radiation enteritis/colitis 135
radioiodine 50
Ramsay Hunt syndrome 174
reactive arthritis 181
recovery position 285
rectal bleeding 152–4
rectal examination 56–9
rectal tumour 57
red flags 107
back pain 187
diarrhoea 136
reflexes 26, 26
relapsing polychondritis 180
renal cell carcinoma 145
renal disease 11
end-stage renal failure 11, 14, 16
renal failure 196
respiratory acidosis 264
respiratory alkalosis 264
respiratory examination 7–9
respiratory failure 264
retinitis pigmentosa 38
rheumatoid arthritis 178–9
breaking bad news 209
hand 88, 91
hip 94
knee 100
pyrexia 193
Rinne test 32, 32
Rockall score 150–1, 151
rodent ulcer 77
Romberg’s test 22, 41
rotator cuff
impingement 81
tendonitis 81
test 83, 83
salbutamol overuse 169
saphena varix 61, 74
SBAR framework 241
scapular winging 85
Scarf test 84, 84
scars
abdominal 17, 17
cardiovascular 4, 5
nephrectomy 16
respiratory 8
shoulder 82
vertebrectomy 188
scissor gait 25, 42, 94
SCOFF questionnaire 114
scrubbing up 276–7
self-control 237
seminoma 66
sensory ataxia 94
septic arthritis 181
hip 94
knee 101
seronegative arthritis 100
shingles 116
short bowel syndrome 134
shoulder
dislocation 81
examination 80–6
instability 84, 84
muscle groups 82
nerve supply 85
referred pain 85
scars 82
significant event analysis 238
signposting 206
sinusitis 163
Sjögren’s syndrome 159
SOCRATES mnemonic 107, 182
spastic gait 25, 42
speech 44–7
spigelian hernia 62
SPIKES framework 209
spinal cord
lesions 24
subacute combined degeneration 24
spinal infection 185
spinal shock 188
spinal stenosis 185
spinothalamic tract 26
spirometry 268–70, 269, 270
spleen 16–17, 17
splenomegaly 13–14, 18, 145
causes 15
spondyloarthropathies 94
stamping gait 25, 42
statins 213
non-compliance 223
steroids 212
non-compliance 223
Still’s disease 193
Stokes-Adams attacks 175
stomas 18, 18, 19
Streptococcus bovis 4
stroke 24
subarachnoid haemorrhage 35–6, 163,
164
sulcus sign 84
suprascapular nerve injury 85
supraventricular tachycardia 119
ECG 272
suturing 278–81, 280
indications and contraindications
279
local anaesthetic 279
technique 279–81, 280
types of suture 279, 279
systemic lupus erythematosus 180
pyrexia 193
systemic sclerosis 89, 179
systolic murmurs 3–4
temporal arteritis 163
tension headache 162
teratoma 66
teres minor test 83, 83
Terry’s nails 19
testes 61
examination 64–7
tumour 65

298 Index
tetanus prophylaxis 281, 281
Thomas test 96
thoracic outlet syndrome 85–6
thyroglossal cyst 49
thyroid autoantibodies 50
thyroid examination 48–52
thyroid function tests 50
thyroid-stimulating hormone receptor
antibody 50
thyroidectomy 50
thyrotoxicosis 119
Tinel’s test 88, 90
tiredness 109–11
torsade des pointes 289
tramadol 255
transurethral resection of prostate
(TURP) 218
trauma
back pain 186
joint pain 181
tremor 168–71
benign essential 169
cause 170
intention 43
Trendelenburg gait 25, 42, 94
Trendelenburg test 95
tricuspid regurgitation 3, 4
trifascicular block 273
trigeminal neuralgia 162
trigger finger 89
tuberculosis 129, 193
ulcerative colitis see inflammatory bowel
disease
ulcers
arterial 70
diabetic 77
edges of 77
examination 76–9
penile 65
peptic 116, 149
pressure-induced 77
rodent 77
venous 74, 78
ulnar nerve 90
palsy 88
umbilical hernia 62
upper motor neurone disease 24, 25, 31
increased tone 26
urinary catheterisation 245–7
types of catheter 247
urinary tract infection 193
urostomy 19
vagal nerve palsy 46
vagus nerve palsy 30
valve replacement 4
valvular lesions 3–4, 3
varicocele 65
varicose veins 74
vascular examination
arterial 68–72
venous 73–5
vasovagal syncope 174
venepuncture 252–3
venous examination 73–5
venous insufficiency 196
venous ulcers 74, 78
ventricular ectopics 120
ventricular fibrillation 272
ventricular tachycardia 119
ECG 272
vertebrectomy 188
vertigo 173–4
vestibular neuronitis 173
VIPoma 135
visceral pain 140–1, 141
visual field defects 32, 32
VITAMIN CDE mnemonic 182
waddling gait 25, 42, 94
warfarin 212
non-compliance 223
weakness 23
asymmetrical 25
distal symmetrical 26
grading of muscle power 26, 26
proximal symmetrical 25
Weber test 32, 32
Wegener’s granulomatosis 129, 181
weight loss 110, 112–14
Wernicke’s receptive dysphasia 45
Whipple’s disease 135
Wilson’s disease 13
Wolff-Parkinson-White syndrome 273
xanthelasma 5
xanthochromia 164
xerostomia 159
yellow flags in back pain 189
yellow nail syndrome 124, 127

Would you like to receive up-to-date information
on our books, journals and databases in the areas
that interest you, direct to your mailbox?
Join the Wiley e-mail service - a convenient way
to receive updates and exclusive discount offers
on products from us.
Simply visit
www.wiley.com/email
and register online
We won’t bombard you with emails
and we’ll only email you with
information that’s relevant to you.
We will ALWAYS respect your e-mail
privacy and NEVER sell, rent, or
exchange your e-mail address to any
outside company. Full details on our
privacy policy can be found online.
l
y
r
y
17841
www.wiley.com/email
Keep up with
critical fields
The at a Glance series
Popular double-page spread format
t
Coverage of core knowledge
Full-colour throughout
t
Self-assessment to test your knowledge
t
Expert authors
www.wileymedicaleducation.com